How to Run Manual Jobs in Gitlab CI/CD


Gitlab is eating the world, or so we thought till we moved to GitHub as an open source company. That should tell you enough about our love for Gitlab, but there is one thorny problem with Gitlab CI that didn't have a solution in any pricing tier. It's the ability to trigger CI jobs with custom parameter values manually. This article will explore the benefits and drawbacks of manual jobs, potential workarounds, and finally, how using Gitlab API and forms, we can get around this problem.
Why are manual jobs important in CI/CD?
Although CI is primarily aimed to be continuous (I didn't see that coming, did you?), there is still a precious place for the manual triggering of jobs in a CI pipeline. This becomes especially apparent when we consider parameters in the build process. For example, you are working on a separate branch that does a PoC of a new feature. You want to ensure that the CI can handle the codebase in this branch but don't want to push your official organization. So, if your build script took parameters (with sane defaults, of course) that can be configured to have the image pushed to your personal organization, you'll be able to test it to your heart's content. What's more, you can even run the Docker image and check all is in order. Basically, you don't break the app.
Another simple example would be when you have a specific set of servers you want to push your changes to from a specific branch in your repo. This is a case of CD, with finer control. You can use the same deploy pipeline but set the branch and server(s) variables and run this job to get the desired outcome. This becomes incredibly useful as the organization scales and has multiple branches, teams, and servers, especially in this age of mono-repos.
If you're a pipeline wizard, you can probably spin off a new script each time for these jobs and run these scripts each time, but a more practical solution would be to use a pipeline template and have a few variables (set defaults for a standard run) that can be populated for manual runs. This is where Gitlab comes a bit short.
I have no idea what I am doing here!
How do I run manual jobs using GitLab?
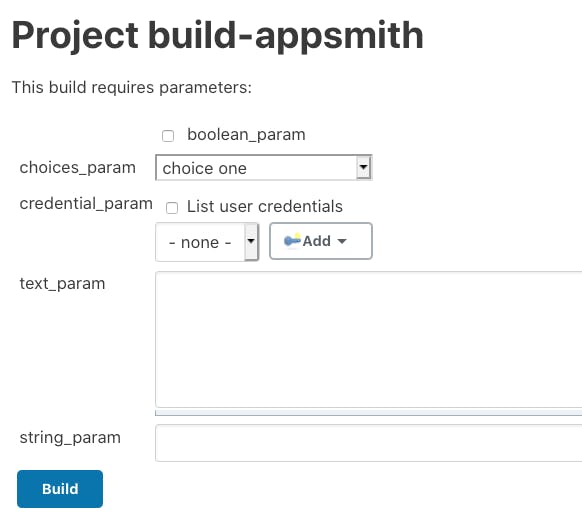
If you're willing to compromise on everything else Gitlab has to offer, Jenkins is your go-to for CI/CD and boy does it ship with an out of the box manual job runner. But of course, who wants to compromise on all the other awesome stuff from Gitlab?
The biggest inconvenience stems from the fact that Jenkins and Gitlab are two separate systems. It's up to the developer to ensure that these two talk to each other well and stay on good terms. For example, If the source code on Gitlab moves from being a Java project to a Golang project, the Jenkins build jobs must be configured to stop using Maven and start using go. Having Gitlab be the integrated solution for both your source code and your CI pipelines is just too convenient. The overheads of running Jenkins and Gitlab will just make your team grumble much more than usual.
Let's say you do end up integrating with Jenkins, are you sure this is enough for you to sacrifice all of Gitlab's CI/CD efficiencies for?
Do you want to integrate this with your repo?
Manual Jobs For Gitlab
Assuming you haven't ripped apart your Gitlab instance and installed Jenkins, and you're still asking yourself "So how does one trigger manual jobs for Gitlab?", the main (and surprisingly the simplest) suggestion is to build a form for each job and use Gitlab API to trigger it - from the discussion for this issue from four years ago (remember, Google is your friend). Why don't we give that a shot? Sounds simple enough, right?
<html lang=en>
  <head>
    <meta charset=utf-8>
      <title>Gitlab CI Trigger</title>
  </head>
  <body>
    <form method=post action='gitlab-api-endpoint'>
      <p>
        <label for=branch>Branch </label>
          <select id=branch name=branch>
            <option value=master>master </option>
            <option value='feature /one'>feature/one </option>
            <option value='feature /two'>feature/two </option>
            <option value='bug /that-nasty-bug'>bug/that-nasty-bug </option>
          </select>
      </p>
      <p>
        <input type=checkbox id=debug name=debug>
          <label for=debug>Print debug output </label>
      </p>
      <p>
        <label for=reason>Reason for trigger </label>
          <input name=reason id=reason>
      </p>
      <p>
        <button type=submit>Run pipeline! </button>
      </p>
      </form>
  </body>
  </html>
We're not even getting started here 😰
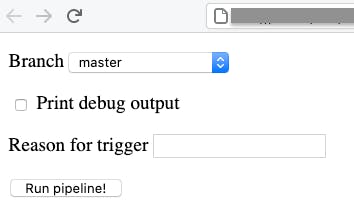
Voila? 🤔
But a few things to remember before we deploy that in production. You need to update the branch list whenever that changes, which is almost every day. Also, remember to add or remove any parameters along with your build pipeline. Every time you run a manual job, you essentially have to rebuild this file, or scope all potential manual jobs and have files ready. This is really inconvenient.
Beyond just being inconvenient, this method doesn't scale. Even if you maintain this HTML form as part of your source code, it still warrants a significant maintenance effort. You don't want to spend time building/debugging/fixing/maintaining your pipeline-runner, you want to build the software you are actually working on.
The better way to manage CI/CD workflows
Fear not, Appsmith is here. While not an official workaround, Appsmith makes it incredibly easy to create your forms and set up the API needed to run manual forms. Building the form will be easier than in Jenkins, API calls can be managed gracefully in the interface, AND you can build a job runner that looks like this in 10 minutes.
We've built a small tutorial to walk you through how we create a manual pipeline to deploy your code on multiple production servers. Let’s get started!
“”Appsmith is an open-source cloud or self-hosted platform to build admin panels, CRUD apps and workflows. Appsmith helps you speed up application building through fast UI creation, and making you write code only when necessary.
Here’s a video to get you started!

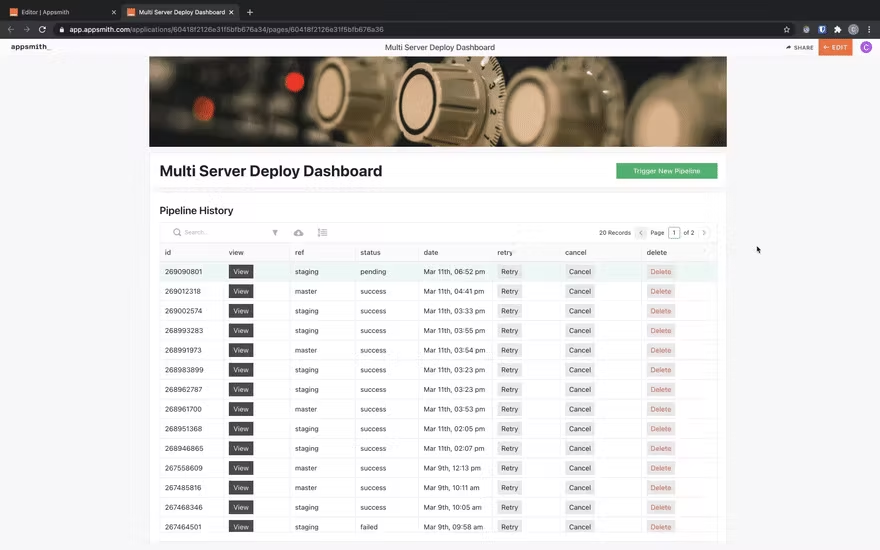
We’ll be building a dashboard on Appsmith to simplify and manage a simple CI/CD workflow that allows developers to deploy software by selecting a specific branch and server.
View a Specific CI/CD Workflow
Cancel a Running Workflow
Retry a Failed Workflow
Delete a Workflow
Save Workflow History
This dashboard is going to be created entirely using Appsmith and the Gitlab API.
We’ll be using a Gitlab repository named ci_cd to follow along and set up workflows. It’s a basic “Hello World!” Node.JS application that is deployed to multiple servers on Heroku. We have our .gitlab-ci.yml file configured in such a way as to run two jobs. The first job is to perform a test with the npm test command, and the second is t deploy our app onto Heroku using a ruby gem called dpl.
The entire workflow is configured dynamically so that it can be deployed to any Heroku server given a Heroku
Below is a snippet showing the content of .gitlab-ci.yml file.
image: node:latest
stages:
  - test
  - deploy

testing:
  stage: test
  script: npm test

deploying:
  stage: deploy
  image: ruby:latest
  script:
    - gem install dpl
    - dpl --provider=heroku --app=$heroku_app_name --api-key=$heroku_api_key
Building Dashboard on Appsmith
Now that we have a clear picture of what’s cooking, let’s head to Appsmith and start building our Dashboard. If you haven’t signed up, you can get started for free, here.
Next, let’s head over to our Appsmith dashboard and create a new application by clicking on the Create New button. We’ll be now redirected to a new application named “Untitled Application 1”. Now, let’s give our app a creative name, let’s call it Deploy Dashboard. Our first step is to build a feature that would list all the existing and future workflow history. To do this, let’s utilize Gitlab’s pipeline API, fetch all the details and display it onto the Appsmith table widget.
Let’s go ahead and configure our workflow API Gitlab
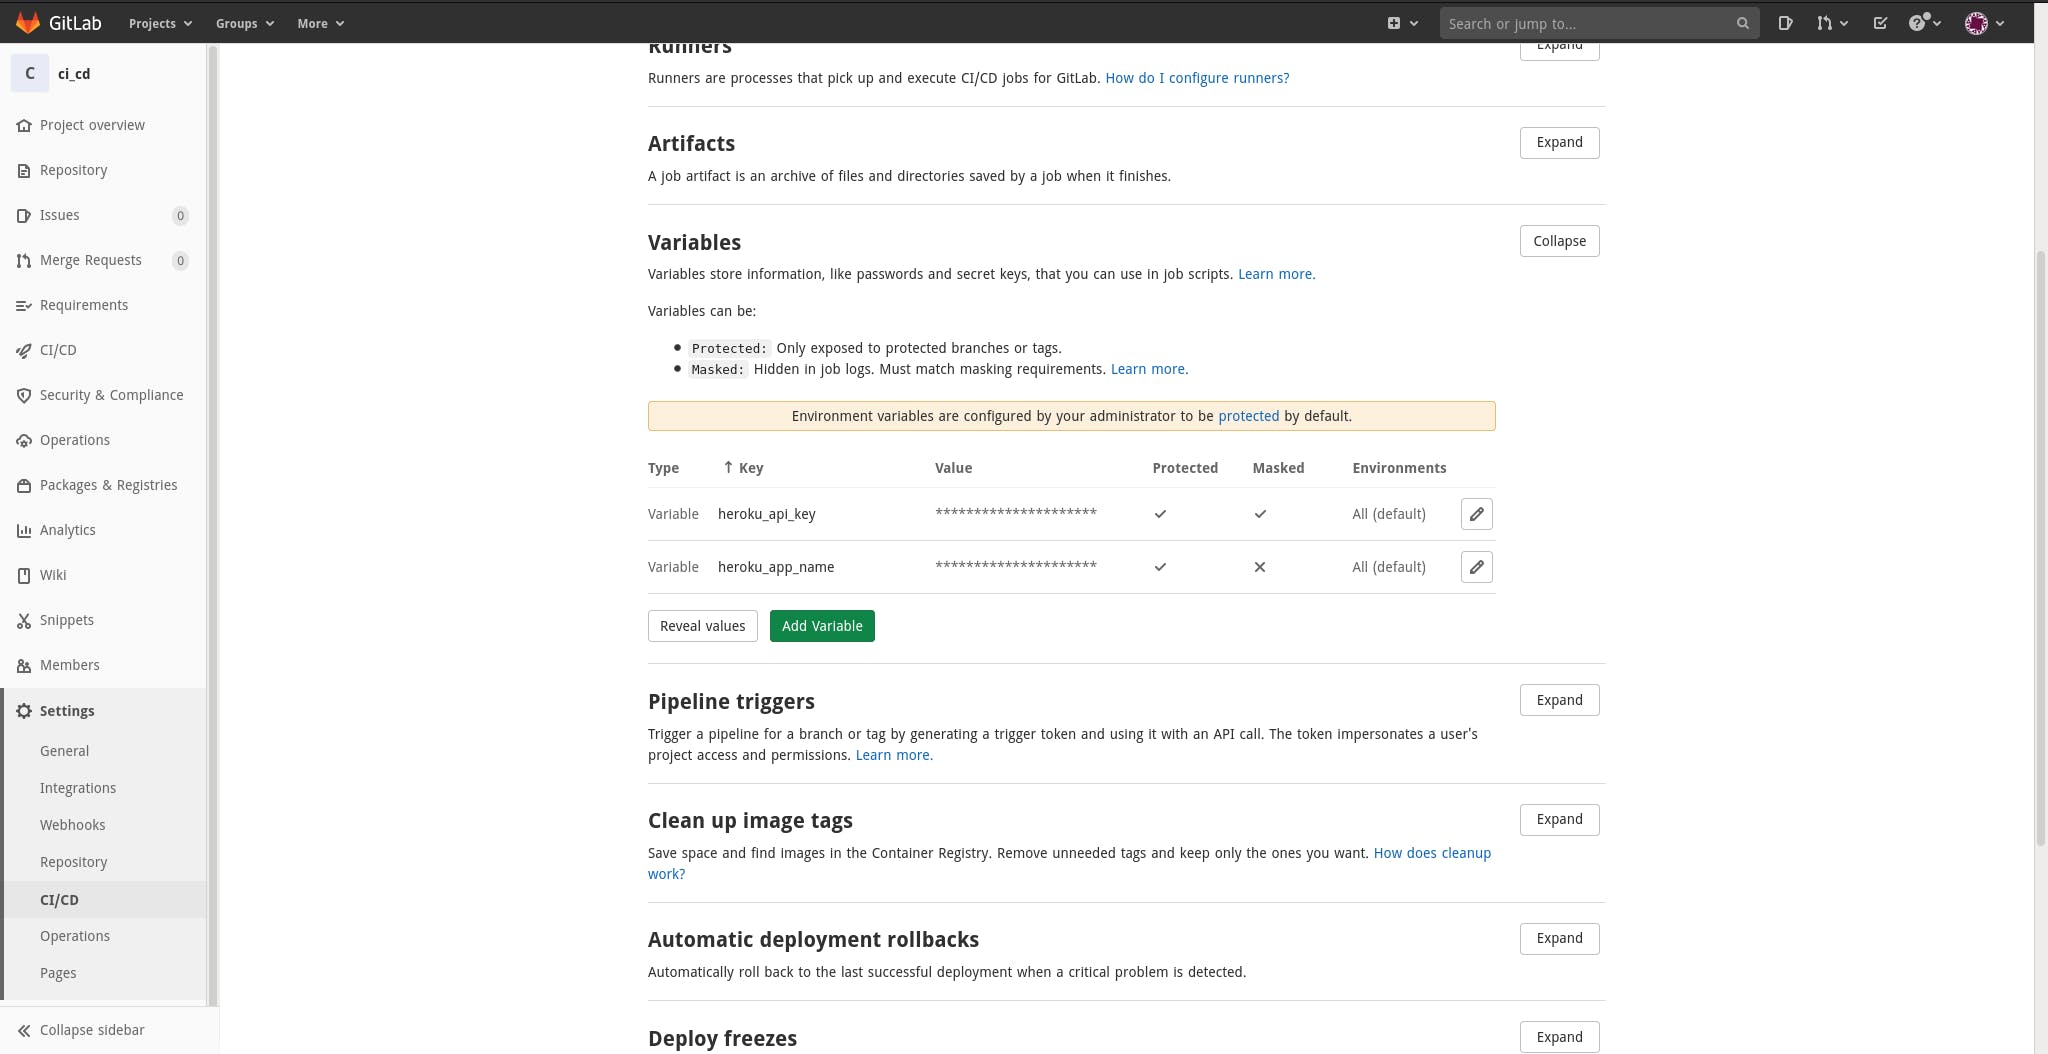
Setting up Gitlab API as Datasource
In this section, we’ll be using the GitLab API as a data source to configure it with the Appsmith Deploy Dashboard application. Let’s now create a new API, we can do it by navigating to the API section under Page1 and clicking on Create New option.
Paste the following in the request form and click on Save as Data Source
https://gitlab.com/api/v4/projects/:id Next, let’s follow the below steps to display all the existing workflows on the Appsmith dashboard.
Firstly, the id in the above GitLab API is a parameter to access details of a particular repository on Gitlab, you can find it on your repository page on GitLab.
To make things more clear, let’s rename the Datasource name as GitLab, we can do it by double-clicking on the existing one.
Next, let’s add a new key name PRIVATE-TOKEN under the headers section. We can find the value of PRIVATE-TOKEN from GitLab.
Navigate to the Preferences -> Access Tokens on GitLab and create a new access token and paste it to the PRIVATE-TOKEN key on the Appsmith data source. (Also be sure to give it at list API scope)
Lastly, save the data source!
Getting Workflows List
Our Datasource is up and running, now let’s head back to the API section on Appsmith and create a new API to fetch all the existing workflows on the repository. Now create a new API and set the name as get_pipelines. On clicking on the URL we have suggestions to use our previously configured GitLab data source. Use the suggestions and add /pipelines to its end. The URL should now look like the following:
GET https://gitlab.com/api/v4/projects/:id/pipelines Hit the Run button and you will be greeted with an array of the workflow linked to that repository! Sweet, isn’t it?
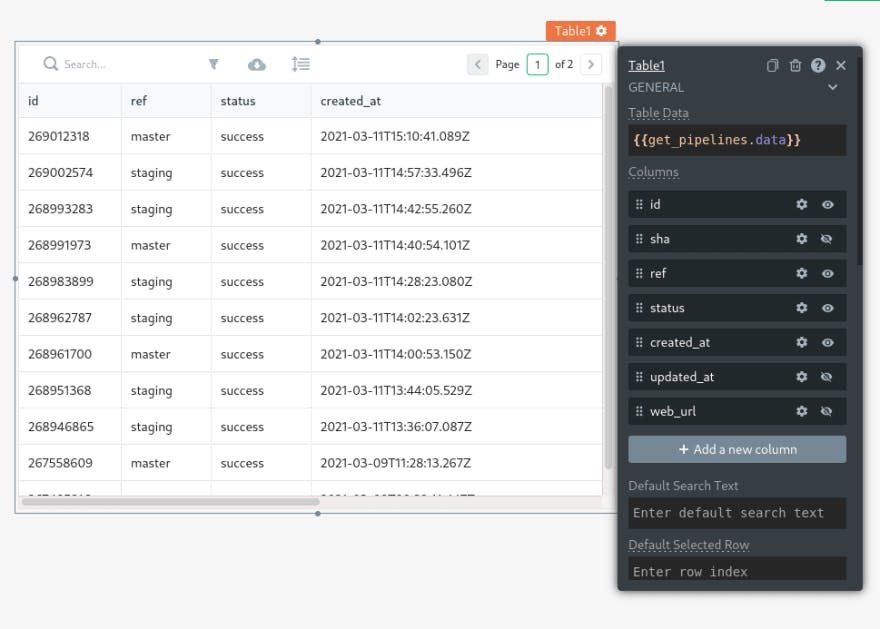
Now to make things cooler, let’s build UI to display all these CI/CD workflows on the Appsmith page. Click on the widgets on the navigation bar and drag and drop a table widget onto the canvas. You should see a new table with some pre-populated data. We should also see a floating pane, that consists of all the table properties. Under that pane, edit the Table Data property to the following:
{{ get_pipelines.data }} Now, we can see data from the get_pipelines API rendered on the table. You can go ahead to rearrange the column and disable columns that you don’t want showing up on the table i.e sha and updated_at.
Triggering A Pipeline
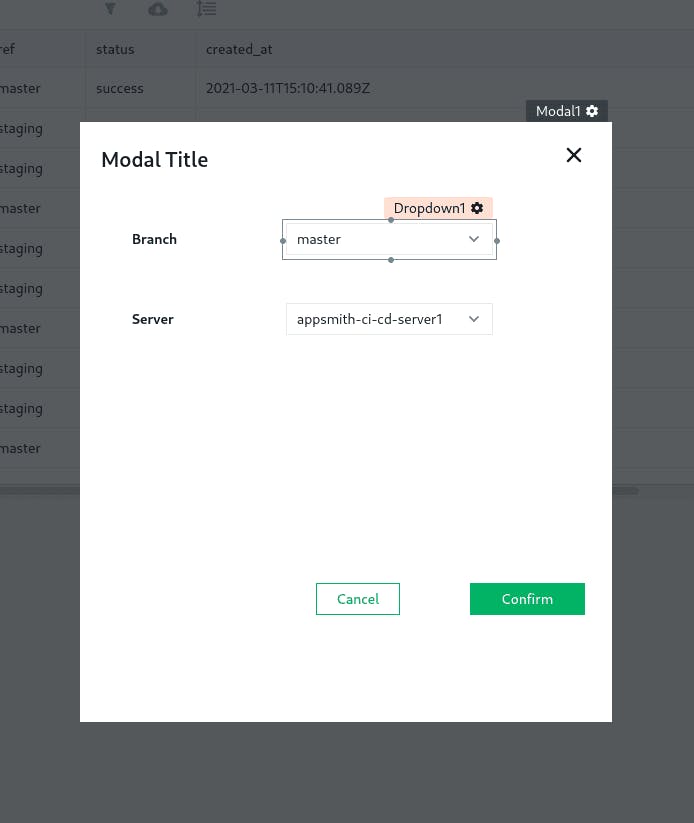
Now let’s add a new feature to trigger a new workflow on the same dashboard. To do this, we’ll create a new button by dragging and dropping a button widget. Rename the button to Trigger New Pipeline. Also, drag a modal widget to the canvas. The button should be configured such that the modal is opened whenever it’s clicked. On the other hand, the modal’s type should be set to form modal and we’ll drag in two dropdowns with corresponding labels into it. The first dropdown should be configured to select a branch with the following options:
[
  {
    "label": "master",
    "value": "master"
  },
  {
    "label": "staging",
    "value": "staging"
  }
]
Similarly, we configure the second dropdown to show the server options that are configured on Heroku namely, appsmith-ci-cd-server1 and appsmith-ci-cd-server2:
[
  {
    "label": "appsmith-ci-cd-server1",
    "value": "appsmith-ci-cd-server1"
  },
  {
    "label": "appsmith-ci-cd-server2",
    "value": "appsmith-ci-cd-server2"
  }
]
Perfect, we should now see a great looking modal on our Appsmith dashboard.
Let’s head back to the API section and create a new API to trigger a workflow whenever the Confirm button from our modal is clicked. Let’s name this API create_pipeline and set the value to the following:
POST https://gitlab.com/api/v4/projects/:id/pipelineAdditionally, we have the option to provide variables and ref (meaning the source branch) in the body of this endpoint. We should configure the body as given in the below snippet.
{
    "ref": "{{ Dropdown1.selectedOptionValue }}",
    "variables": [
       {
            "key": "heroku_app_name",
            "variable_type": "env_var",
            "value": "{{ Dropdown2.selectedOptionValue }}"
        },
       {
            "key": "heroku_api_key",
            "variable_type": "env_var",
            "value": "your_heroku_api_key_here"
        }
    ]
}
By looking at the above snippet, the ref key is obtained from the branch dropdown, which was previously configured, and in the variables section, the value of the heroku_app_name key is obtained from our server dropdown.
“”"You can find the value of heroku_api_key from your Heroku account under the Settings-> API Keys section."
Lastly, let’s head back to the modal and configure the onclick action of the confirm button to trigger the create_pipeline endpoint. Add the following JS snippet to the onclick property under the button settings.
{{
create_pipeline.run(() => get_pipelines.run( closeModal('Modal1')), () => {})
}}
Kudos! With this, we should be able to trigger a workflow from the Appsmith dashboard itself. Let’s now fine-tune this to have more features in the next section.
More Fine Tuning
Alright, in the last section, we’ll now add fine-grained controls such as deleting, canceling, retrying, and viewing workflows. These are quite similar to each other, let’s look at the delete workflow option and you can try adding the rest as an exercise :)
Deleting the CI/CD Workflow from Appsmith Dashboard
To implement this feature, let’s add head back to our table and add a new “Custom Colum”. You can find it under the table settings pane. Let’s name this column delete. To make our dashboard more intuitive, we can set the column type to button and add the label delete. Now let’s create a delete API under the APIs section and name it delete_pipeline. Use the following endpoint to add functionality.
DELETE https://gitlab.com/api/v4/projects/:id/pipelines/{{ Table1.selectedRow.id }}
This API grabs the id of the selected row from the table, which is automatically set when the delete button is clicked. Heading back to the delete button, let’s configure the onclick action to run the delete_pipeline API and call the get_pipelines API on success to update the table. Here’s the configuration JS snippet:
{{
  delete_pipeline.run(() => get_pipelines.run(), () => {})
}}
Perfect, now we have the ability to delete a specific workflow from the Appsmith dashboard itself.
“”"Disclaimer: Clicking on this button will delete that pipeline for good. As a safety measure, you can add a confirmation modal to prevent accidental delete."
Here’s a quick lookup to configure the other actions to play with our workflows:
Retry Workflow:
POST https://gitlab.com/api/v4/projects/24888719/pipelines/{{ Table1.selectedRow.id }}/retry
Cancel Workflow:
POST https://gitlab.com/api/v4/projects/24888719/pipelines/{{ Table1.selectedRow.id }}/cancel
Final Thoughts
We are glad you made it this far. As a quick summary, here’s a gif to show everything we’ve built so far!
Honestly, that was a lot to take in, but we’ve been able to go through a complete flow of how you can build a custom dashboard to manage your ci/cd process. Also, here's a quick demo of the app that we've built! And we are quite sure you’re bubbling with ideas on the limitless use cases you can build with this. So go into the world and build amazing stuff!
Image Credits: Photo by Ryan Quintal on Unsplash