Build a CMS for Your Company in Under an Hour

by Adeyinka Adegbenro A content management system (CMS) is software used to manage the creation and editing of content, usually formatted articles containing images and videos. Wordpress, Contentful, Gatsby, Drupal are popular examples of CMS. A CMS is a very important tools for managing content because they make it easy to create, update, and delete data without any coding knowledge. Appsmith is an open-source framework that helps developers build dashboards, workflows, pages, and CRUD apps very quickly. Appsmith allows you to build tools with little or no code, with the ability to connect to APIs or databases such as MongoDB, PostgreSQL, or MySQL, as the case may be. You can also use charts, widgets, and other customization tools for building a UI. Appsmith has more flexibility than off-the-shelf options, and it’s fast to build and easy to maintain.
Getting started with building a CMS from scratch
In this article, you will learn how to set up Appsmith locally, create a new application, connect an API to it, and build a content management system using widgets and pages.
Setting Up the Application and Database
This section will focus on how to create a CMS as an Appsmith application, as well as how to set up and connect a SQL database for use in Appsmith.
Create an Appsmith App
For the purpose of this tutorial, you’re going to create a local instance of Appsmith using Docker. Read Appsmith’s documentation to set this up for your operating system. After going through those steps, visit http://localhost/ in your browser to see the local version of Appsmith. Create a local account to log in. Next, click the Create New button to create a new application and name it CMS. This takes you to an empty workspace with a sidebar. On the sidebar, you should see items such as Pages, API, and DB Queries.
Connect to a Database
To work with Appsmith, you need a data source. This can be in the form of an API or a database. Appsmith supports MongoDB, MySQL, and PostgreSQL among others. In this tutorial, you’ll connect to a local PostgreSQL database. To create the data models required for the CMS, go into the PostgreSQL command line, and create the database:
CREATEDATABASE appsmith_cms;Connect to the database and create a DB table called Author:
CREATETABLE AUTHOR(
   AUTHOR_ID SERIAL PRIMARY KEYNOTNULL,
   NAMETEXTNOTNULL,
   PROFILE_PICTURE TEXT,
   ABOUT_ME TEXT,
   LINKEDIN TEXT,
   GITHUB TEXT
);
Create a table, Article:
CREATETABLE ARTICLE(
   ARTICLE_ID SERIAL PRIMARY KEYNOTNULL,
   TITLE TEXTNOTNULL,
   SUBTITLE TEXT,
   CONTENTTEXT,
   IMAGE TEXT,
   AUTHOR_ID INTEGERNOTNULLREFERENCES AUTHOR(AUTHOR_ID),
   DATE_UPDATED DATENOTNULLDEFAULTCURRENT_DATE
);
Create a table, Tag:
CREATETABLE TAG (
    TAG_ID SERIAL PRIMARY KEYNOTNULL,
    NAMETEXTNOTNULL
);
Create a table, Article_Tag:
CREATETABLE ARTICLE_TAG(
    ARTICLE_ID INTEGERREFERENCES ARTICLE(ARTICLE_ID),
    TAG_ID INTEGERREFERENCES TAG(TAG_ID),
    PRIMARY KEY (ARTICLE_ID, TAG_ID)
);
By now, you should have a standard database with the tables Author, Article, Tag, and Article_Tag on it. Next, insert some data into the database tables by running the following queries, so you can view it when you build your user interface:
INSERTinto author (name, profile_picture, about_me, linkedin, github) VALUES ( 'Achebe', 'https://en.wikipedia.org/wiki/Chinua_Achebe', 'i am cool', 'https://www.linkedin.com/', 'https://github.com/');

INSERTinto author (name, profile_picture, about_me, linkedin, github) VALUES ( 'Chimamanda', 'https://en.wikipedia.org/wiki/Chimamanda_Ngozi_Adichie', 'i am cool', 'https://www.linkedin.com/', 'https://github.com/');


INSERTINTO"article" ( "title", "subtitle", "content", "image", "author_id") VALUES
( 'Hello', 'hi', 'Hello world', 'img.me', '1');


INSERTINTO"tag" ("name") VALUES
('food');

INSERTINTO"tag" ("name") VALUES
('tech');

INSERTINTO"tag" ("name") VALUES
('fashion');

INSERTINTO"tag" ("name") VALUES
('beauty');
To connect to the appsmith_cms database from within Appsmith, go to the application sidebar. Click the plus icon near DB Queries, then click New Datasource, select PostgreSQL, and enter the connection details for your database. Since you are on localhost, set the host address as host.docker.internal and the database name as appsmith_cms. Add your PostgreSQL username and password to the Authentication section and click Connect. Once connected, rename the new datasource as CMS.
Your App’s First Page: Create an Article
In this section, you’ll create the first UI view of your CMS application. It will be a form with several fields, for title, content, cover image, and a URL. These form fields will take in all the necessary data for creating an article. On the sidebar, under Pages, a new page called Page1 already exists. Rename it as create_article_page.
Prepare the Data
Before building the form, prepare the queries necessary for creating an article. Click the plus icon near DB Queries and click the New Query button near the CMS Datasource to create a new query. Rename it fetch_authors from the default name Query1. This will be useful in displaying all the available authors in your database. Paste the following code in the query box and run it:
SELECT * FROM author;Create a new query called fetch_tags. This will be useful for displaying all available tags in your database. Paste the following code in the box and run it:
SELECT * FROM tag;Create a new query called submit_article. This will be used to create a new article entry in the database.
INSERTINTO"article" ( "title", "subtitle", "content", "image", "author_id")
VALUES
('{{create_article_form.data.title}}',
'{{create_article_form.data.subtitle}}',
'{{create_article_form.data.content}}',
'{{create_article_form.data.cover_image}}',
{{create_article_form.data.author}}
) returning"article_id"
;
Create a new query called create_article_tag. This will be used to create a new article_tag entry that associates a tag with an article.
INSERTINTO article_tag
  ("article_id", "tag_id")
VALUES
  (
    '{{submit_article.data[0].article_id}}',
    '{{create_article_form.data.tags}}'
  );
Build the Page
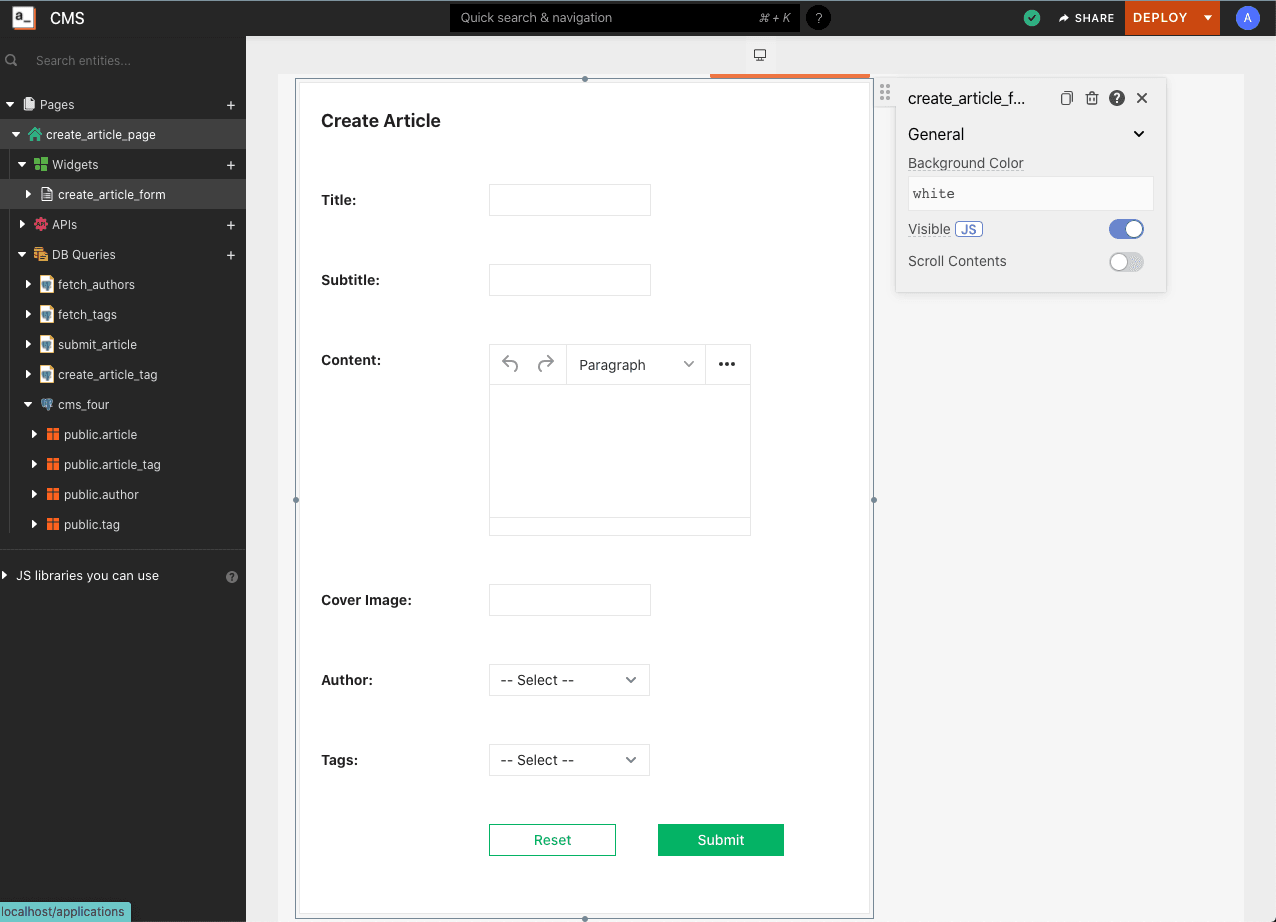
Go to create_article_page > Widgets, and add a form to the page by clicking the plus icon. Drag and drop a Form widget to the page’s workspace. Click the settings gear to configure the form. Change the form name from form1 to create_article_form. Next, let’s add a few fields along with labels. To begin, add a Text widget and label it Title:, then drag the Input widget in front of it and change its name from input1 to title. Below that, add a Text widget and label it Subtitle:, then drag the Input widget in front of it and change its name from input1 to subtitle. Add a Text widget and label it Content:, then drag the Rich Text Editor widget in front of it and change its name from RichTextEditor1 to content. Delete the default text. Add a Text widget and label it Cover Image:, then drag the Input widget in front of it and change its name from input1 to cover_image. Add a Text widget and label it Author, then drag the Dropdown widget in front of it and change its name from Dropdown1 to author. In the options settings for this dropdown, add the following code:
{{
fetch_authors.data.map(
  (row)=>{

    return {label: row.name, value: row.author_id}
  }
)
}}
Add a Text widget and label it Tags:, then drag the Dropdown widget in front of it and change its name from Dropdown1 to tags. In the options settings for this dropdown, add the following code:
  {{
fetch_tags.data.map(
  (row)=>{

    return {label: row.name, value: row.tag_id}
  }
)
}}
Go to the onClick section of the Submit button’s settings, and select Execute a DB Query, choose the submit_article query, then in the onSuccess section, select Execute a DB Query > create_article_tag query. This creates an article entry in the database, and then creates the article_tag entry that links the tag and article together. To test that it works, fill in the form with some test data and submit it. In the Article table in your database, you should see the new article row with data you just filled in.
Your App’s Second Page: View Articles
Create a new page called all_articles_page. This page will be used to display all the articles available in the database.
Prepare the Query
Add a new query called fetch_articles and run it. This query will fetch all the articles in the database, as well the authors who wrote them.
SELECT art.*, aut.name as author FROM article art
join author aut on aut.author_id = art.author_id;
Build the UI
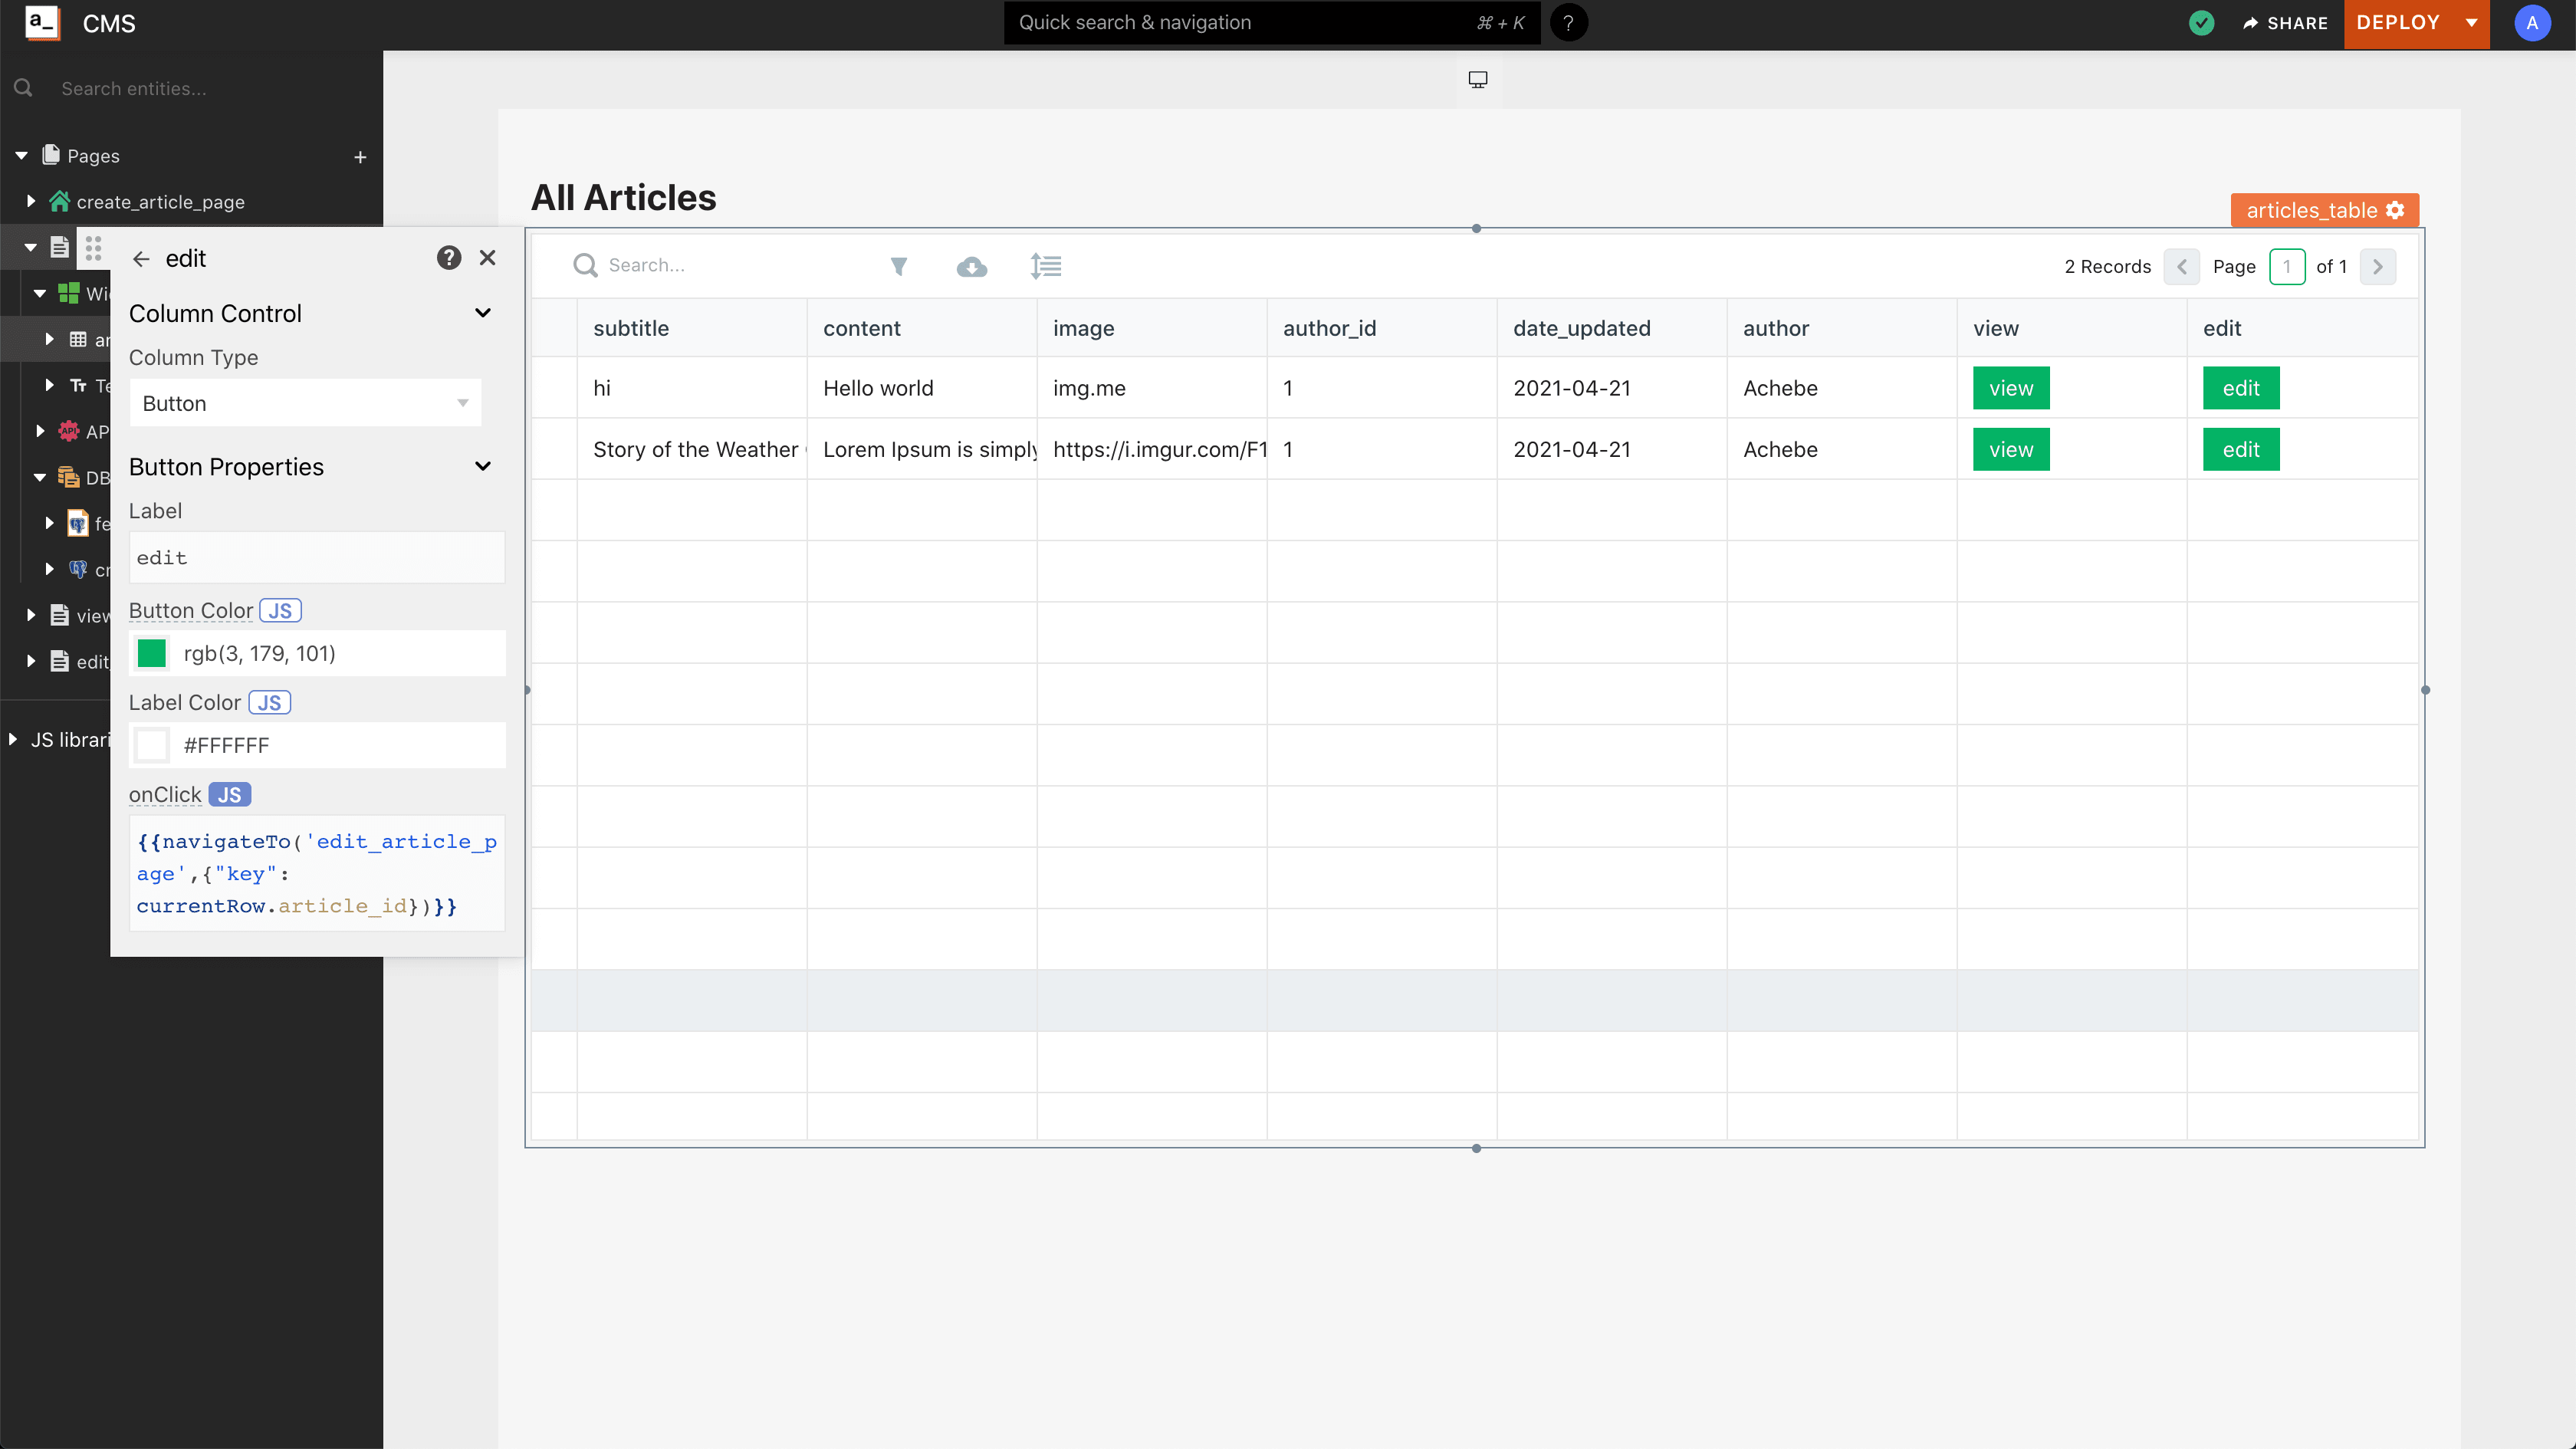
On the all_articles_page, drag a table widget to the page and rename it articles_table. In the Table Data section of the table settings, set the value to {{fetch_articles.data}}. This will use data from the fetch_articles query defined above. By now, the table should be populated with a list of all the articles. The table automatically comes with search, pagination, and filter features. Next, add a new column to the table and call it View. In the settings for View, set the Column Type as a button, label it View, and set the value for onClick as {{navigateTo('view_article_page', {"key": currentRow.article_id})}} after setting it to JS mode. So when View is clicked, a user will go to the view_article_page. Create a new page and name it view_article_page. Create a new query, get_article, and fill it as:
select art.*, tag.name as tag_name, tag.tag_id, auth.name as author from article art join
author auth on auth.author_id = art.author_id
leftjoin article_tag aton at.article_id = art.article_id
leftjoin tag on tag.tag_id = at.tag_id
where art.article_id = {{ appsmith.URL.queryParams.key }};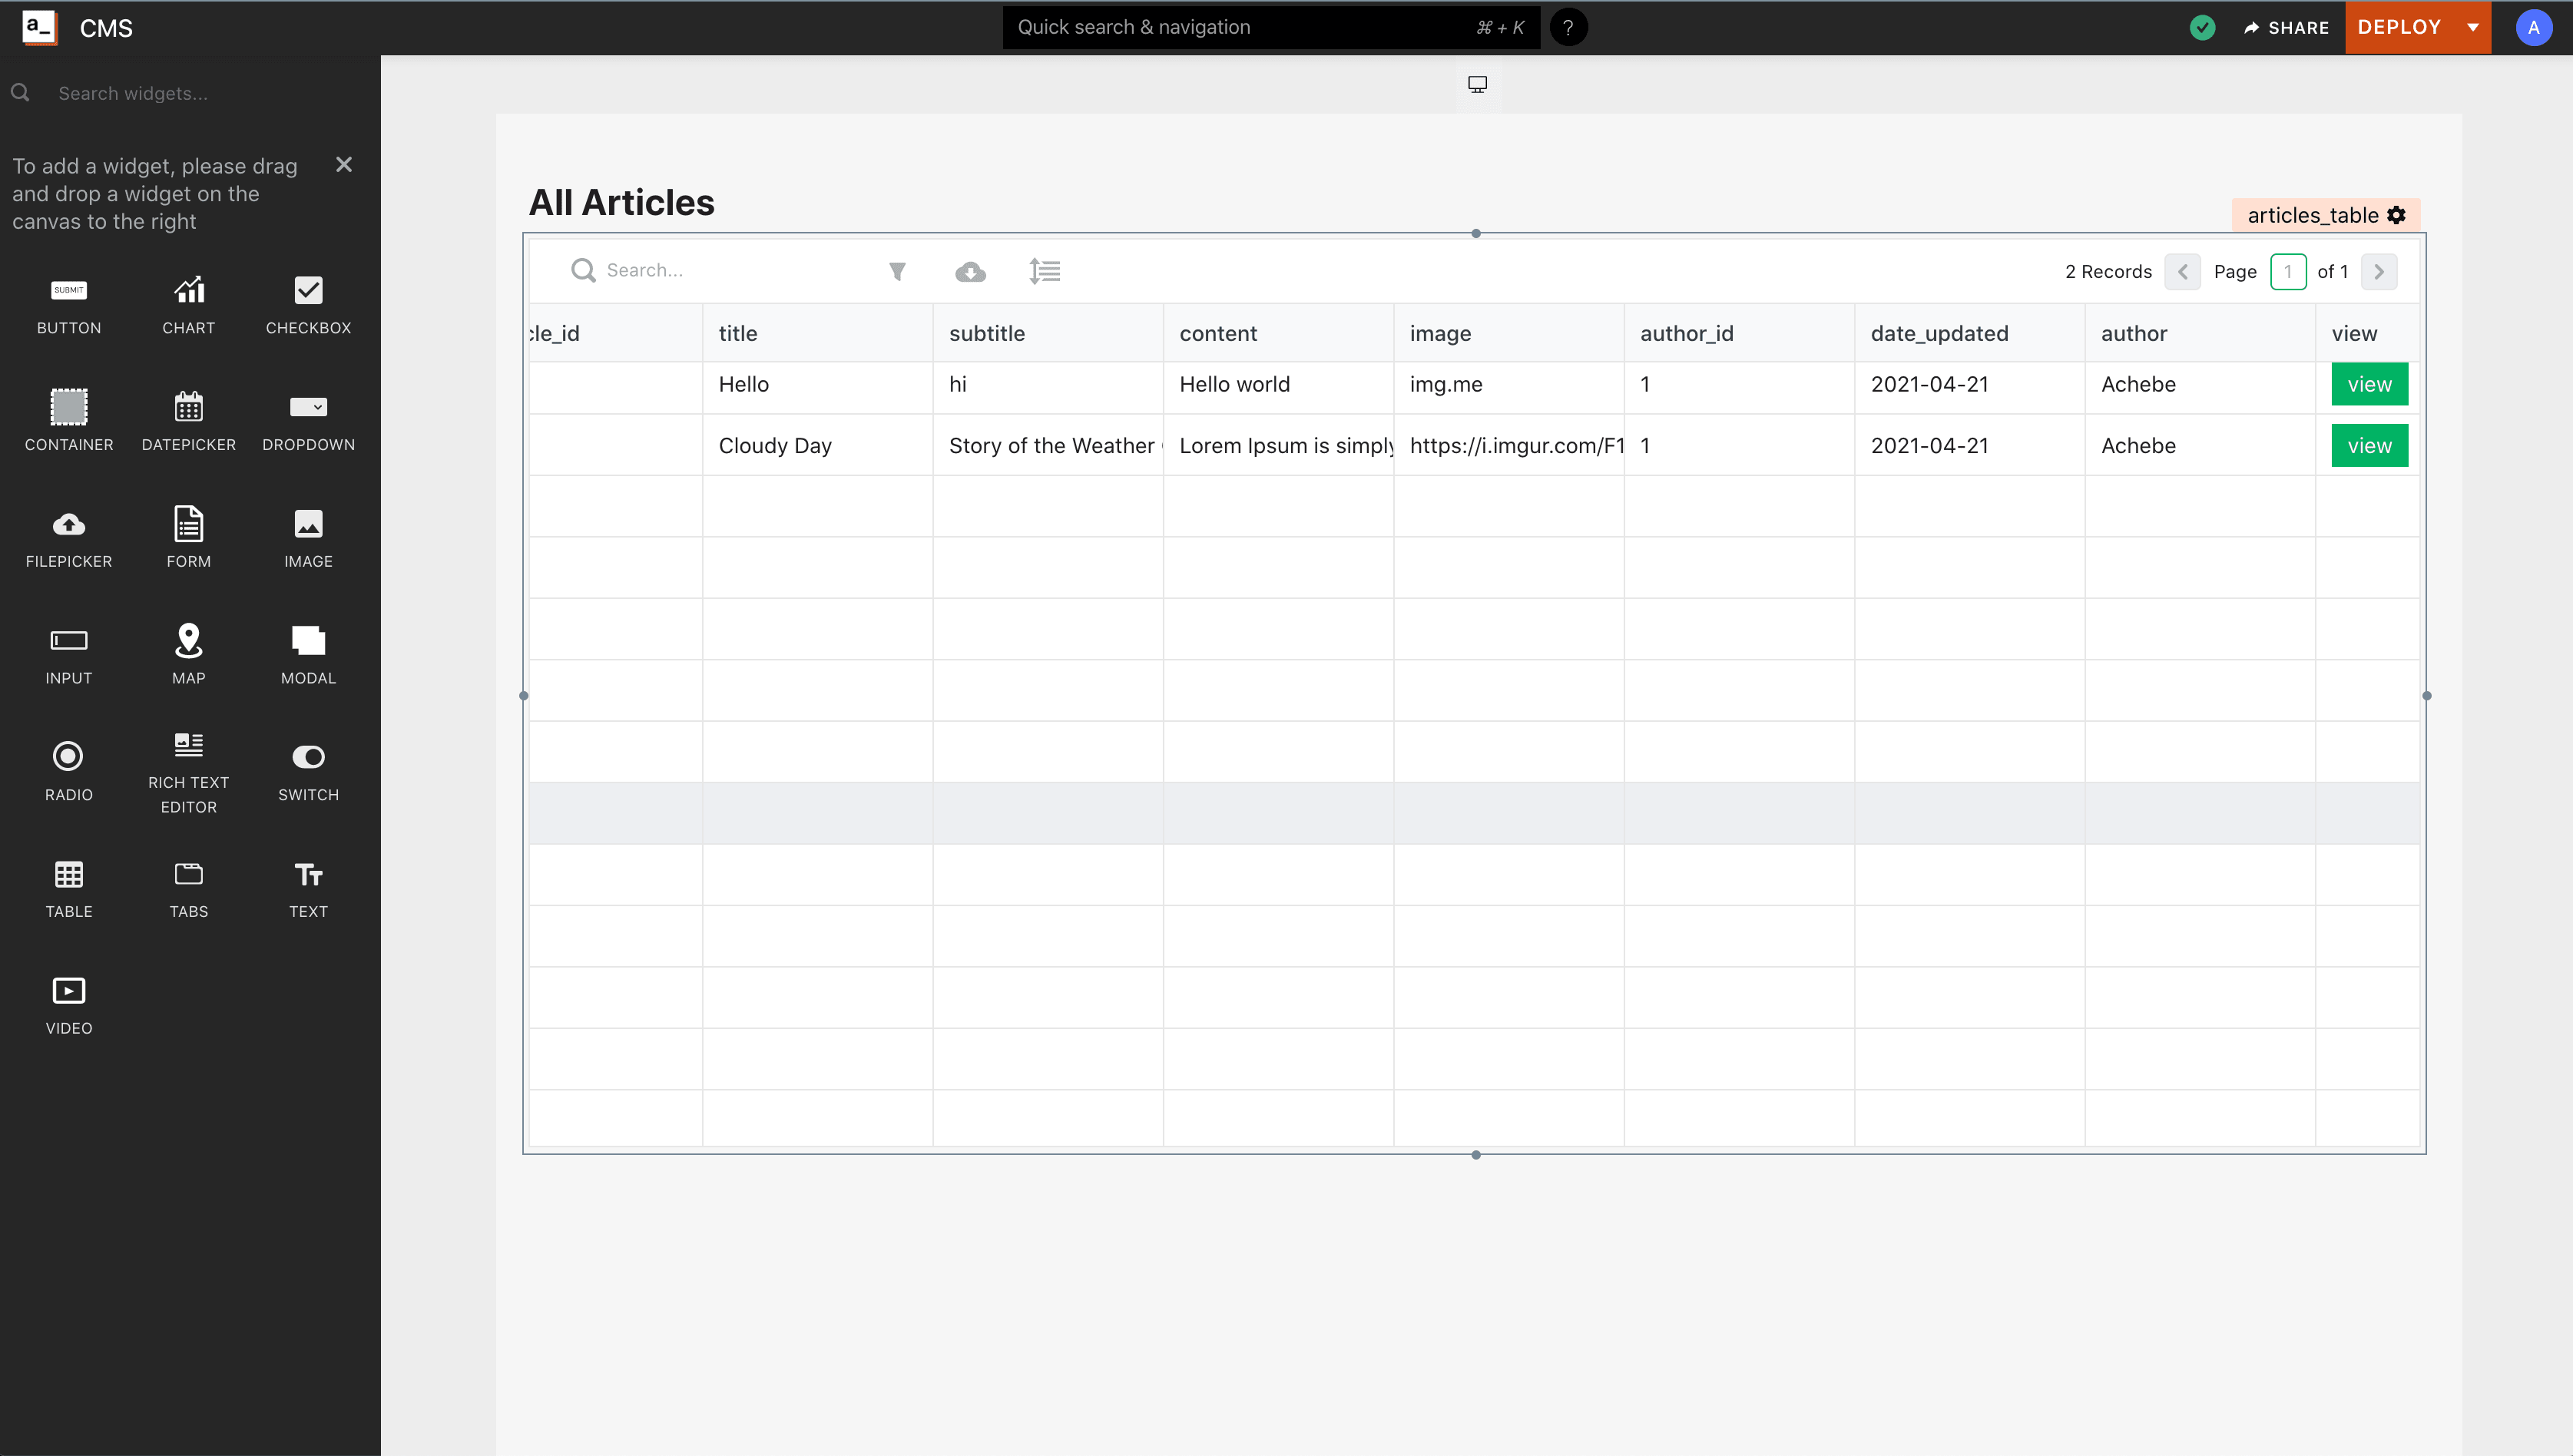
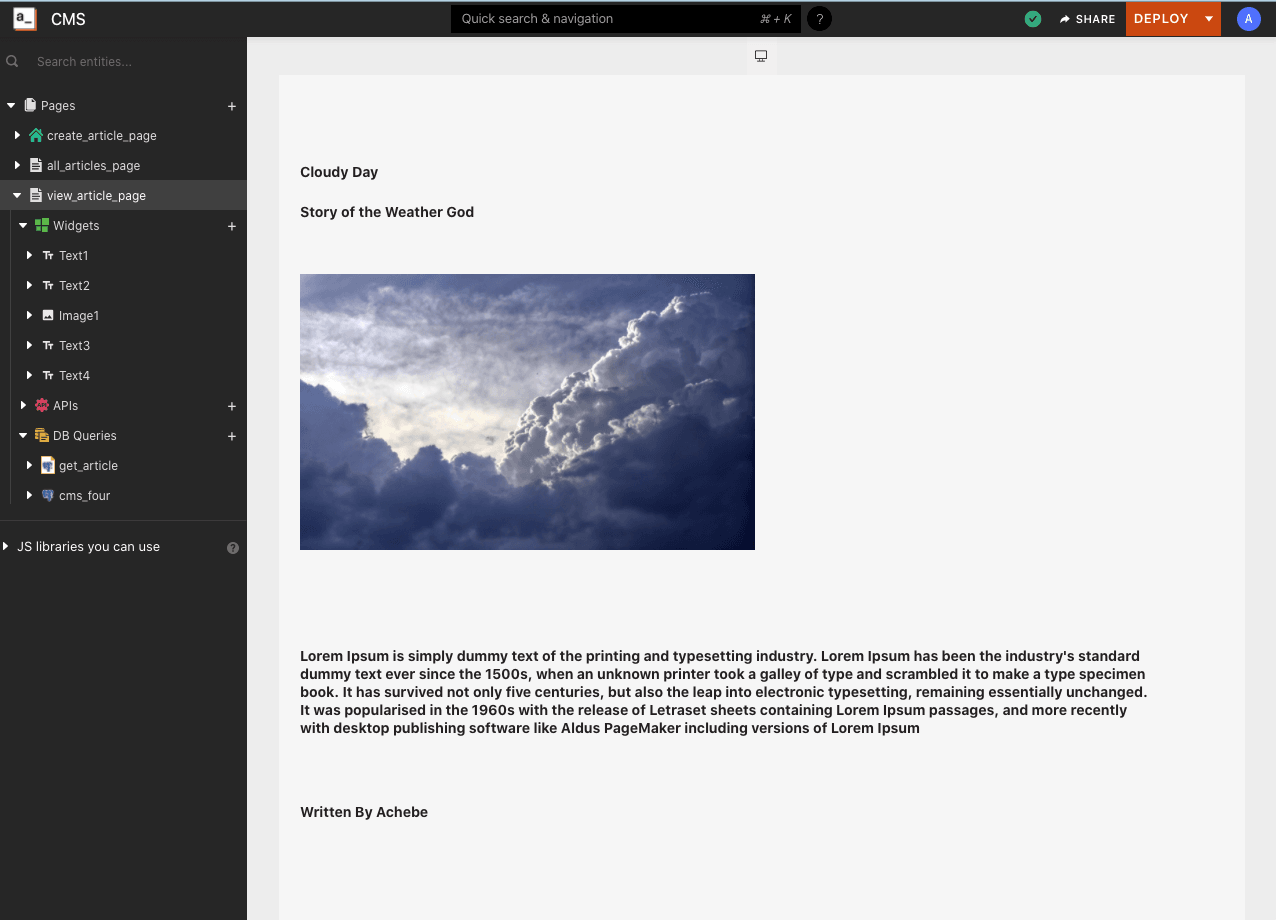
Go back to the view_article_page and add the following widgets and settings:
Add a Text widget for the title and set the value of Text to {{get_article.data[0].title}}.
Add another Text widget for the subtitle and set the value of Text to {{get_article.data[0].subtitle}}.
Add an Image widget for the cover image and set the value of Image to {{get_article.data[0].image}}.
Add a Text widget for the article content and set the value of Text to {{get_article.data[0].content}}.
Add a Text widget for the article’s author and set the value of Text to Written By {{get_article.data[0].author}}
To test that the configuration works, go to the all_articles_page and click View on any of the rows. This should take you to the view_articles_page with the actual article loaded.
Your App’s Third Page: Edit an Article
On the all_articles_page, add a new column to the table. Then add a button called Edit to the column. In the settings for Edit, set the onClick section to JS and add {{navigateTo('edit_article_page',{"key": currentRow.article_id})}} as its value.
Create a new page and name it edit_article_page. On this page, you’ll add a form to edit existing articles. You'll also make sure that the form is prefilled with the details of the article you want to edit.
Prepare the Data
Go to view_article_page > DB Queries > get_article and copy the get_article query to edit_article_page. Go to the queries under the create_articles_page, click the three dots near fetch_authors, and select Copy to Page and then edit_article_page. Copy the query fetch_tags to the edit_article_page as well. Under the edit_article_page, you should see all the copied queries. Make sure that the getArticlesCopy ends with { appsmith.URL.queryParams.key }}; instead of {{ }};. Create a new query edit_article_query and add:
update article
SET title = '{{edit_article_form.data.title}}',
    subtitle = '{{edit_article_form.data.subtitle}}',
    content = '{{edit_article_form.data.content}}',
    image = '{{edit_article_form.data.cover_image}}',
    author_id = {{edit_article_form.data.author}}
  WHERE article_id = {{ get_articleCopy.data[0].article_id }};
Create a new query, new_article_tag_query, and add:
INSERTINTO article_tag
  (article_id, tag_id)
VALUES
  (
    '{{ get_articleCopy.data[0].article_id }}',
    '{{ edit_article_form.data.tag }}'
  );
Create a new query, delete_old_article_tags, and add:
DELETEFROM article_tag
WHERE article_id = {{get_articleCopy.data[0].article_id}};
Build the Page
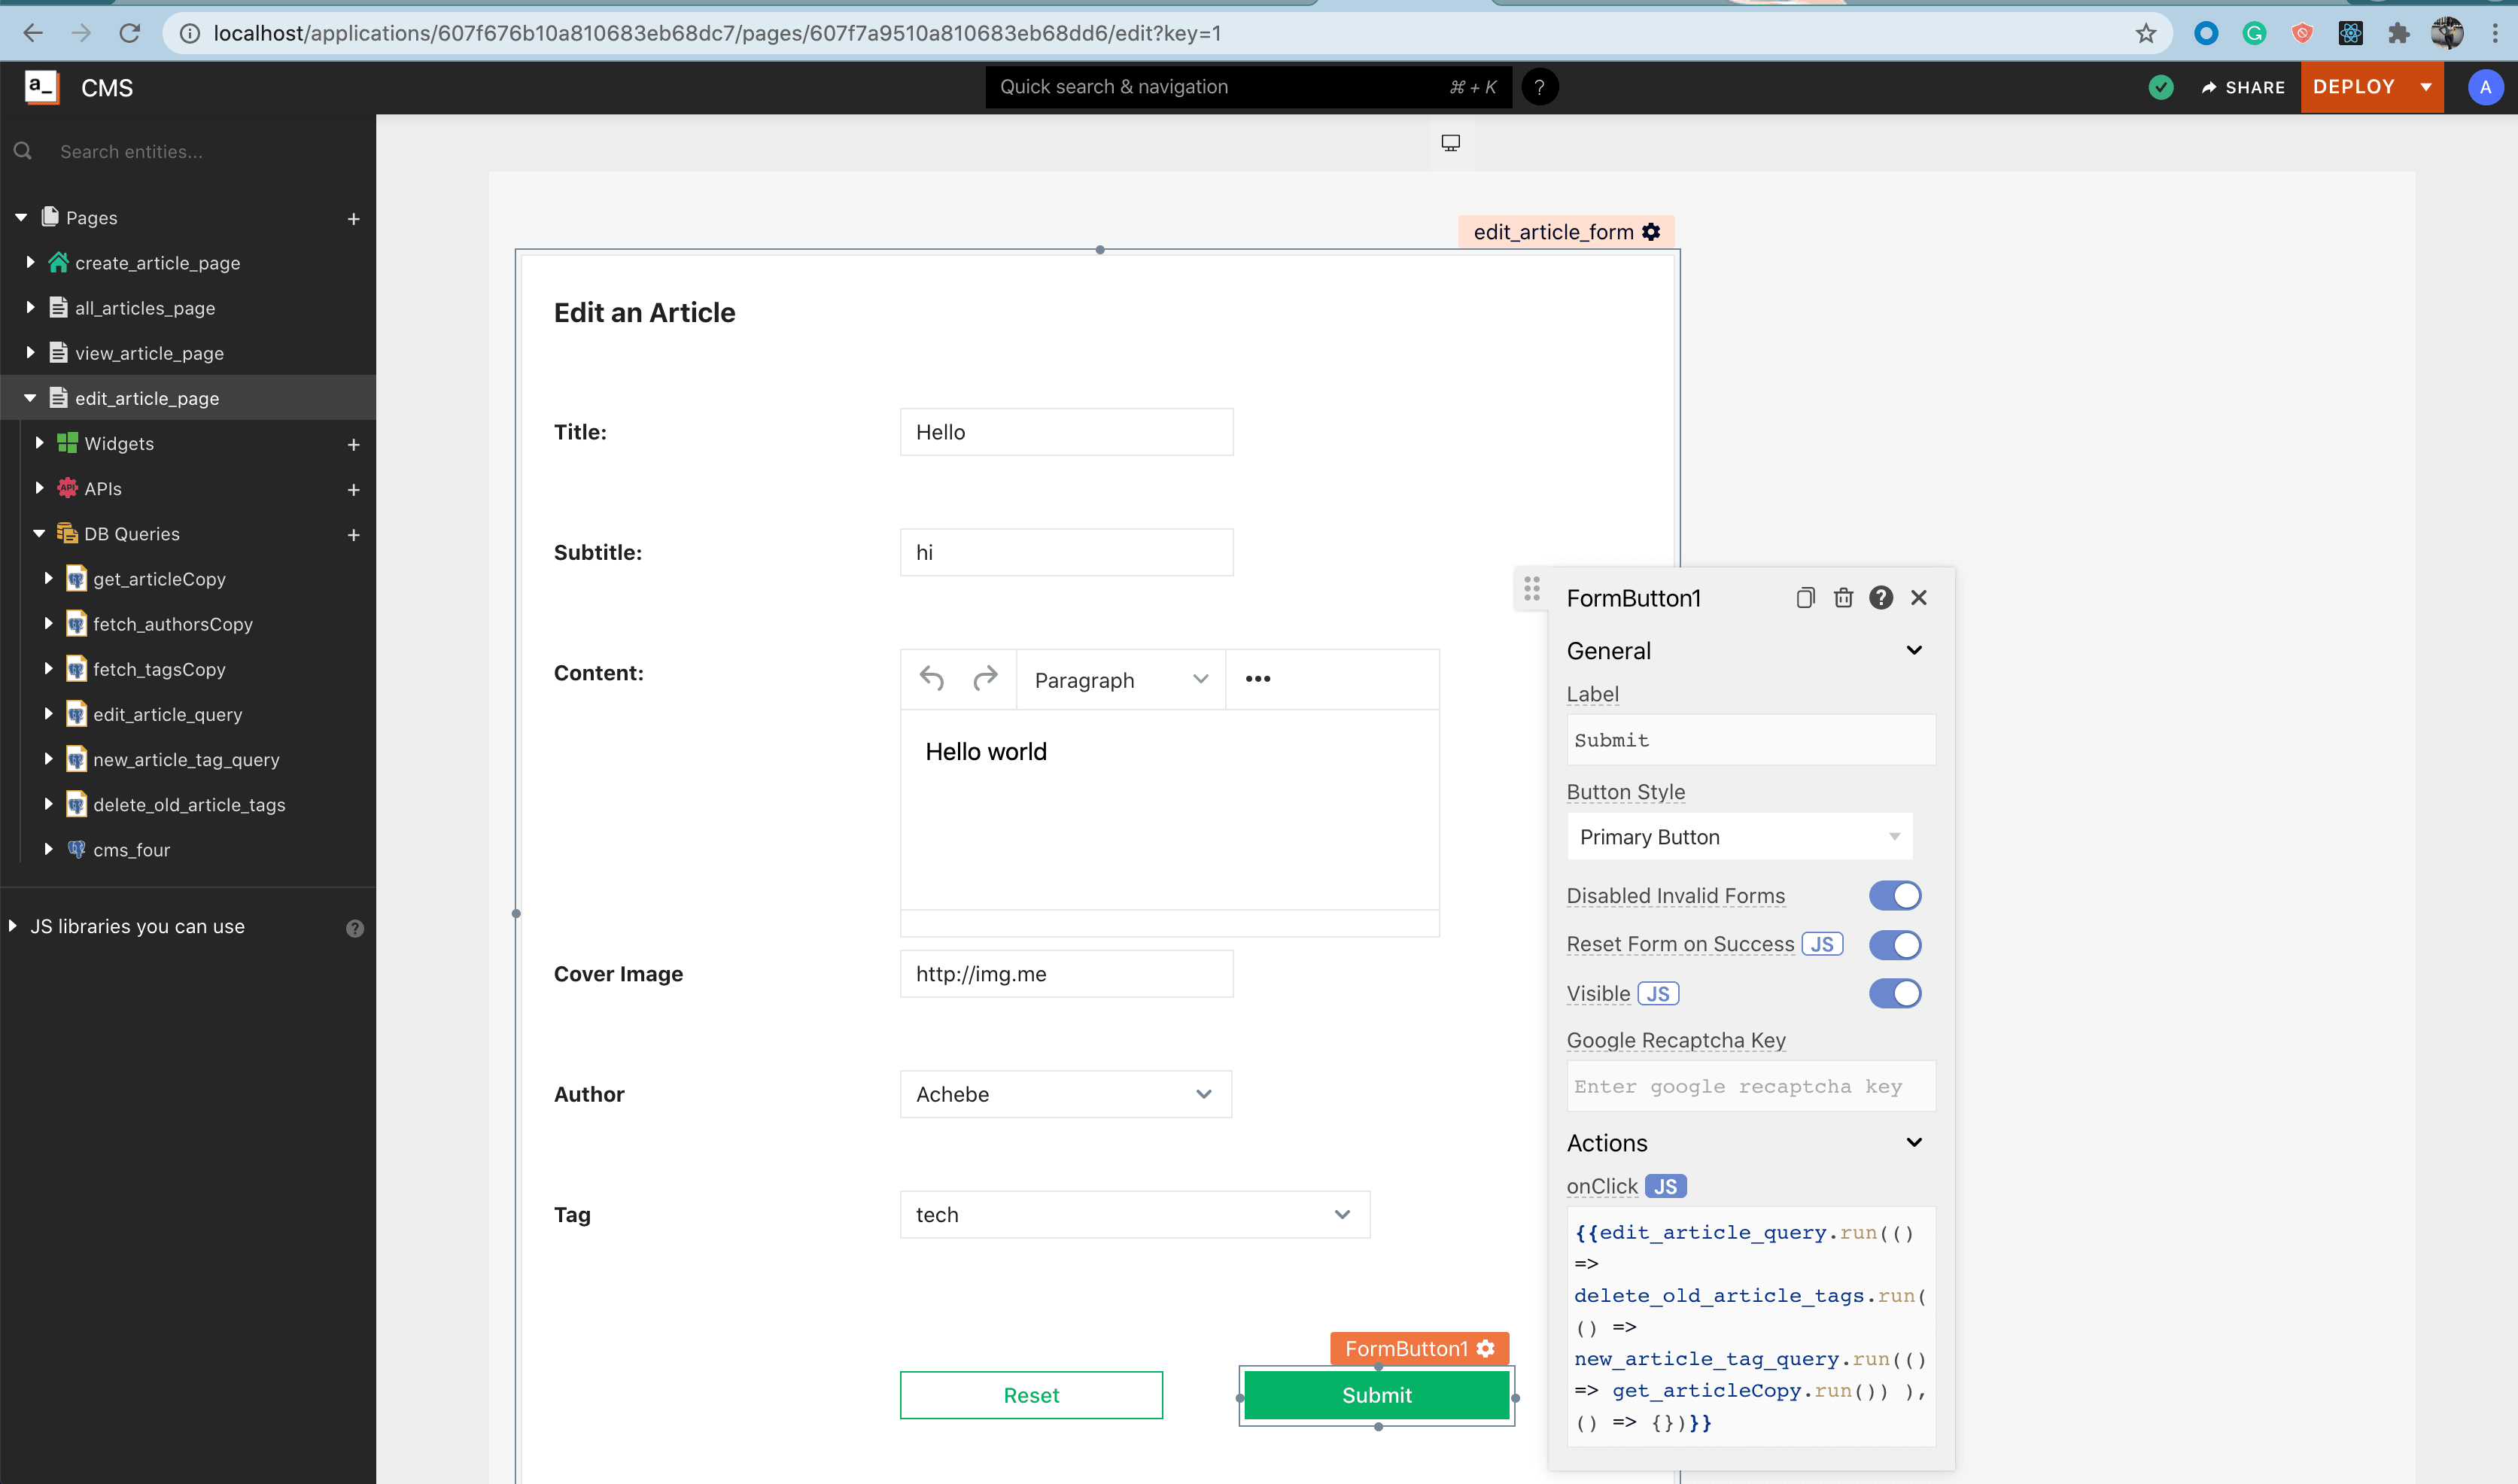
To build the edit_article_page page, add a Form widget to the page, click the settings gear, and rename the form edit_article_form. Change the form label to Edit an Article. Add six text widgets to the form and label them Title, Subtitle, Content, Cover Image, Author, and Tag respectively, just like you did on the create_article_page. Drag the Input widget in front of Title and Subtitle and change their names from input1 to title and subtitle respectively. Open the title widget and set default text as {{get_articleCopy.data[0].title}}. Also set default text for Subtitle as {{get_articleCopy.data[0].subtitle}}. Drag the Rich Text Editor widget in front of the Content label and change its name from input1 to content. Set the widget's default text as {{get_articleCopy.data[0].content}}. Drag the Input widget in front of the Cover Image label. Rename the widget cover_image. Set the default text as {{get_articleCopy.data[0].image}}. Drag a dropdown widget in front of both the Author and Tag labels. For Author, change its name from Dropdown1 to author and set the default text as the following:
{{
  fetch_authorsCopy.data.map(
  (row)=>{

    return {label: row.name, value: row.author_id.toString()}
  }
  )
}}
And the Default Option as {{get_articleCopy.data[0].author_id}}. For the Tag field, change its name from Dropdown2 to tag and set the options as:
  {{
    fetch_tagsCopy.data.map(
    (row)=>{

      return {label: row.name, value: row.tag_id.toString()}
    }
    )
  }}
And the Default Option as {{get_articleCopy.data[0].tag_id}}. In the Submit button's settings, go to the onClick section and click JS. Set the value as:
{{edit_article_query.run(() => delete_old_article_tags.run(() => new_article_tag_query.run(() => get_articleCopy.run()) ), () => {})}}To test that the configuration works, go to the all_articles_page and click the Edit button on one of the rows. This should bring you to the edit_article_page, with the form prefilled with the selected row's data. From here you can edit the article and then submit. Confirm that the article got edited successfully from the all_articles_page by looking up the row to see if the data changed.
Your App’s Fourth Page: Manage Tags and Authors
Create a new page called authors_and_tags_page. On this page, you'll be able to view all the Authors and Tags. You'll also add the ability to remove and add tags.
Prepare the Queries
Go to the create_article_page > DB Queries and copy fetch_authors and fetch_tag to authors_and_tags_page. Create a new query, create_tag_query, and paste in the following:
INSERTINTO tag
  (name)
VALUES
  (
    '{{create_tag_modal.data.tag_name}}'
  );
Create a new query, delete_article_tag_query, and paste in the following:
INSERTINTO tag
 DELETEFROM article_tag
WHERE tag_id = {{tags_table.selectedRow.tag_id}};
Create another query, delete_tag, and add the following code:
DELETEFROM tag WHERE tag_id= {{tags_table.selectedRow.tag_id}}Build the Page UI
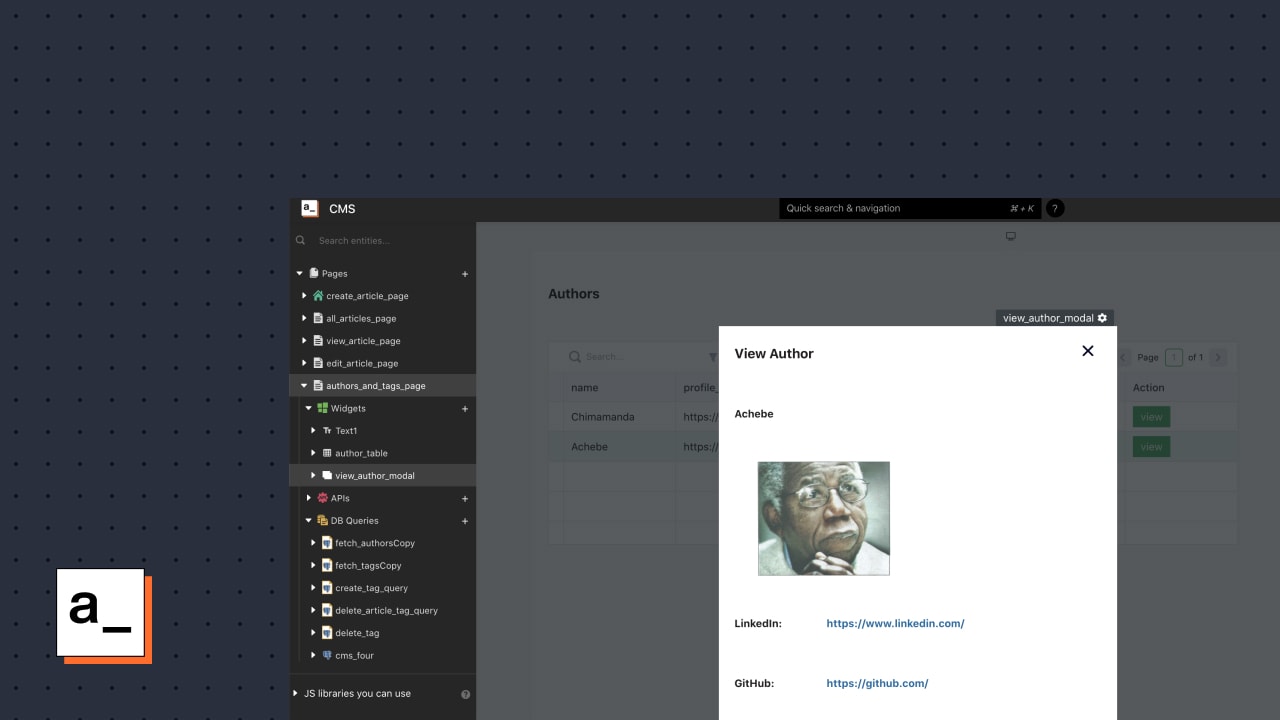
To start building the page UI, add a text widget and name it Authors. Underneath, add a table widget and rename it author_table. Set the Table Data as {{fetch_authorsCopy.data}}. Reload the page. Add a new column called Action. Go to Action's settings, set its column type as Button, and label the button as View. In the onClick section, set it as JS, and the value as {{showModal('view_author_modal')}}. You just created a button on the table called View. When this button is clicked, you want it to open a modal called view_author_modal.
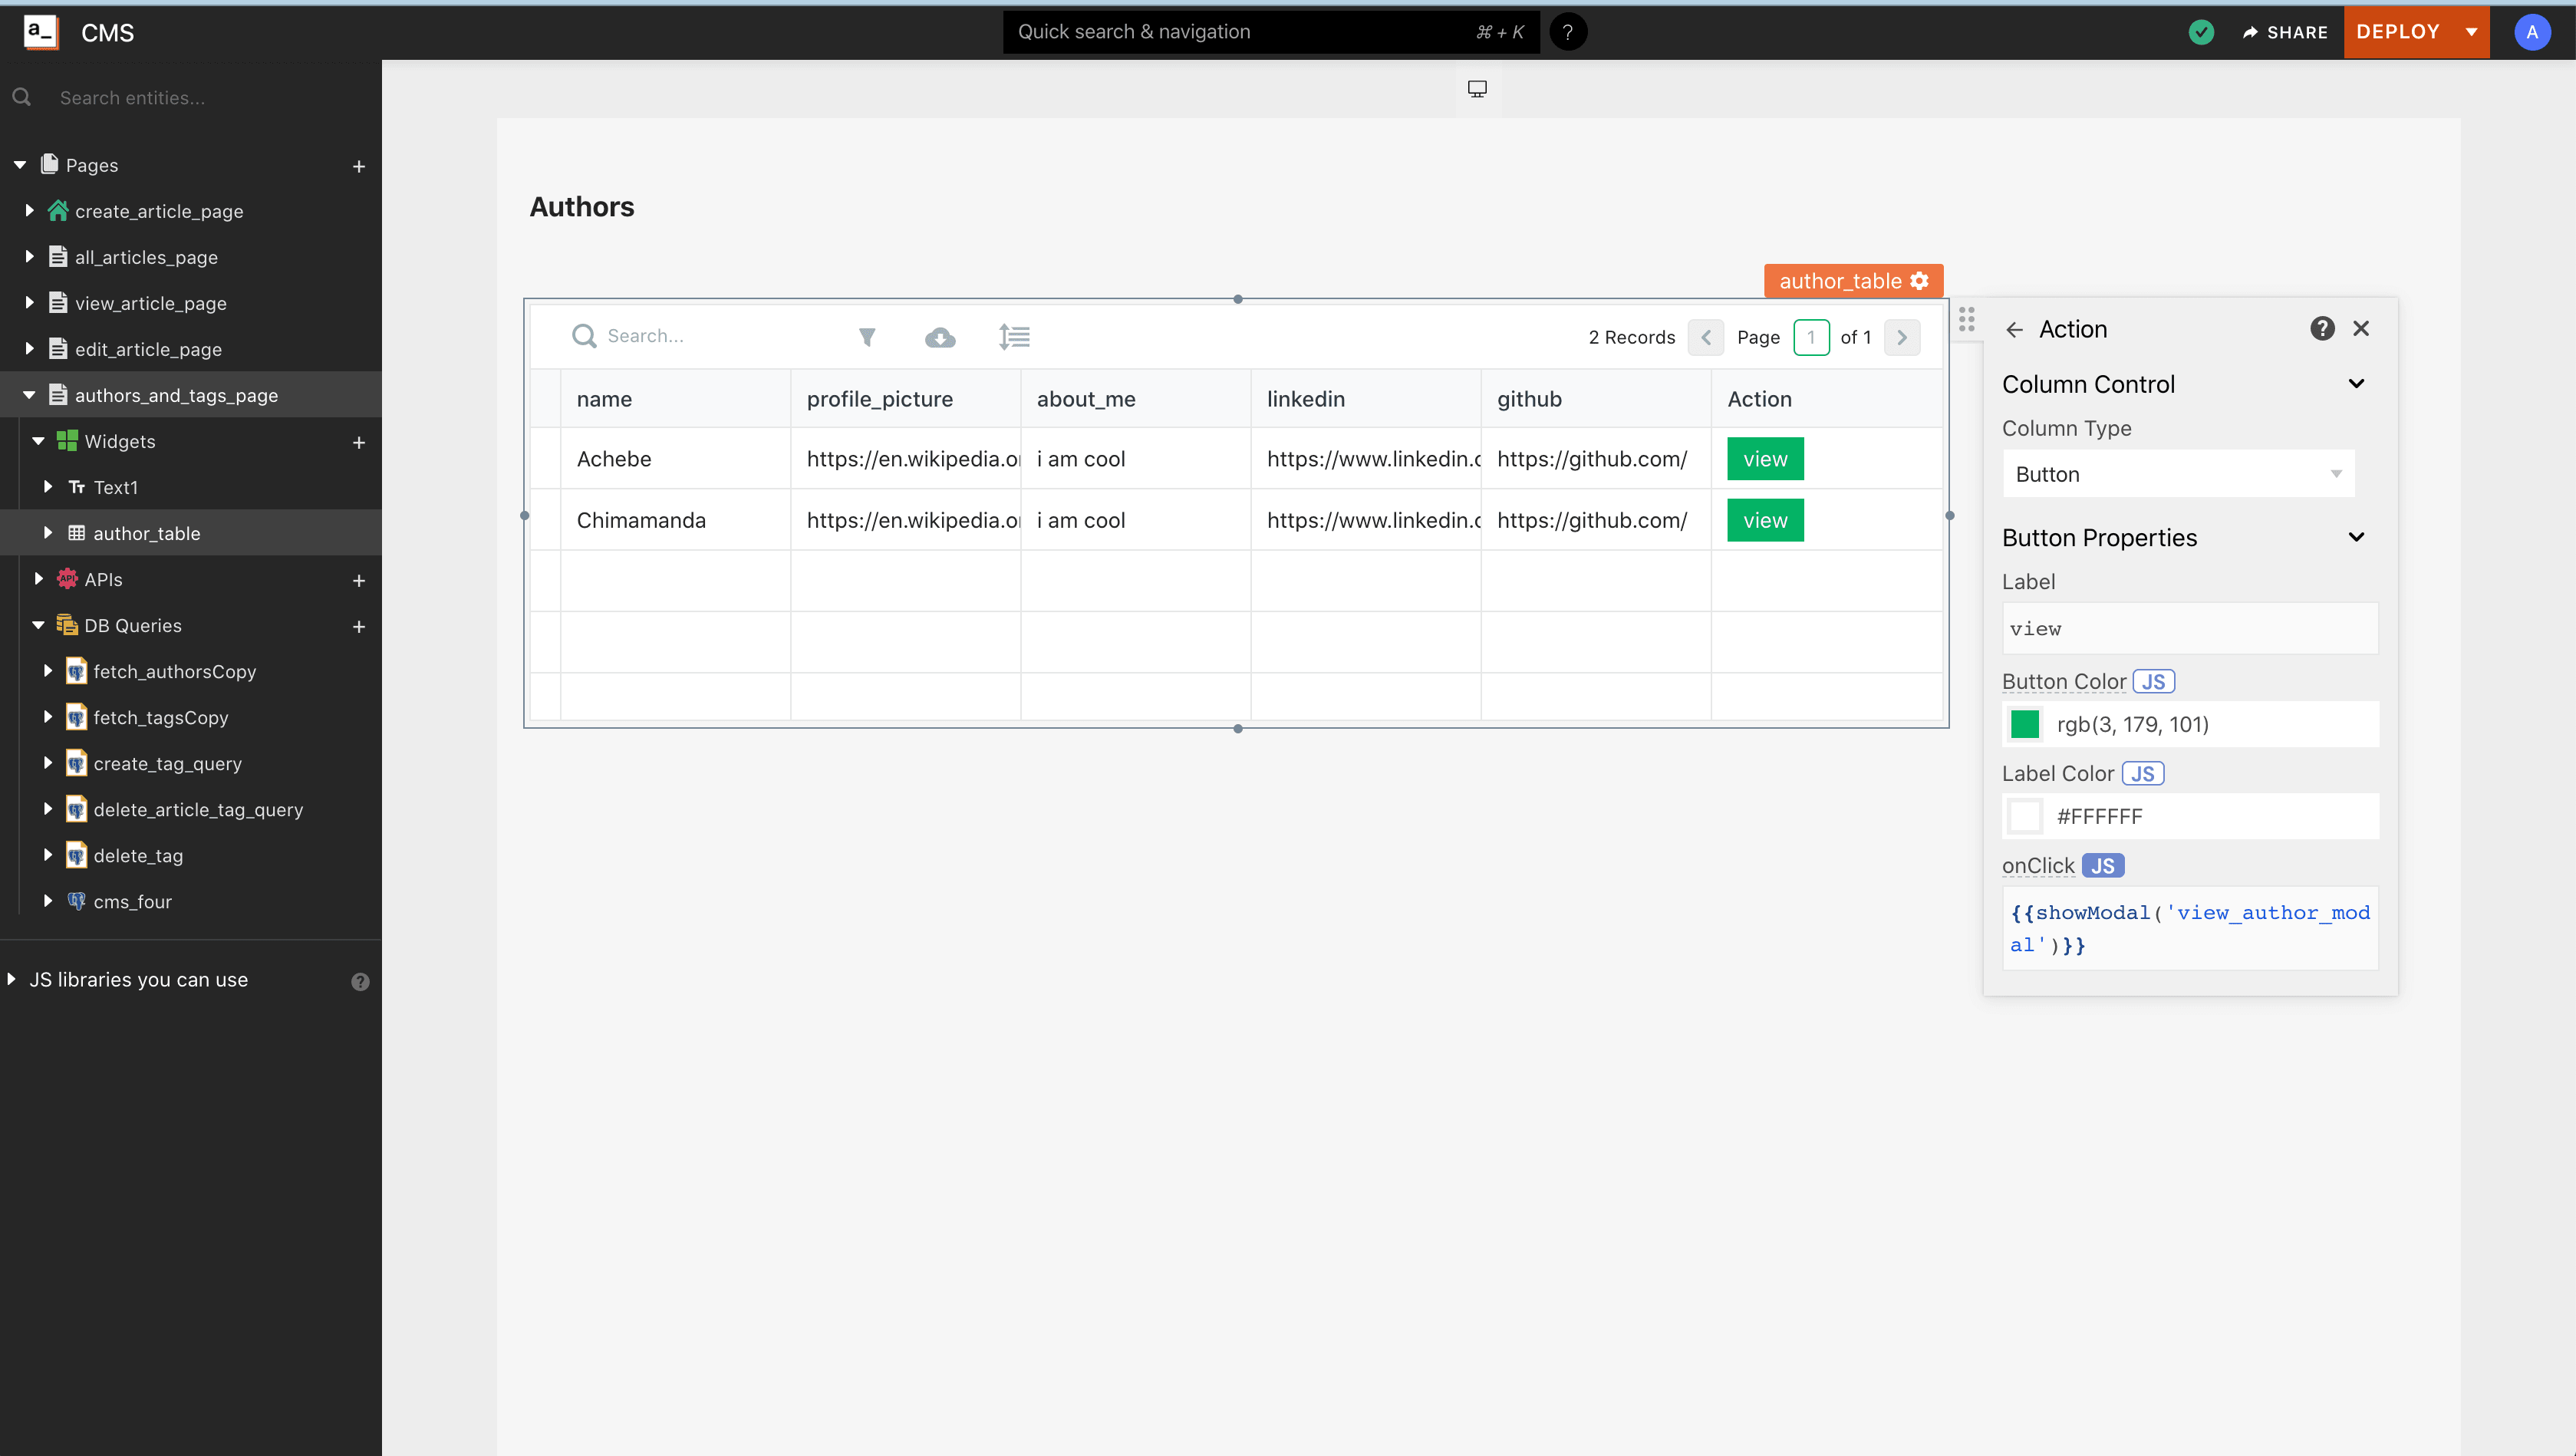
To create view_author_modal, drag a Modal widget to the page and rename it view_author_modal. Change the Modal Title text to View Author, set the Modal Type as a Form Modal, and delete the buttons in the modal. Dismiss the modal and click one of the View buttons on the Authors table. This should open up the modal. Now add a Text widget and set the Text value to {{author_table.selectedRow.name}} in the settings. Add an Image widget and give it an Image value of {{author_table.selectedRow.profile_picture}}. Add a Text widget and label it LinkedIn:. In front of it, add another Text widget and give it a Text value of {{author_table.selectedRow.linkedin}}. Add a Text widget and label it GitHub:. In front of it, add another Text widget and give it a Text value of {{author_table.selectedRow.github}}. At this point, you should see all of the Author's information rendered on the modal.

Next, you need to create a table to display all the tags. Start by adding a Text widget and labeling it Tags. Underneath, add a Table widget and rename it tags_table. Set the Table Data as {{fetch_tagsCopy.data}} and reload the page. Add a new column called Action. Go to Action's settings, set its column type as Button, and label it as remove. Set the button to Red as well. In the onClick section, enable JS and paste the value as {{delete_article_tag_query.run(() => delete_tag.run(), () => {})}}. You can test deleting a tag by clicking one of the remove buttons on the Tags table. Add a Button widget in the bottom right corner underneath the Tags table and label it Add Tag. Next, in the button's onClick settings, click JS and paste the value {{navigateTo('create_tag_page','SAME_WINDOW')}}. Here you’ve configured the Add Tag button to open a new page called create_tag_page.

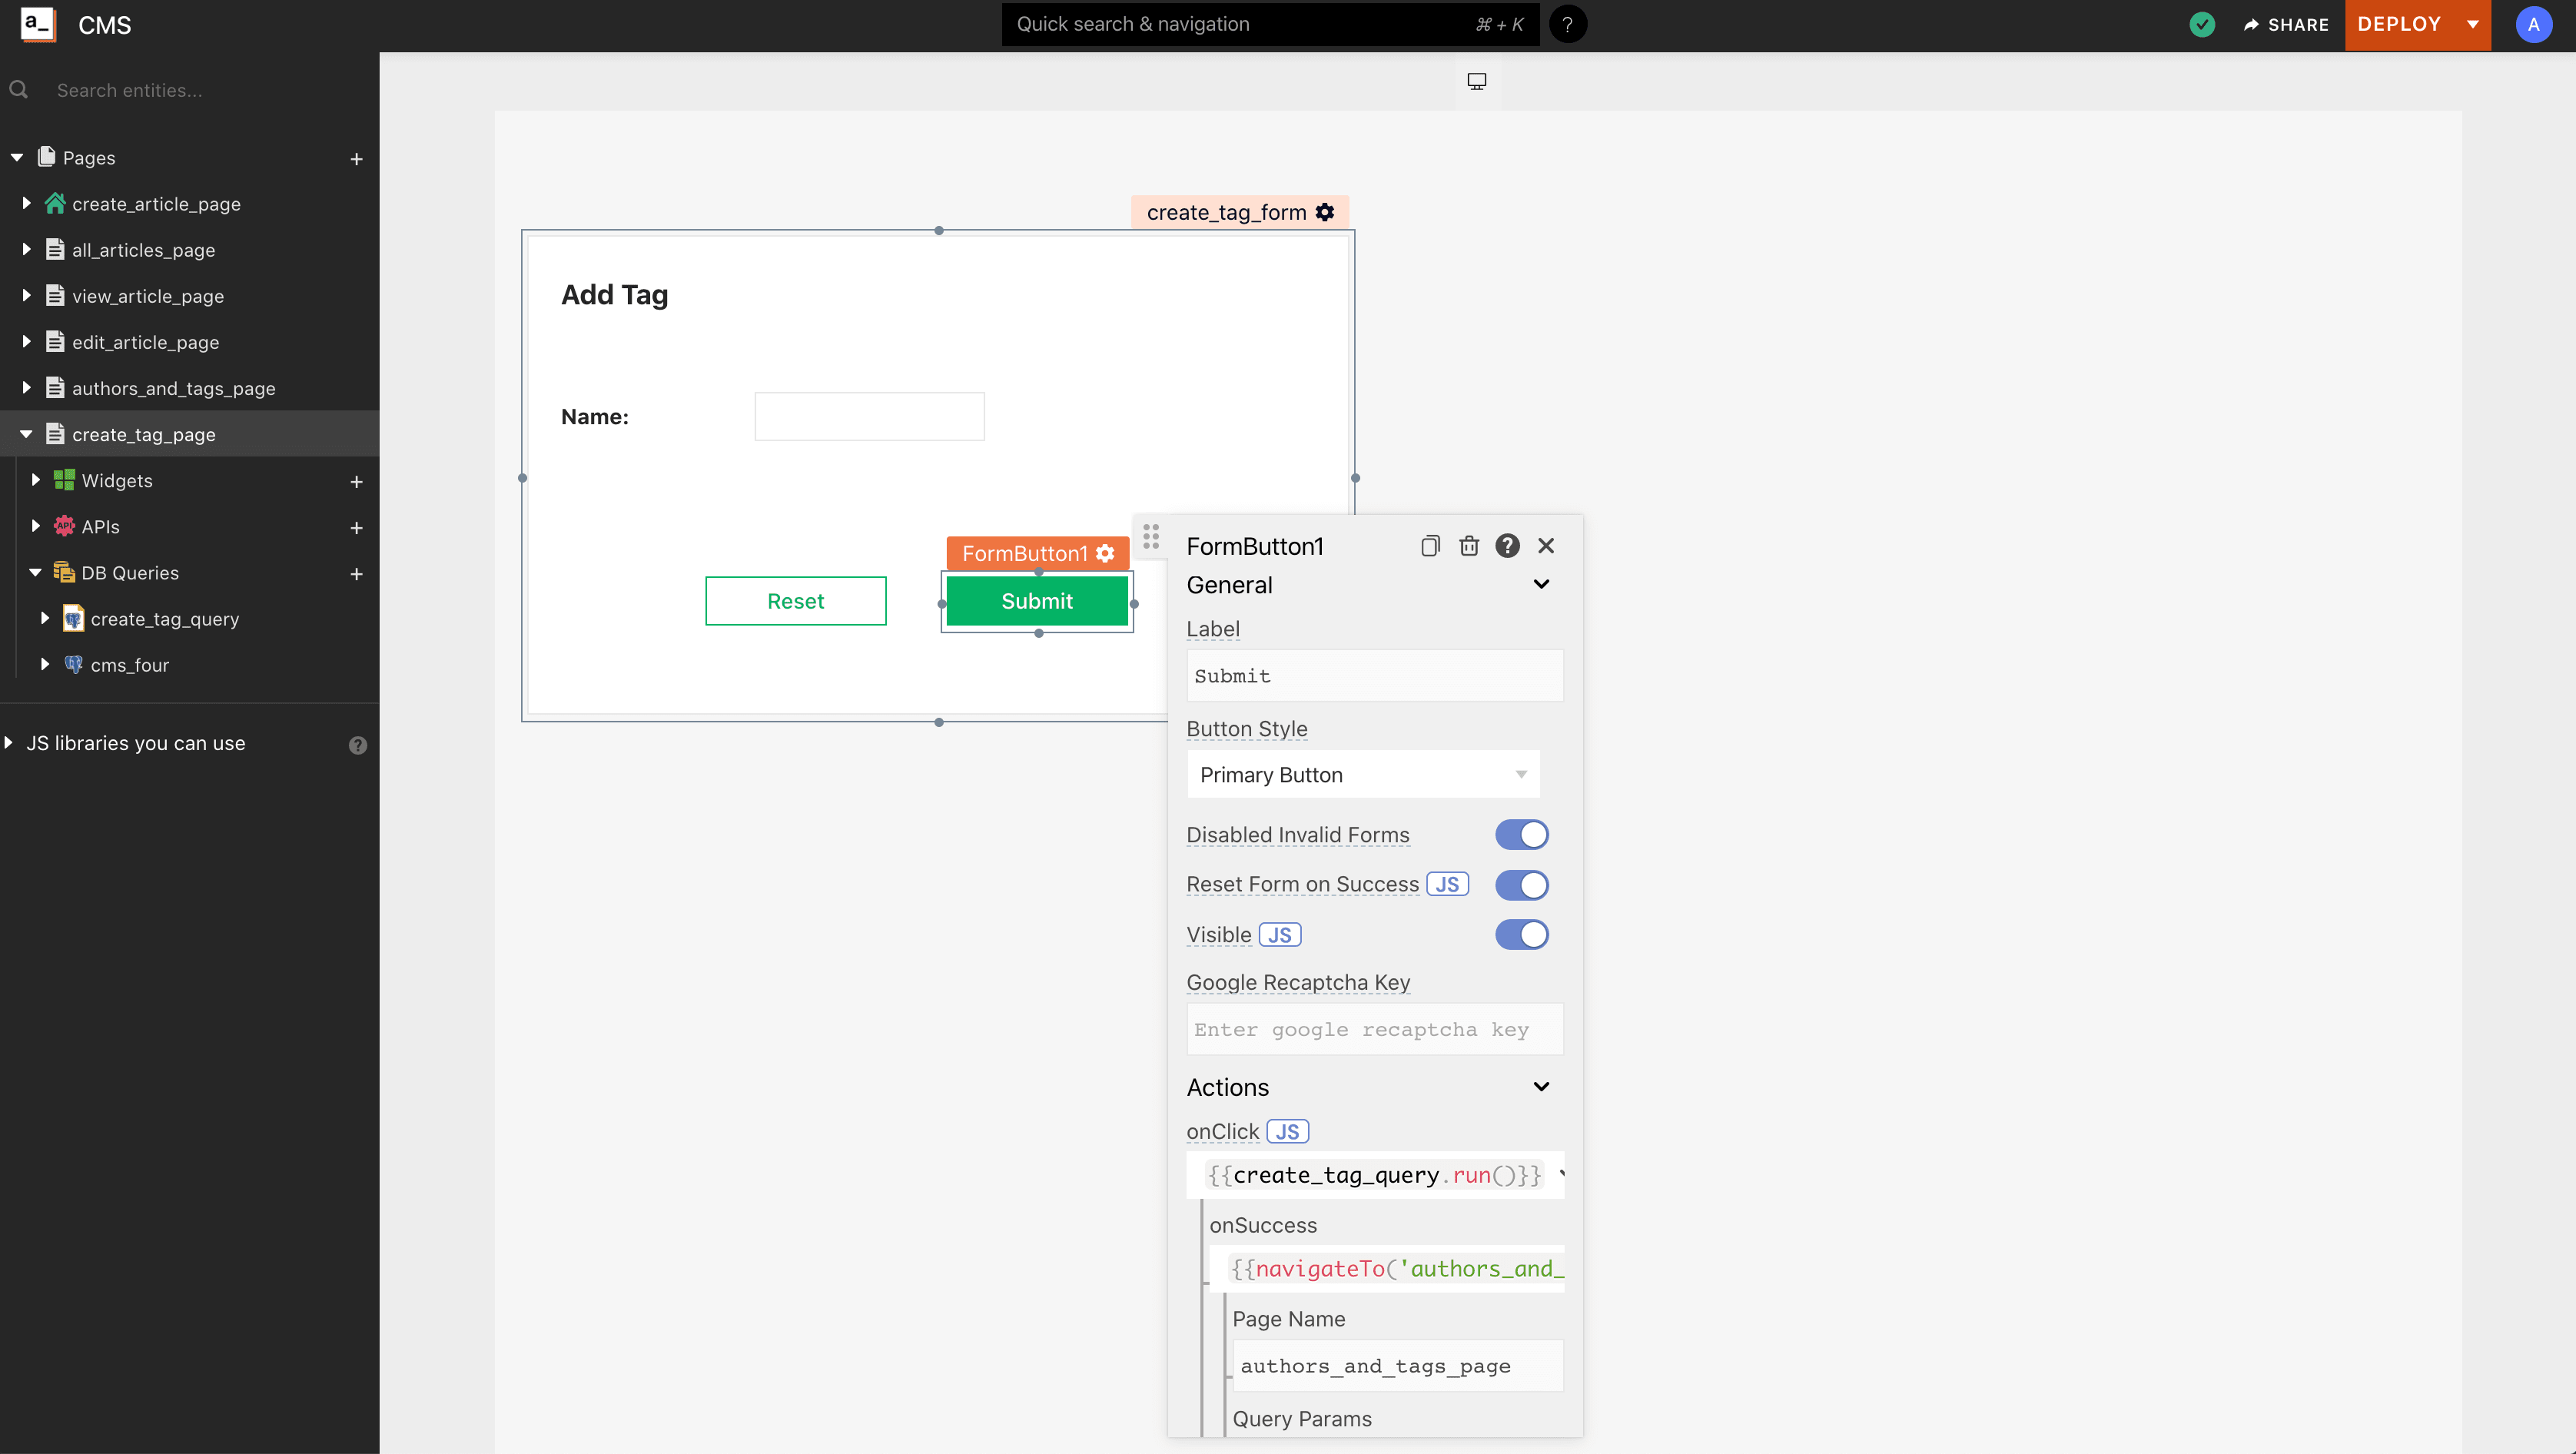
Create a new page called create_tag_page. When the Add Tag button is clicked, it should go to this new page. Go to DB Queries and create a new query called create_tag_query. Paste in the following:
INSERTINTO tag
(name)
VALUES
(
  '{{create_tag_form.data.tag_name }}'
);
Go back to the create_tag_page, and drag a Form widget into the workspace. Rename it create_tag_form. Then inside the form, add a Text widget and label it Add Tag. Underneath, add a Text widget and label it Name:. In front of it add an input widget and rename it tag_name. Go to the onClick section of the Submit button settings and select Execute a DB Query. Choose the create_tag_query. In the onSuccess section, select Navigate to, and for Page Name enter authors_and_tags_page. This means you want to navigate to the Tags page once a new tag has been created. Test creating a new tag and checking that it is present on the Tags table.
Conclusion
You've seen how easy and fast it is to build a content management system on Appsmith. You’ve connected to a database and built pages, and made them interactive. You’ve experimented with how Appsmith’s widgets work and learned to customize them for your purposes. If you’re looking for a fast way to create a CMS or another internal tool with minimal need for developer hours, consider building it with Appsmith.


