Build a Product Review Tool For Telegram Bot with Appsmith
In this tutorial, we will use Appsmith to build a product review tool for a Telegram bot. Think of this as a proof of concept of how Appsmith can help small businesses by automating some aspects of their businesses. More specifically, this app allows users to add reviews on products they've used to help others make wise decisions when purchasing. Business owners can take the feedback given to make their products more consumer-friendly.
Telegram-Business is a Telegram bot that connects customers to small-scale businesses. Users can either sign up to use the bot as business owners and create a catalog for their products or use it as customers looking to purchase something from businesses on the bot. It works a lot like the popular Whatsapp Business platform.
If you want to see how I built the Telegram bot, you can check this article I wrote about it here.
Prerequisites for building the Product Review Tool
To follow along with the article steps, you should have the following setup:
Appsmith Account: You can create an account with Appsmith for free via this link.
Also, be sure to read the tutorial on how to create a telegram bot via this link.
Overview of the Product Review Tool
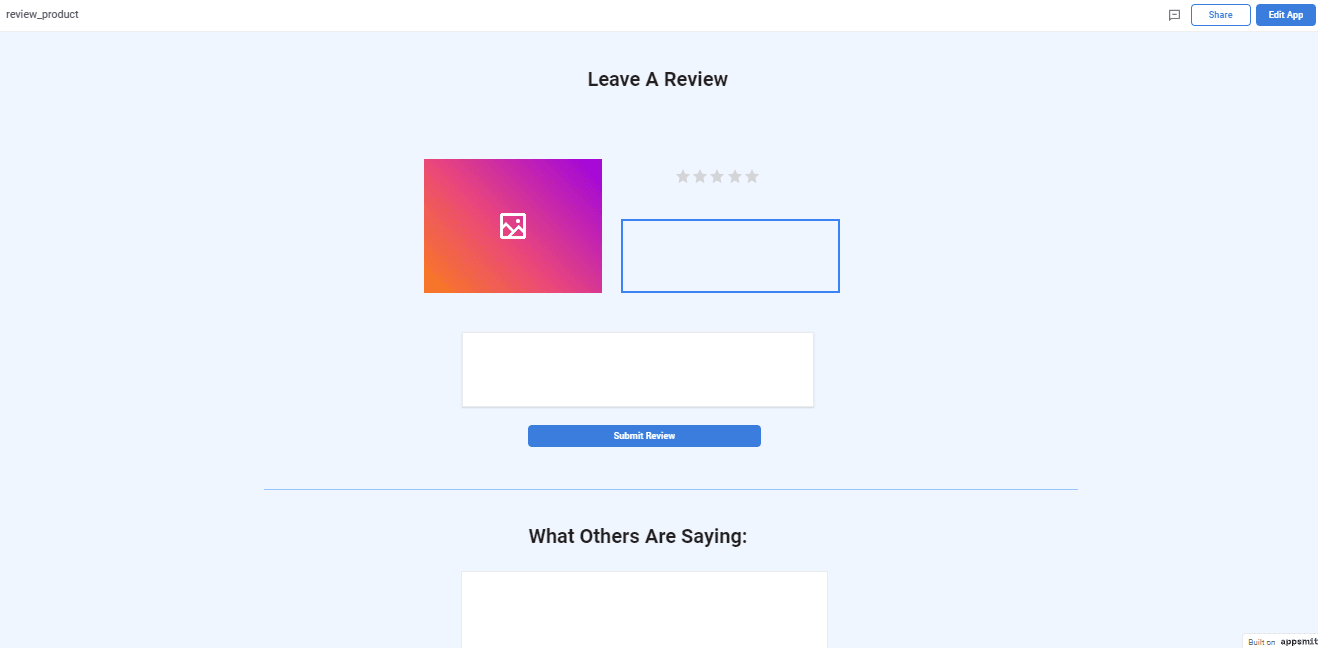
The process starts by creating a new application on Appsmith, and designing the interface for the product review tool using the available widgets in the design area, as shown below:
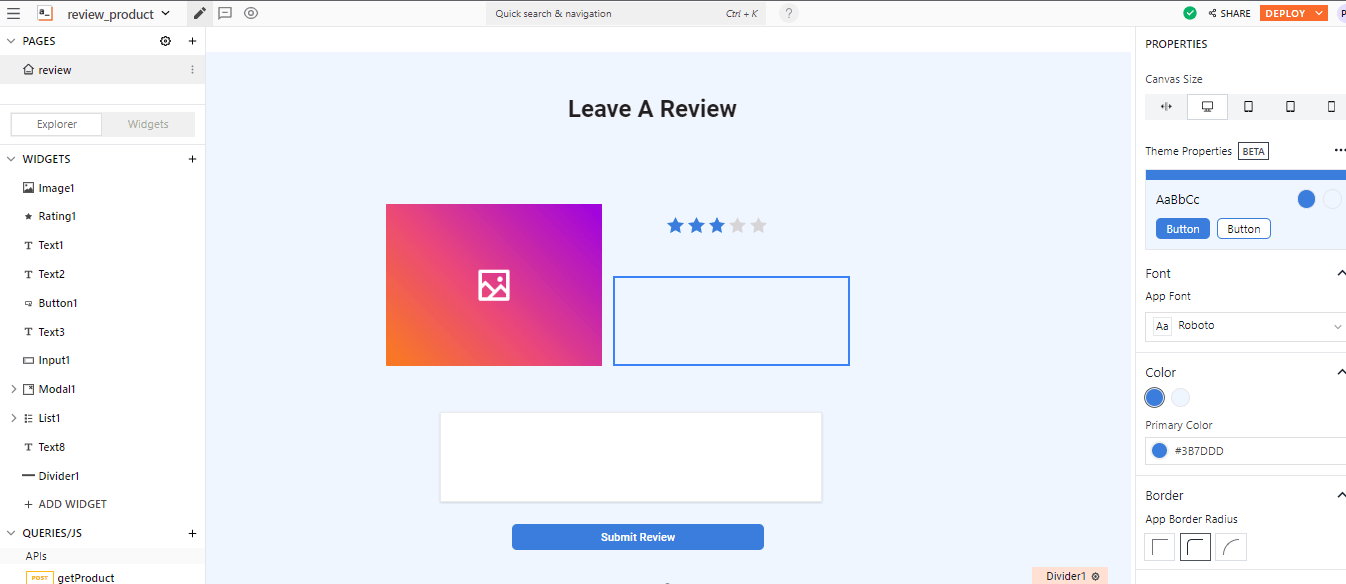
This utilizes the rating widget for the star rating, the text widget to display the product description, image widget to show an image of the product, and input widget for the comment that the user may want to leave on the product as part of their review, and of course, a button widget to submit the review.
We also want users to see comments made by other people on the product, so we'll design a second portion of the interface right beneath this one, as shown below:
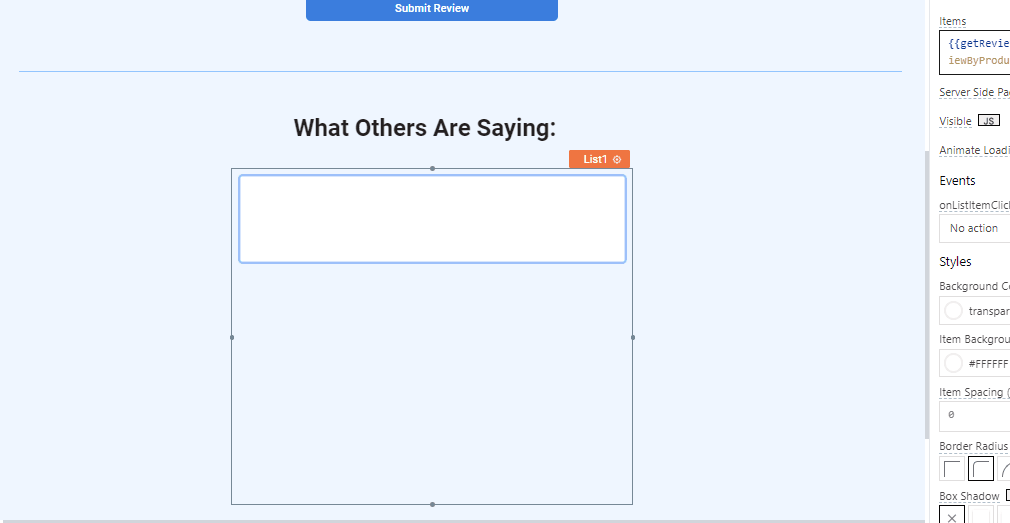
This portion consists of a text widget that describes the section "what others are saying", followed by the list widget, which has been emptied and contains only a text widget to display the comments by other users. It's empty at the moment so it seems bare, however, once the data kicks in it'll come to life. You can choose to add an outline to the input field to make it more visible as shown below:

Adding FaunaDB as a Datasource
We'll start by creating an API to fetch data to display on the list widget from the bot's database; which is hosted by Fauna which is a serverless database provider, that also provides us with a GraphQL API through which we can send queries directly to the database.
We will query the database via this GraphQL API from our Appsmith application. Head over to the "Queries/JS" section and choose to create a new "Blank API", and add the following details to this new API:
Name: getProduct
method: POST
Headers:
Authorization: Bearer
body
Once you're done your API should look like this:
{{
  JSON.stringify({
    variables: null,
    query: query {
      findReviewByProductID(product_id: "${appsmith.URL.queryParams.product_id}") {
        data {
          comment
        }
      }
    }
  })
}}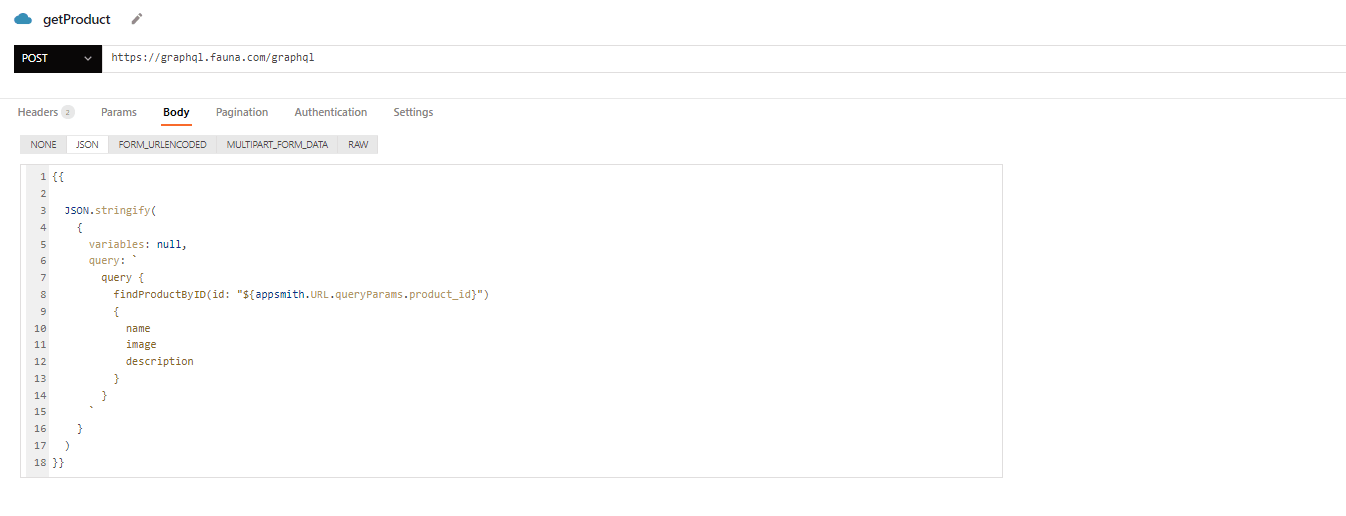
You will observe that in the body of this API, we use the "findProductByID" GraphQL query made available to us via FaunaDB.
Inside of this query we must specify a product id, namely the product id of the product that is to be reviewed, that way we can fetch the information about the product including the product image and description, which we can then display on our interface via the image widget and text widget.
id: "${appsmith.URL.queryParams.product_id}"
That is what this line does in the query, we fetch the product id from the Context object that Appsmith provides us with.
The Context object contains a number of properties of any Appsmith application that help us store and reference information about our application, for example, the famous "store" object is a part of the context object and we can use it to store information in our application's local store. Here's a list of items available in the Appsmith context object:
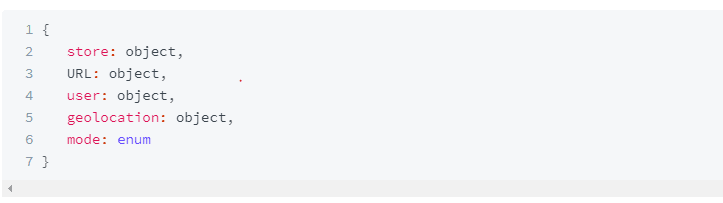
You can find out more about the context object here.
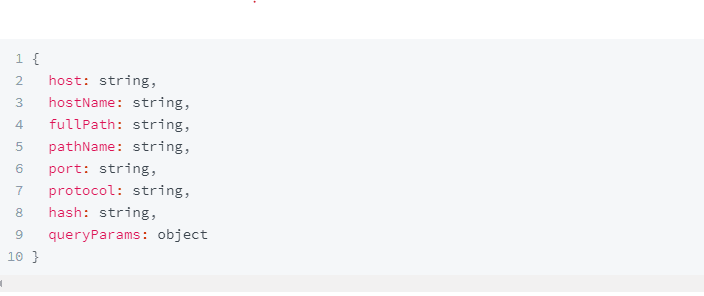
Meanwhile, the item of interest for us here is the "URL" object from the context object, which holds information about our application's URL, including the hostname, and query parameters amongst other things, as shown below:
This is important to us because we will be passing in information about the product to be reviewed and the user issuing a review as query parameters to our application url, namely the "product id" and the "user id" from the bot. This will make more sense when we integrate the application with the telegram bot.
getReviews API
Next, let's add another API that will fetch all the reviews on the given product. So head to the "Queries/JS" section again and choose to create a new API this time with the following details:
Name: getReviews
method: POST
Headers:
Authorization: Bearer
body
{{
    JSON.stringify({
        variables: null, query}
Here we send a query to the bot's database to fetch all reviews from the "Reviews" table that are associated with the given product's id, which is also gotten from the URL query parameter as with the previous API.
send_review API
This API is what will handle the creation of new reviews, which plays a vital role in our application since that's the main purpose of the application. This API, unlike the rest, utilizes a GraphQL mutation (also provided by the FaunaDB GraphQL API for the bot's database). Below are the details of this API:
Name: send_review
method: POST
Headers:
Authorization: Bearer
body
{{ JSON.stringify( { variables: null, query: As you can see in this mutation query, we reference the data from some of the widgets, including the rating widget, for the value of the ratings that are given. And the "input" widget, which holds the comment given by the user on the product. Also, observe that we fetch the user's telegram id (chat_id) from the URL to associate the new review with that particular user.
Connect Datasources To Widgets
Next, we must connect the APIs we've created to the interface via some of the widgets. First, off we want the user to be able to send in a review to the database once they click on the "submit review" button, so to do that, we will open up the properties of the button by clicking on the settings icon next to it, and choose an OnClick action for the button.
Head over to the submit button widget and bring up the settings pane, and under the Actions section, choose the option to Execute a query and then select thesend_review` API from the list of options shown, as shown below:

Not only do we specify an "onClick" action, but we also specify an onSuccess action, which simply brings up a modal that displays a success message, like the one shown below:
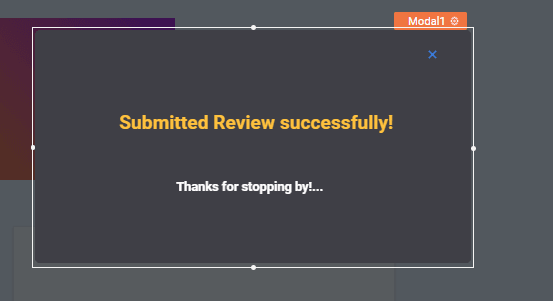
This is a simple modal with just two Text widgets, so you can create one like that and link it to the onSuccess action as I have done.
Next, we must feed data to the list under the "What others are saying" section; click on the widget to bring up the settings for the list. Under the " items" option, add the following to load the data from our getReviews API:
{{getReviews.data.data.findReviewByProductID.data}}This will load data from the query onto the list widget as a list of JSON objects. However, we must still specify what data goes where for each list item. In our case, we must specify what data from the "current object" goes to each list item's Text widget. Recall that each list item has a "text" widget in it, so for that text widget, we will specify its "Text" property to be the following:
{{currentItem.comment}}Lastly, we must add data to the Image widget and the Text widget that holds the product's description. For the image, we'll set the "image" property to the following:
{{getProduct.data.data.findProductByID.image}}Here, I am calling the "getProduct" API, which we created earlier on, and fetching the data from the response of the API call. For the description text widget, we'll set the "text" property to something similar
{{getProduct.data.data.findProductByID.description}}Now that we are done with this, we can deploy the application and fetch the URL. So I'll click on the Deploy button to deploy the application, wait for it to load up completely, then copy the URL from the browser.
As observed, the application currently has no data in it because necessary arguments for the APIs getProduct and getReviews are not yet present, namely:
user_id
product_id
If you recall, these two parameters were taken from Appsmith's URL context object, which holds information about the current URL of our application - including any query parameters that may be present.
This is important because I will be passing these two arguments as query parameters to our Appsmith application.
Integrate With The Telegram Bot
This brings me to my next stop, which is to implement some logic from the bot to help users who want to leave reviews access my application.
For this, I will send a message containing the link to our Appsmith application, along with the query parameters, which would contain the "ID" of the product they want to review and their user id on telegram (chat_id) to whoever is interacting with the bot.
“”Note: The code snippets shown below do not show the full implementation of my telegram bot; if you want to see how I built it, kindly refer to this article
Typically, when users come to the bot, they get multiple options when viewing products in a catalog, as shown below:
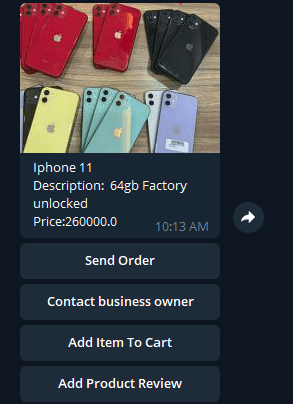
As observed I have added a last option which allows them to Add Product Review, in order to handle that I wrote a handler function that will send back a message containing the Appsmith URL with the product id and their chat_id in the URL as query parameters. Observe:
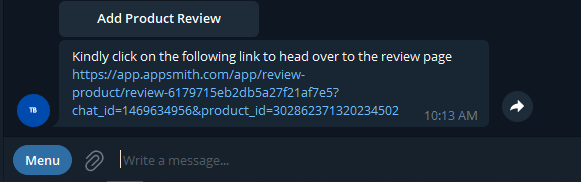
appsmith_url = "https://app.appsmith.com/app/review- product/review-6179715eb2db5a27f21af7e5"The appsmith_url variable holds the URL for our deployed Appsmith application, and contains no parameters, so opening that would just display a "bare" version of the interface we designed. However, notice how i append the ?chat_id={chat_id} option along with the product_id={product_id} option to the URL before sending it.
That way the user gets a response that's customized to include their personal id and the id of the product they wish to review. As such, when they click on the URL our Appsmith APIs will be able to fetch the data they need from the context object and react accordingly. Here's what a typical response from the bot looks like:
Now when they click the link, it'll take them to the Appsmith tool we created but this time with data loaded in, as shown below:
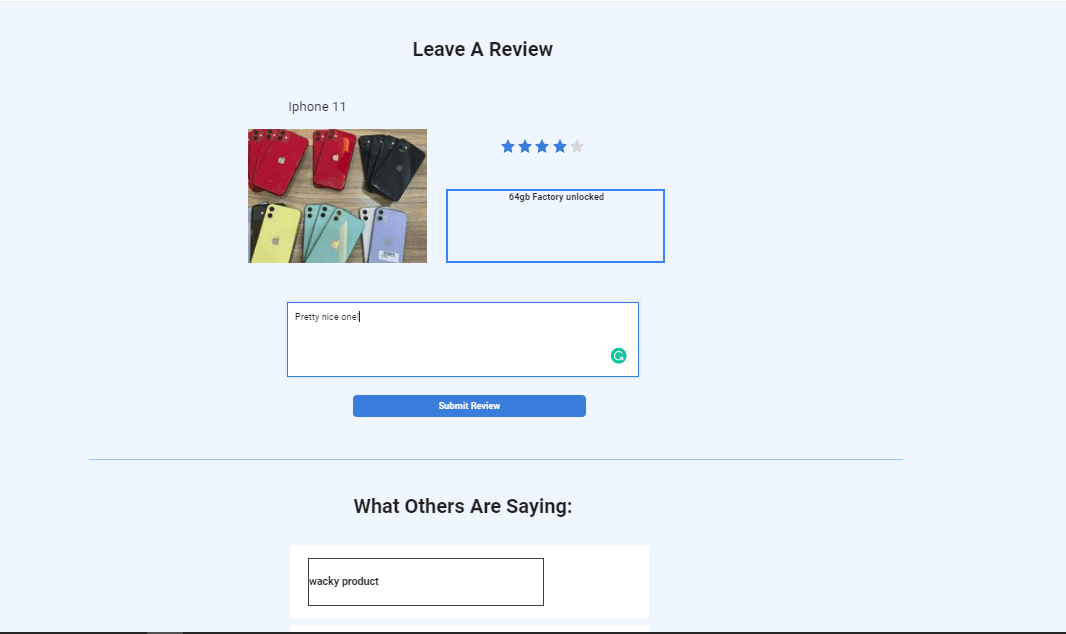
This way, my users can also leave comments on the products, and see reviews on the product, further increasing the trust that they have in the platform and in small-scale business ventures.
I hope you enjoyed reading that!, this article has shown you how to use the Appsmith context tool as well as how to send GraphQL queries on Appsmith, via the API editor, and ultimately how to build a simple product review tool for any use case you might have.
I invite you to use what you've learned from this article to build more interesting versions of what I have built or even different tools if you wish, rest assured everything you need to fast-track your development is available to you on Appsmith.com. If you wish to see the code base for my bot you can find it on GitHub here.


