Building a CRUD App using Box and Appsmith
Introduction
Appsmith offers a wide range of integrations that developers can use as a backend when building custom applications. You can easily connect to any REST or GraphQL API, MongoDB, Postgres, MySQL, Google Sheets, Airtable, and several other databases. But what about file storage?
Box.com, a cloud-based content management and collaboration platform, has a robust API with tons of advanced features like password protected file links, watermarks, file versioning, tasks, webhooks, and more.
In this guide, we will show you how to integrate Appsmith with the Box API, and build a CRUD app to interact with your Box files. We’ll cover using both a developer token and OAuth2.0 authentication methods. From there, you can connect to any of the other Box endpoints to build your own custom UI and workflows using data from your Box account.
This gives Appsmith developers a new option for file storage to use with their apps, and also enables Box users to integrate their files with other APIs and databases through Appsmith.
But before you can begin connecting Appsmith to the Box API, you first need to create a new application in your Box account.
Application Configuration in Box
Start out by creating a sandbox to develop your code in. You can find instructions on how to setup a sandbox here. After that, you can login to the Box Developer Console to set up an application.
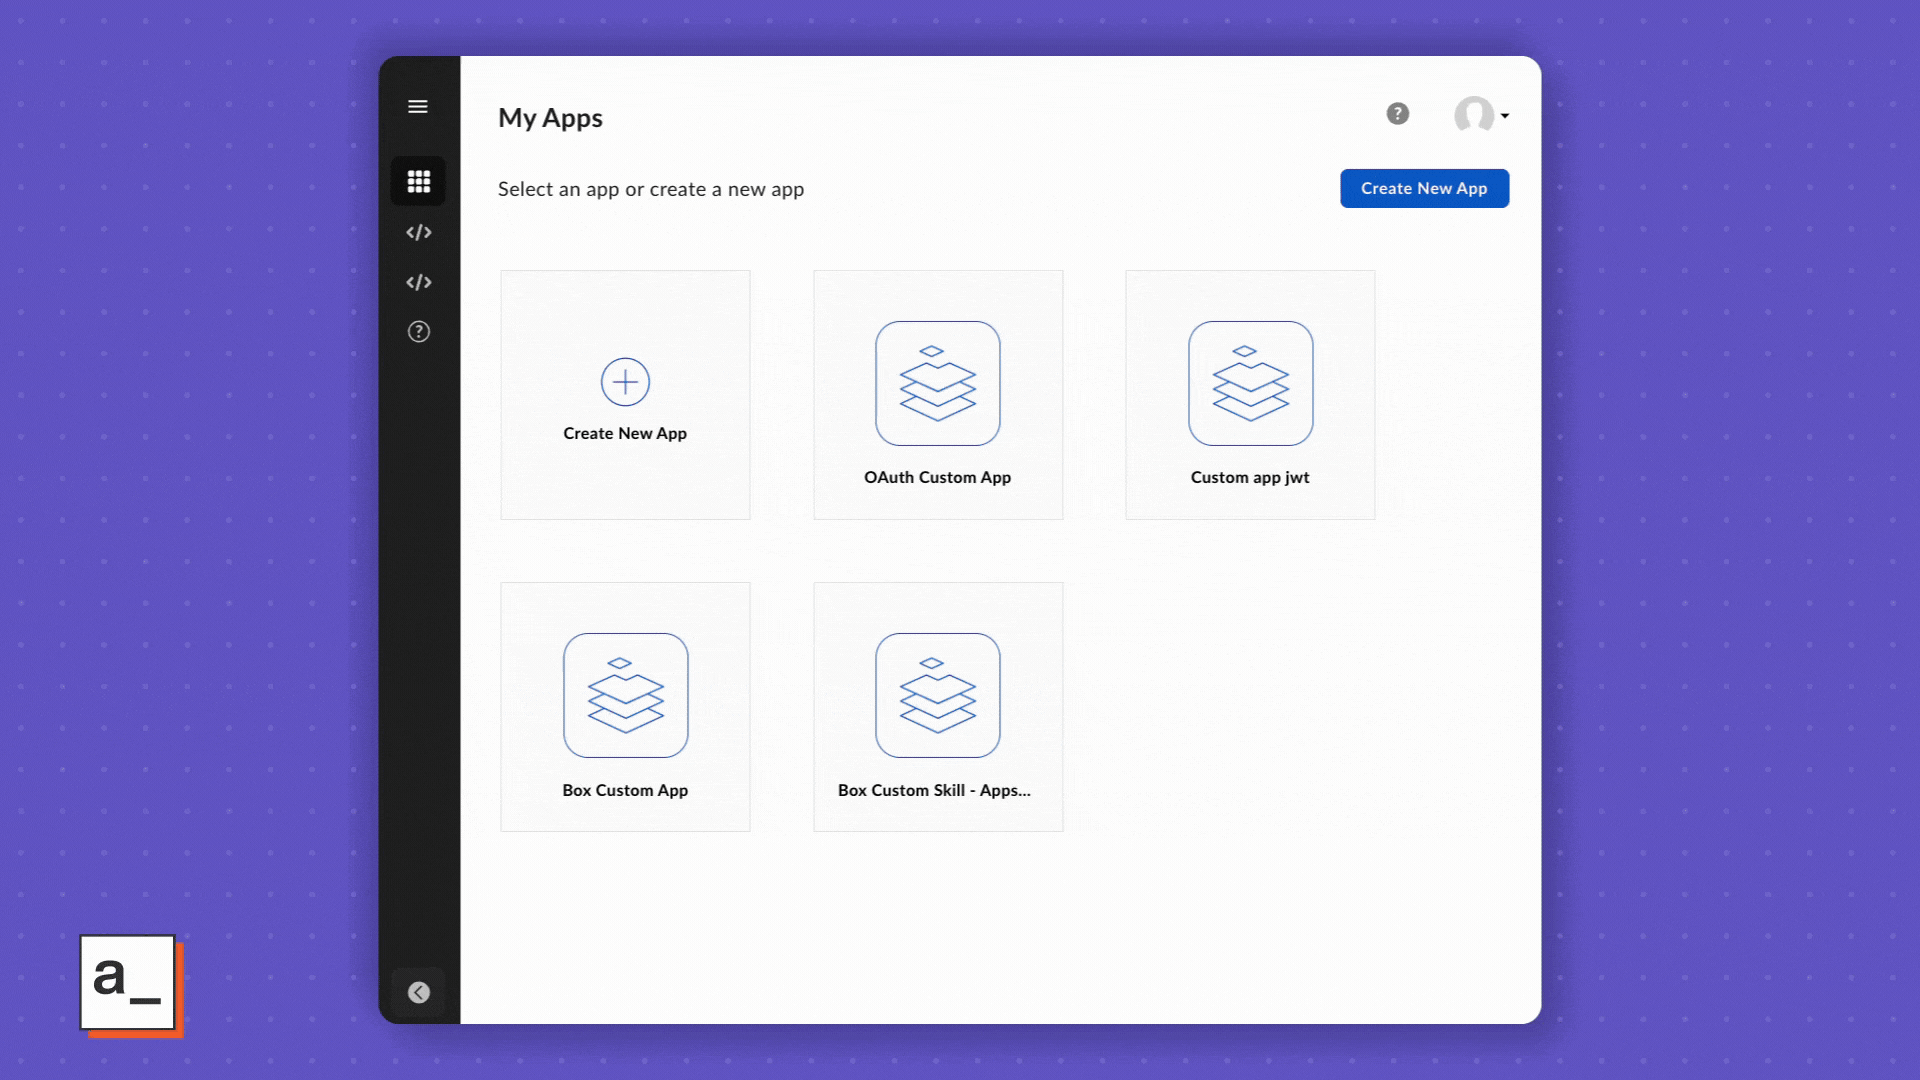
Click on My Apps, and then Create New App
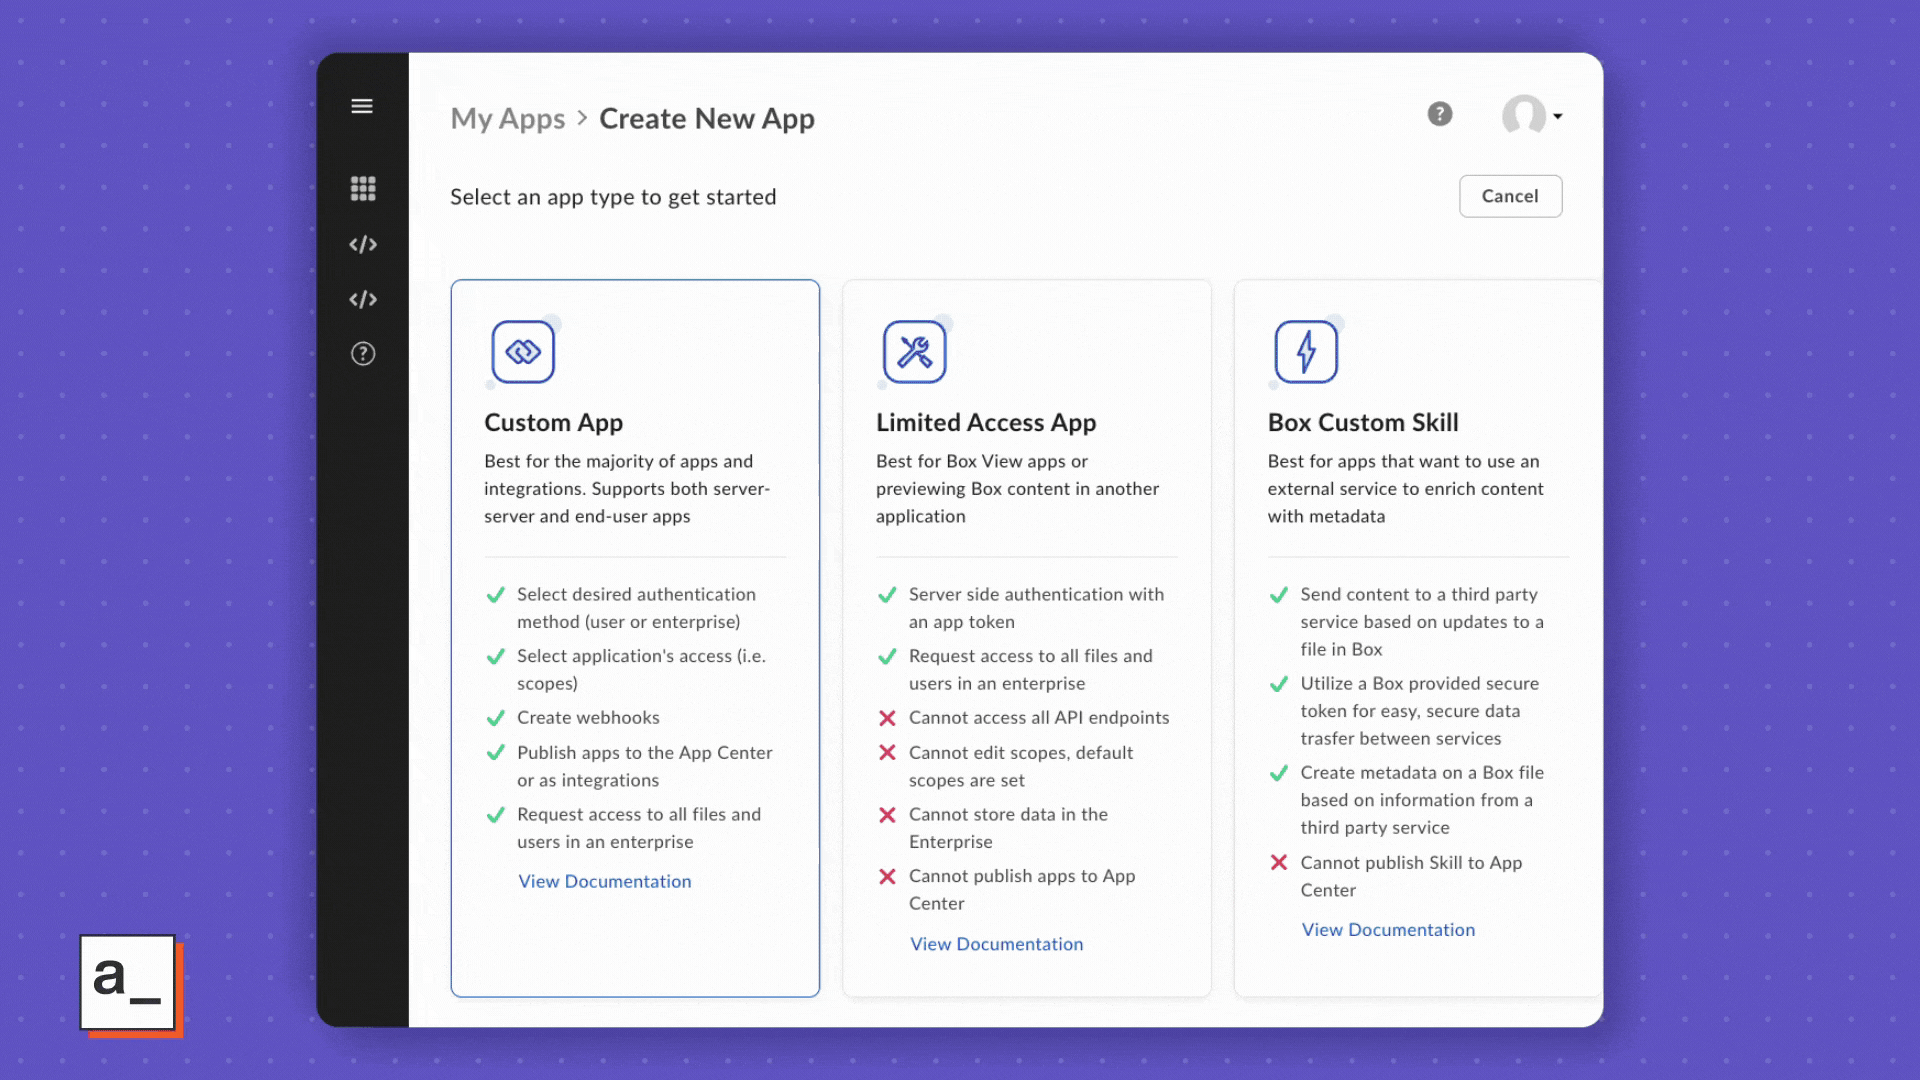
Select Custom App
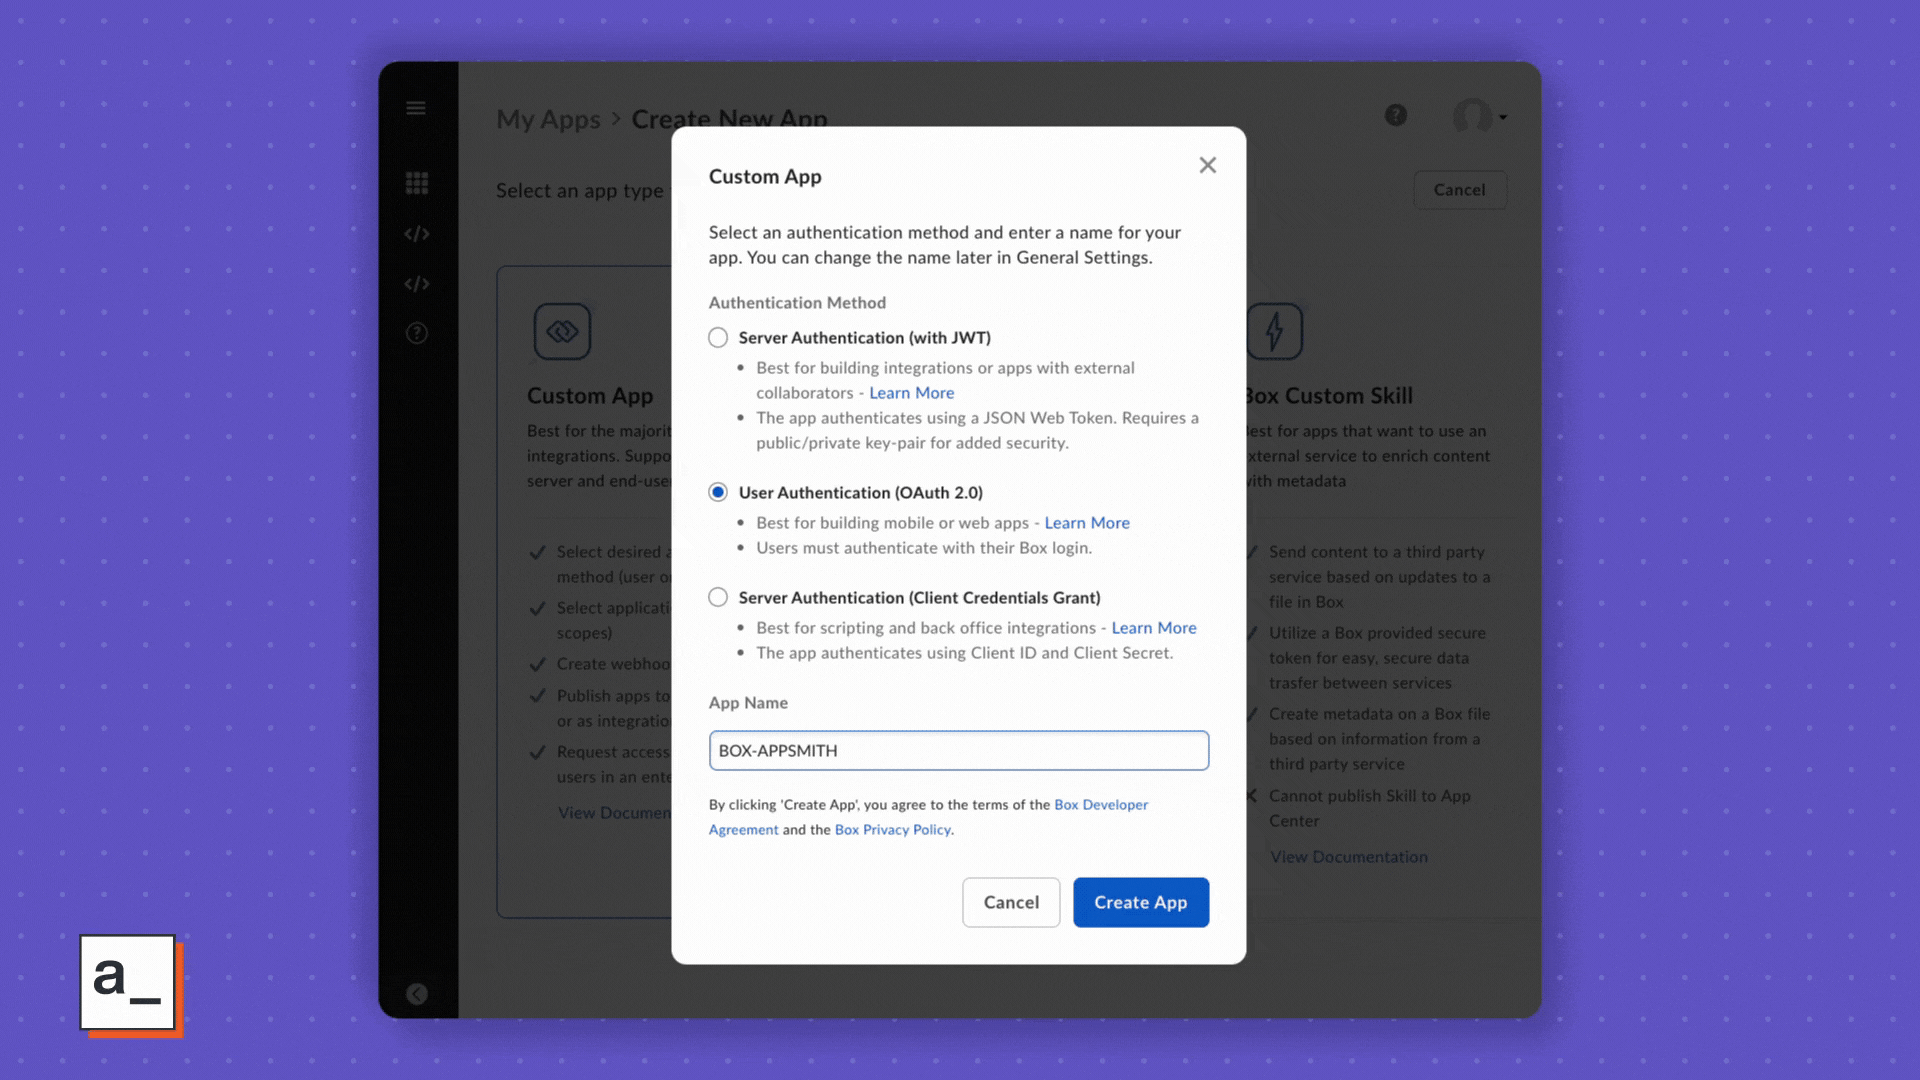
Select User Authentication (OAuth 2.0)
Enter the name of your app and press Create App
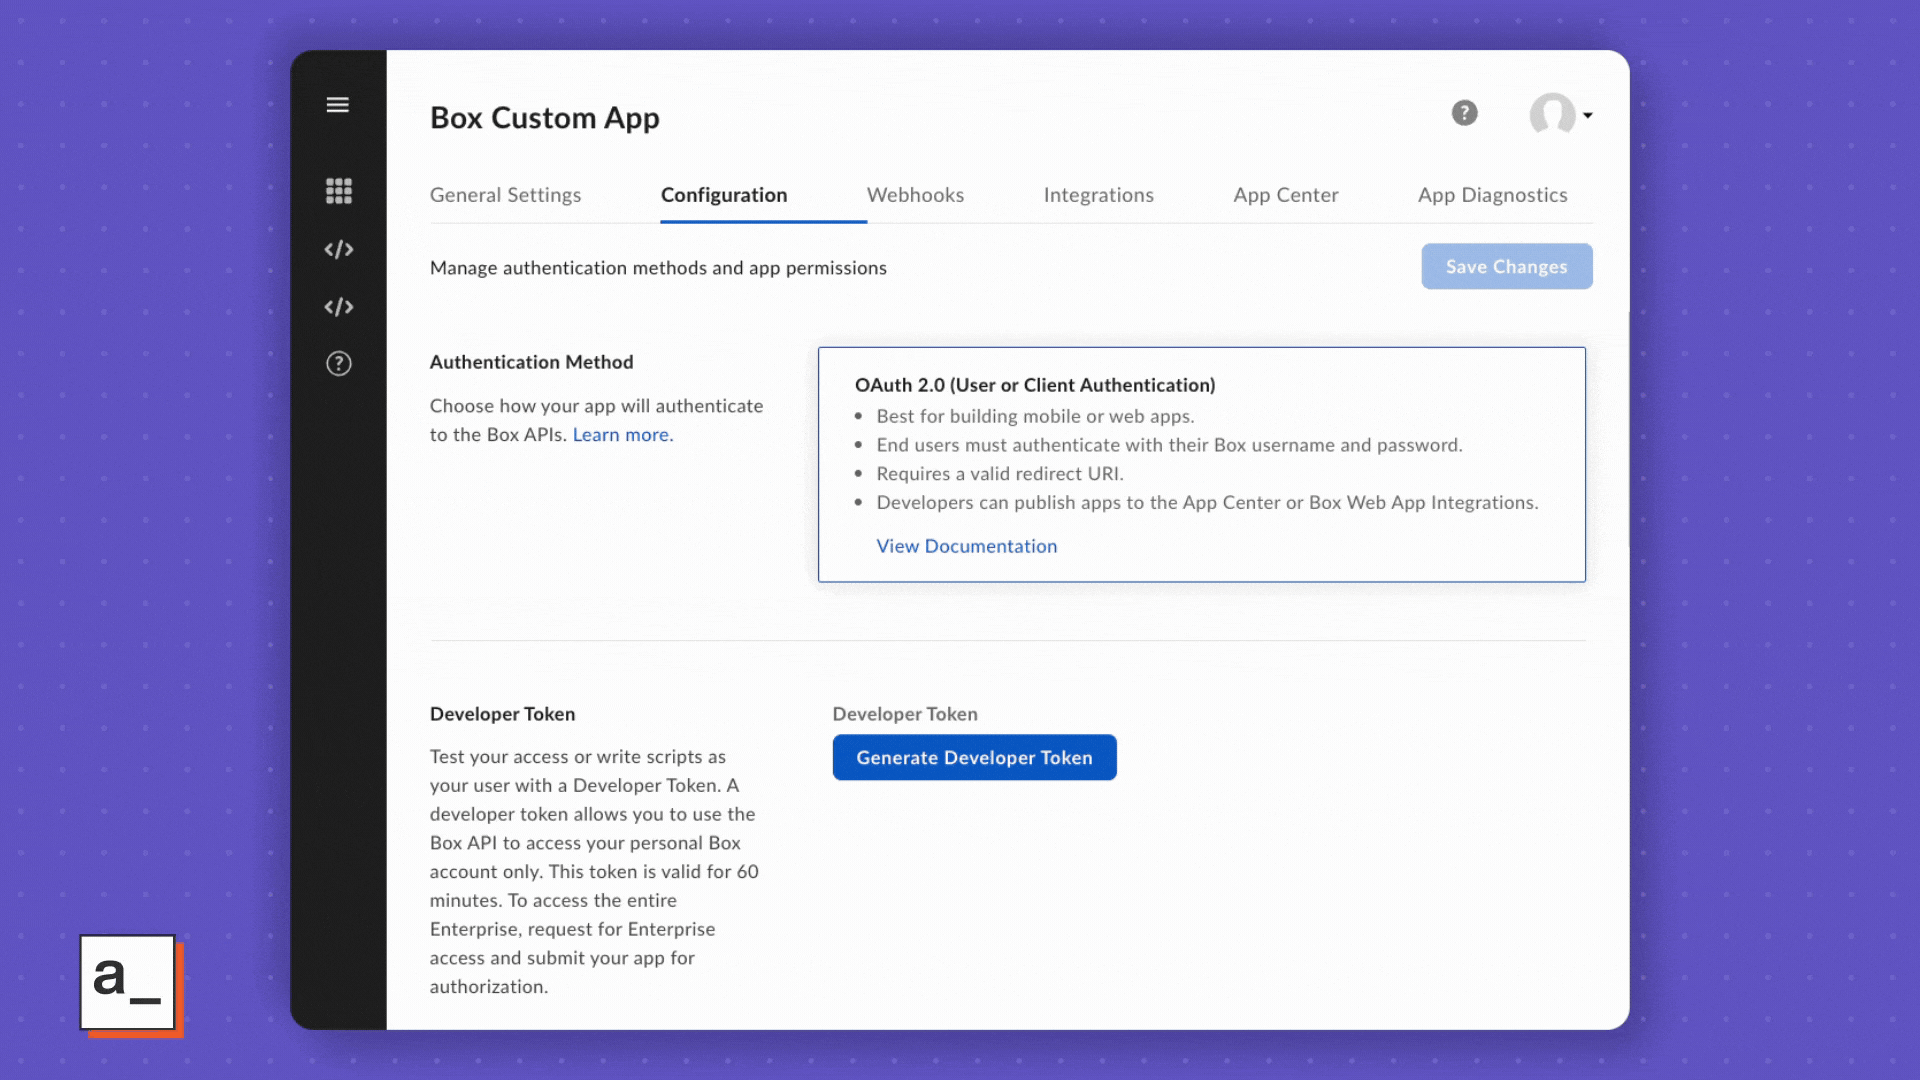
Additional configuration
In OAuth 2.0 Redirect URI add a new URI and enter the Appsmith URI:
https://app.appsmith.com/api/v1/datasources/authorizeIn Application Scopes select: Write all files and folders stored in Box
Click Save Changes
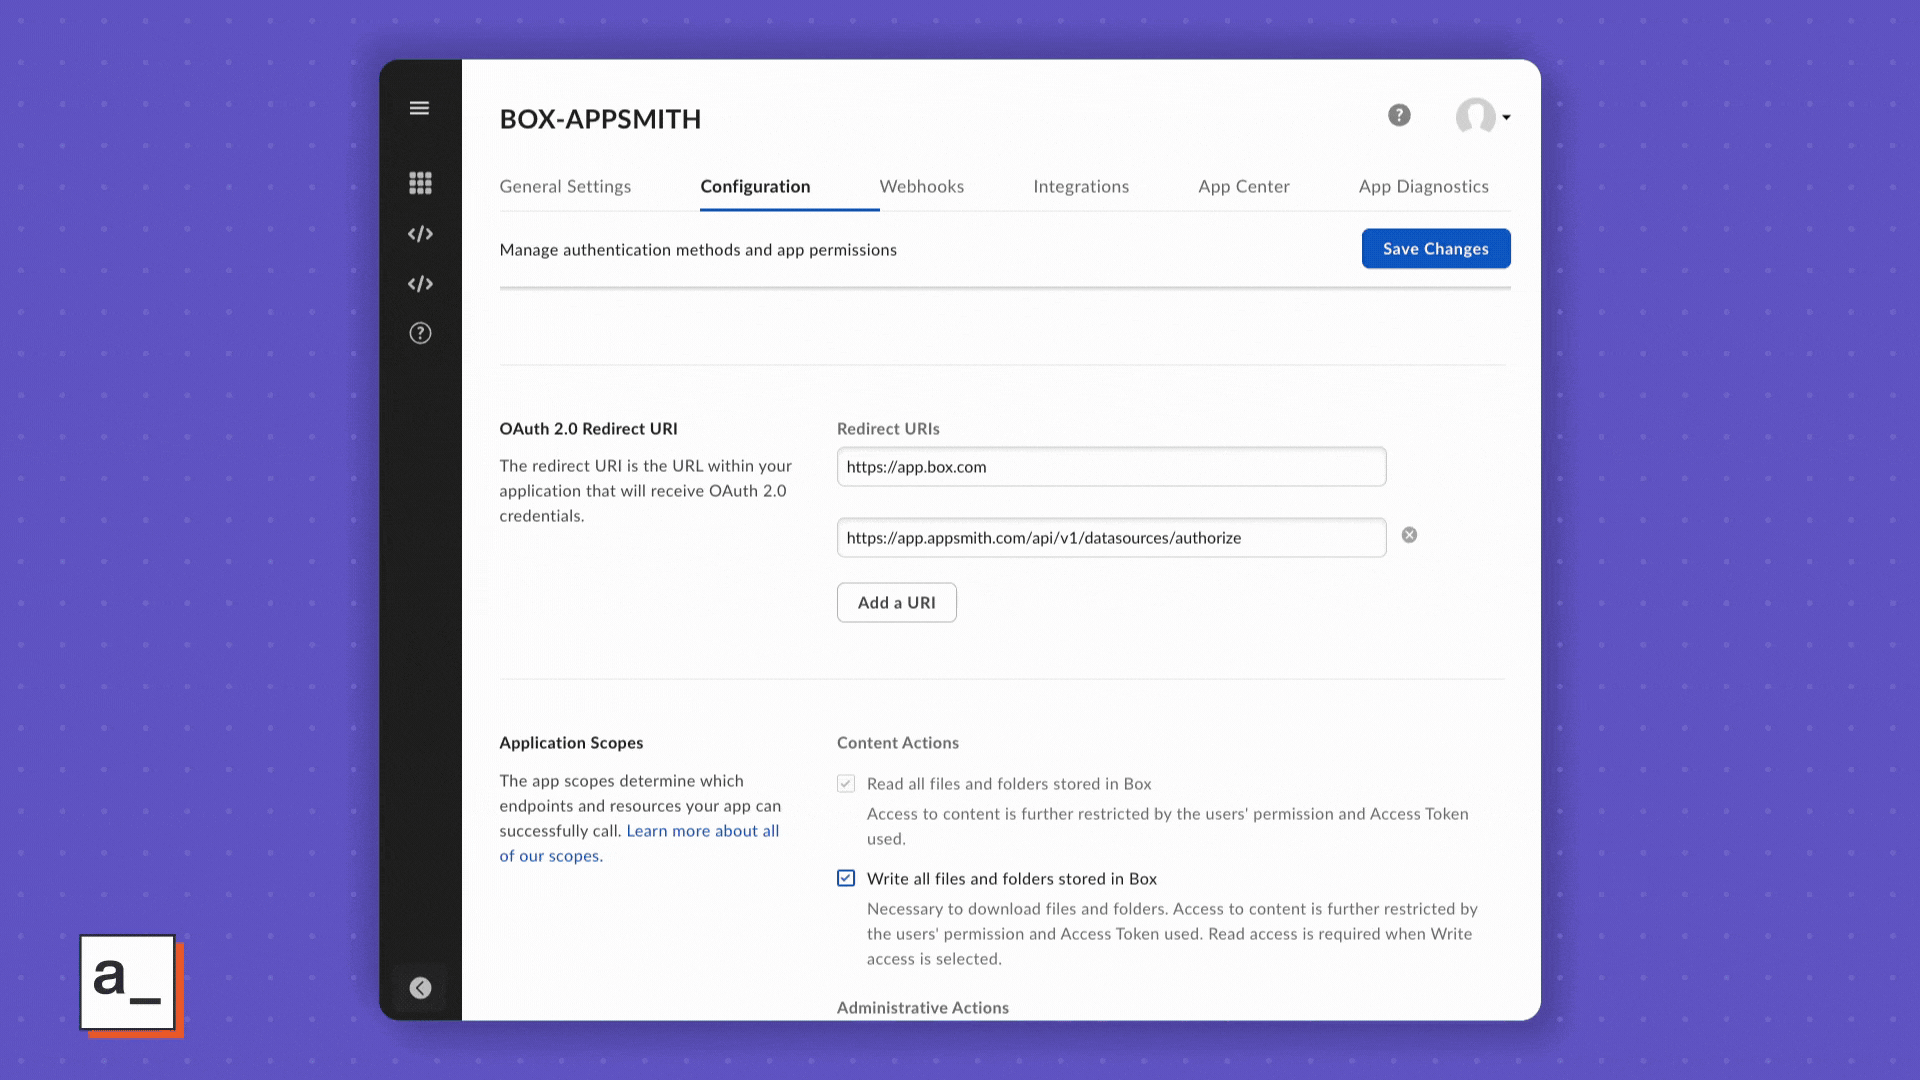
This configuration will allow other applications (like Appsmith) to request access tokens, then make API calls to your Box account using that token.
Building a CRUD app in Appsmith
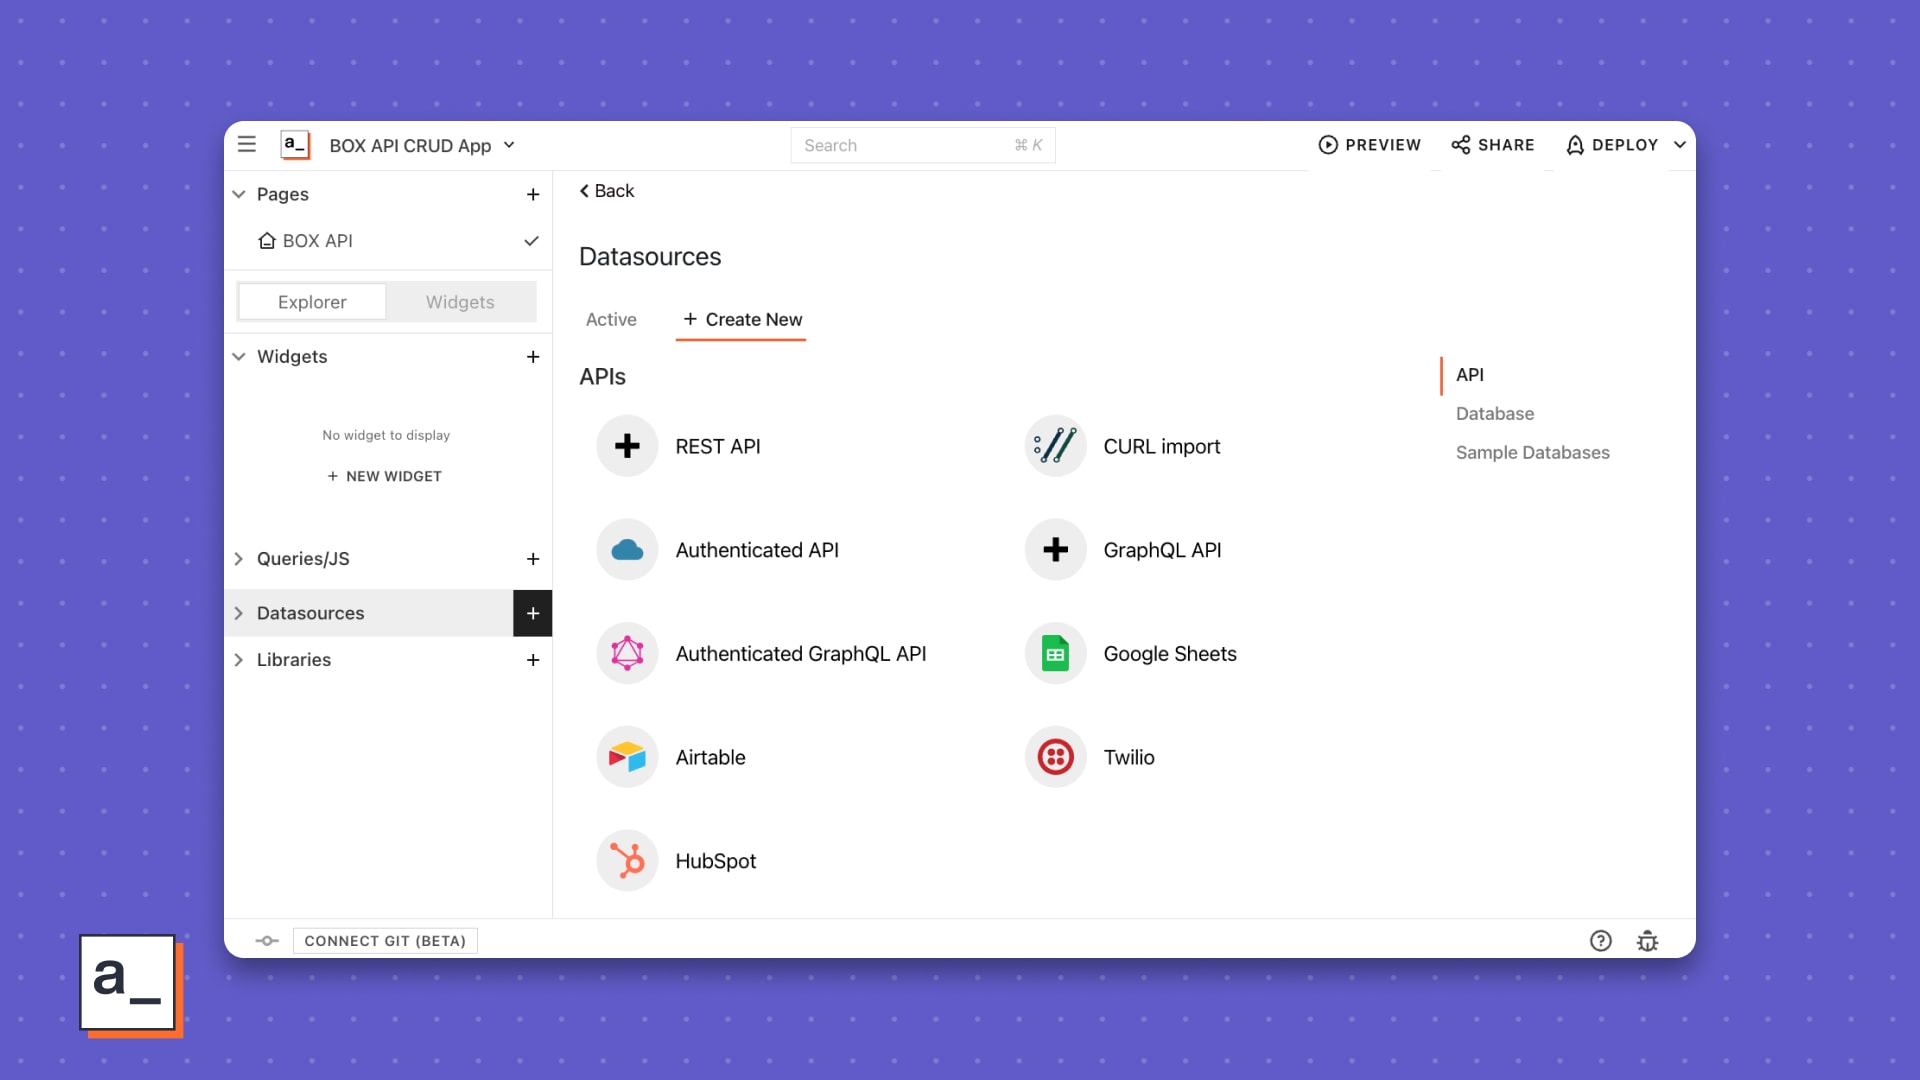
With the Box API enabled, we can set up a datasource in Appsmith and start building a CRUD app. Head over to Appsmith and navigate to your Apps page. We’ll start by creating a new app and adding a datasource.
Authenticated APIs
Appsmith offers four types of API connections: (regular) REST and GraphQL APIs, and Authenticated REST and GraphQL APIs. The authenticated versions save the credentials on the Appsmith server as a Datasource. This makes it easier to re-use the credentials in different APIs, and also is more secure because the credentials are no longer needed on the client-side.
Additionally, by setting up an Authenticated API, the Appsmith server will handle the OAuth flow and keep the token refreshed. It’s a little more setup to create a datasource first, but well worth the effort!
Create an Authenticated API Datasource
Click Datasources [+] on the left sidebar, then choose Authenticated API
Set the configuration parameters as follows:
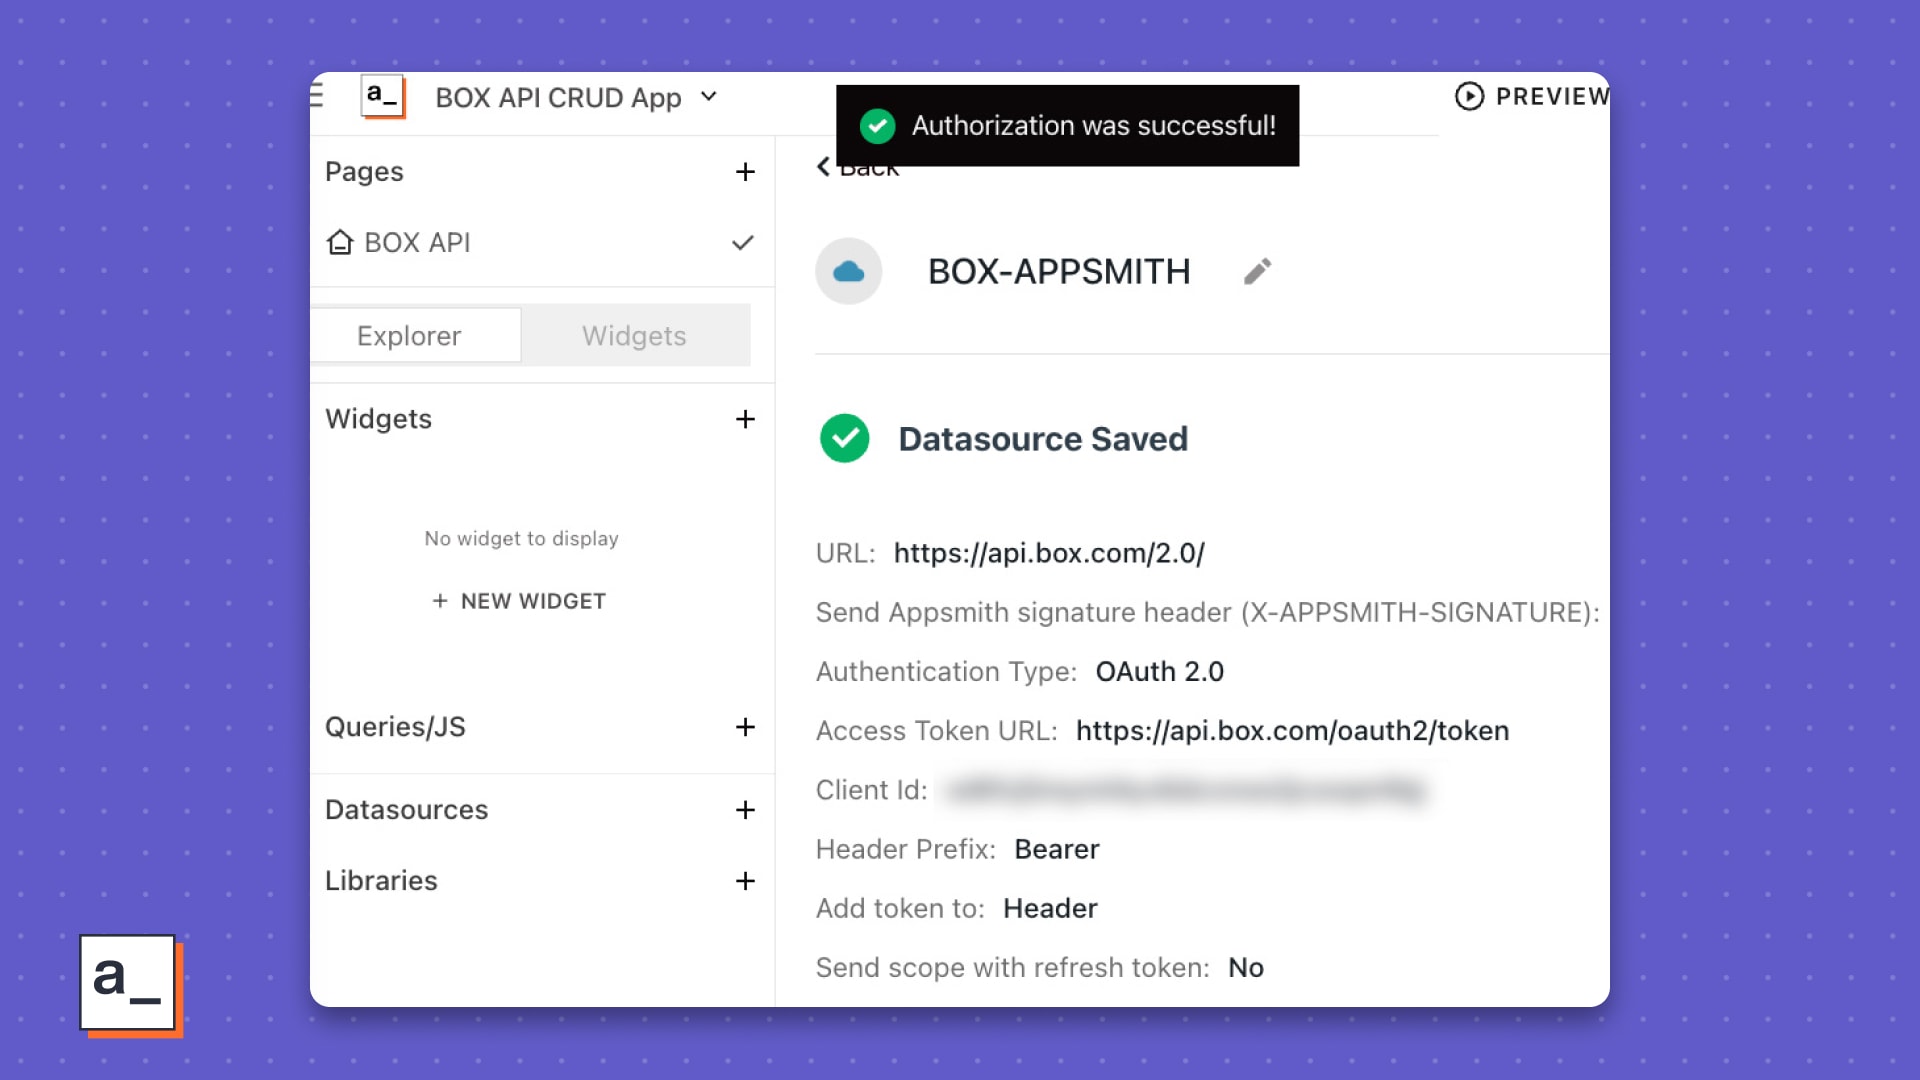
URL: https://api.box.com/2.0/
Authentication Type: OAuth 2.0
Grant Type: Authorization Code
Add Access Token To: Request Header
Access Token URL: https://api.box.com/oauth2/token
Client ID: <<your_client_id>>
Client Secret: <<your_client_secret>>
Authorization URL: https://account.box.com/api/oauth2/authorize
Click the Authorize button, and you should be redirected to grant access to your Box account.
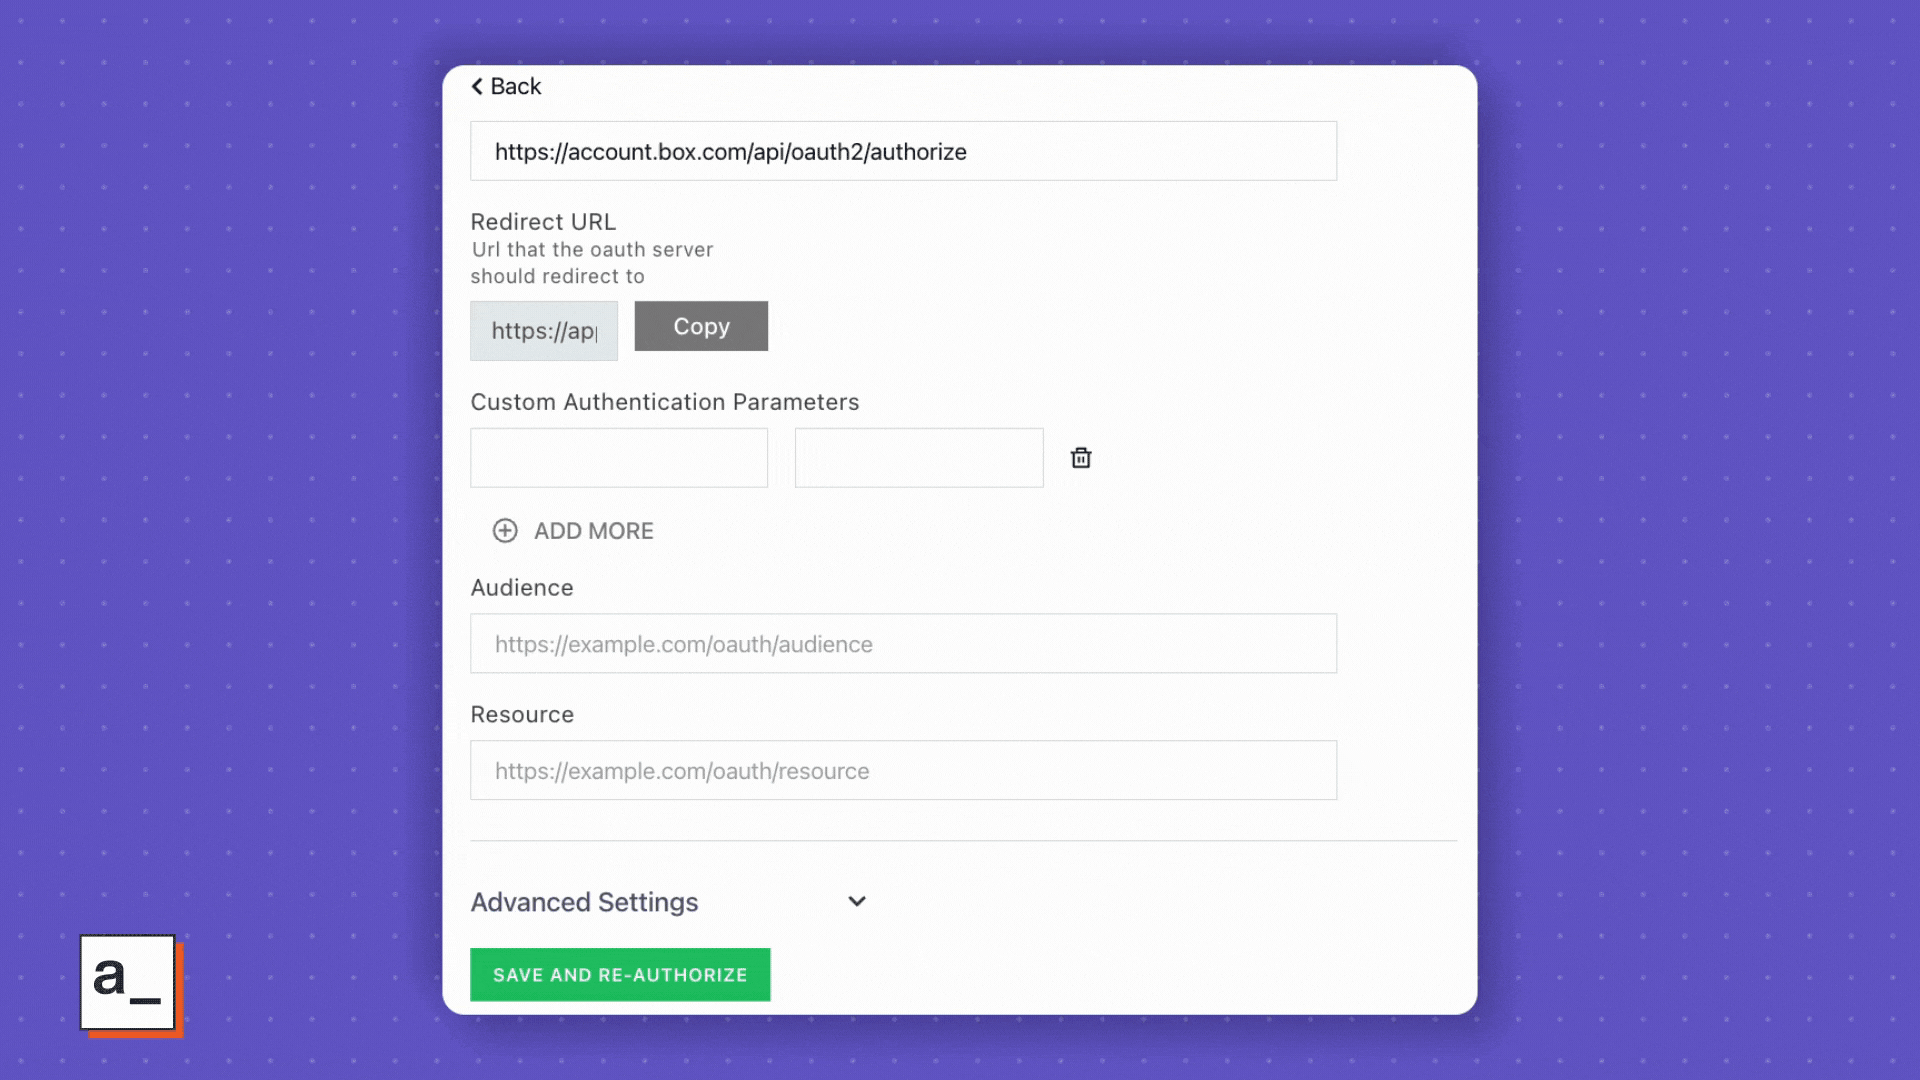
If everything is configured correctly, you should be redirected back to the new datasource in Appsmith, and see a message showing the Authorization was successful!
NOTE: If you don’t see the BOX access grant screen, check the Access Token URL in the Box application configuration. And if the access grant works but you don’t get redirected back to Appsmith, check the Redirect URI.
Occasionally, you may receive a message that says "something went wrong." Just authorize the data source again.
Connecting with a Developer Token
Although the Authenticated API is more secure, sometimes you may just want to do a quick test and see an API response in Appsmith, instead of configuring a datasource first. For this, you can use Appsmith’s curl importer, and a temporary developer token from your Box account.
NOTE: You can skip this section if using the Authenticated API Datasource.
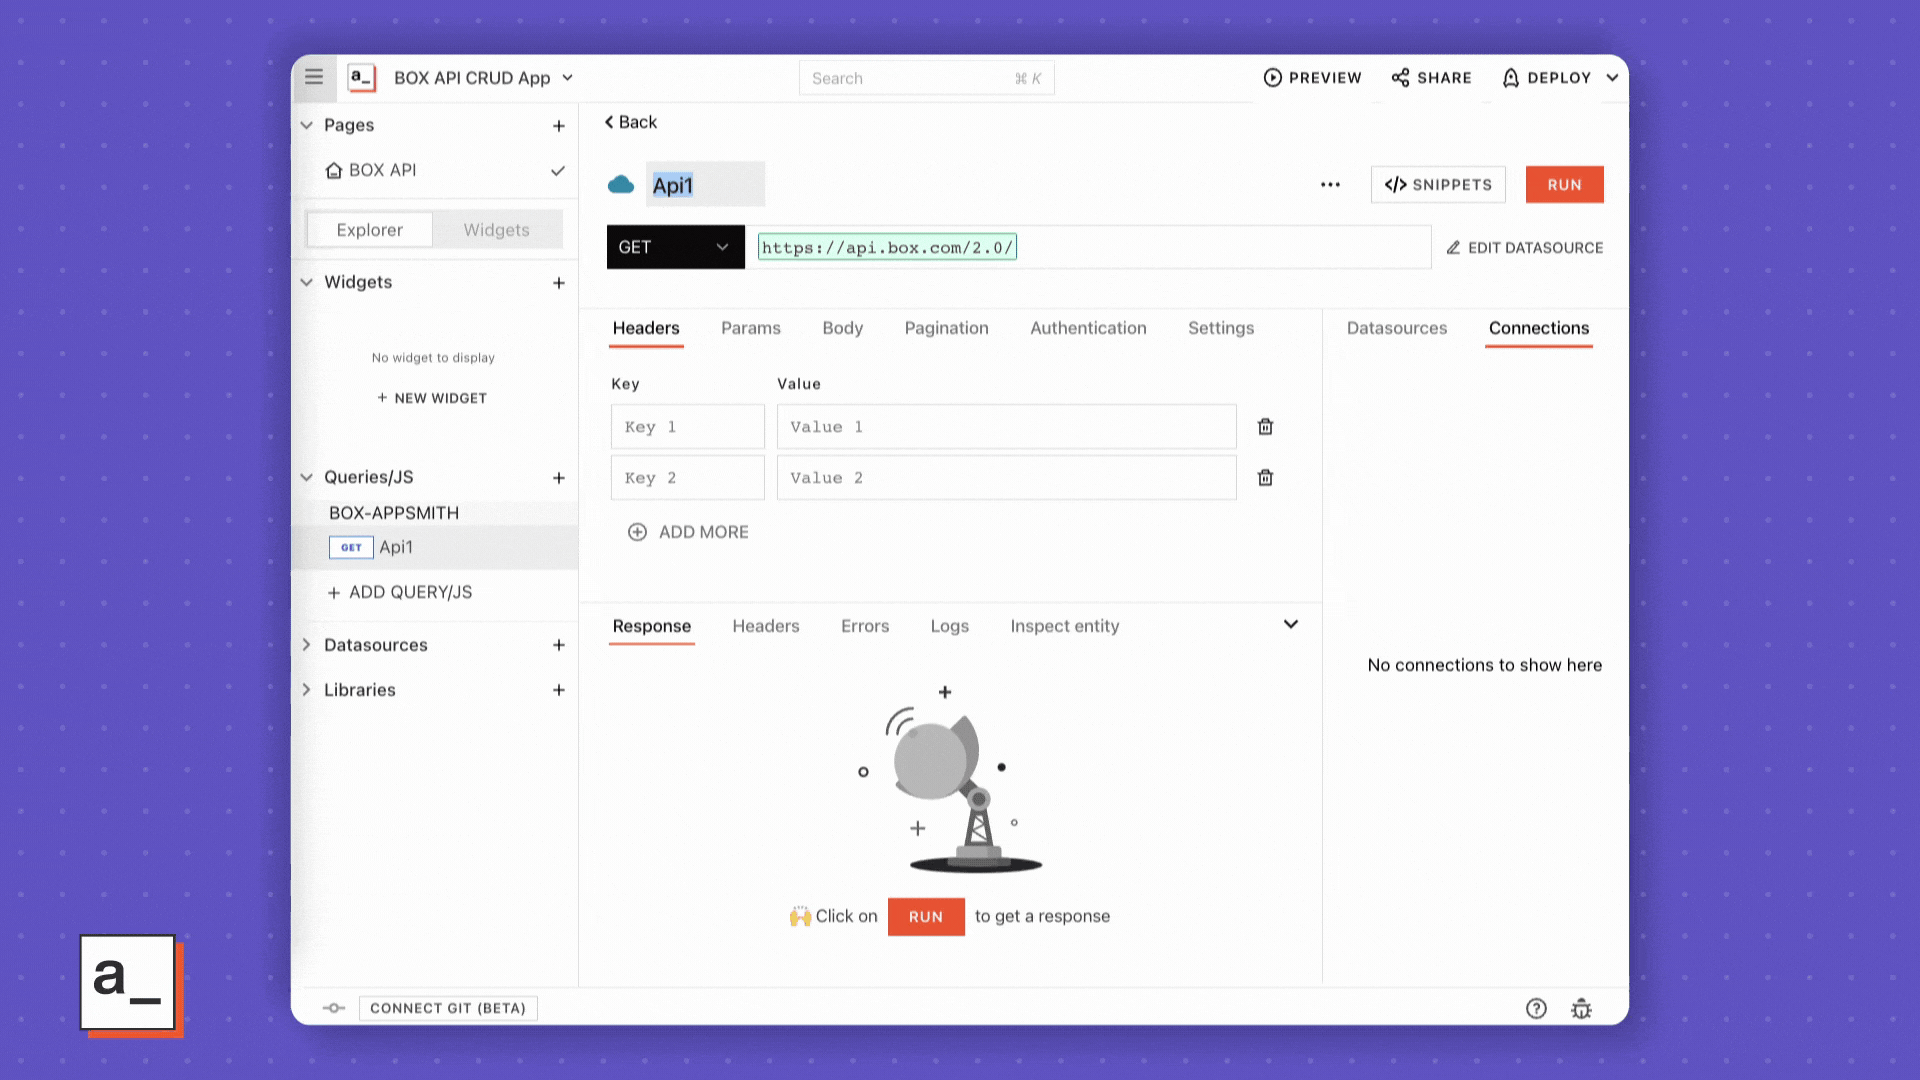
To connect with a developer token, add a new API using the CURL Import:
curl https://api.box.com/2.0/folders/0 -H "Authorization: Bearer <<Token>>" -H "Content-Type: application/json"Then just update the Authorization Header with your token from Box. This will let you quickly test an API without creating a datasource first.
You can create a temporary developer token in your Box Application’s Configuration settings
NOTE:
Box developer tokens are only valid for 60 minutes
The remainder of this post will focus on the more secure, Authenticated API datasource established earlier
Now that we have connected Box to Appsmith, we can begin performing CRUD operations on our files.
CRUD Operations with Box
Start by adding a new API under the BOX-APPSMITH datasource. Note how the URL is prefilled with the Box API address, so you only have to type in the endpoint now. The saved datasource will also add the authentication headers and handle refreshing the token.
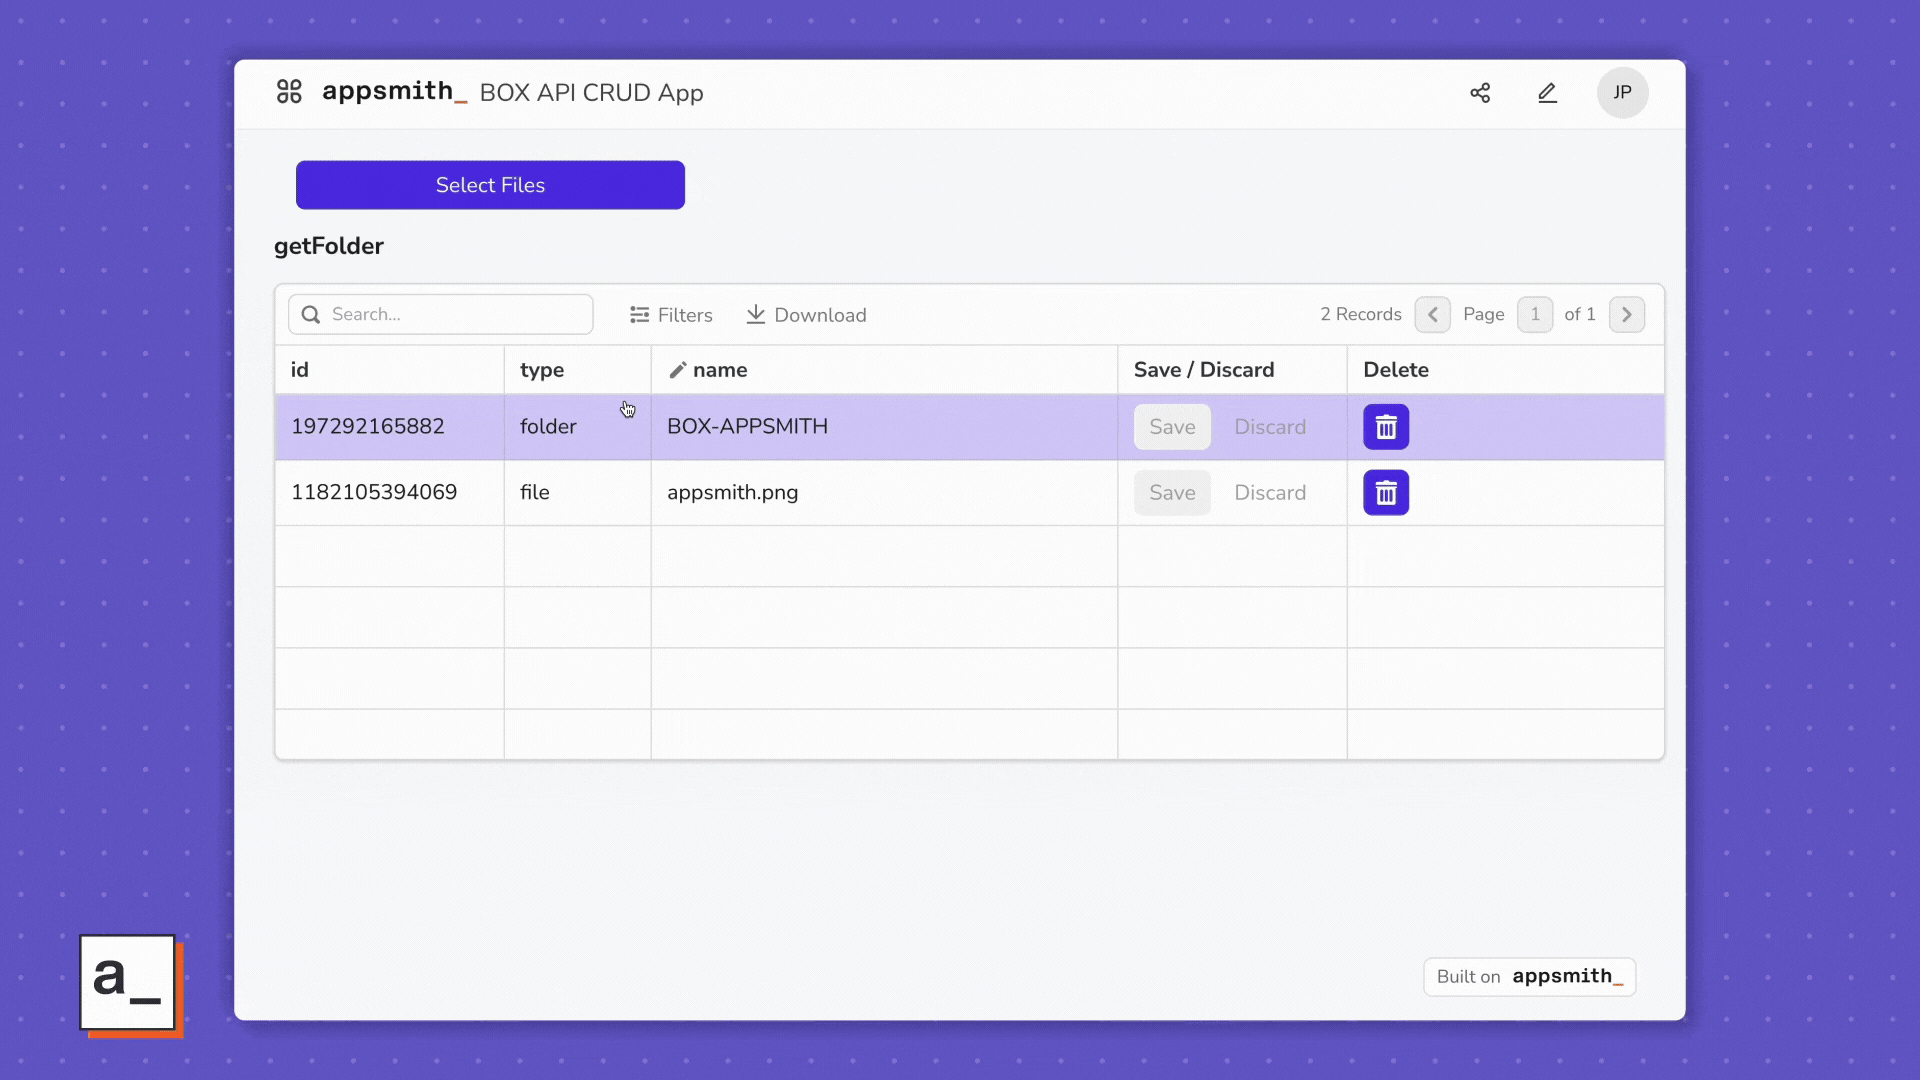
Get Folder
https://developer.box.com/reference/resources/folder/
Rename the API to getFolder
Update the URL with the endpoint:
/folders/0Click RUN
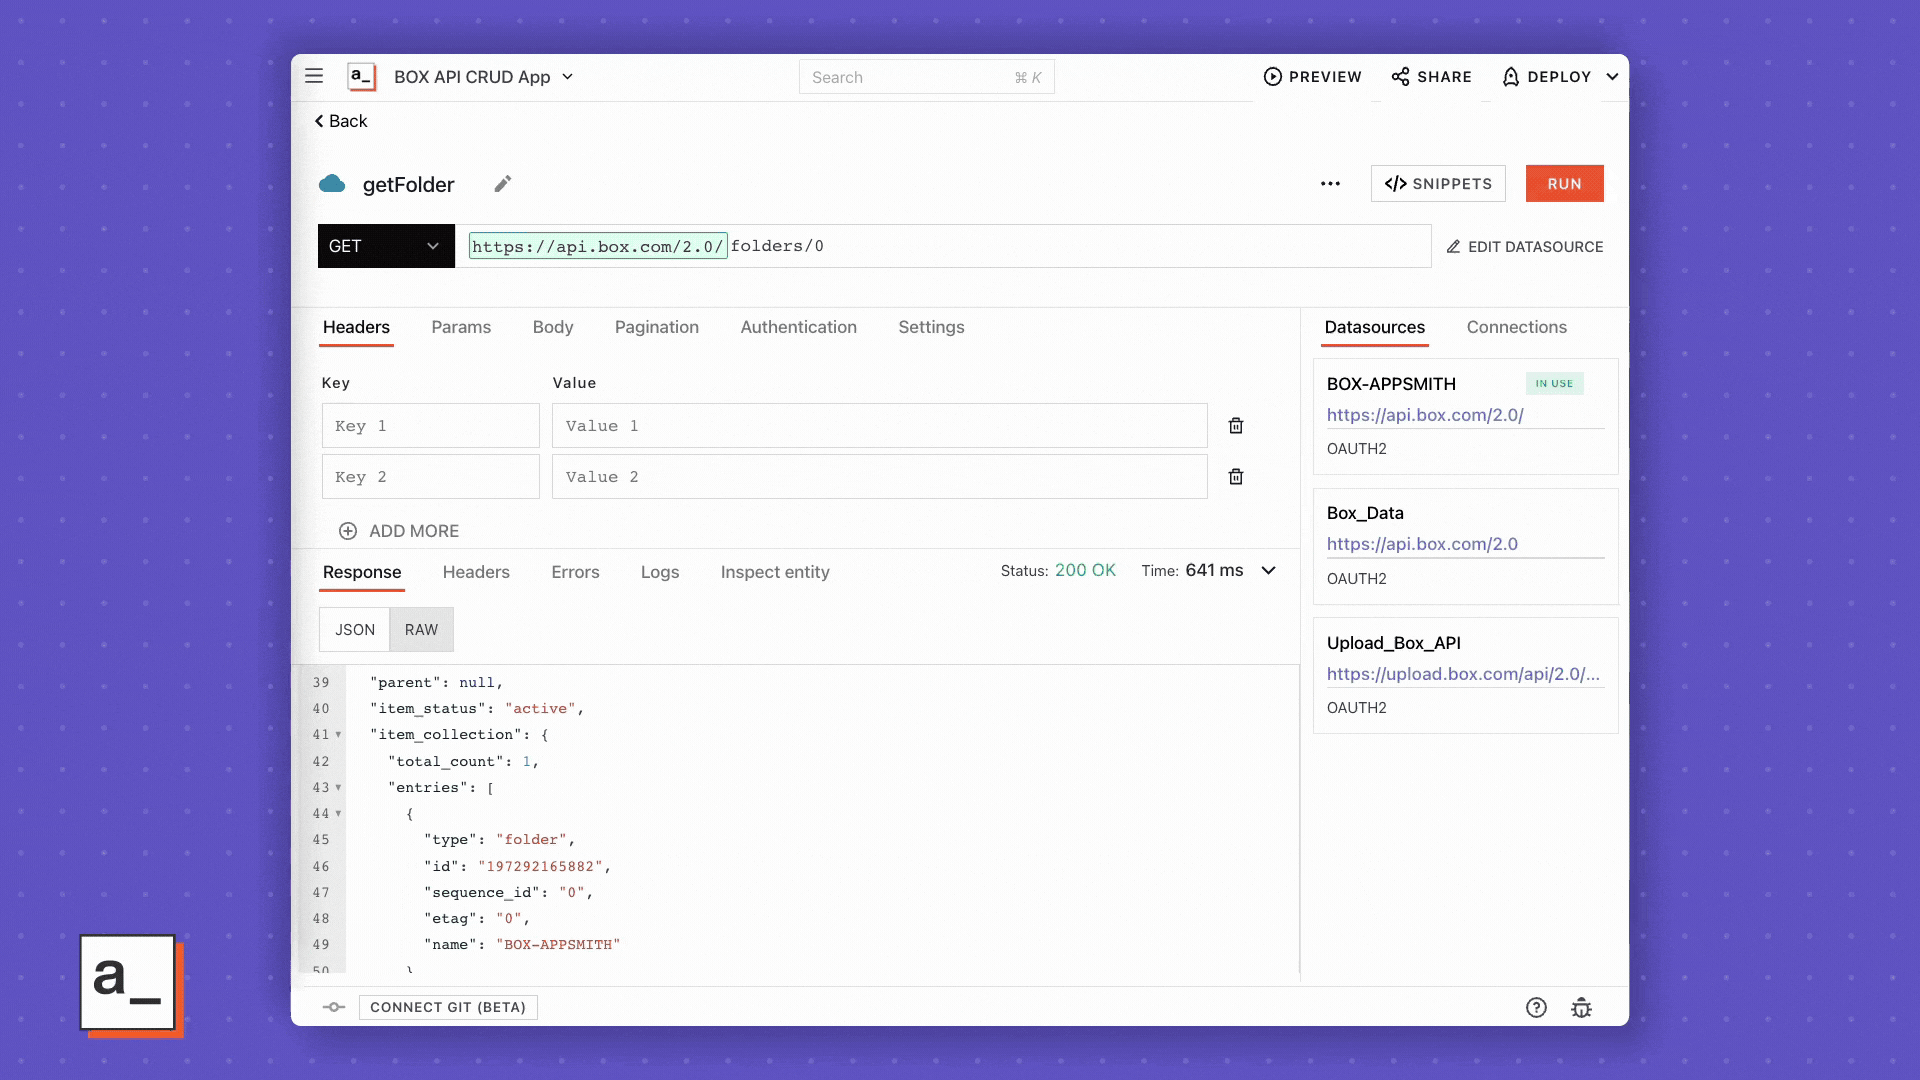
You should get back a response with an item_collection.entries property, containing an array of folders and files.
NOTE: The zero in the folder path denotes the root folder of your Box account.
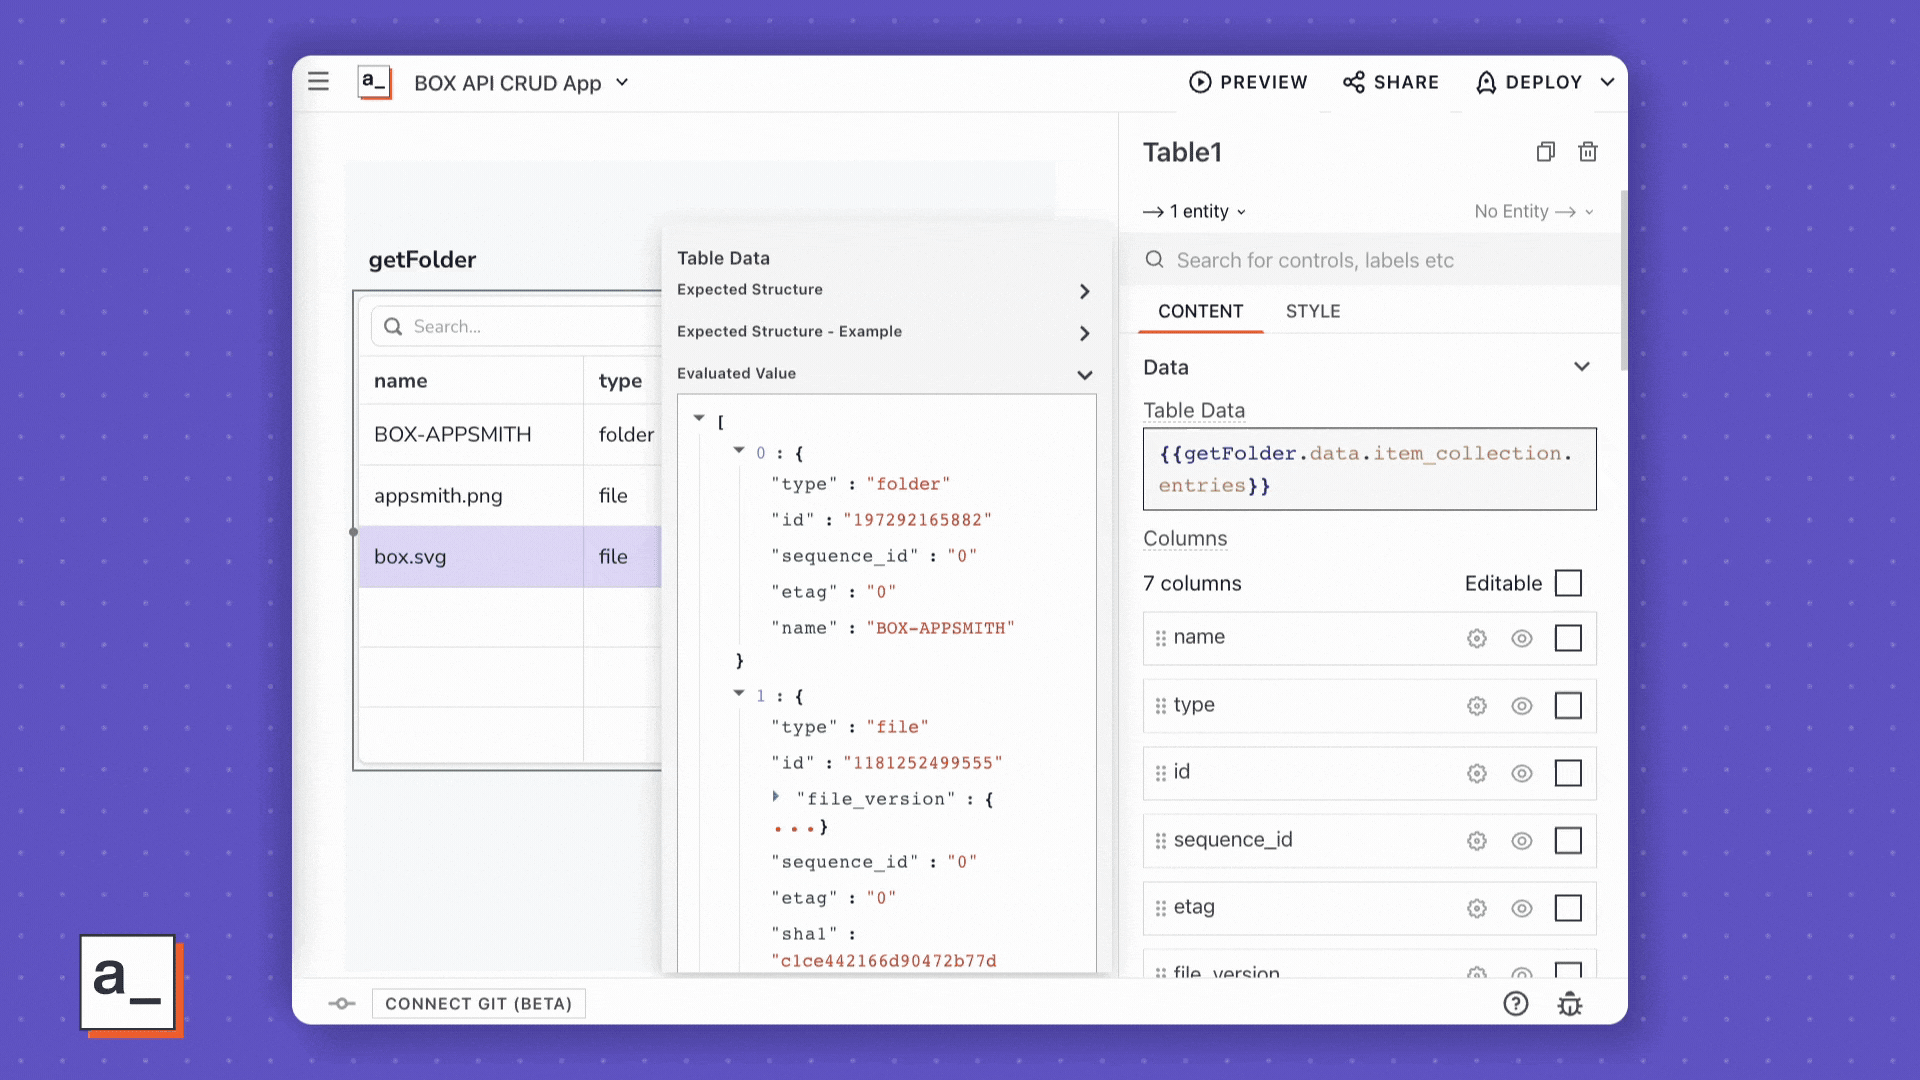
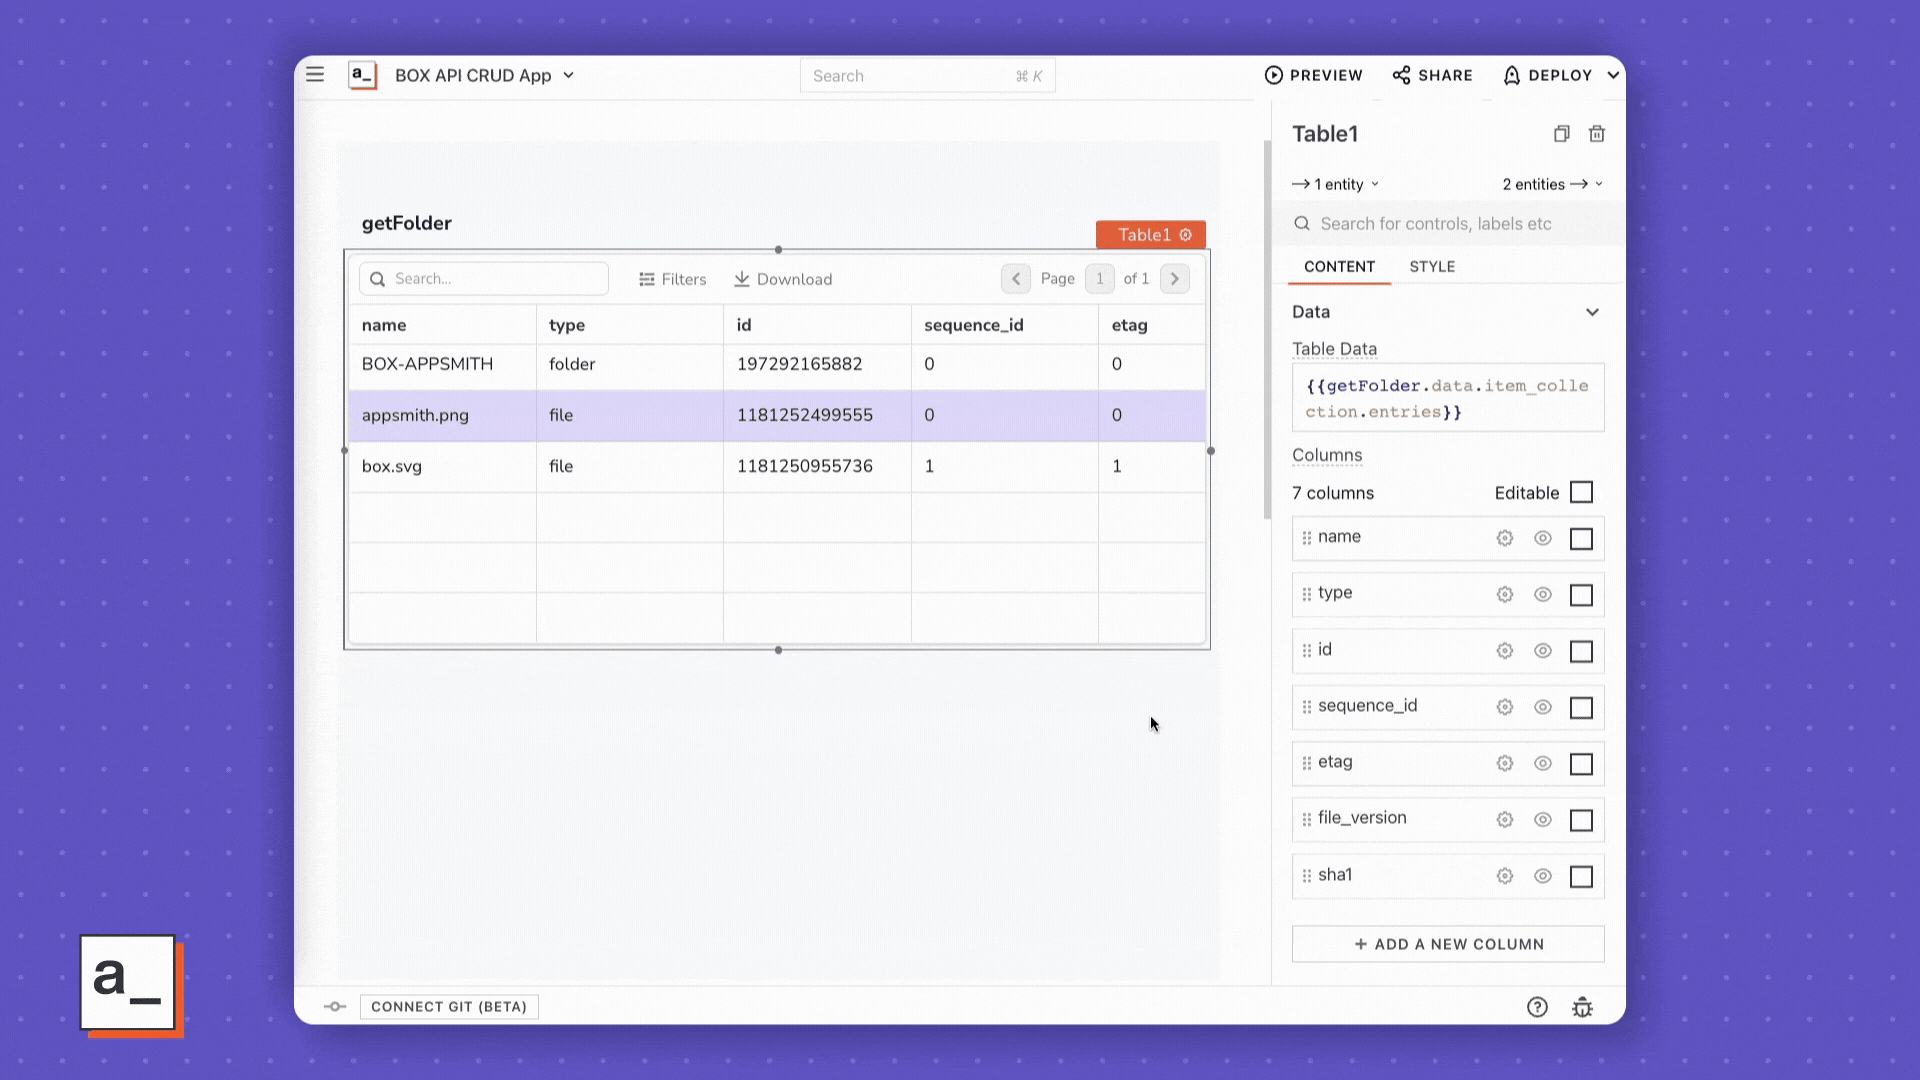
Connecting an API response to a widget
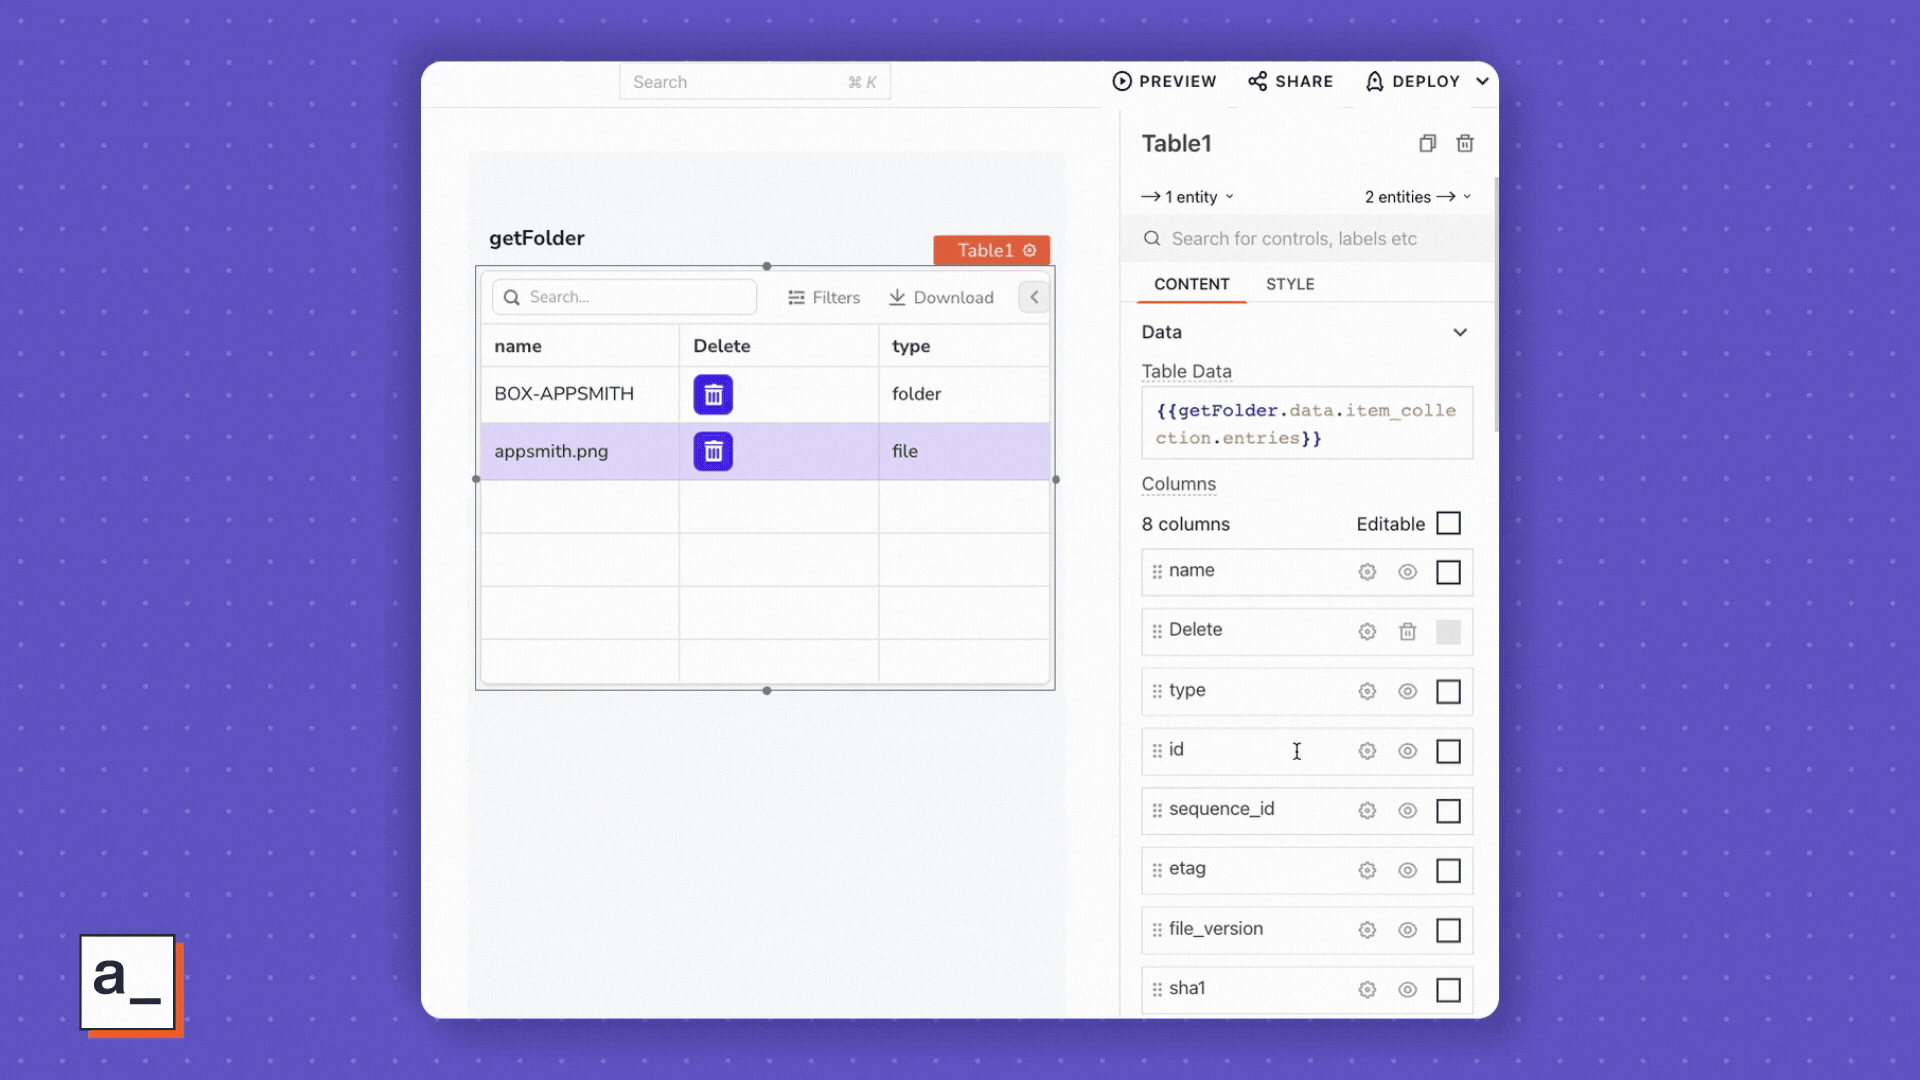
Next, add a Table widget to view the response from the /folders endpoint.
In the Table Data property, enter {{getFolder.data?.item_collection?.entries}}.
Get Files
https://developer.box.com/reference/get-files-id/
This endpoint can be used to download a file, instead of just listing files like the /folders endpoint.
Add another API under the Box datasource, and set the URL to files/{{Table1.selectedRow.id}}.
Run the API and you should get back a response with the selected file.
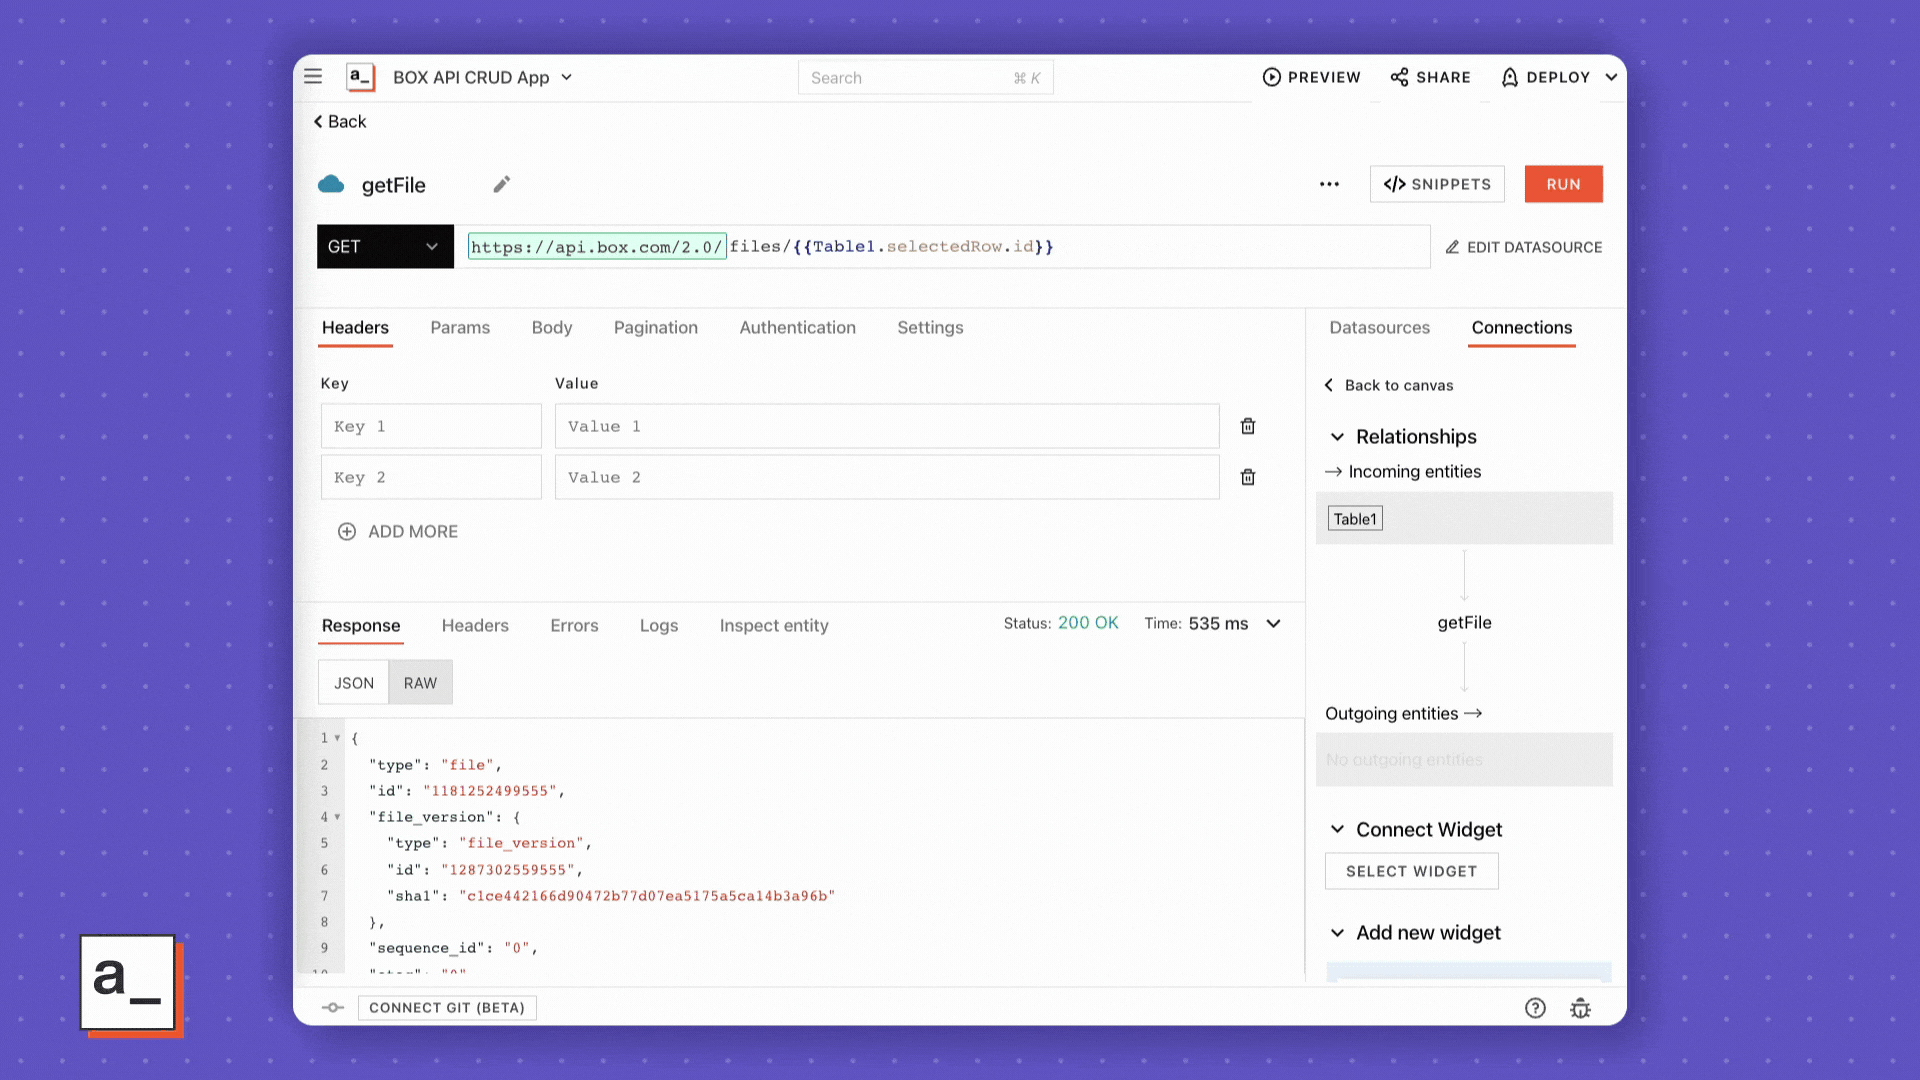
NOTE: this API will return a 400 response if the selected row is a folder
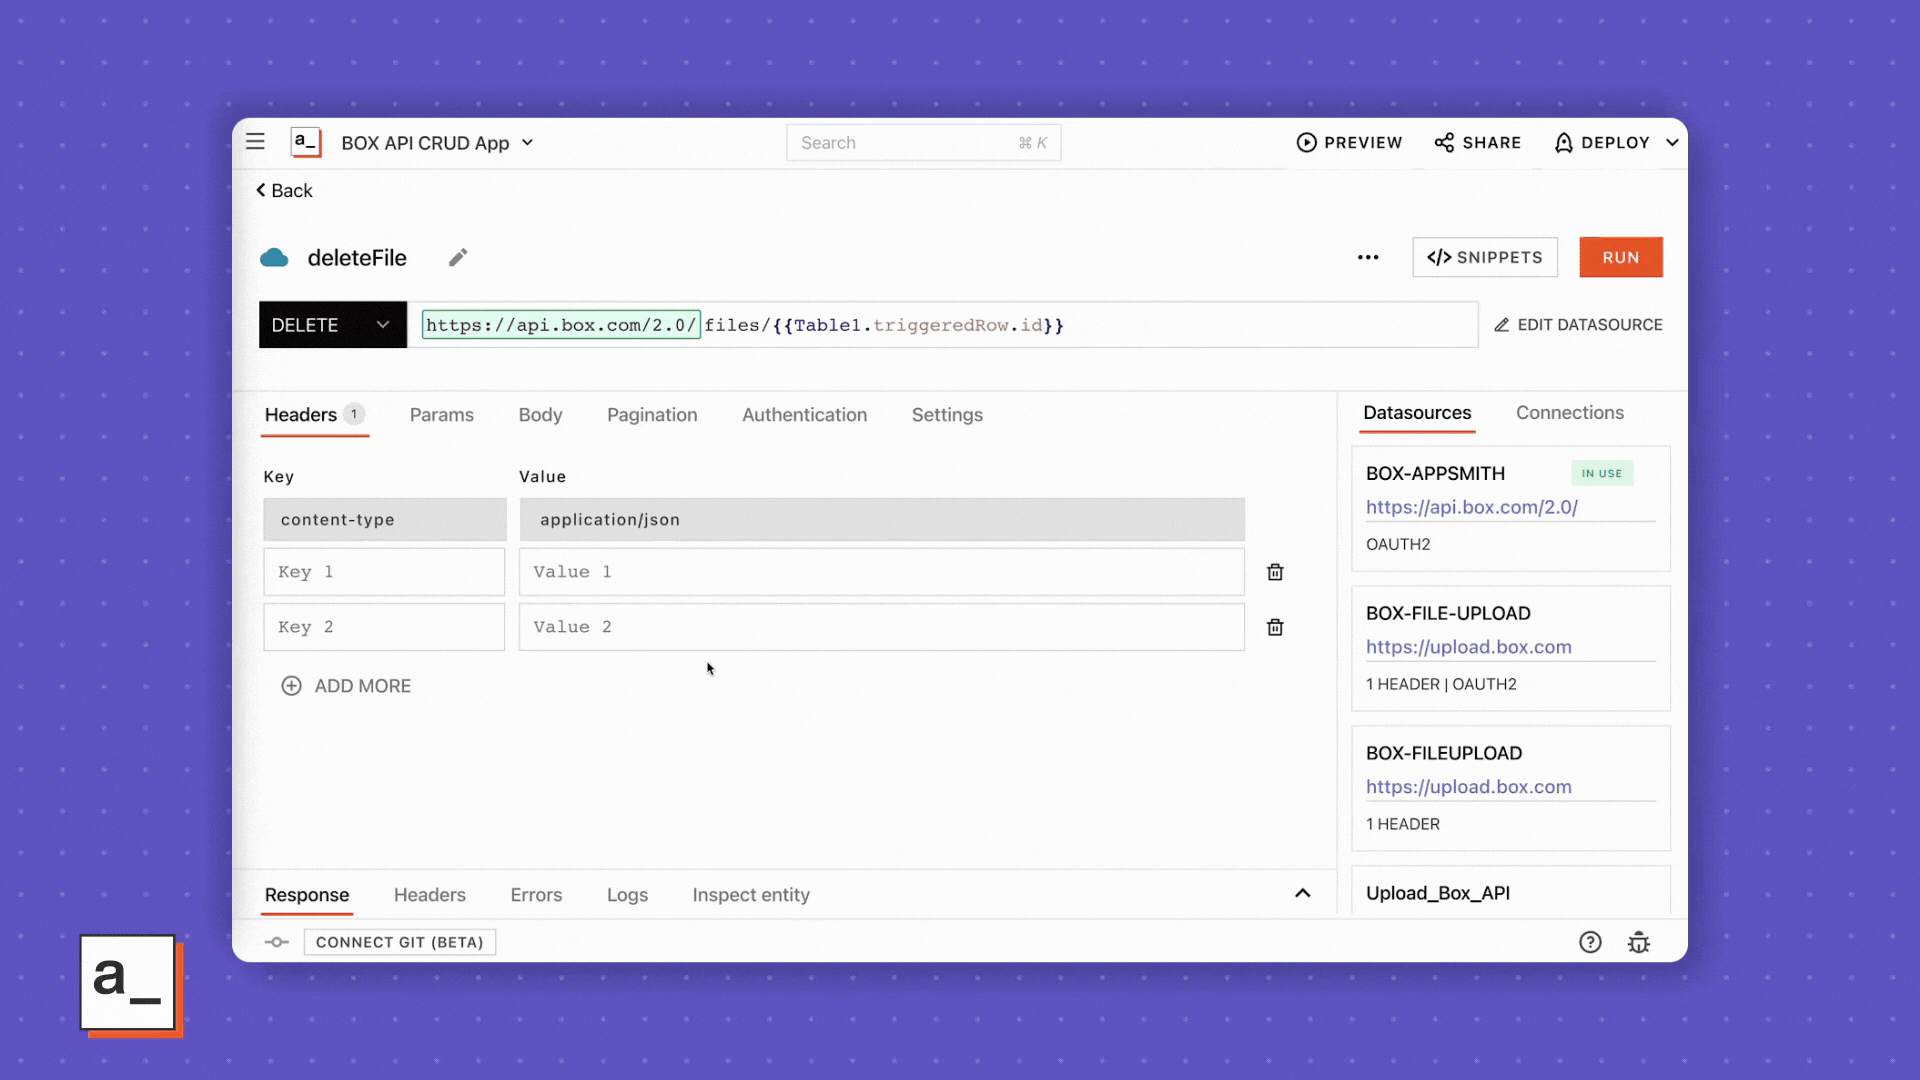
Delete Files
https://developer.box.com/reference/delete-files-id/
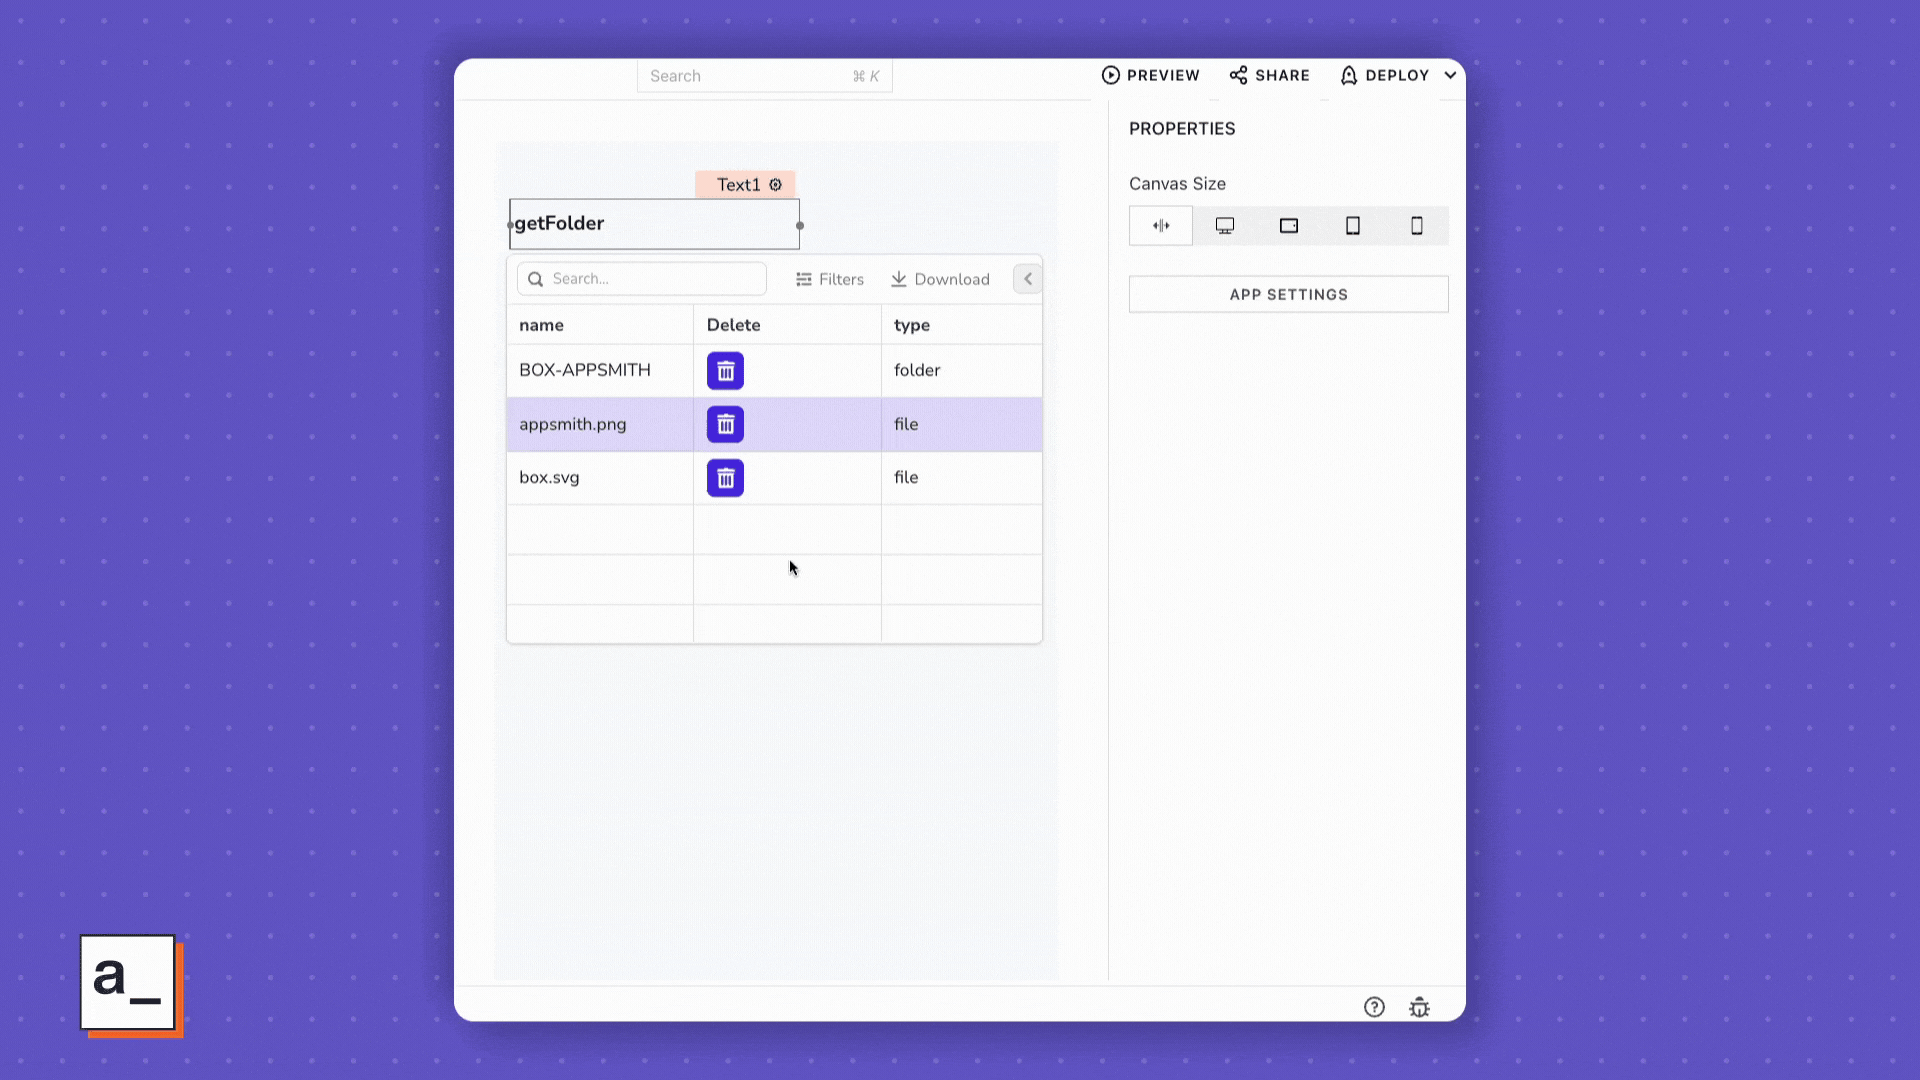
Next, we’ll add a delete button to the table widget. Start out by adding a new column to the Table widget, and set the Column Type to Icon Button.
Next, add a new API and set the method to DELETE. Then update the URL with files/{{Table1.triggeredRow.id}}
NOTE: In the Settings tab, you may want to enable: Request confirmation before running API
Next, head back to the Table widget, and navigate to the settings for the Delete button. Set the OnClick to run the deleteFile API, and set the onSuccess action to run the getFolder API. This will refresh the data from the getFolder API and show that the file has been deleted.
Update File
https://developer.box.com/reference/put-files-id/
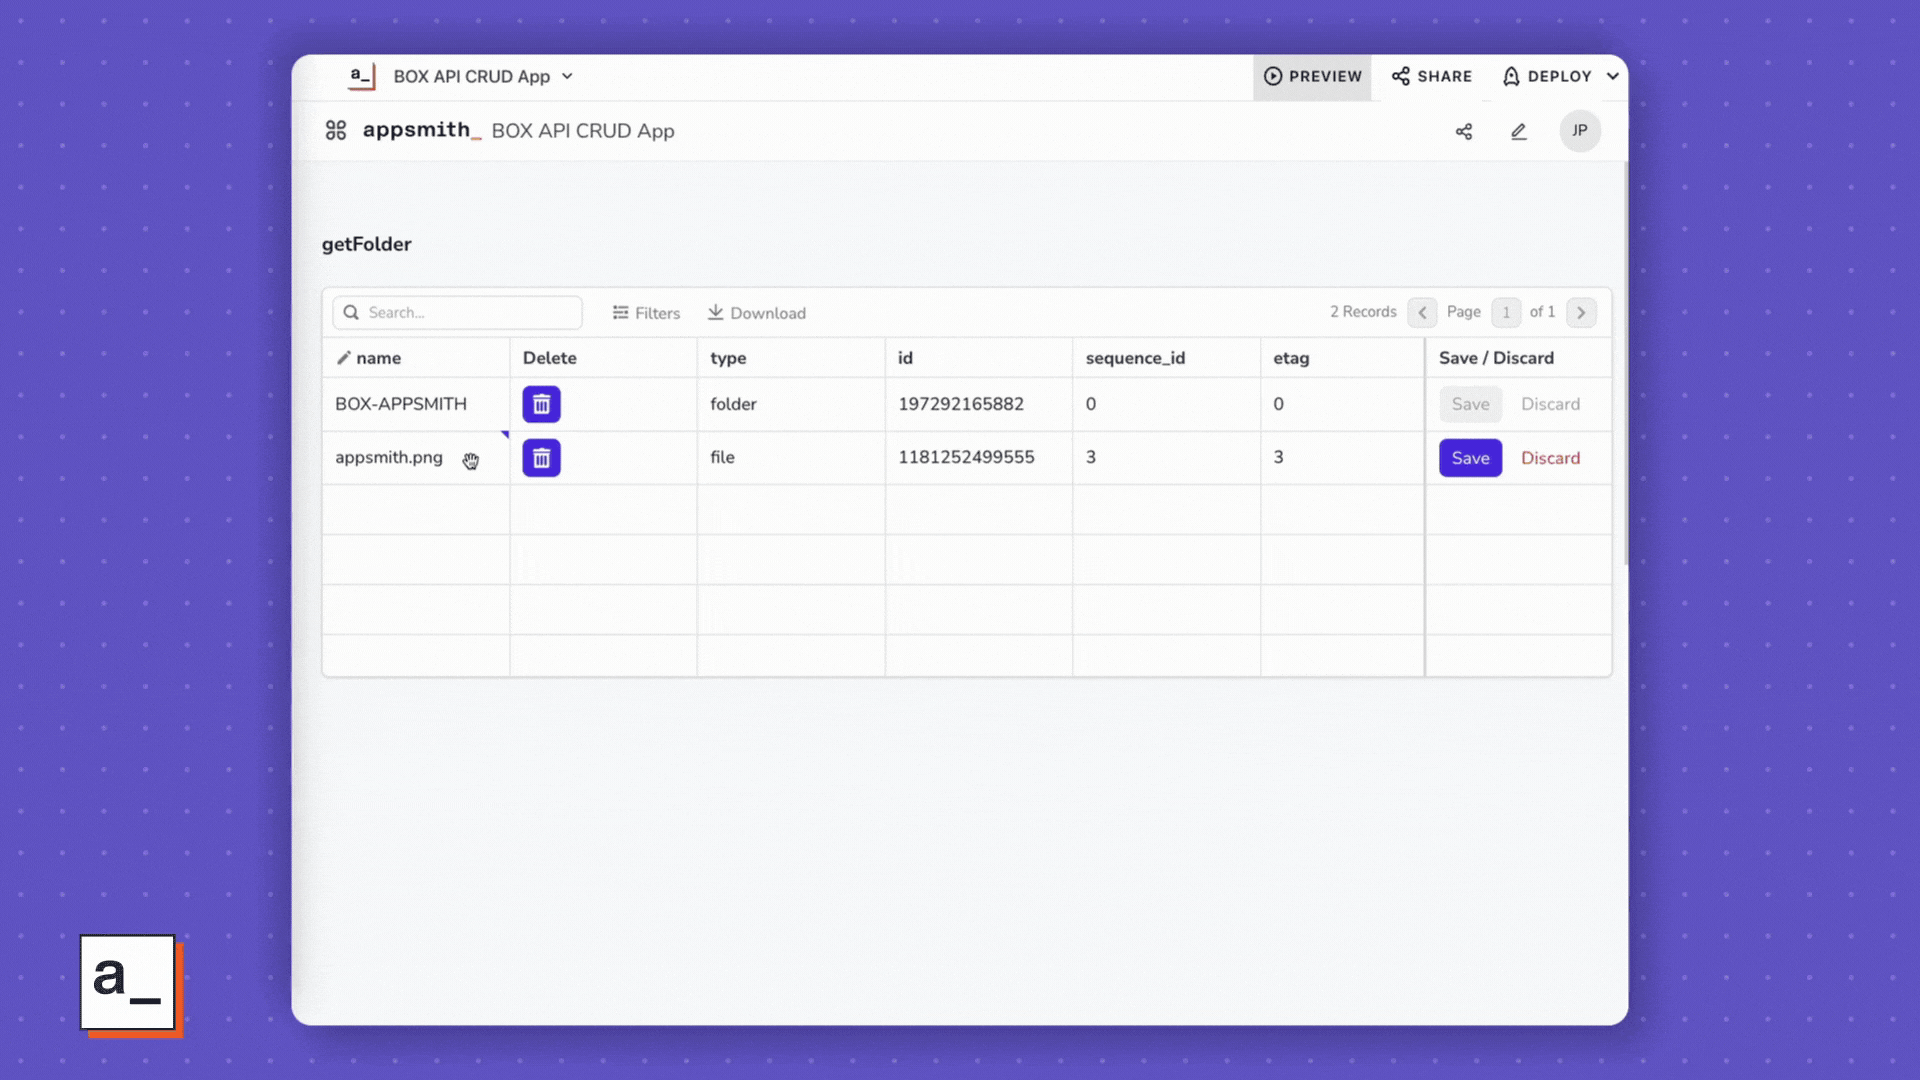
Ok, now let’s add an API for updating the filename. First, enable the Editable checkbox next to the name column. Then make an edit to one of the file names.
Next, make a copy of the deleteFile API, rename it to updateFile, and change the method to UPDATE.
Then set the Body-Type to JSON, and enter:
{{
{
  name: Table1.updatedRow.name
}
}}
Now go back to the Table widget properties, and navigate to the settings for the new Save/Discard button. Set the onSave action to run the updateFile API, and the onSuccess action to run the getFolder API.

Time to test it out! Click PREVIEW, and try editing a name, then deleting a file.
Upload File
https://developer.box.com/reference/post-files-content/
Ok, we’ve covered everything except uploading a new file. Time to add a FilePicker widget, and an uploadFile API.
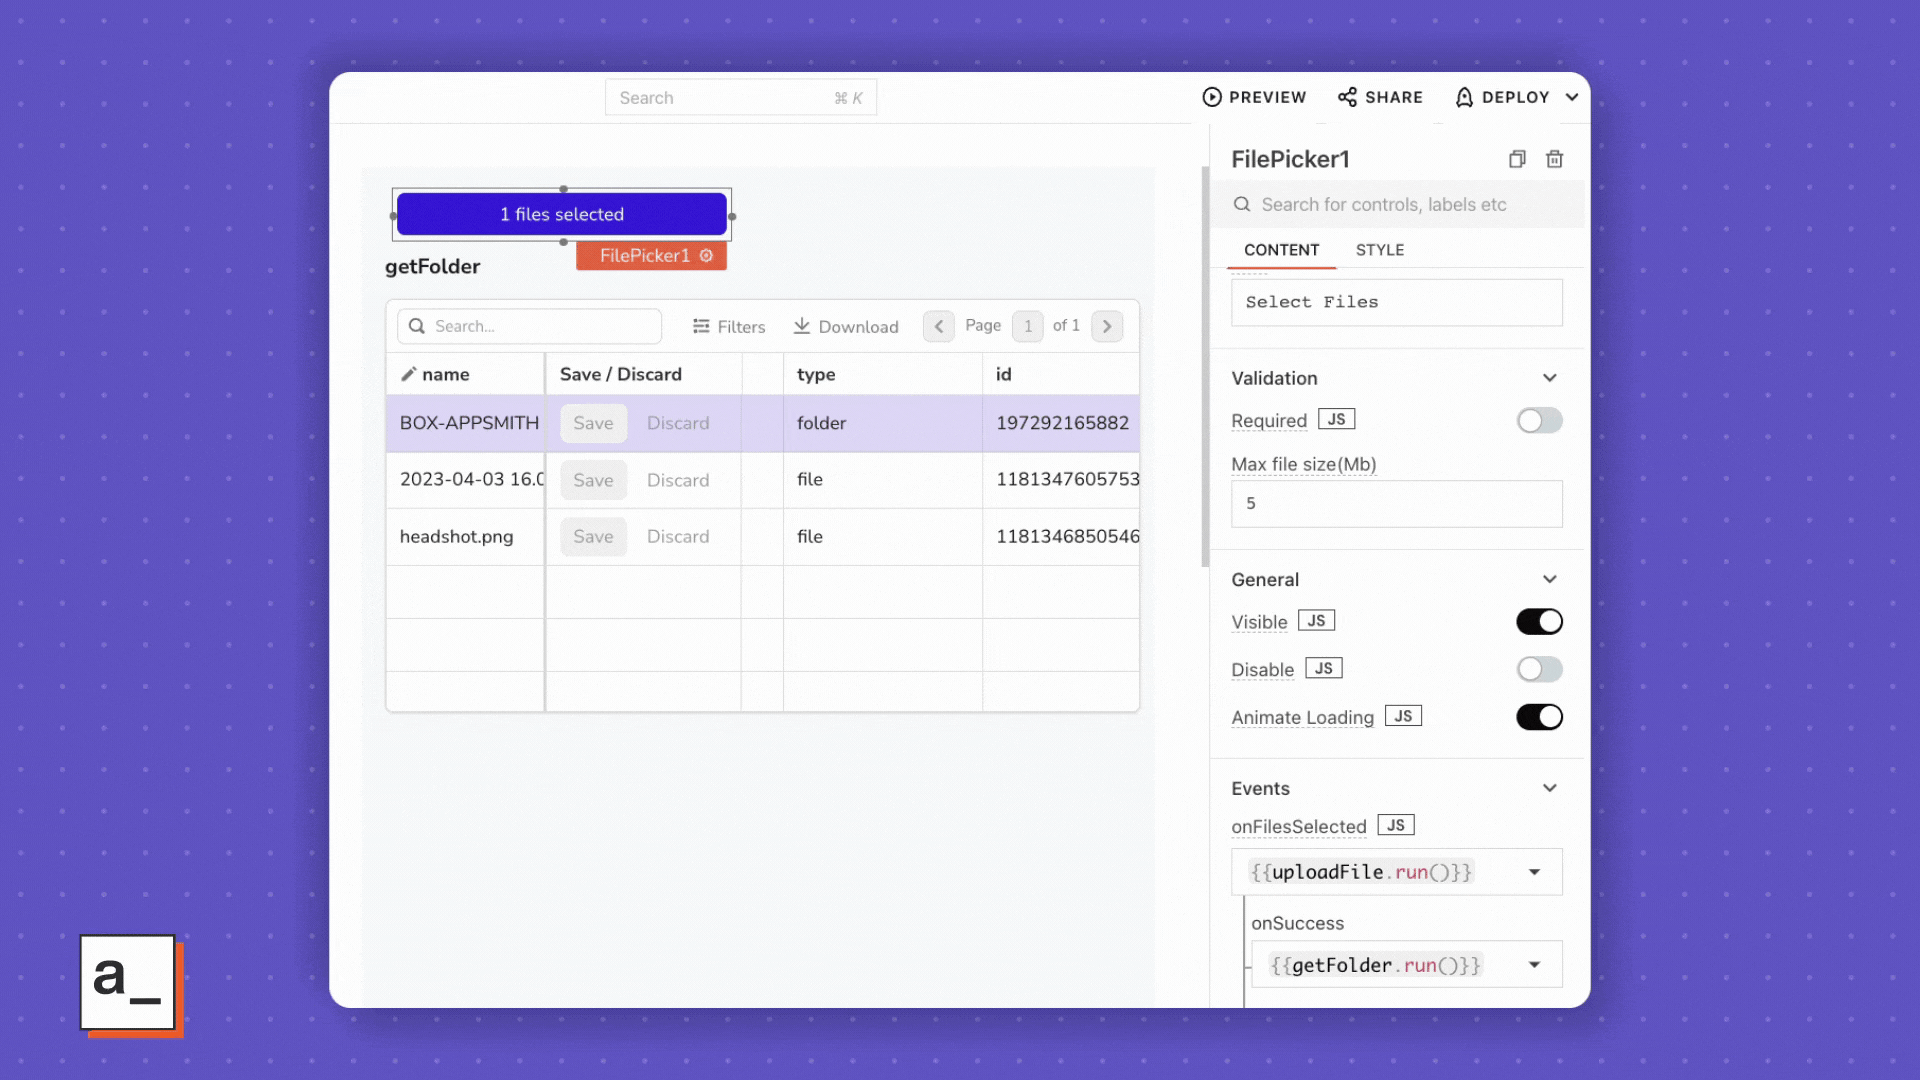
Drag in a FilePicker widget above the table. This will let us select a local file to upload.
Next, we need to create a new API for uploading the file, and trigger that API once a file has been added to the FilePicker.
NOTE: The Upload File endpoint uses a different domain. DO NOT create this API under the existing datasource.
File Uploads use: upload.box.com
The previous APIs used: api.box.com
Since this is a different domain, we have to create a new datasource. But this time, we'll create the API first, then save it as a datasource, just to show a different approach.
Copy this curl request:
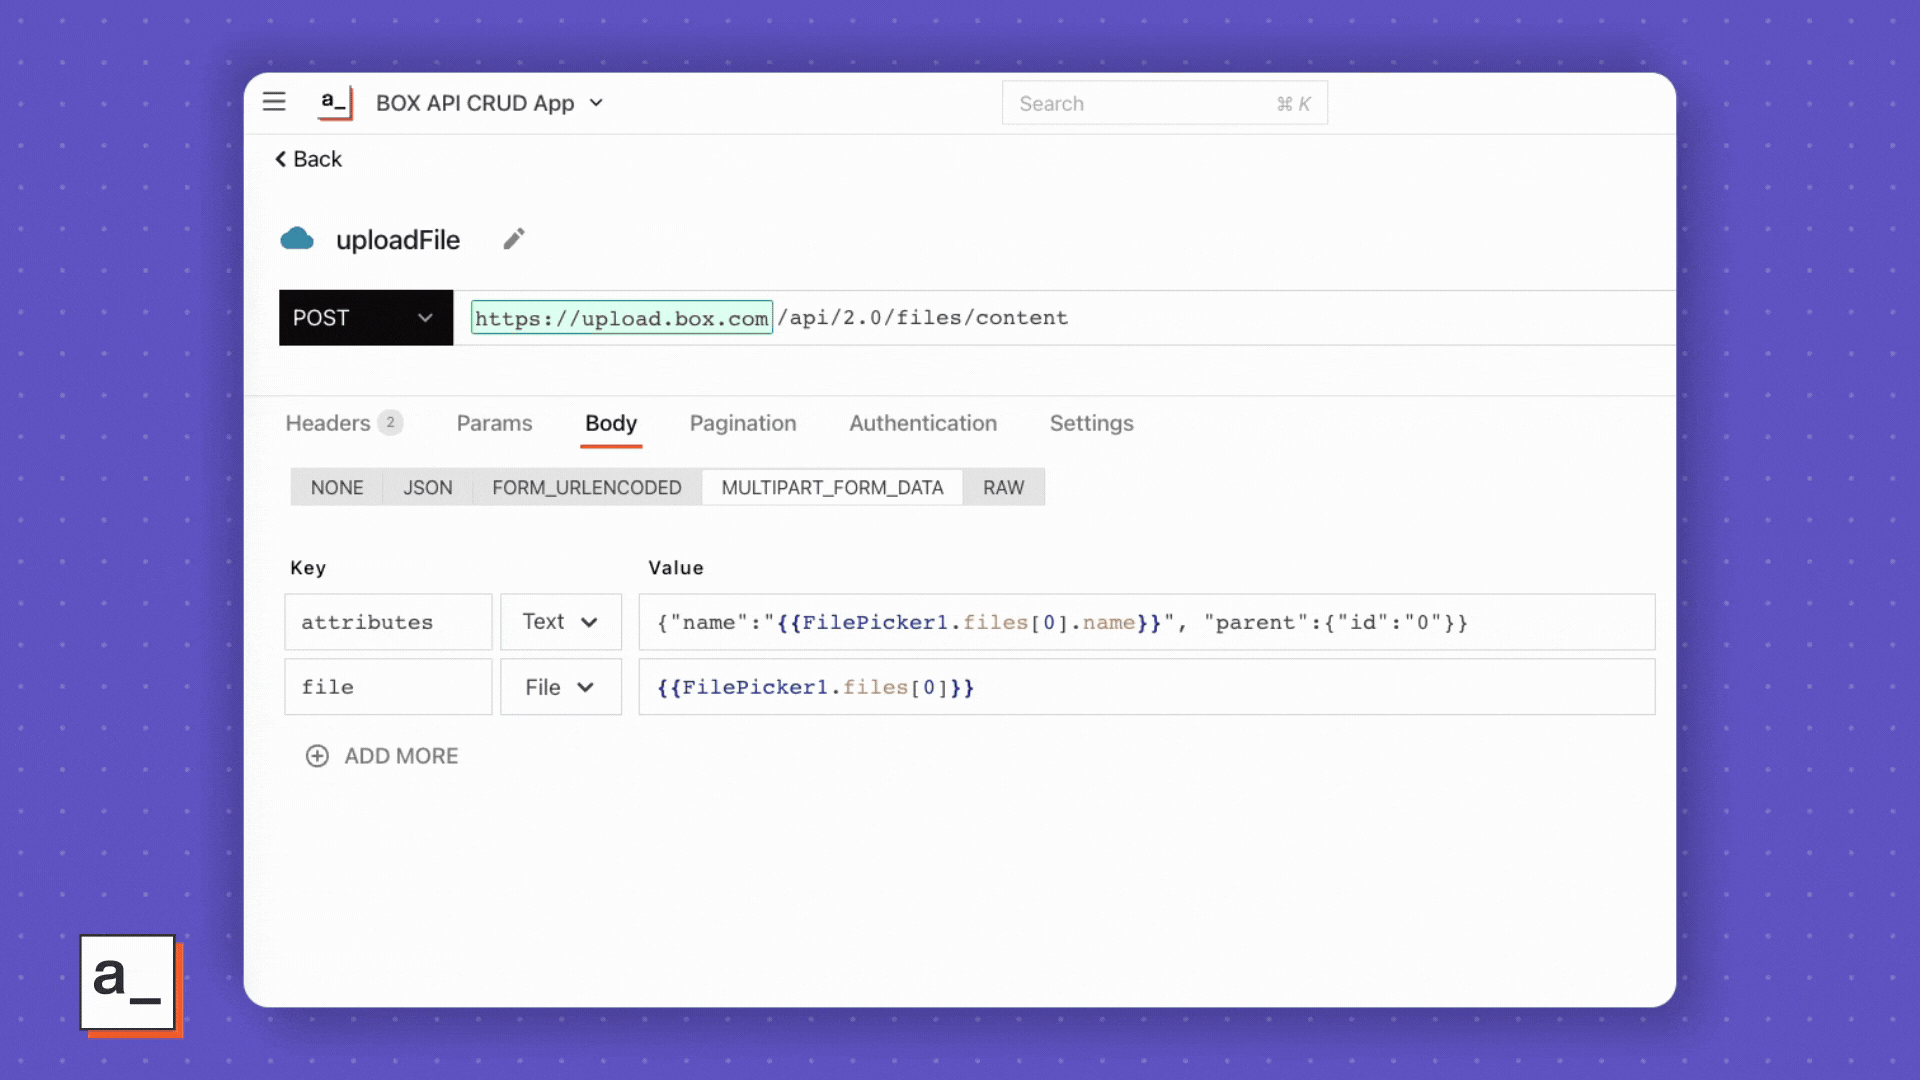
curl -i -X POST "https://upload.box.com/api/2.0/files/content" \
     -H "Content-Type: multipart/form-data" \
     -F attributes='{"name":"{{FilePicker1.files[0].name}}", "parent":{"id":"0"}}' \
     -F file={{FilePicker1.files[0]}}
Then, import the curl request and save it as a new datasource.
Click + ADD QUERY/JS and choose Curl Import
Paste in the query and click IMPORT
Change the name to uploadFile
Click SAVE AS DATASOURCE on the top right.
Name the new Datasource and click SAVE.
Next, go back to the new uploadFile API. In the Body section, select MULTIPART_FORM_DATA and set the types to:
attribute=Text
file=File
Then, go back to the FilePicker widget, and set the onFileSelected action to uploadFile, and the onSuccess action to getFolder.
Conclusion
Click DEPLOY and then give it a shot! You should now be able to Create, Read, Update and Delete files in your Box account. From here, you can connect to any of the other Box endpoints and build integrations using some of their more advanced features, like tasks, watermarks, webhooks, and more.
For more examples with the Box API, check out the Box developer blog. And for other Appsmith API examples, head over to the Tutorials section of the Appsmith blog.


