Building a holiday tracking app in Appsmith

Appsmith is a popular low-code development platform which enables your development team to rapidly build internal applications for your business. In this latest blog series, we wanted to highlight a few common internal applications which you can build within a few hours, whilst learning the core concepts of Appsmith and have the opportunity to extend further (e.g API integration).
“”Content from Tick9, an Appsmith partner
The first application we’ll be developing is a basic holiday tracking and request system. This application will enable your employees to request a holiday, view their entitlement and track their requests. Whilst also providing access for managers to review requests, and respond to them.
Note - This article presumes you already have basic knowledge of PostgreSQL, JavaScript and SMTP. If you need assistance building a holiday tracking application, then please reach out to us.
Database
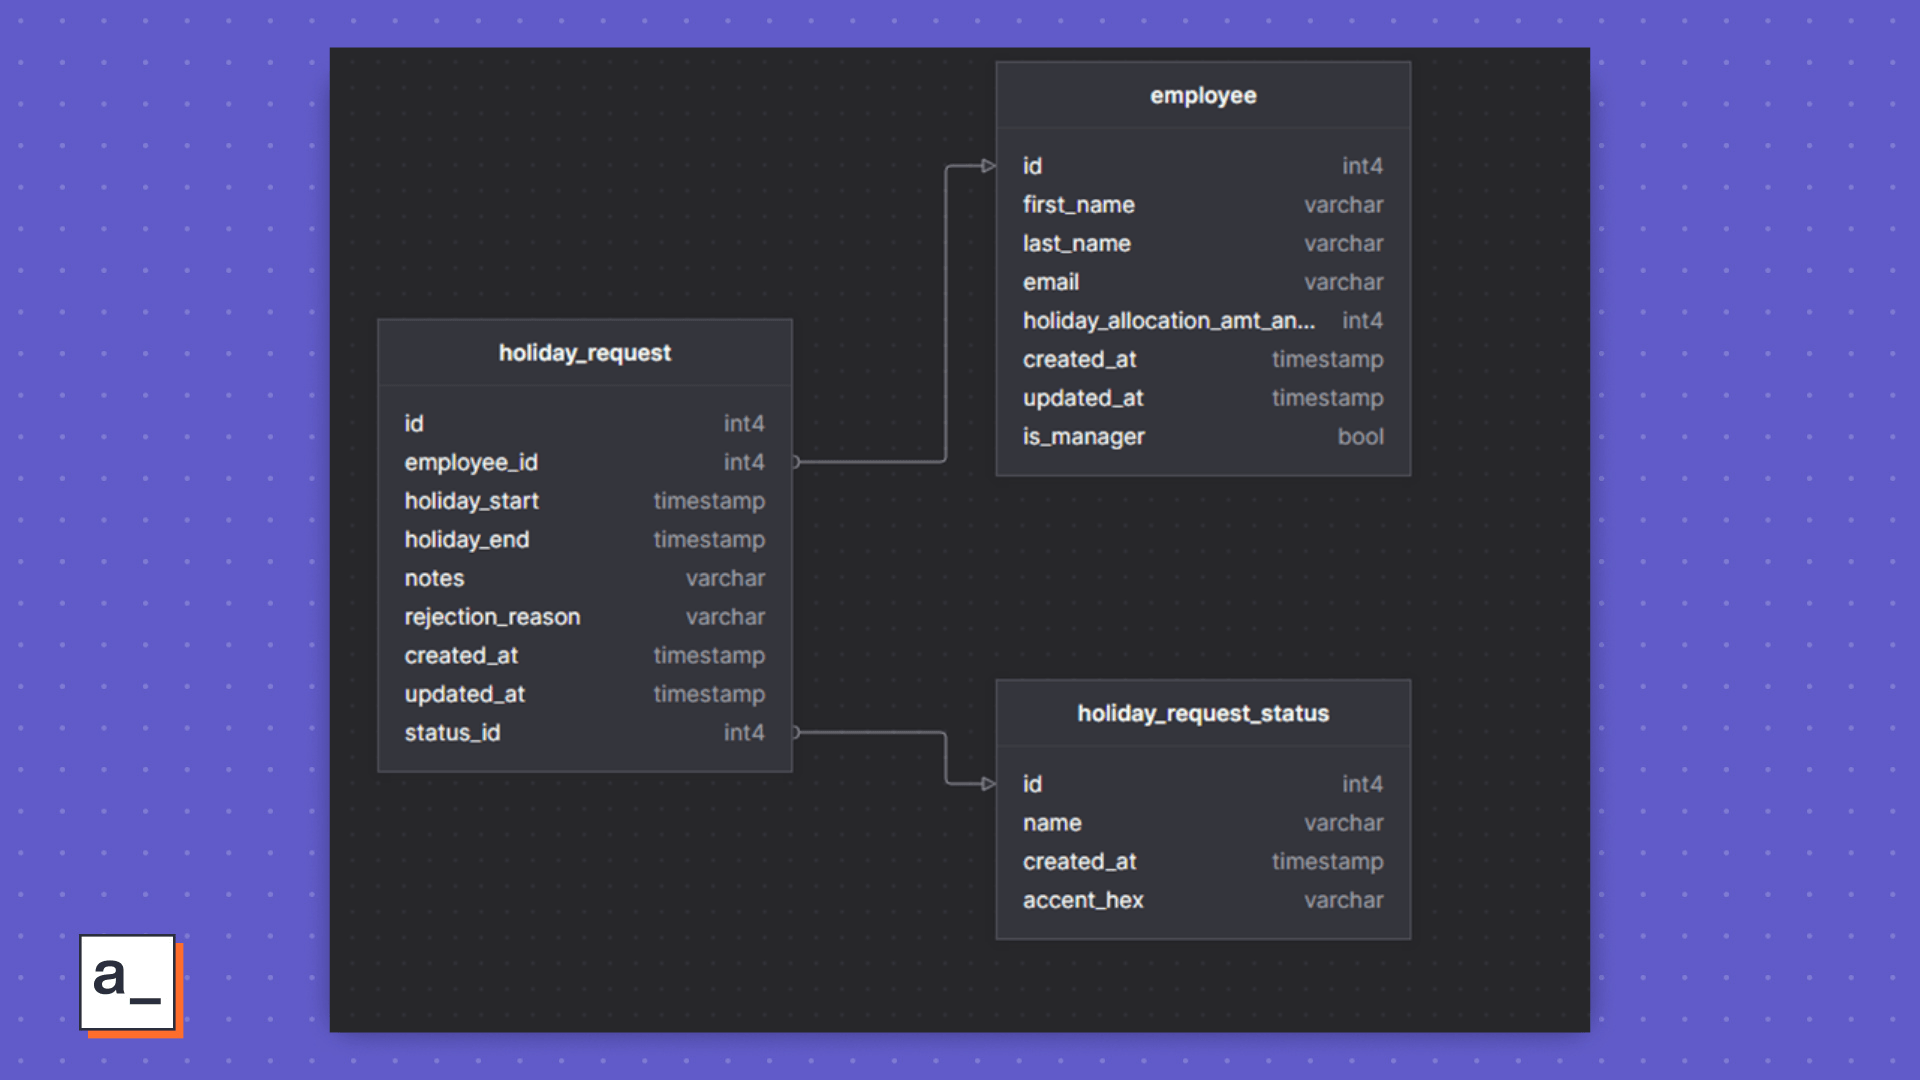
To support our simple holiday tracking application, we’ll need a backend database to store employee information, and the the holiday requests which the user will create. In this series, we’ll be using PostgreSQL however Appsmith supports many other data sources such as Microsoft SQL Server, MySQL, Google Sheets, MongoDB and more. Whatever SQL-based datasource you use, create a schema containing the two tables from the above diagram.
Creating your App
Now you’ve got your database setup – let’s get started with building the app itself! Head over to your instance of Appsmith (or your Appsmith Cloud account) and create a new application. Rename the application to “Holiday Tracking” and set the “Canvas Size” to “Desktop”.
Building the Request Form
With your fresh new app created in Appsmith, let’s begin development by creating a dedicated page for requesting a new holiday. On your left-hand side, under “Pages” create a new page labeled “New Holiday Request”. Then on your new page, drag-and-drop the “Form” widget from the “Widgets” panel, and then create the following input fields:
Start Date / startDateInput (Date Picker, Required)
End Date / endDateInput (Date Picker, Required)
Notes / notesInput (Rich Text Editor, Not Required)
Once you’ve got your fields added to your form, we then need to create a SQL query to match the signed-in user with their employee record. Return to the left-hand side panel, under “Queries/JS” click on “New Query/JS” and select your datasource from the connection list. If you haven’t added your database as a source yet, follow this article from Appsmith to get connected.
A new query editor panel will open, give your query a name (e.g getCurrentEmployee) and then paste the following code snippet in to get the employee’s record from the database using the signed-in user’s email address:
SELECT * FROM holiday_tracker.employee WHERE LOWER(email) = {{appsmith.user.email.toLowerCase()}};
Click on the “Run” button on the top-right hand side to confirm that your query works, and then navigate to the “Settings” tab to enable “Run query on page load”. Once switched on, this will ensure that the SQL query will execute when the user navigates to the page.
Now we’ve got a form which captures the user’s input, and a query to identify the user, we can proceed to write the insert query to create the holiday request. Create a new SQL query using your existing datasource with the name “insertHolidayRequest”, and paste the following code snippet into the editor panel.
INSERT INTO
    holiday_tracker."holiday_request" (
        "employee_id",
        "holiday_start",
        "holiday_end",
        "notes"
    )
VALUES
    (
        {{this.params.employee_id}},
        {{moment(this.params.holiday_start)}},
        {{moment(this.params.holiday_end)}},
        {{this.params.notes}}
    );
If this is your first time building an Appsmith application, you might be wondering why we’re referring to a “params” property. The “params” property is data which you can pass into the query when executing it from JavaScript. It’s a good practice to do this so your queries aren’t tightly coupled with your input widgets, and enables you to copy it to other pages without changing your syntax.
Next, we want to create a JavaScript object which will handle the creation of the request. On the left-hand side under “Queries / JS”, select on “New JS Object” and name it “requestHelper”. We want to implement a new method within this JS Object named “createHolidayRequest” which will execute the SQL query “insertHolidayRequest” with the data parameters from the input fields, then navigate back to the “Home” page if the query was successful, or display an error to the user if the query failed.
type: embedded-entry-inline id: 3selMt1Dr9wRSFDZAAOjz3
Finally, return to your page, click on the “Submit” button, under “onClick” event, paste the following code snippet (or navigate to your JS function via the drop-down menu).
{{requestHelper.createHolidayRequest()}}
That’s it – you can now enter data into your form, and press the “Submit” button to write the data into the backend database. If you have an error, head back to your query to see the error reason, or use the console window.
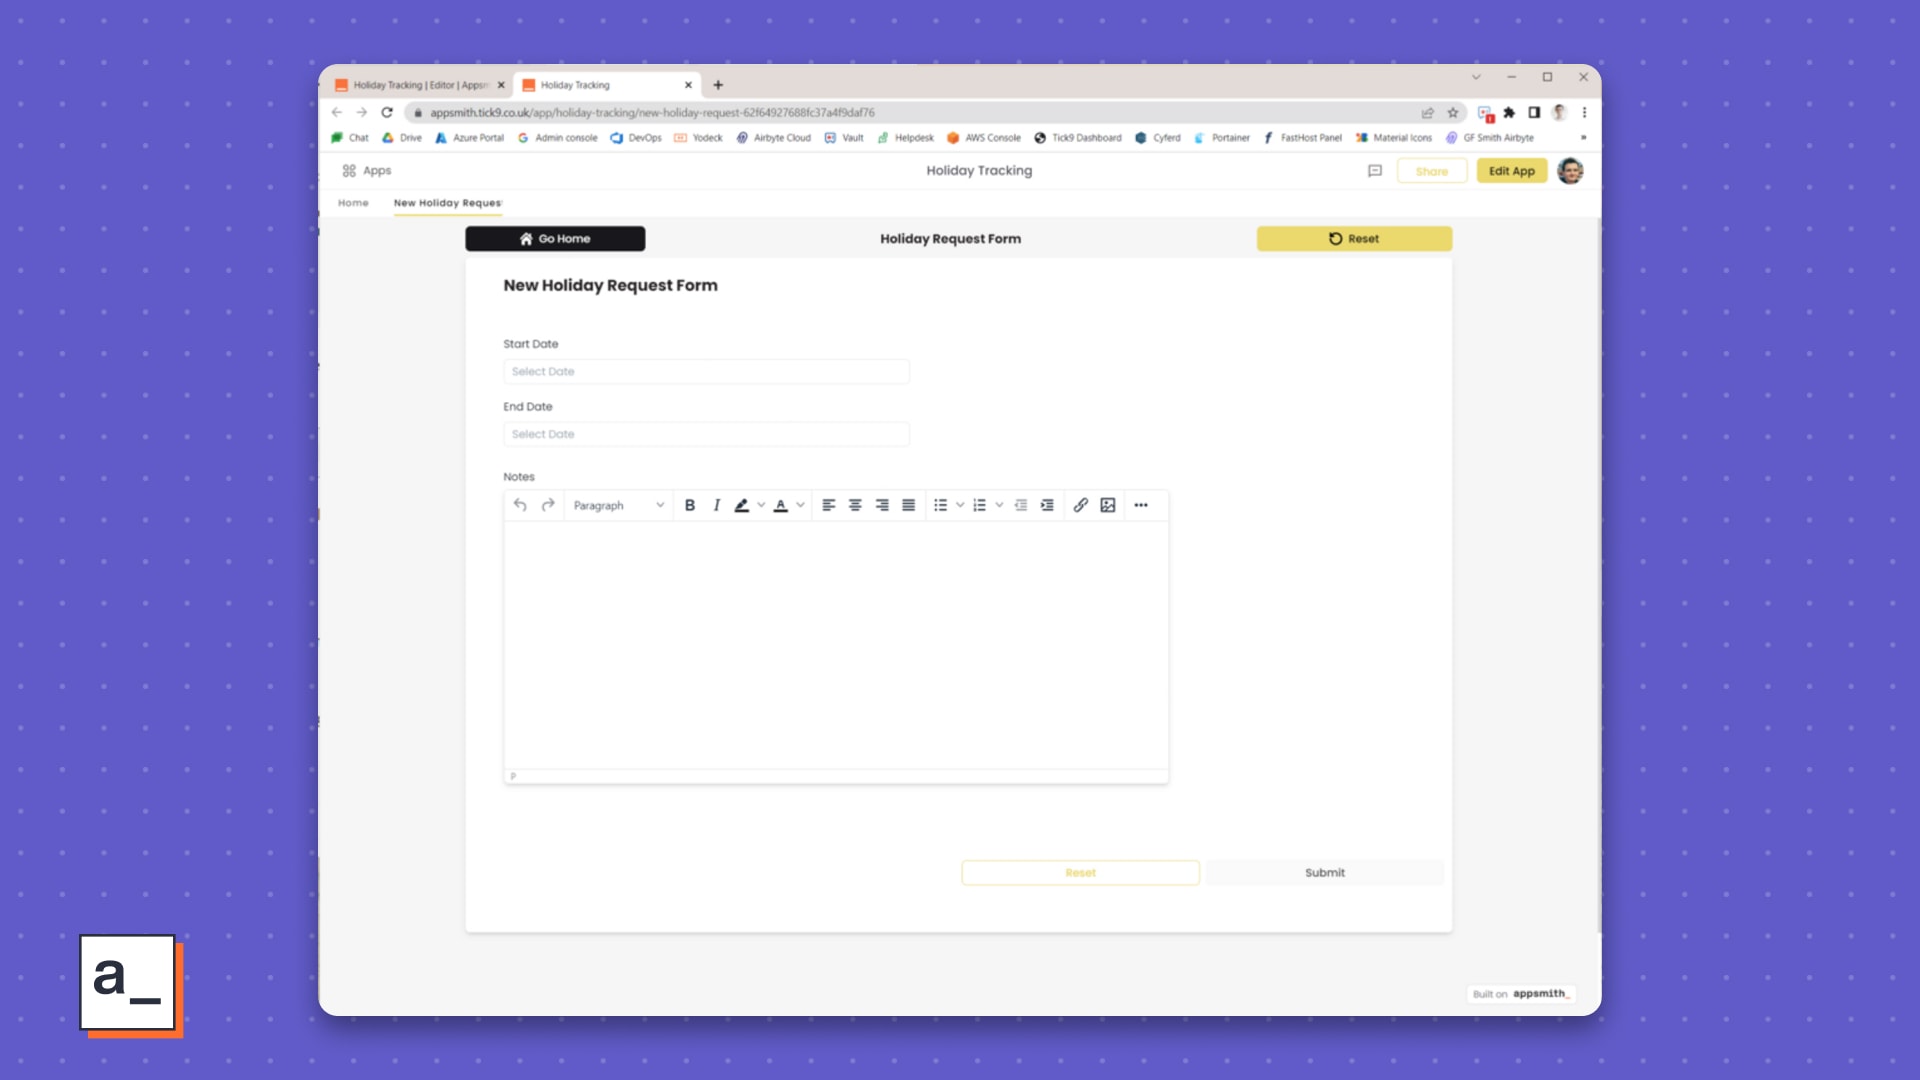
Once you’ve done the above, you should have a form which looks like this!
Before we move onto the next stage, you may want to consider implementing the following features at this stage:
Send an email notification to the user or manager using an SMTP datasource.
Set “invalid” logic on the input fields, for example, you don’t want a user to requesting a holiday in 1984!
Check that the user hasn’t already requested a holiday on the same date range, or you may want to prevent the user from requesting a holiday which overlaps with another employee.
Building your Home Dashboard
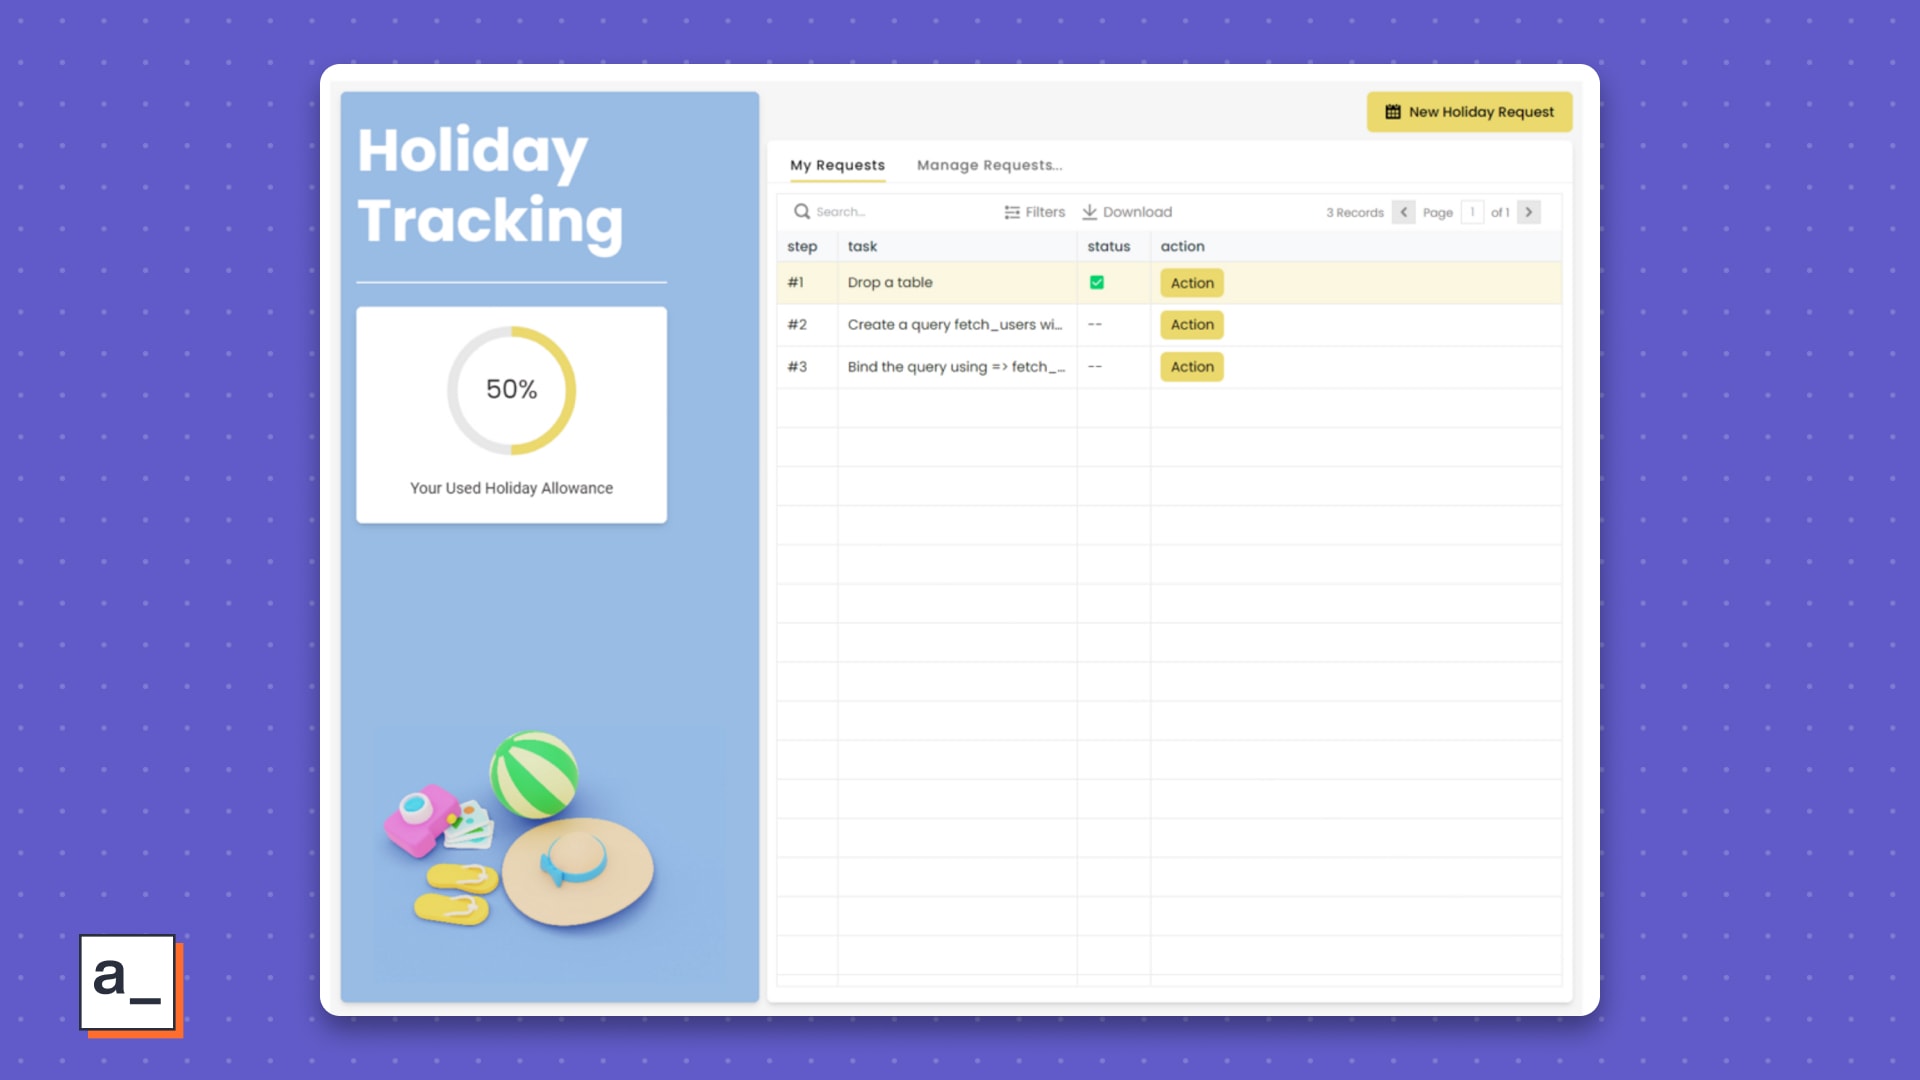
How your dashboard should look like by the end of this stage
At this stage, we’ve got an application which enables the user to create a holiday request. Next, we want to create a home dashboard for the user to view their holiday allowance, track their holiday requests and if the user is a manager then enable those users to approve or reject outstanding holiday requests.
Copy the getCurrentEmployee query from your form page, and then create a new SQL query named getEmployeeRequests with the following syntax:
SELECT * FROM holiday_tracker.holiday_request WHERE employee_id = {{this.params.employee_id}};
We want both of these queries to execute with each other when the app starts, with the getCurrentEmployee query first to get the user’s employee id, and then the getEmployeeRequests request to get their linked holiday requests. To do this, create a new JavaScript object on the page, and create a method onStartUp:
type: embedded-entry-inline id: laeYc99aA0VU4ov3ZeQST
Once you’ve implemented the above, go to your Settings page, and set onStartUp method to run on page load. Drag-and-drop a Tabs widget onto the new page and rename the default tab to “My requests”. Then, drag-and-drop a table widget into the tab and set the Table data to the following: {{getEmployeeRequests.data}}.
This will display all the record data from the query’s response. However, you may want to rename, and adjust some of the column data. For example, “Is Approved” will show true or false – however we may want to extend that logic to display “Review” when the field is null, then “Rejected” when false and “Approved” when true. To do this, go to the “Is Approved” column and update “Computed value” with the following JavaScript.
{{currentRow["is_approved"] === null ? "Waiting for Review" : (currentRow["is_approved"] ? "Approved" : "Rejected")}}
To test it all works, click on “Published” and when the page loads, the two queries should execute with the table displaying the signed-in user’s holiday requests.
Approving and Rejecting Requests from the Dashboard
Next up, when the employee is a manager, we want to display an additional table on the page to view received requests, and then update them with their approval or rejection. In the previous stage, you added a table on your homepage to display the table. In this stage we’re going to add a new tab to the home page to show the manager table.
Copy the getEmployeeRequests query and create a new SQL query called “getAllRequests” with the following syntax:
SELECT * FROM holiday_tracker.holiday_request;
This query is similar to previous query except it will return all requests, rather than the requests linked to a single employee.
Now we’ll add a new a tab to our tabs widget and call it “Manage Requests”. Then drag-and-drop a table widget and set the Table Data to the following:{{getAllRequests.data}}. This will display all the requests submitted by employees.
Just like the previous table, you may want to rename and adjust the column data such as displaying “Approved”, “Review” and “Rejected” rather than true/false.
Once the table is displayed correctly, we’re going to add a menu button to each request in the table, so that a manager can interact with them. Go to the columns section in the table properties and press the “Add a new column” button to create a new column for the table data and rename this column to “Menu”. In the column settings, change the column type to Menu Button and add two new menu items with the names “Approve” and “Reject”.
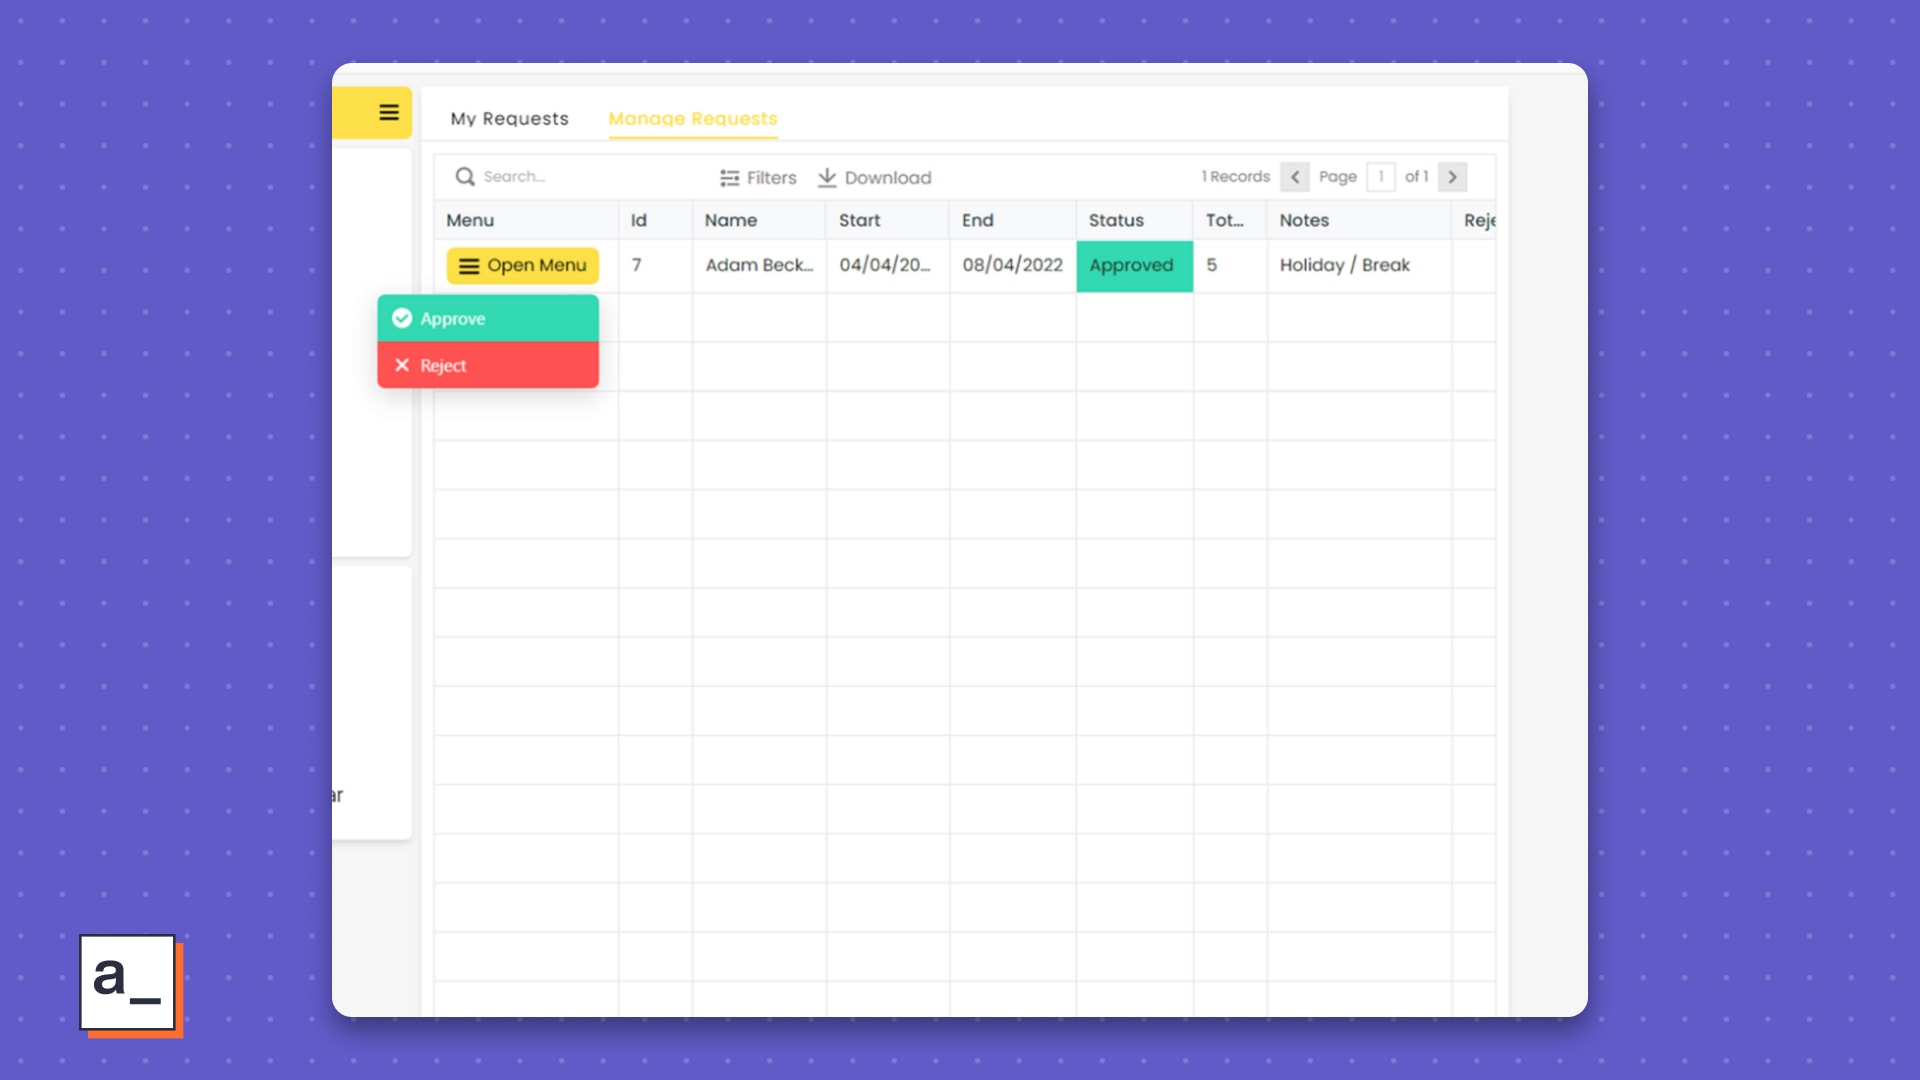
Once you have done the above, you should have a dashboard that looks close to this.
Approving
Now that we have menu buttons, we’ll want to add functionality to each of them, starting with Approving requests. Create a new SQL query with the name “updateRequestWithStatus” and paste the following code snippet into the editor.
type: embedded-entry-inline id: 4wyJnxcC0Rgcr1DbxZ781A
To get the params for running this query we’ll need to add a new method. In the JavaScript object we created earlier, create a new method “approveRequest”:
type: embedded-entry-inline id: 4kDDQ6JCK29kCx60guSjDM
Once this method is implemented, we can return to the column menu button properties and click on the settings icon for the “Approve” menu item. Under onClick event, paste the following code snippet:
{{helper.approveRequest(manageRequestTable.triggeredRow.holiday_id)}}
The Manage Requests table should now be able to approve requests by selecting the “Approve” menu button.
Rejecting
Next we’ll move onto adding the reject functionality. Rejecting a request will use the same updateRequestWithStatus query we created earlier, so only creating a separate JavaScript method with new parameters is required. In the JavaScript object, create a new method “rejectRequest” with the following code:
type: embedded-entry-inline id: 2psY5i0Jlia9Zrf1i6fQaF
Rejecting a request will sometimes require a rejection reason to be provided, so we will need a dialog box with an input field to put this text. Drag-and-drop a Modal widget from the widgets panel onto the page and give it the widget name rejectRequestDialog. Then, inside the modal drag-and-drop a Form widget and then create the following:
Rejection Reason / rejectionReasonInput (Input widget, Not Required)
Change the form button text to “Reject Request”
Then, click on the “Reject Request” button, under onClick event, paste the following code snippet:
{{helper.rejectRequest(manageRequestTable.triggeredRow.holiday_id, rejectionReasonInput.text)}}
Back on the Manage Requests table, go to the column menu button properties and click on the settings icon for the “Reject” menu item. Under onClick event, paste the following code snippet (or navigate to the Open Modal function via the drop-down menu):
{{showModal('rejectRequestDialog')}}
The Manage Requests table should now be able to reject requests by selecting the “Reject” menu button, which will open the rejection dialog box.
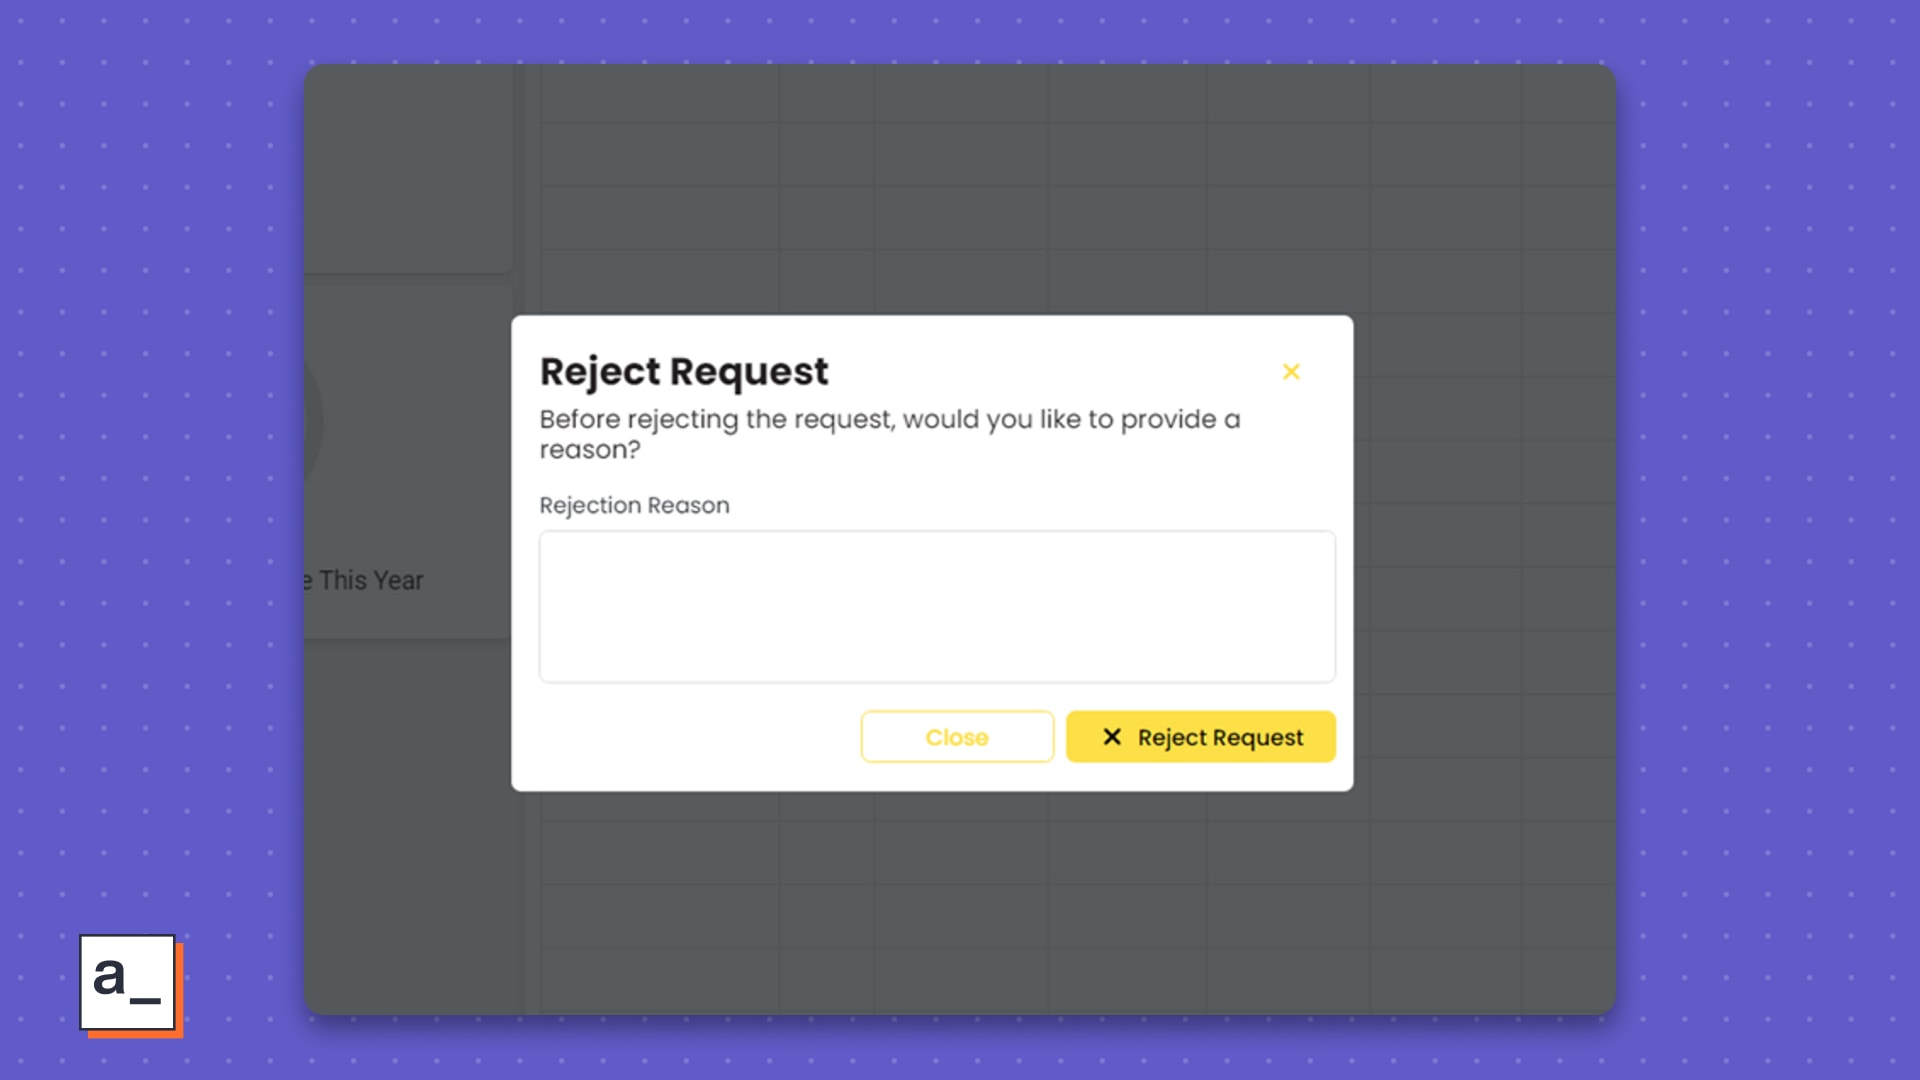
Once done, you should have a modal that looks like this!
Conclusion
That’s it – you can now approve or reject requests from the dashboard and have finished creating the holiday tracking app!
Now that we’ve finished, you may want to consider implementing the following extra features on your own:
Send an approval/rejection email notification to the user who submitted the request when the status is changed.
Set the background colour of the “Status” column to correspond with the status of each request, for example green for “Approved”, yellow for “Review” and red for “Rejected”.
Set the “Manage Requests” tab to be only visible to employees who are managers by adding an “is_manager” boolean property to employees and setting it to true/false.


