Building an Admin Panel with Appsmith

https://youtu.be/kMTdSIYSD9Q
Admin panels are an important part of every organization. They are necessary to serve customers better and run business processes smoothly. They help reduce management and people overhead significantly. But on the other hand, they take a lot of time to build and are troublesome and expensive to maintain. As a result, it is not the choice of project for most developers. Thankfully, there are a lot of options available to developers today to build complex admin panels and dashboards fairly easily while making maintenance easier. An example of such a framework that we have explored, React-admin. We’ve written an article on how to use it. It’s better than building an admin panel from scratch, but it is still cumbersome to move from a simple admin panel to an admin panel that behaves like an internal app. And that’s one of the reasons why we built Appsmith. Building Admin panels and internal apps should be easy and, more importantly, fun. Appsmith offers a drag and drop interface for creating UI elements and provides the option to write code wherever you may need to. You can build dashboards a hundred times faster on Appsmith, and that’s not an exaggeration. For this article, I’d like you to imagine it's 2005. Netflix doesn’t stream video yet. You run a local DVD store, and you need software to manage your rentals. You’re the only developer in the organization. How do you go about building one that is fast, scalable and easily maintainable? In this article, I’m going to show you how to build an admin panel using Appsmith to manage DVD rentals for your store. The app would have two pages. The first page would have a table listing all registered members of the store. The second page will have a table that holds all rental records. From here, new rental entries can be created, and existing rentals can be updated i.e from borrowed to returned. We would also be able to click on a customer from the first page and then taken them to the rentals page to see his rental history.
Before we begin, I’d like to give you a quick overview of the dataset we’ll be making use of. We’ll be using a modified version of the Sakila dataset. The database of choice is MongoDB on MongoDB Atlas and here’s the schema for each collection
// Customer collection
{
  "store_id": String,
  "first_name": String,
  "last_name": String,
  "email": String,
  "address_id": String,
  "activebool": Boolean,
  "create_date": Date,
  "last_update": Date,
  "active": Number
}
// Film collection
{
  "title": String,
  "description": String,
  "release_year": Number,
  "language_id": String,
  "rental_duration": Number,
  "rental_rate": Number,
  "length": Number,
  "replacement_cost": Number,
  "rating": String,
  "last_update": Date,
  "special_features": String,
  "fulltext": String
}
// Rental collection
{
  "status": String,
  "rental_date": Date,
  "film_title": String,
  "customer_email": String,
  "return_date": Date,
  "staff_id": String,
  "last_update": Date
}
That’s the overview of everything. Now let us get started! Oh, snap! I almost forgot. Here are some of the core Appsmith concepts we’re going to cover:
How to connect Appsmith directly to your database (eliminates the need for an API server)
How to create data-driven widgets
How to perform CURD operations
How to securely share your application (no auth required)
How to deploy your application
We can get started now! Connecting to your data source
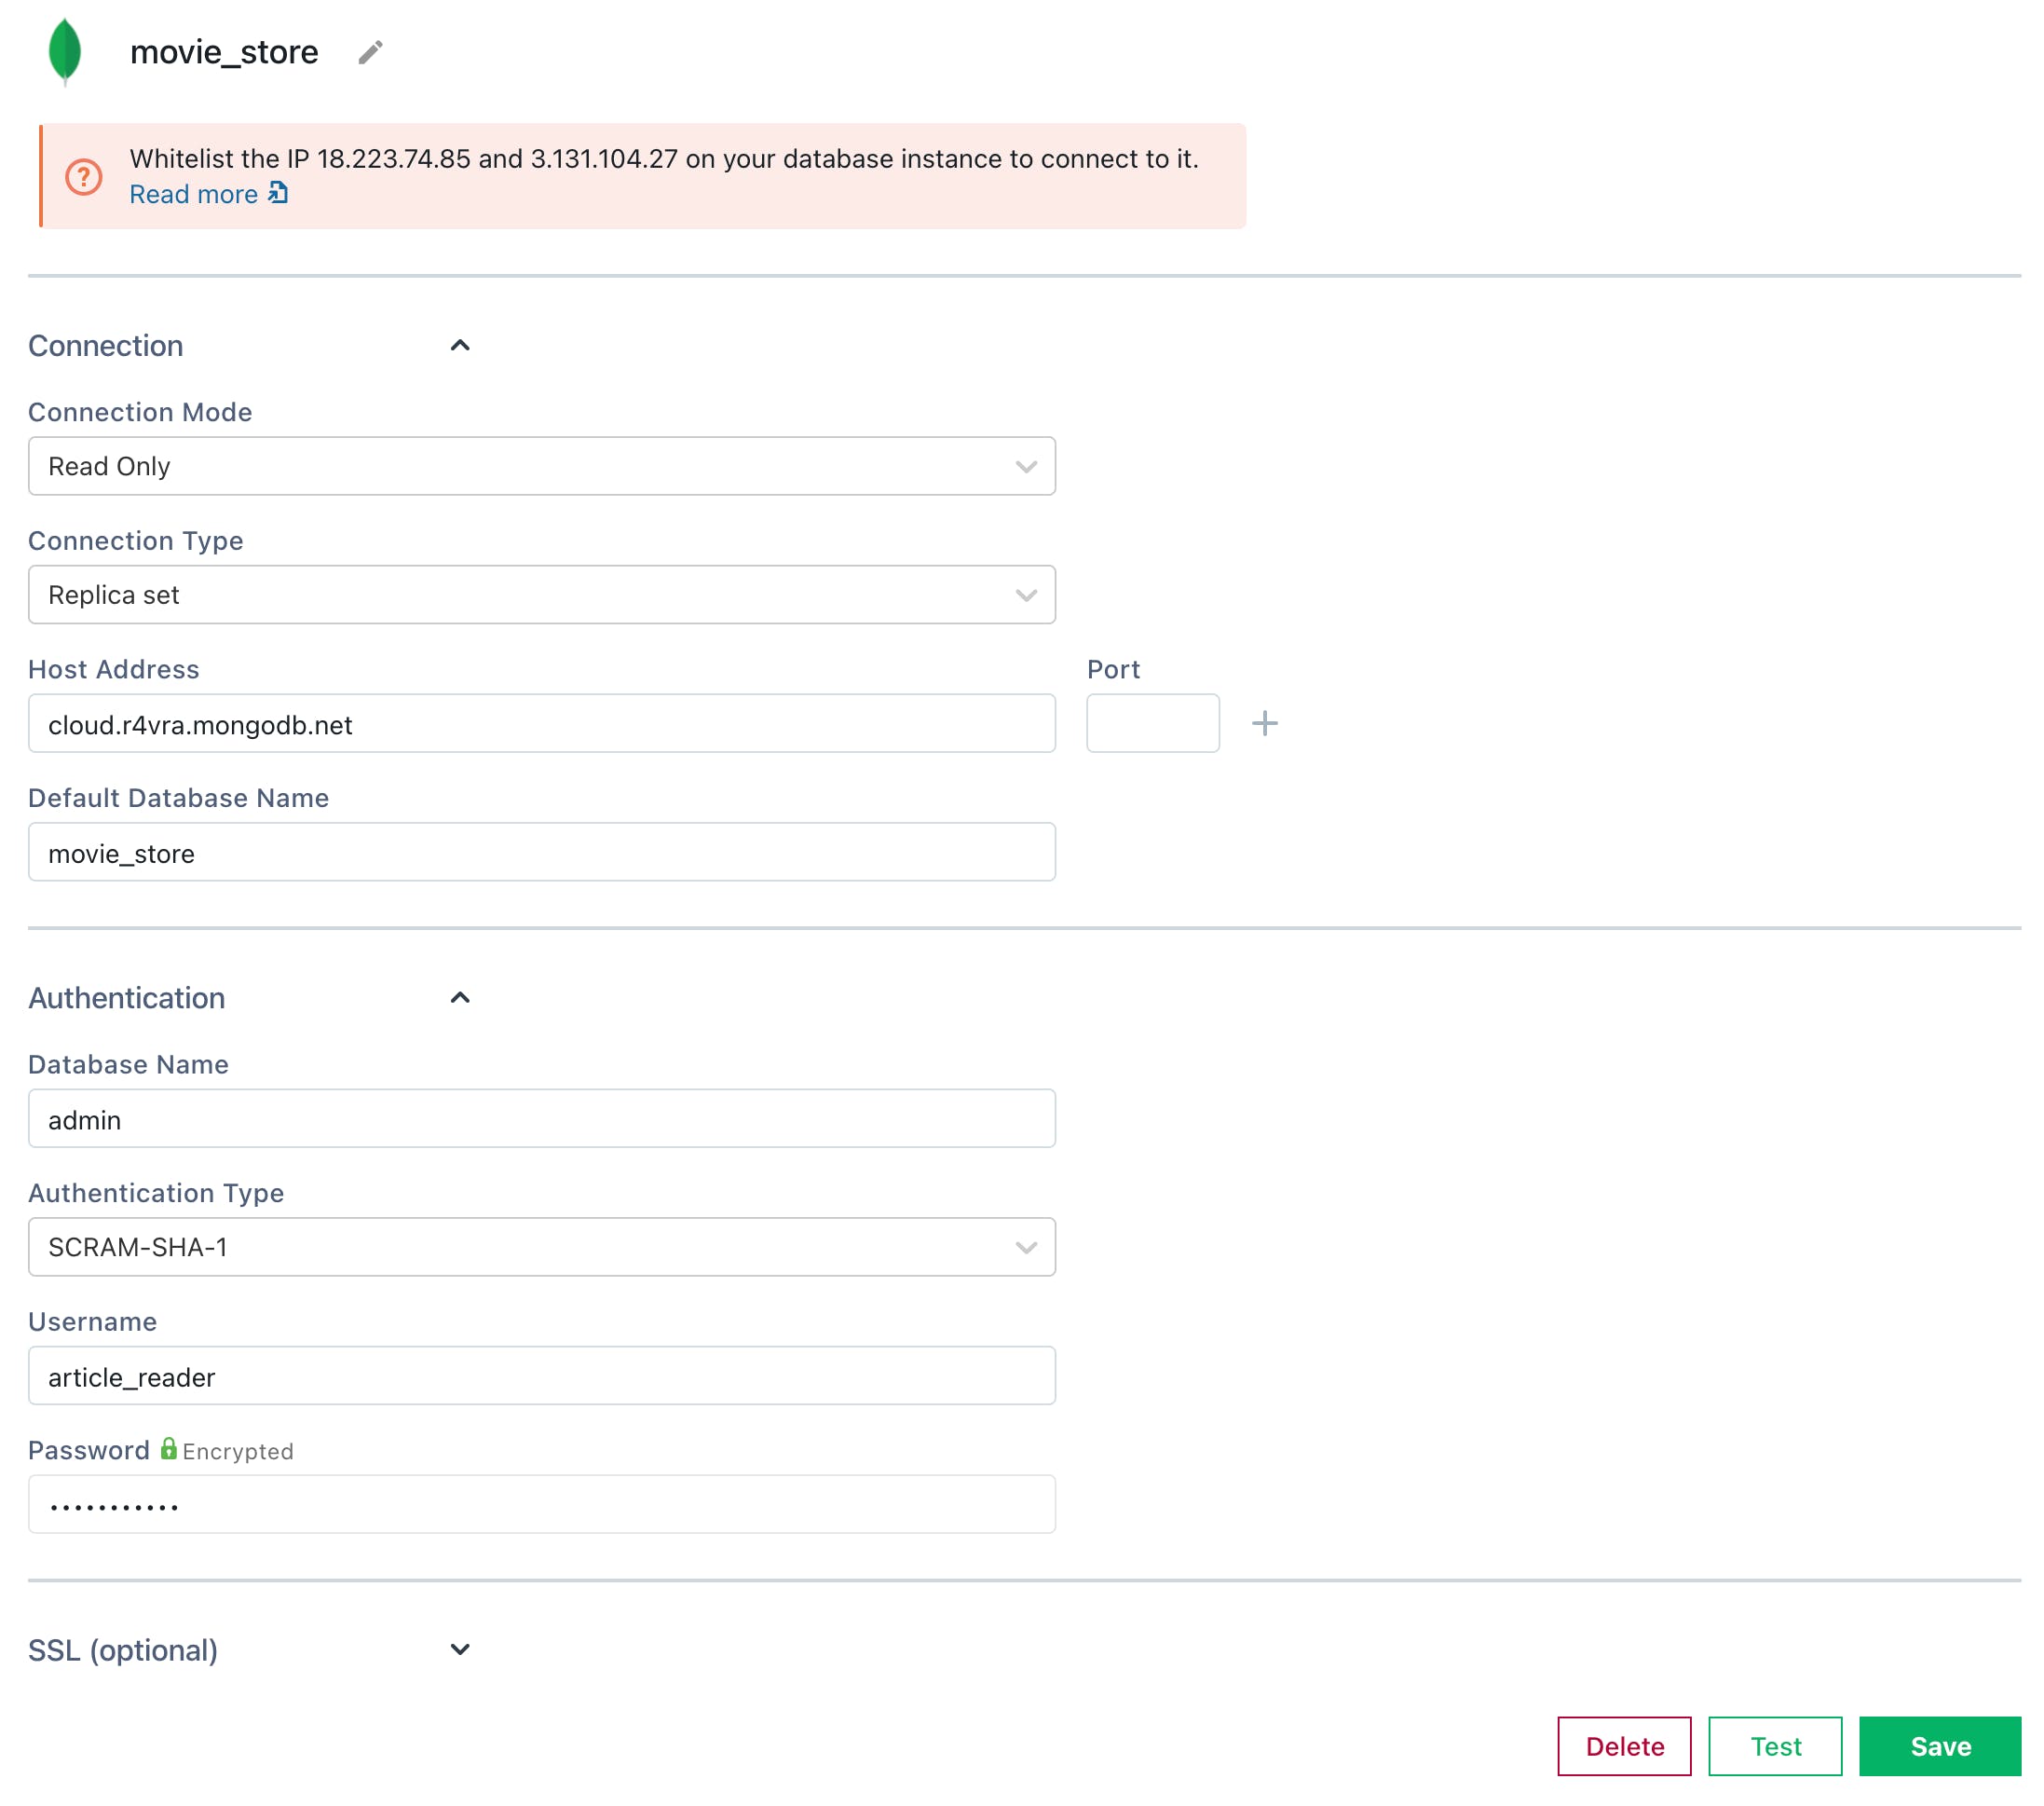
It’s quite important that our application is linked to a persisted data source because admin panels are almost always data-driven applications. This data can come from an API, a database, or a Google sheets table as we have the freedom to use any of these on Appsmith. We’ll be with the database route. Create an Appsmith account if you do not have one yet and let’s begin to smith our application 😁 As highlighted earlier, our application would be based on a MongoDB database. Don’t despair if you would like to follow along and do not have a ready-to-go database. Here’s a database connection you can make use of. Mind you, it’s read-only (don’t forget to say thank you) Username: article_reader Password: 0HkfXpxVpvvSvUOx Connection url: cloud.r4vra.mongodb.net Database name: movie_store Alright, we’ve removed all hurdles from the track, now let’s start racing! Go ahead to create a new application from your Appsmith dashboard and give it a fancy name. Next, let’s connect to the mongo database. Click on the DB Queries button on the left panel on the page and select MongoDB from the list of supported databases. Now go in and supply the database credentials to the from, also give this data source a descriptive name i.e. movie_store or movie_store_db. I think I’ll go with movie_store. And lastly, hit the big green save button.
Awesome! We’ve connected the application to the database. We can now do some querying and build data-driven widgets. Let’s move on to the next section. Creating data-driven widgets
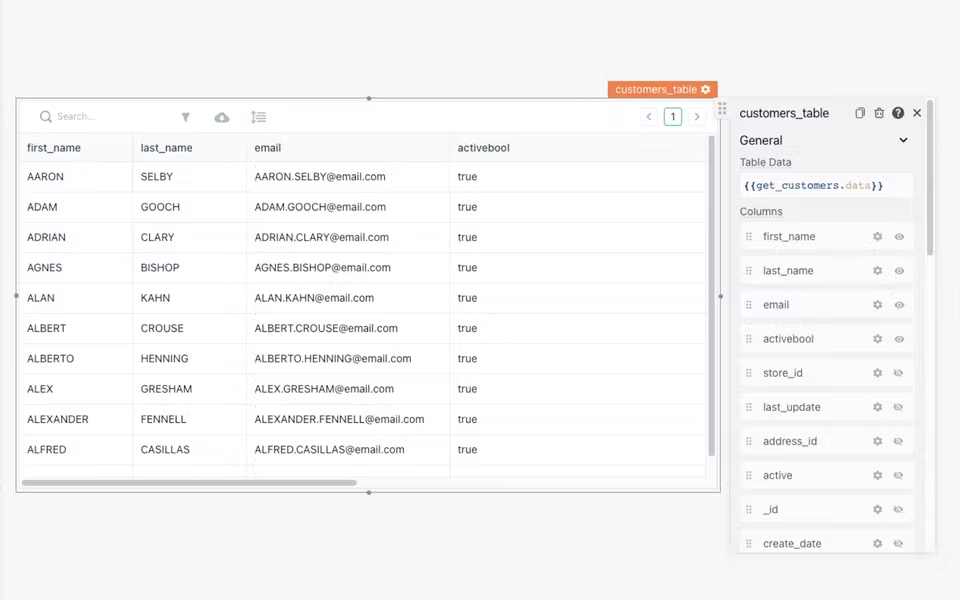
We now have a database connected to the application. The next thing we need to do is to create a widget that can be used to create, update and display data from the database. To achieve this, we need a way to fetch data from the database. This can be done on Appsmith by writing database queries. Rolle up your sleeves because we’re going to be writing our first DB query! Click on the DB Queries section again, and you’ll see a button to create a new query on the MongoDB movie_store data source. Give the query a name i.e. get_customers, and select a read template from the list because we’re going to be reading documents from the Customer collection. The get_customer query should find all customers in the Customer collection, sort them by email and return a fixed limit of customers. Your query should look like this.
// Customer collection
{
"find": "Customer",
"sort": {
"email": 1
},
"limit": 10
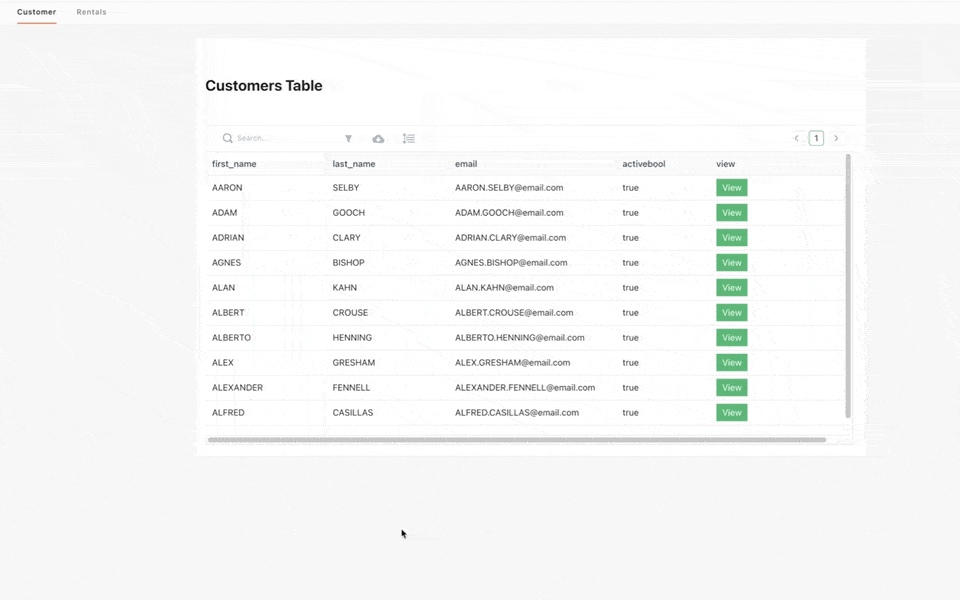
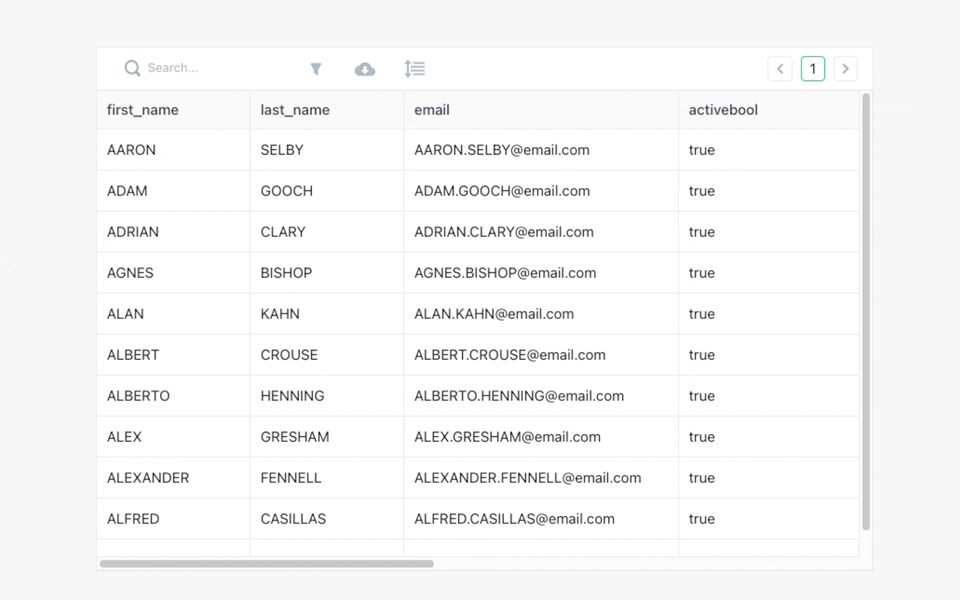
}Configure your query and hit the run button, and you’ll get a list of 10 customers. Sweet! It would be much readable to display this data in a table. So let’s do exactly that. Click on the Add widget button just below the query editor, and you’ll get a new table widget on the canvas that has been automatically linked to the get_customers query. An alternative way would be to click on the Widgets section and drag a table widget to the canvas. Then, data from the query can be bound to the widget via the Table Data property on the widget’s configuration menu using moustache syntax.
// Customer collection
{{get_customers.data}}
It’s important you give the table a descriptive name. Consider changing the name from Table1 to customers_table
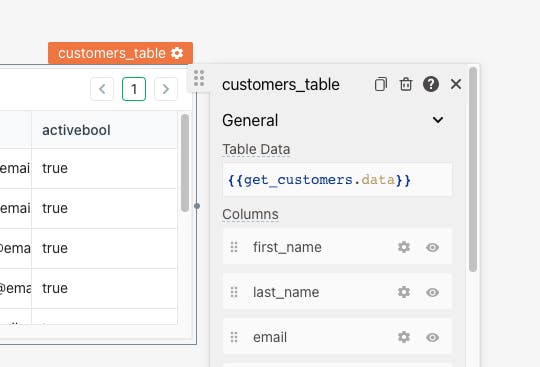
Go ahead to customize the table by re-ordering the columns and hiding columns you don’t like. We’ll also need to paginate the table, so on the table’s config menu, turn on Server Side Pagination and configure the onPageChange action (in the Actions subsection of the menu) to execute a DB query and then select the get_customers query. We’ll need to update the query and add a skip property that calculates a skip based on the current table page number to simulate pagination. The moustache syntax would be very handy in this case to perform quick evaluations, so let’s make use of it. Your updated get_customer query should look like mine.
{
  "find": "Customer",
  "sort": {
    "email": 1
  },
  "skip": {{(customers_table.pageNo - 1) * 10}},
  "limit": 10
}
As you may have noticed, we are accessing the table’s page number from within the {{}} through the object bearing the widget’s name (customers_table in this case). You can learn more about writing Javascript in Appsmith here. Click on the page number on the table widget now fetches new records. We’ve been able to query the database, bind data to a widget and perform customization on the widget. Good job!
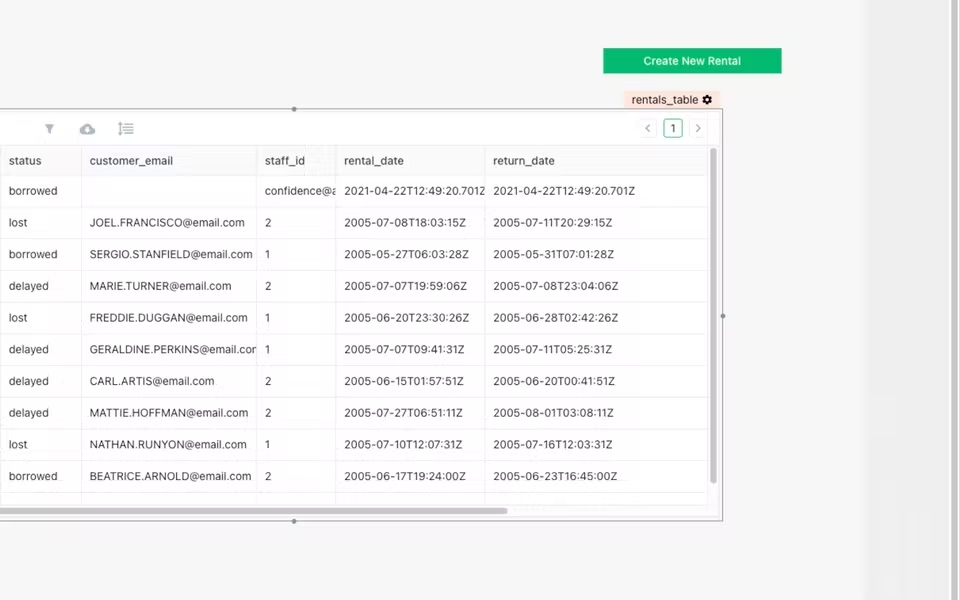
Now, we’re going to create a new page to manage rentals. Click on the plus button on the Pages section of the left-hand panel and create a new page. Call this the Rentals page and update the name of the home page to Customers. On this new page, you’re going to be building a table to display rentals like we just did for the Customers page. You’ll need a query (should be named get_rentals) and a table widget (should be named rentals_table) for this. Your query to get rentals should look like this.
{
  "find": "Rental",
  "sort": {
    "_id": 1
  },
  "skip": {{(rentals_table.pageNo - 1)*10}},
  "limit": 10
}
Where rentals_table is the name of your table widget on the Rentals page. Creating new rentals
After completing the table on the Rentals page, the next feature we need to build in is the ability to create new rental records. Here’s the game plan: We’re going to build a form that takes as input the status, rental data, film title, customer email, and return date. This form would be housed within a modal widget that would be triggered by clicking on a ‘Create new rental’ button. Now, you have a good overview, let’s get started! On the Rentals page, head to the widget’s section and drag in a modal widget. In the modal’s config menu, update the name to create_rental_modal and set the Modal type to Form Modal. Now you see we have more space to work with. With create_rental_modal open, drag in three dropdown widgets and two date picker widgets. The name of the first dropdown widget should be updated to customer_dropdown. Following this convention, go ahead and rename the other two dropdowns to film_dropdown and status_dropdown. For the two date pickers, their names should similarly be updated to rental_datepicker and return_datepicker. You should drag in a few text widgets to label these inputs.
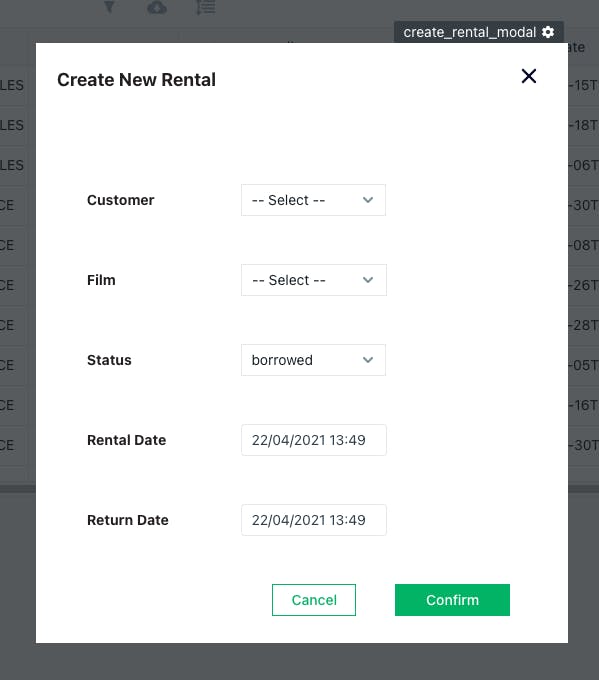
We need a button on the UI to trigger the opening up of the modal. Let’s drag a button from the widgets section to the canvas. Give this button a new label i.e Create New Rental, and set the onClick action to Open Modal, then select create_rental_modal. Clicking on the button now opens up the modal. Nice! We’ve completed the UI for the crate form. Now let’s wire it up with some queries. The first query we’ll be writing for the create form would get all registered customers from the DB. We would use the returned data to build the options for the customer_dropdown. This query would be similar to the get_customers query from the Customers page. Go ahead and create a new query named all_customers. It should be configured as shown below
{
  "find": "Customer",
  "sort": {
    "email": 1
  }
}
Now, we can use the data returned from this query to build the options of the customer_dropdown. Open up the create_new_rental modal and head to the config menu of the customer_dropdown. Now replace the content of the Options section with the snippet shown below.
{{all_customers.data.map(c => ({label: c.email, value: c.email}))}}This returns an array of objects whose label and value are the email addresses of the customers from the all_customers query. You can play around with the dropdown and see that the options generated from the query. Sweet 🤩 Now you’re going to do the same thing for the film_dropdown. Create an all_films query and use the title field of each document to build the options for the dropdown. Your query should look like this.
{
  "find": "Film",
  "sort": {
    "title": 1
  }
}
Cool! For the status_dropdown, we can simply hard code the Options with this simple JSON array.
[
  { "label": "borrowed", "value": "borrowed" },
  { "label": "delayed", "value": "delayed" },
  { "label": "lost", "value": "lost" },
  { "label": "returned", "value": "returned" }
]
Don’t forget to set a default option for each dropdown widget The rental_datepicker and return_datepicker widgets do not require further configuration, and they are good to go. The last thing we need to do is to write a query that would create a new document on the ‘Rental’ collection using the data from the input widgets. Alright, go ahead and create a new query called create_rental and configure it this way.
{
  "insert": "Rental",
  "documents": [
    {
      "staff_id": "{{appsmith.user.email}}",
      "status": "{{status_dropdown.selectedOptionValue}}",
      "customer_email": "{{ customer_dropdown.selectedOptionValue }}",
      "film_title": "{{ film_dropdown.selectedOptionValue }}",
      "rental_date": "{{ rental_datepicker.selectedDate }}",
      "return_date": "{{ return_datepicker.selectedDate }}",
      "last_update": "{{moment().format()}}"
    }
  ]
}
Now we can go back to configure the big green Confirm button on the modal to run this query when it is clicked. We also want to close the modal and refresh the rental table when the button is clicked. Because what we want to do is a complex chain of actions, we can write some JavaScript to achieve this. Click on the JS button just beside the onClick button of the Confirm button and supply the bellow code snippet.
{
{create_rental.run(
  ()=> {
      closeModal("create_rental_modal");
    get_rentals.run();
  }
)}
}
Great Job! Go ahead, give it a spin and create a few new rentals.

Updating a rental
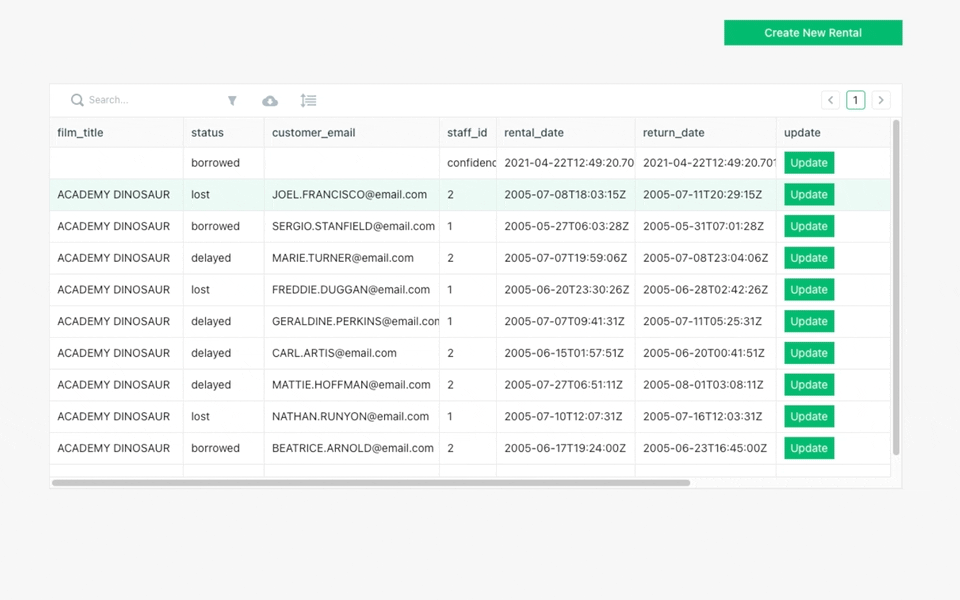
The flow for updating a rental is quite similar to that of creating a rental. We’ll need a modal that would be opened by clicking on a button. The modal would only contain form elements for updating the status and return date of the rental. The only difference here is that we want the rental in question to be the one selected from the table. To do this, we need to head back to the config menu for the rentals_table and create a new column by clicking on the Add a new column button. Click on the gear icon of the newly created column and set the column name to Update. Also, set the Column type to button and set its Lebel property to Update. For its onClick action, it should be configured to open up the update_rental_modal which you’re going to build on your own.
And that all you need. Oh, you’ll also need to write a update_rental query too. It should look somewhat like this.
{
  "update": "Rental",
  "updates": [
    {
      "q": {
        "_id": "{{rentals_table.selectedRow._id}}"
      },
      "u": {
        "$set": {
      "status": "{{ update_status_dropdown.selectedOptionValue }}",
          "return_date": "{{update_return_date_datepicker.selectedDate}}",
          "last_update": "{{moment().format()}}"
     }
      }
    }
  ]
}
Now you have everything you need to know. Go ahead and build the update flow.
Putting it all together
You’ve done a good job making it this far. I’m so proud of you that I’m going to leave the gif below. 🤗

We’ve been able to accomplish most of what we set out to do. We have a table on the Customers page to view all customers. On the Rentals page, we can view all rentals, create a new rental or update existing rentals. It was no small feat we accomplished. I’ll like us to add one more feature. Let’s make it such that clicking on a customer on the customers_table takes us to the Rentals page, and then we can view all rentals made only by that customer. We’ll need column buttons for each row like we did for the update flow. In this case, the onClick action of the custom column buttons would perform a navigation to the Rentals page and pass the selected customers’ email from the table as query params. Use the below snippet in the Query Params configuration for the navigation.
{{{customer_email: customers_table.selectedRow.email}}}And lastly, we need to update the get_rentals query in the Rentals page to filter by customer_email coming in as a query param. We also add a fallback just in case no email is passed.
{
  "find": "Rental",
  "sort": {
    "customer_email": 1
  },
    "filter": {
    "customer_email": {
      "$regex": "{{appsmith.URL.queryParams.customer_email || ""}}"
      }
    },
 "skip": {{(rentals_table.pageNo - 1) * 10}},
  "limit": 10
}
And that’s it! You’ve completed the app. 🥳️🎉🎉
Sharing and deploying the app
It’s quite easy to hand off your application to the team that would make use of it i.e customer support. You don’t have to worry about an authentication/authorization flow; Appsmith does all the work for you. There’s a SHARE button on the top right side of the page. You can easily use it to invite users to the application and set roles i.e app viewer or developer. No hassle is required! Clicking on the ‘DEPLOY’ button to the right of the share button will publish all changes made in the editor to the hosted version of the application. Isn’t that cool? Wrapping up
We set out to build an admin panel, and we’ve seen how we can do it very easily using Appsmith. Going this route will drastically reduce the development time and resources put into maintaining the app. If you found this tutorial helpful, please consider giving us a star on Github. Cover Photo Credits: Photo by Serpstat from Pexels


