Connect Xero API to Appsmith

In this guide – we’ll walk you through connecting your Xero account to Appsmith to create an application around its data.
“”Content from Tick9, an Appsmith partner
Setting up Appsmith
Appsmith can be downloaded and hosted within your local business network. But this guide won’t cover the installation process; if you want to try Appsmith, you can use the cloud service provided by Appsmith or speak with a member of our team for advice on installing Appsmith within your local network.
Open Appsmith, create a new application called “Xero – Invoices,” and click “Build with drag & drop.” You’ll see an empty page with “Drag and drop a widget here.” We now need to connect Appsmith to your Xero API account.
Setting Up the Data Source
On the left-hand side of Appsmith – you’ll find a toolbar combining “Widgets,” “Queries/JavaScript,” and “Data Sources.” Let’s start by connecting to your business account on Xero through the Xero API.
Click on the plus button to the right of “Datasources” and then select “Authenticated Account”. Appsmith will now create a new REST API datasource within your application. But before using it, we need to configure the datasource to communicate with Xero’s OAuth Authentication correctly.
In the URL field, paste the base address of Xero’s API (https://api.xero.com/).
Click on the Authentication Type dropdown, and select OAuth 2.0.
Scroll down to Grant Type and select Authorization Code.
Within the Access, Token URL field, paste the following
We now need to provide the scope of our API access. In this guide, we’ll need to access our organization's contacts and accounting data. So paste the following values into the field OpenID, offline_access, accounting.transactions.read,profile,
accounting.contacts.read,email.
Within the Authorization URL, paste the following
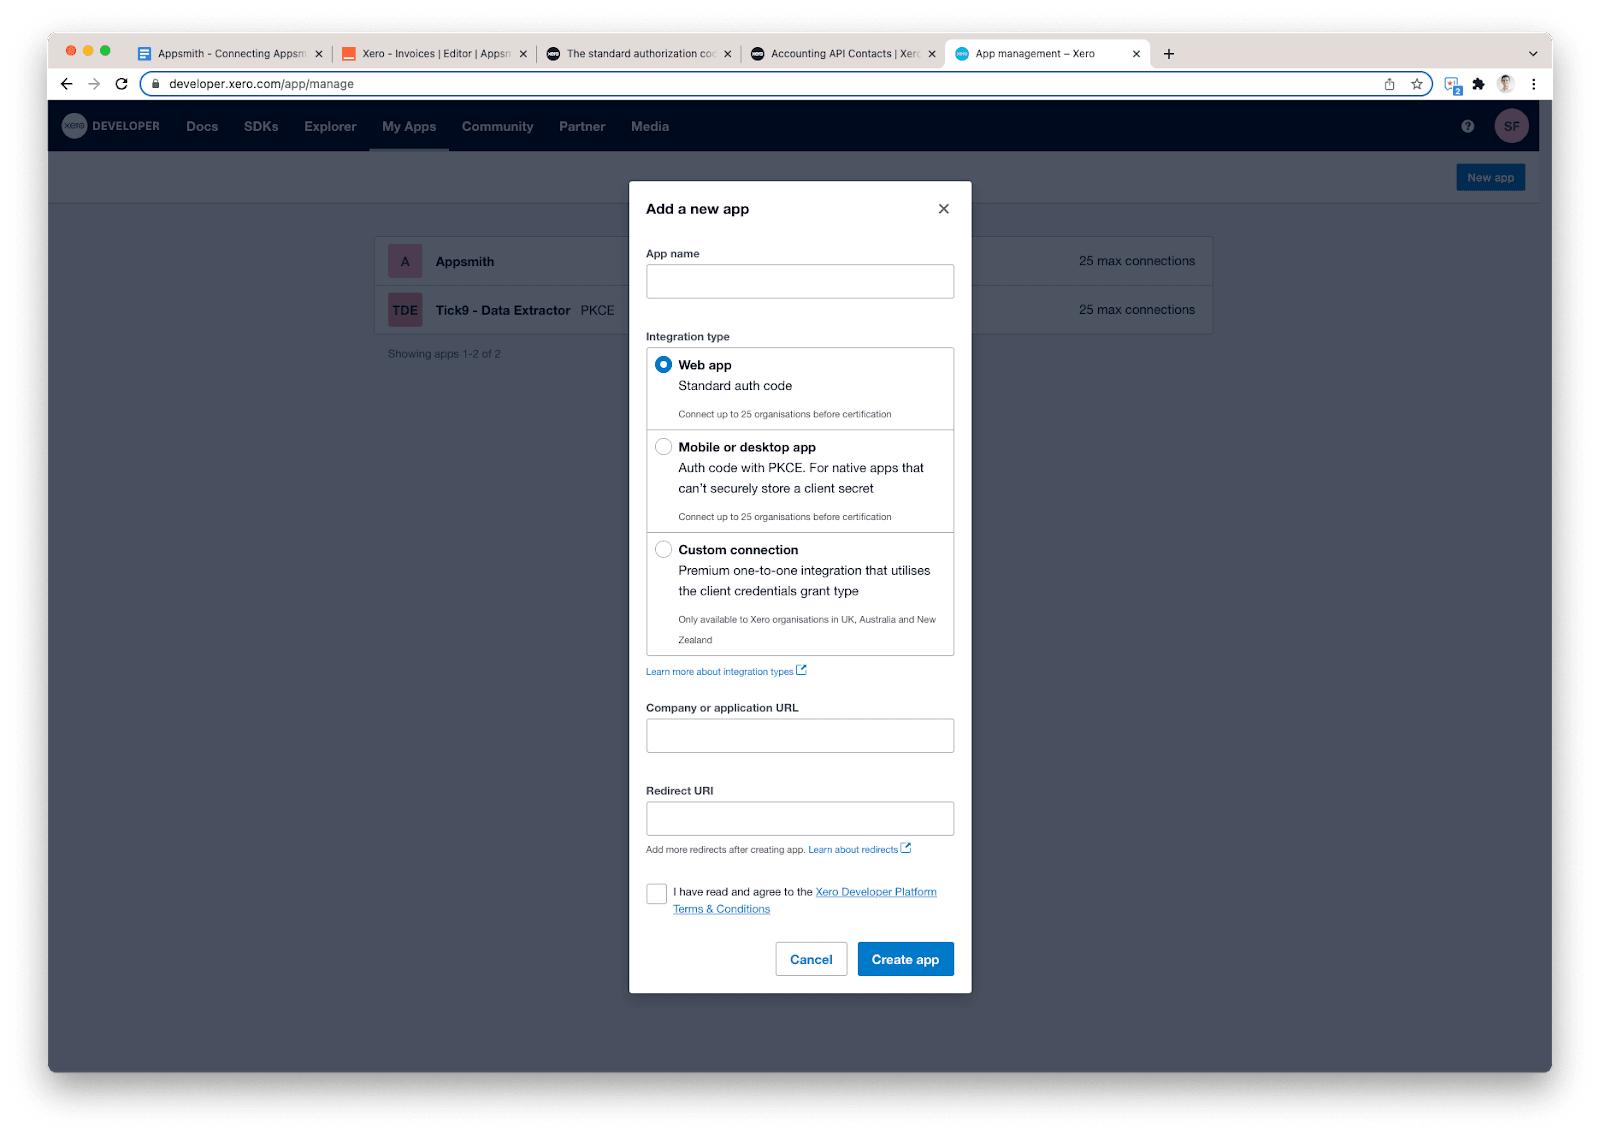
In order to get our Client ID and Client Secret – we need to make a quick diversion to Xero. Head over to the following link and click on the blue “New App” button once logged in. Give your application a name (e.g., Northwinds Appsmith), and then paste your generated “Redirect URL” from Appsmith into the box at the bottom.
Once created, go into the registered application and select “Configuration” on the left-hand side. Take note of the Client ID and Client Secret (if you don’t have one, click on the generation button). Now return to Appsmith and paste these values into the respective fields.
We should now be ready to authorize your access with Xero. Simply click on the “Save and Authorize” button at the bottom of the page and wait a few moments until you’re redirected to Xero (as shown in the screenshot above). Select the organization you want to grant access to, and click “Allow access.” You’ll then be taken back to Appsmith.
Selecting Your Organization
Now you’ve successfully connected Xero to Appsmith – we can retrieve data from your Xero account. Let’s begin by getting the information of organizations from your Xero account.
On the left-hand side of Appsmith – click on your data source (e.g. Xero API) and click on New API +. You’ll now be taken to Appsmith’s query editor for REST APIs. In the URL bar, type in /connections after the URL. Appsmith will automatically handle the oAuth 2.0 authentication in the background and populate the request with the required headers. Once you click the Run button, you’ll see the JSON response from your request at the bottom of the page. It should contain an array of objects listing the Xero organizations you’ve granted access to.
Let’s now create a drop-down list on your application so that your users can select the organization which they want to view data from. On the left-hand side, under “Pages” select on the first page (e.g Page1) and then click on Widgets .
Click on your widget, and within the Options code block we need to bind the values from our API response to the Select widget. Some JavaScript code may have already been populated, which creates an array of items with two values for the widget, a label value to be displayed to the user and the value which should be the ID of the organization. Paste, or enter the below code into the Options block.
{{getTenants.data.map( (obj) =>{ return {'label': obj.tenantName, 'value': obj.tenantId } })}}Before we move onto the next stage, make sure to provide the widget with a name (e.g tenantSelect – we will need to reference back to the widget in our next query!
Getting Invoice Data

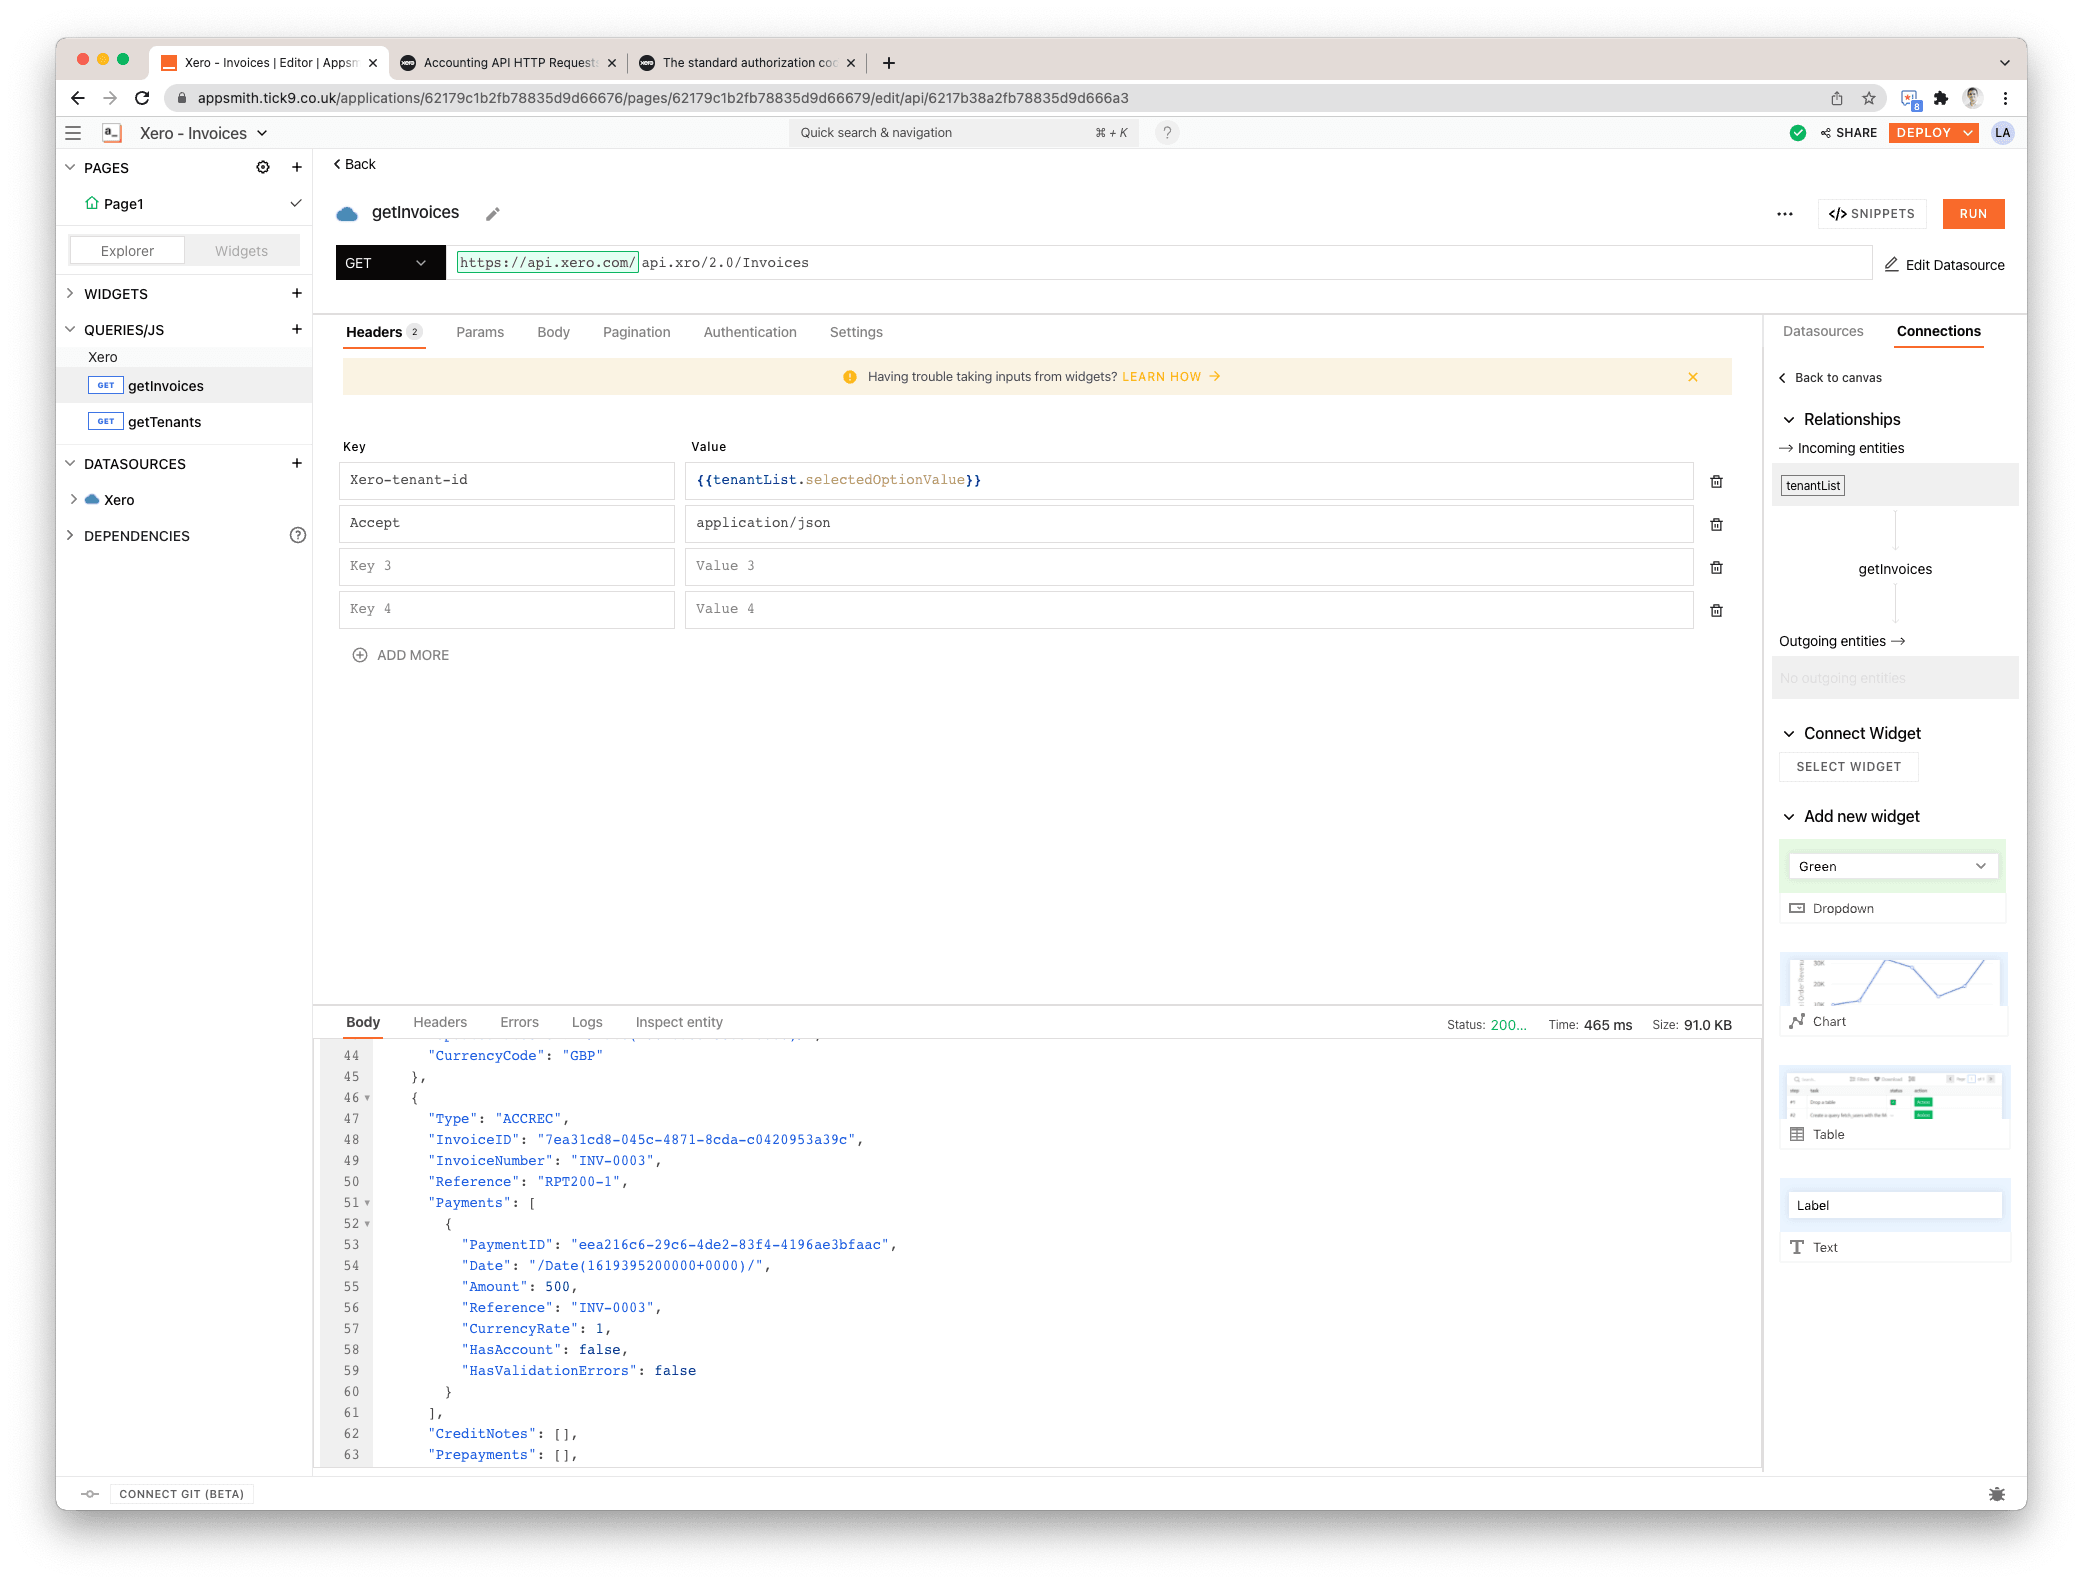
Let’s now retrieve the invoice data from your Xero account! On the left-hand side, click on your Xero datasource and click on New API+. Name the query getInvoices and press return.
In the URL bar, enter /api.xro/2.0/Invoices after the base address.
Under the Headers tab, we need to specify the organization in Xero which we want to pull back the invoices for. You’ll see two rows under this tab, under Key 1 enter Xero-tenant-id and then in Value 1 we need to bind to the selected value from the drop-down we previously placed on the page.
Enter the value
{{tenantList.selectedOptionValue}}
Next, we need to tell Xero that we want the API to respond with JSON, and not XML which is the default behaviour. To do this, simply enter Accept in the next row under the Headers tab, and enter application/json .
Now press “Run”, and if everything has gone to plan – the API would have responded with a list of invoices from your Xero account.
Displaying Invoice Data
We’ve now created a query which retrieves invoice data from your Xero account, but let’s now create a table which will display the list of invoices.
On your page, drag and drop a button next to the select button. In the Label field, give the name Refresh . When we click this button, we want Appsmith to execute the getInvoices query which we created in the previous stage – so under Events on the right-hand side, click on the drop-down under onClick and select getInvoices under Execute a query . Then let’s display a useful alert to the user informing them that the data has been refreshed, under onSuccess click on Show message and enter Successfully retrieved invoices from Xero .
Next, find the Table widget and place it on your page. Give the widget a useful name, such as invoiceTable . Then the right-hand side, under Table Data bind to the array of invoices from the API response by entering the following value {{getInvoices.data.Invoices}} . After a few moments, the table will display the list of invoices from your Xero account.
However, this will only display the first page of invoices from the Xero API which is limited to 100 records. In order to display all your invoices, you will have to enable server side pagination – on the right-hand side, scroll down to Server Side Pagination and make sure this switch is enabled.
Return to the getInvoices query – under the Pagination tab select on Paginate with Table Page No . And then go to the Params tab, under Key 1 enter page , and then in the value input bind to the current page of the table with the following value {{invoiceTable.pageNo}}.
Then back on the table widget, run the getInvoices query when onPageChange is triggered. Once this has been enabled you can click on the right arrows at the top of the table to navigate through all your invoices.
Next Steps
That’s it for this article! Click on the “Deploy” button at the top-right to see the the final version of your application.
In the next article, we’ll delve further into how we can modify our application to write changes back to Xero.


