Connecting Mixpanel, Reply.io and Active Campaign using Appsmith to engage with your users

Like most companies, we use analytics and marketing automation software to run our daily operations and engage with different segments of users. We use Mixpanel, ActiveCampaign and Reply.io for analytics, managing lists and automation, and email engagement. To determine which users we need to reach out to, we have a report we run on Mixpanel. Sometimes we need to send them a simple email, and sometimes we need to send them an engaging sequence of emails. This decision is again based on the report from Mixpanel. ActiveCampaign helps us with the one-off emails, but we use reply.io for engaging and personalised sequences. This is what the process looks like:
Mixpanel reports generating cohorts
Feed relevant cohort data to ActiveCampaign for single one-off emails
Feed relevant cohort data along with user specifics to reply.io for engagement
We’re still young, and we look at most users we want to engage with personally, and doing this manually every day would take a lot of time and workforce. So we ended up building a dashboard on which, with a single click of a button, we can customise and send out emails to our users. This is what our process looks like now:
Look at user details in the Appsmith dashboard
Personalise engagement based on an app built, usage and organisation
Click on the button to engage the user
It saves us a LOT of time and helps us keep our core focus on our users. In this tutorial, we’ll be walking through different steps to build such workflows with various APIs and extend them based on our use cases using Appsmith. Appsmith is an open-source framework that lets developers build dashboards, workflows, and CRUD apps with only the necessary code. You can connect to any API or databases like MongoDB, PostgreSQL, or MYSQL and get access to multiple widgets, including charts, tables and forms, for building a UI fast. https://youtu.be/_8qLbyWwXeA Setting up Mixpanel API on Appsmith Mixpanel is a product analytics tool that’ll give reports based on defined queries. It also provides API, which we’ll consume on Appsmith to pull out all the reports of users who have invited others. Now, let’s follow the below steps to set Mixpanel API as a data source on Appsmith:
Create a new account on Appsmith (it’s free!), if you are already an existing user, log in to your Appsmith account.
Next, create a new application by clicking on the “Create New” button under the Appsmith dashboard.
We’ll now see a new Appsmith app with an empty canvas and a sidebar with Widgets, APIs and DB Queries.
Now, click on the + icon next to the APIs section and choose Create new.
Now add the following Mix Panel API endpoint URL in the request input.
https://mixpanel.com/api/2.0Click on the SAVE AS DATASOURCE button next to the URL, rename this data source as MixPanel API, and hit Save.
Now choose the data source and create a new API; let’s rename it as get_users, add the following route at the end of the URL: /engage?project_id=2032485. This is how our API should look like:
https://mixpanel.com/api/2.0/engage?project_id=2032485Sometimes, Mixpanel APIs might be slow to process; hence we’ll have to increase the API timeout options; we can simply do this by going to the settings tab and increasing the time out to 100000.
Lastly, set the request type to POST and hit RUN; we should see the list of users that are inside the Mixpanel report with id 2032485
The API's and ids used in these tutorials are examples created for demo purposes. These do not depict the original data. Feel free to work with your APIs or follow along with these tutorials with the given examples. Fantastic, we should now see the response from API having a set of users for whom we want to build customised email engagements. In the next section, let’s show the users on a List widget and customise it based on our UI preferences. Binding Users onto the List Widget Let’s use the List widget to show all the invited users from the get_users API endpoint. Follow the below steps:
Click + icon next to the Widgets from the left navigation and drop the List widget on canvas.
Now open the list property pane by clicking on the cog icon on the top-right of the list widget. Inside the property pane, we can bind the data and create necessary actions using the pre-defined properties.
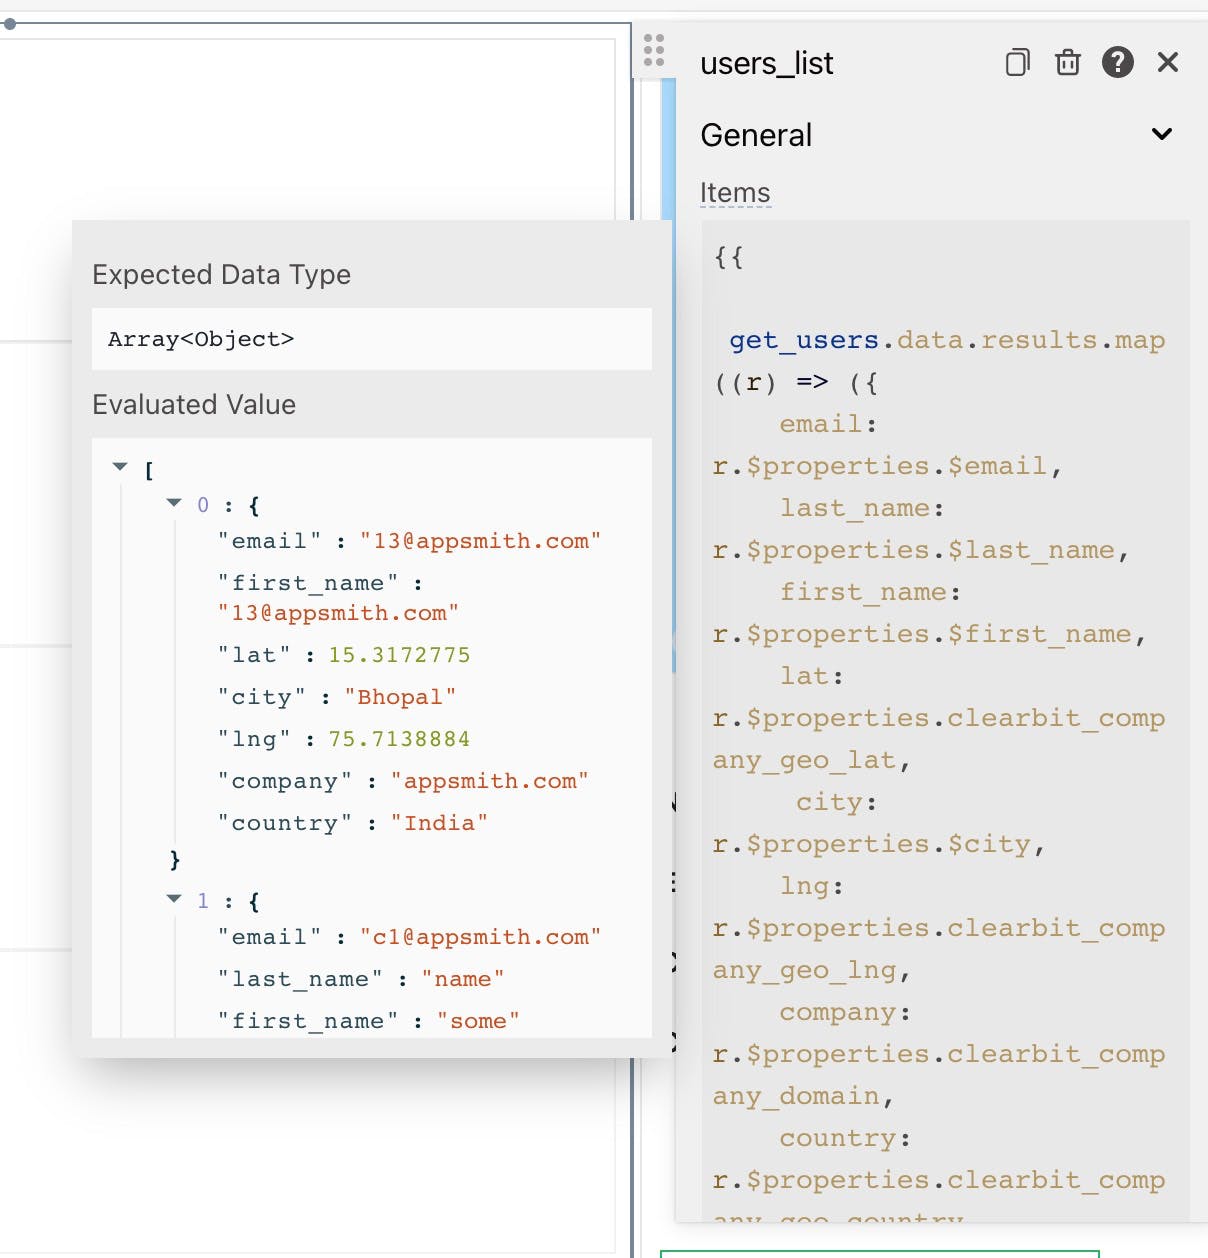
Now paste the following code snippet into the Items property in the property pane:
{
{
  get_users.data.results.map((r) => ({
    email: r.$properties.$email,
    last_name: r.$properties.$last_name,
    first_name: r.$properties.$first_name,
    lat: r.$properties.clearbit_company_geo_lat,
    city: r.$properties.$city,
    lng: r.$properties.clearbit_company_geo_lng,
    company: r.$properties.clearbit_company_domain,
    country: r.$properties.clearbit_company_geo_country,
  })).filter(r => r.lat);
}
}
Above, we have used the moustache syntax and consumed the get_users API, which was defined previously. In Appsmith, we can use the moustache syntax anywhere, anytime and write JS to manipulations. In this case, we are returning the important variables like email, last name, location of user, company to the list. Following is a screenshot of how the evaluated value looks like after we add in the JS:
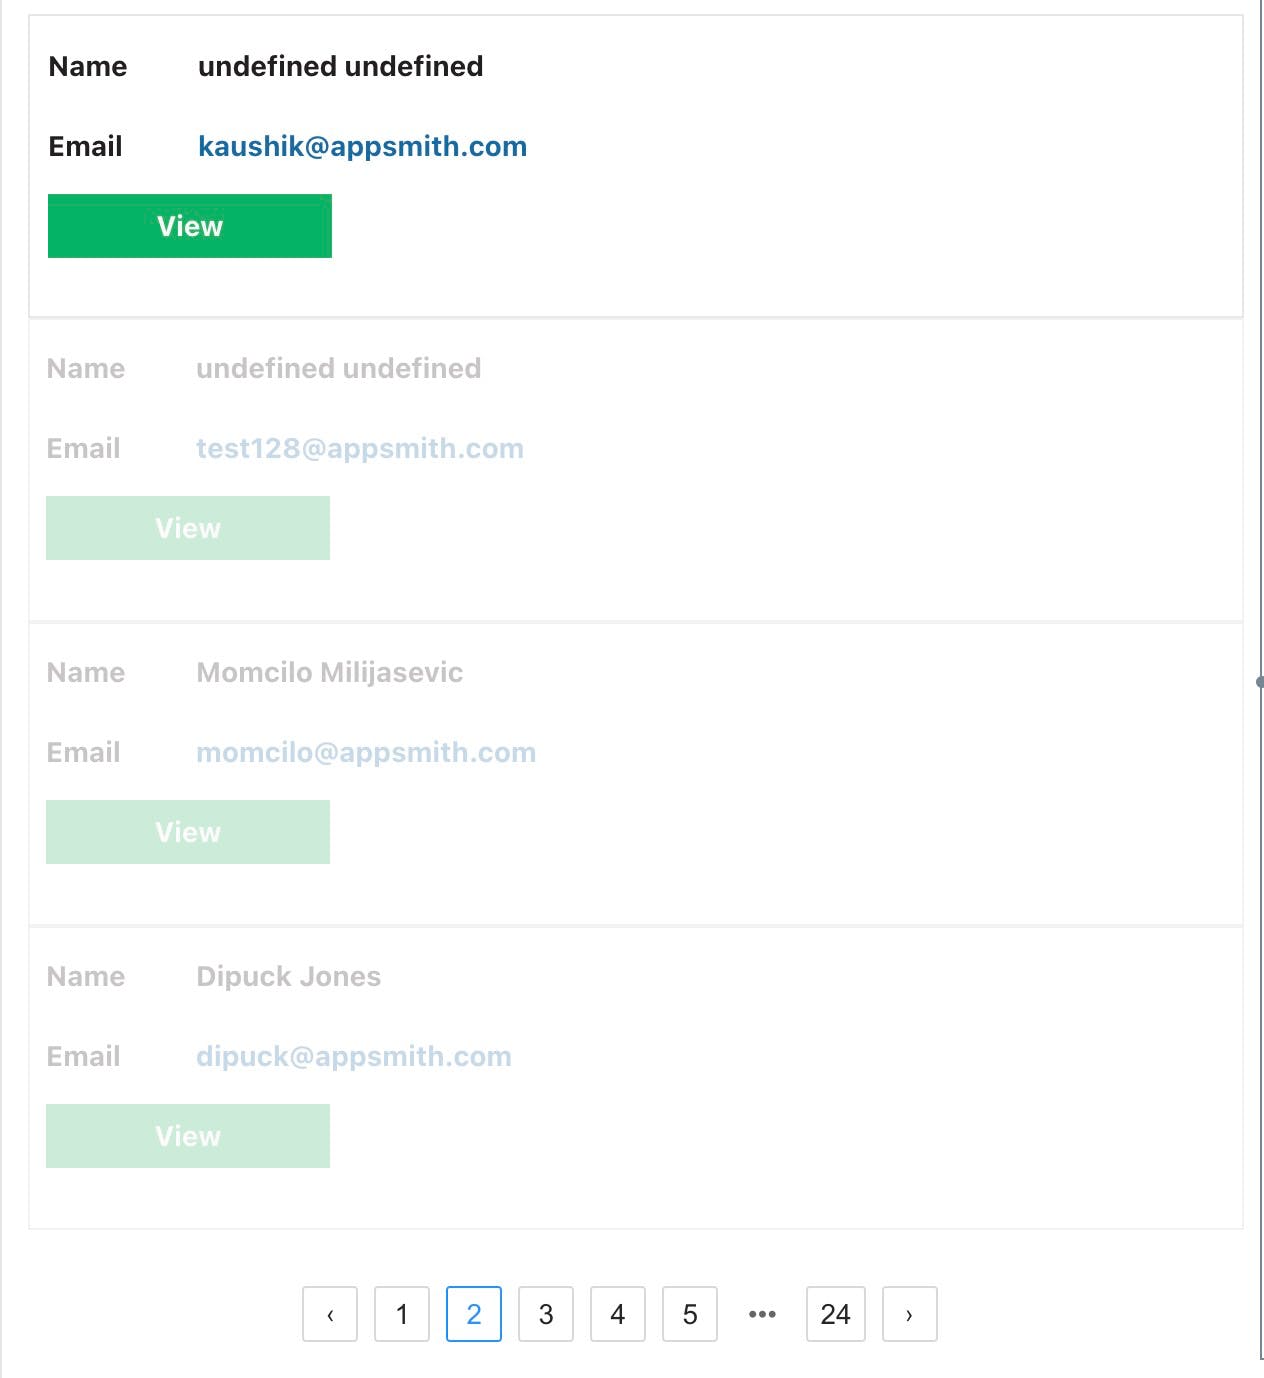
Now let’s drag and drop a few text widget’s on the first list item and bind the values from the list Items property.
Find the text widget from the Widgets section drag and drop four of these; the first two text widgets will act as the Label’s, and the last two will act as the Values from the API.
For the first two widgets, set the values like Name and Email. Next, set the following text Values to {{currentItem.email}} and {{currentItem.first_name + ' ' + currentItem.last_name}} for the other two widgets. Now add one more text widget and customise it with a background colour such that it looks like a button; this is because whenever we click this, we can use the list’s selected item property and show the details of the selected user from the list.
Below is a screenshot of how our list widget looks now:
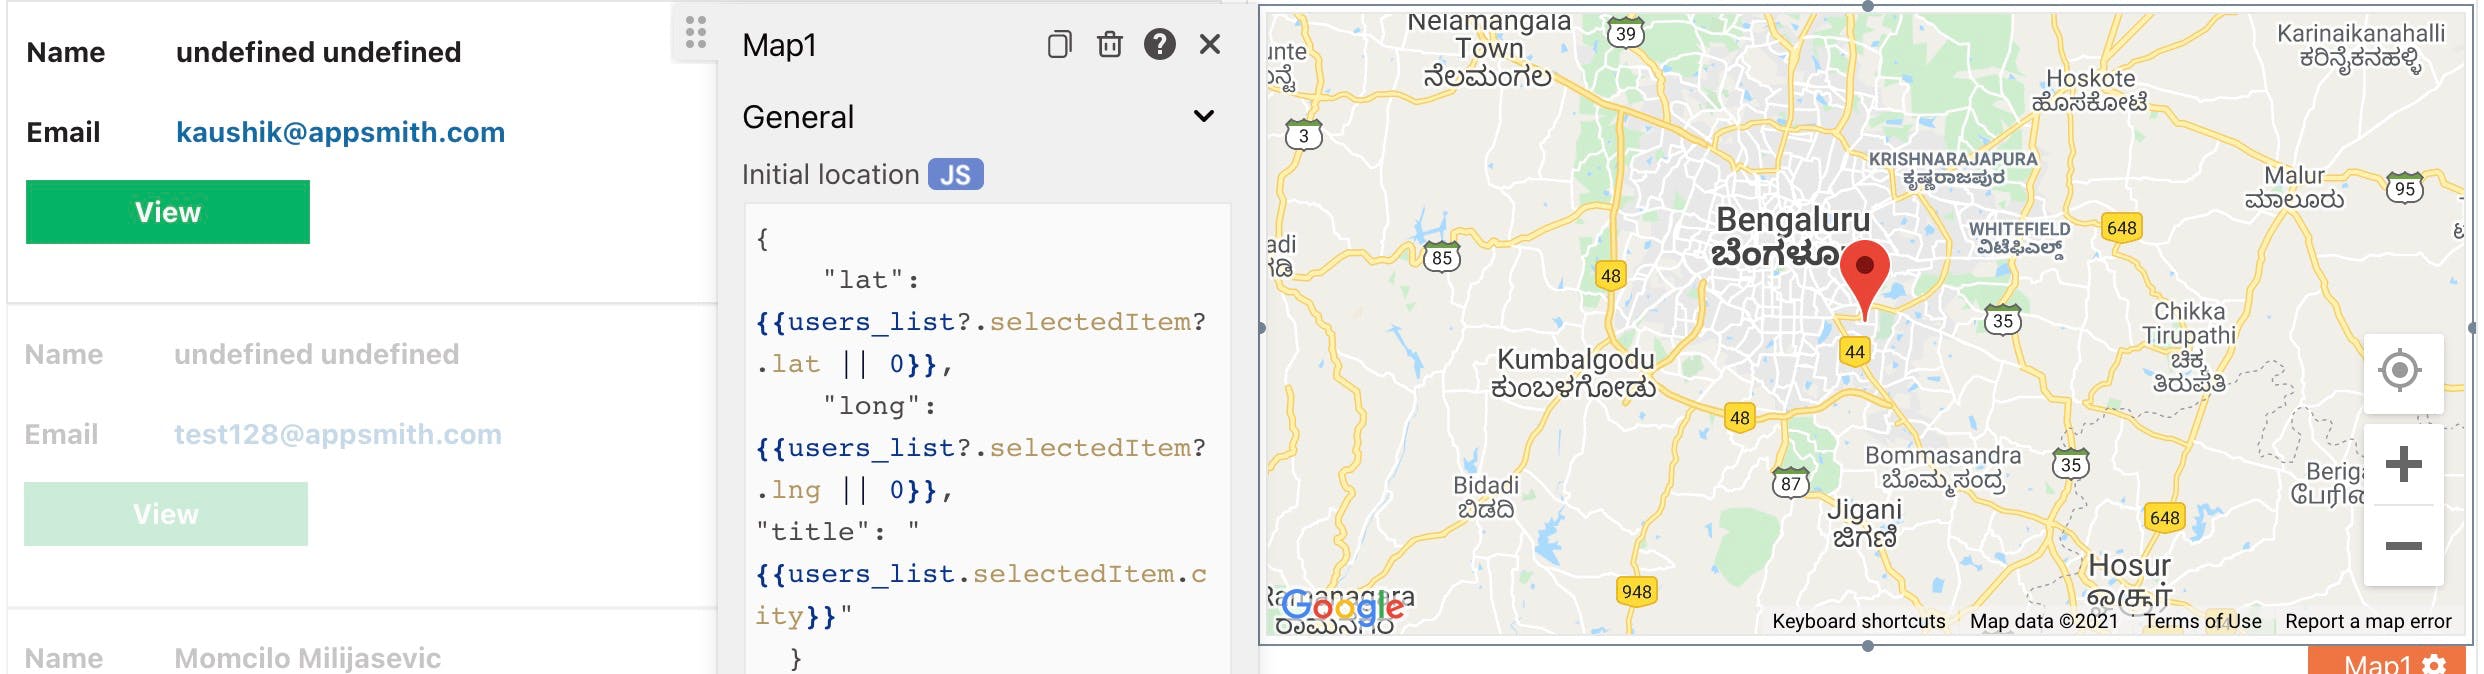
Now, let’s add a Map widget and bind the latitude and longitude to locate the user visually. Let’s follow the below steps:
First, find the map widget’s from the widget’s section and drag and drop a new Map Widget next to our user’s table.
Now, open the Map’s property and add the following JS in the Initial location property by toggling the JS button next to it:
{
    "lat": {{users_list?.selectedItem?.lat ||0}},
    "long": {{users_list?.selectedItem?.lng ||0}},
    "title": "{{users_list.selectedItem.city}}"
}
Here, we’re setting the initial tag to the latitude, longitude and title from the list widget based on the selected item using the selectedItem property.
We’ll also need to set the Default markers to the following:
[{
"lat": {{users_list?.selectedItem?.lat ||0}},
"long": {{users_list?.selectedItem?.lng ||0}},
"title": "{{users_list.selectedItem.city}}"
}]
This is usually an array that takes details of markers we mark on the map. We need only one marker hence adding only a single object from the selected list item. With this, we should see our map, and when an item is selected, we can see the users' location. Simple right! Below is a screenshot of the Map widget:
Fetch Smartlook Recordings from Mix Panel API
In this section, we’ll add one more workflow where when clicked on a button, we should be redirected to the list-item selected user’s smart look recordings. These smart look recordings are added in a different mix panel API which is protected. Hence we’ll be using an authorization mode to access this API. Follow the below steps to follow:
Use the Mixpanel API data source we’ve created before and click Create new.
Now, add the following route to the end of the data source: /jql?project_id=2032485, this is how the API should look overall.
https://mixpanel.com/api/2.0/jql?project_id=2032485Now let’s add Authorisation in the headers, copy-paste the below into the key-value pairs: Authorization : Basic YmZkNDhhYjk1NzcxNTg4NjI0M2VhZDYyNzNhNDhlMTk6 content-type: application/x-www-form-urlencoded
Now, navigate to the Body tag and set the type to X-WWW-FORM-URLENCODED and add the following as a key-value pair.
Key: script
Value:
functionmain() {
  return Events({
    from_date: '2021-01-01',
    to_date: '{{moment().format('YYYY-MM-DD')}}',
    event_selectors: [
      {
        event: 'WIDGET_DROP',
        selector: '"{{users_list.selectedItem.email}}" in properties["$email"]',
        label: 'Invite Graph',
      },
    ],
  });
}
Awesome, this is a custom configuration for our Mixpanel Report to fetch the Smartlook recordings, you can customise this based on your report or use this as an example. Now let’s add a button below the Map widget. Now, whenever this button is clicked, we should be redirected to the Smartlook URL of that particular users. Hence, we have to use JS to solve this. Now drag and drop a button widget beneath the map widget and set the onClick property to the following:
{{navigateTo(get_recording.data[0].properties.smartlookPlayUrl,'{}','NEW_WINDOW')}}Here, when the button is clicked, we navigate to a new page, and the target link is the link that’s returned from the get_recording. We’ve done some additional parsing to fetch the smartlookPlayUrl property. If the API’s are slow, we can always increase the Timeout. Sending Customised Emails to the Users In this section, we'll be using the APIs of reply.io to send emails to the users shown on the list. First, let’s make a simple UI, we’ll have a button labelled, send Email when clicked these email campaign should start. For this, we'll be needing to create two APIs; follow the steps below: 1. Fetch the Emails from Appsmith API In this step, we'll have to fetch the profiles from the Appsmith account. Hence, we need to consume one of our Appsmit APIs and pass in the Email that's selected on the list widget.
First, let's create a new API called get_user and set the URL as follows:
https://appsmith.api-us1.com/api/3/contacts?email={{users_list.selectedItem.email}}Here, user_list is the name of the list widget, and we're binding the selected email using the moustache API.
This API is secure, hence, we'll need to add an API key in header, in our case, it's Api-Token and the value is a60fdd2cb979167412b0a4daa60de8837db13f08538e7221e0d63126a7163c795eb04f7a
2. Send Email
Now, let's create one more API with reply.io to send customised Emails by clicking a button widget.
Create a new API and name it as send_email and set the URL as follows:
https://api.reply.io/v1/actions/addandpushtocampaignIn the header, we'll need to add the API keys that can found in the reply.io dashboard.
Now in the body, we take the inputs from the form widget and then run the API's to send the emails. Below is the JS.
{
    campaignid: 558301,
    lastName : {{users_list.selectedItem.last_name}},
    firstName: {{users_list.selectedItem.first_name}},
    email: {{users_list.selectedItem.email}}
}
Now set the button onClick property to the following JS:
{{
  get_user.run(() =>
    send_email.run(
      () => showAlert("Reached out to user", "success"),
      () => showAlert(send_email.data, "warning")
    ));
}}
Here, we’re fetching the users and sending them the Emails using a reply.io campaign that's already created! Wrapping Up Deploy your application on the cloud and share it with others, and that's it. We're done!
You've seen how easy it is to build a customised workflow on Appsmith. Similarly, we can integrate the number of APIs and data sources and build customised dashboards.
If you like this tutorial, drop us a star on our GitHub repository here


