How I created my own stock index tracker with time-series charts using low-code

I recently started investing and came across a product called Smallcase. The way it works is — experts create a diversified long-term portfolio of stocks & ETFs and manage it on a timely basis for you. I really love the idea of how stocks can be added into portfolios or baskets to reduce market volatility. Unfortunately, at the moment, this product is only available for Indian investors and that led me to create an app, where I could create a portfolio, and also create a custom index on top of it, with features to compare benchmarked indices like Dow Jones / S and P.
Building this kind of application from scratch would have taken me a lot of time; I would have had to choose a front-end framework, configure a database, and work on different visualizing frameworks to build time-series charts. With Appsmith, I was able to build this app in just a few hours. If you don’t already know, Appsmith is an open-source low code framework to build internal apps. In this blog, I will take you through the steps I followed to create the app.
First, let me share the specs of the app in a little more detail.
With this application, you can do the following:
Track stocks: Set filters on what stocks should be tracked, throughout the day by default or create specific lists.
Make your own baskets: Create customized stock portfolios as baskets.
Time-series charts to compare performances: Create a custom index for these portfolios and compare them with benchmark indexes using time-series charts.
Notify: Send notifications and triggers when there are fluctuations in the market.
In this blog, I will also dive into building some nifty time-series charts and build our stock index tracker that can compare with S&P 500, Dow Jones, and NASDAQ.
Here are a few screenshots of the application:
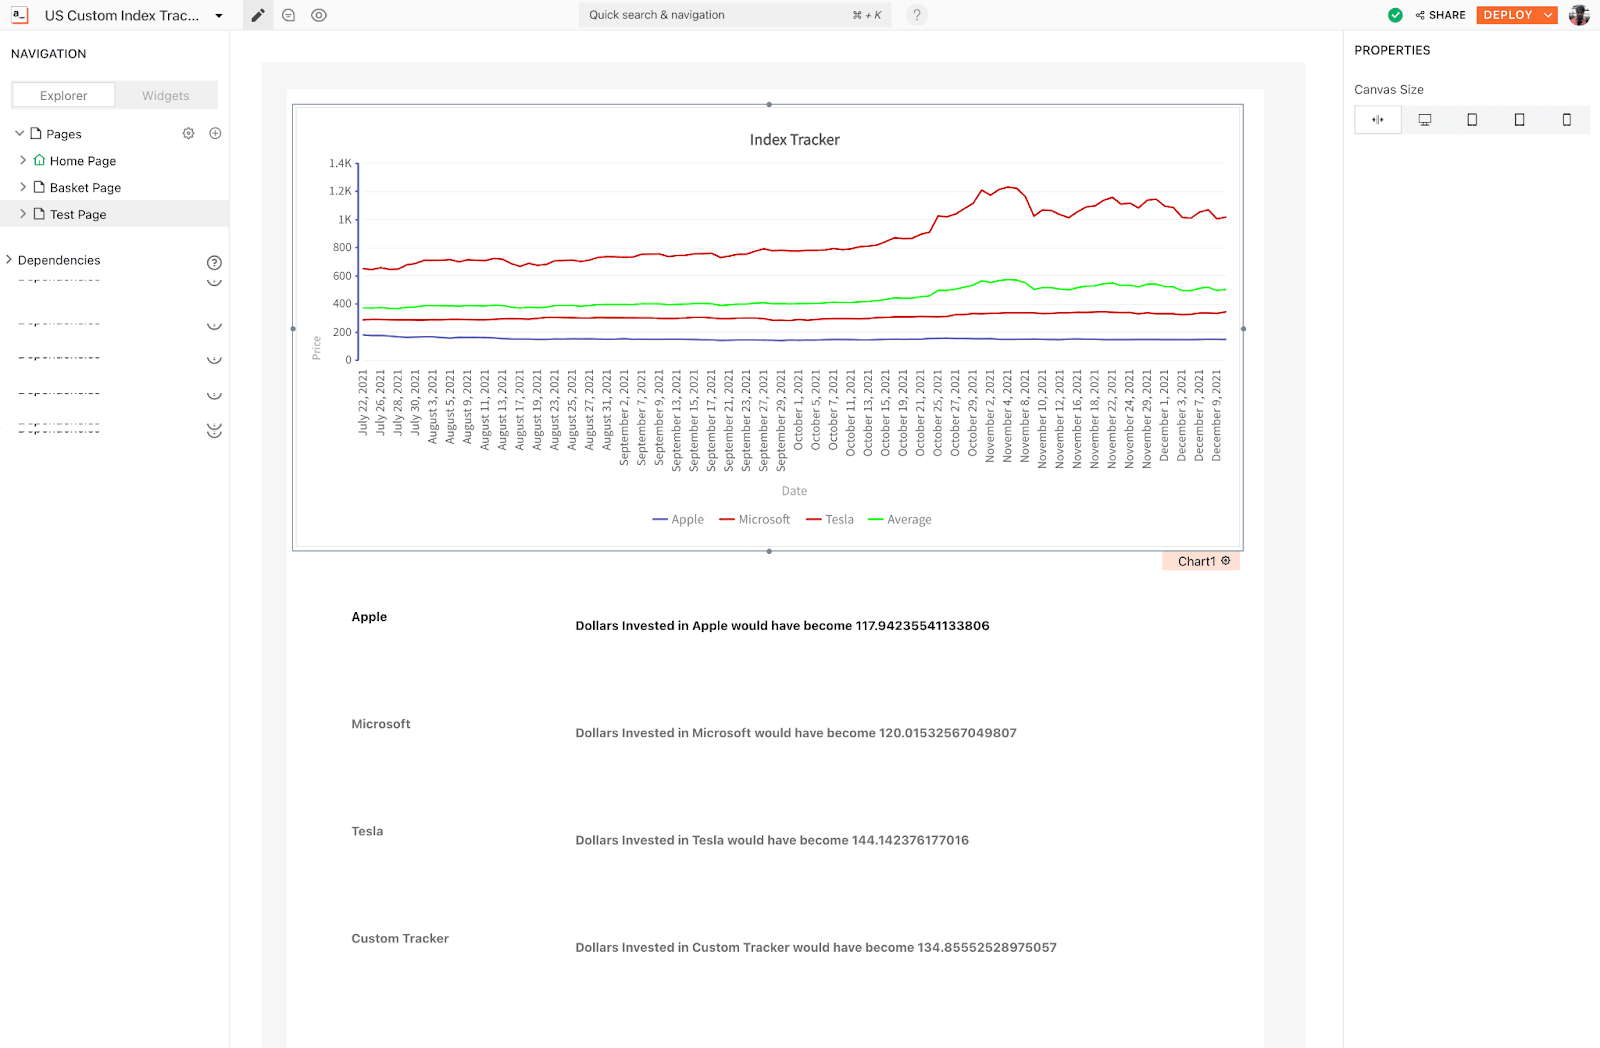
Screenshot of Custom Index Tracker on Appsmith
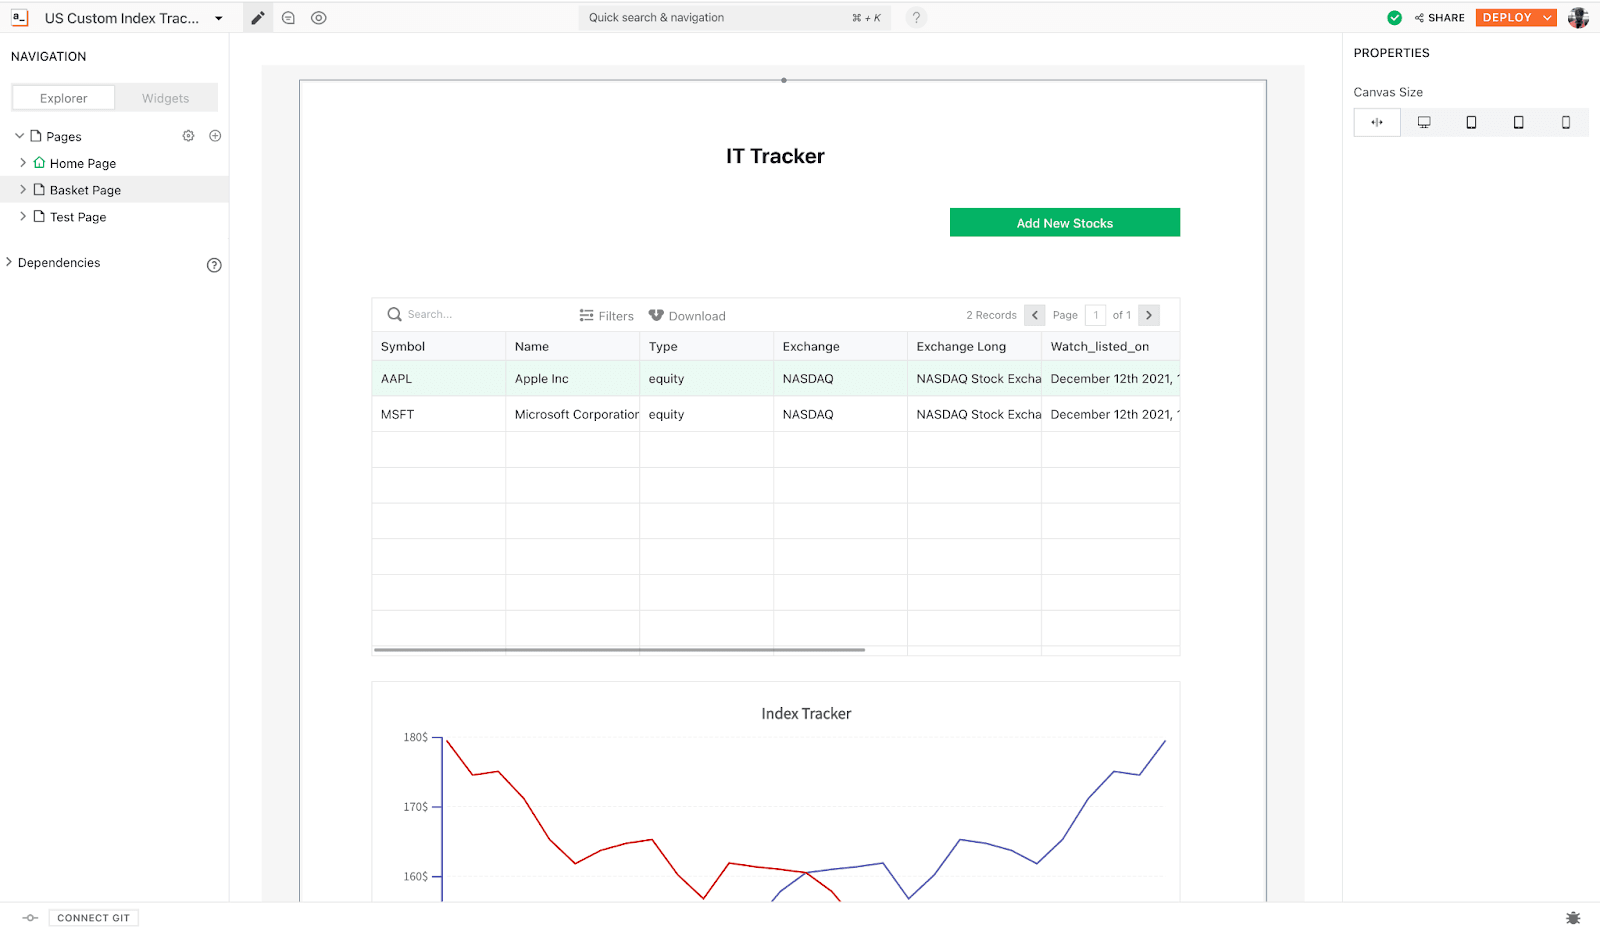
Screenshot of Custom Index Tracker on Appsmith — 2
Now, let’s get started!
What All Did I Use to Build This Application?
TLDR; I’ve used Appsmith, Fusion Charts on Appsmith, APIs from MarketStack, Alphavantage, and Google Sheets as the backend to build this application.
This application primarily uses Appsmith, an open-source low-code tool that can connect to any database, API, or GraphQL to build admin panels, dashboards, and internal tools. Appsmith also supports charting options; it has an in-built extension that uses Fusion Charts to create data visualizations; this made it much easier to build my own time-series charts. To pull all the stock data and prices in real-time, I’ve utilized free APIs from MarketStack and Alphavantage.
(Please remember to generate your own API keys if you’re following this tutorial to build a similar app! To know more about generating your own API keys, read this blog)
I’ve used Google Sheets as my backend to watchlist stocks and store customized stock portfolios and baskets.
Creating Baskets to Group and Track Stocks
The first step to creating portfolios, or as I like to call them, “baskets,” is to build a user interface. Through this, a form can take in our portfolio name, time created, and a logo design for easy viewing… and some vanity! 😎
It took me less than 5 minutes to create this with Appsmith and Google Sheets; here’s how I did it:
Note: I’ve used the Cloud Version (Community Edition, which is free) of Appsmith; you can build this either on a local version using Docker or a self-hosted version of Appsmith.
Sign-up for a new free account on appsmith.com
Click on the + icon next to Datasources and choose Google Sheets as Datasource.
Authorize your Google Account, and create a new query by hitting the NEW API button after the data source is saved.
Renamed the query name to assBasket, as we’ll need to access query names on the UI.
I created a new google sheet with the following columns:
Basket Name Basket Image URL Basket Create On
Copied the URL of google sheets and pasted it under the SpreadSheet URL property.
Set the Query Type to Insert Sheet Row
With this, our query is ready. Next, to build UI on Appsmith, you can just drag and drop widgets from the library on the right side of the screen. Appsmith’s canvas is quite responsive, and you can even drag widgets between two other widgets, and it will auto-resize, saving you valuable time! I added a container widget so that our app looks unified; we even have an option to add colors to this if we want to stylize the background a little more. I then dropped a text widget to set the app’s name and a button widget.
Here’s how it looks:
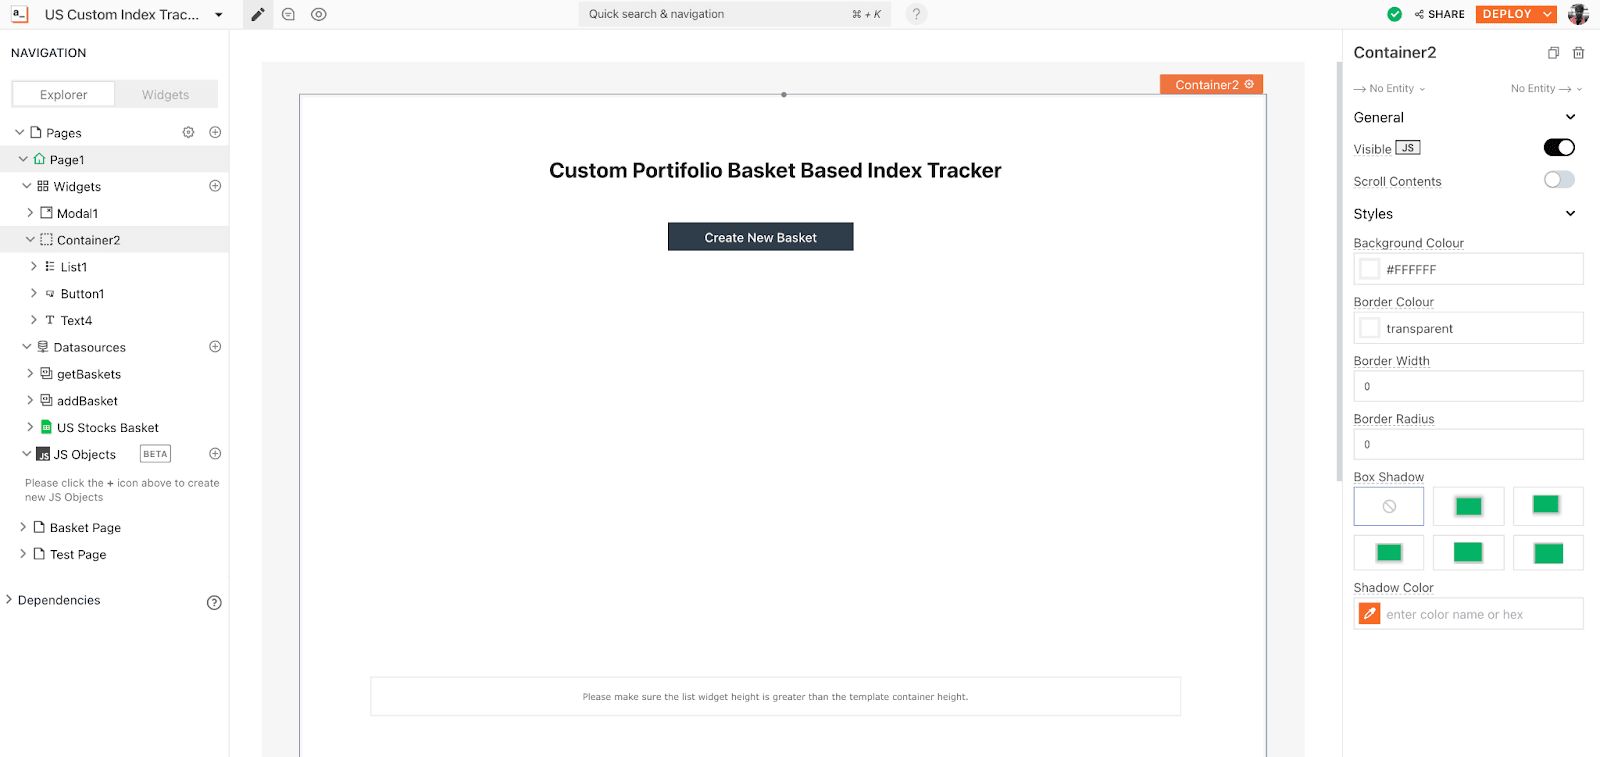
Image by Author | Screenshot of Page 1 Custom Index Tracker
Neat, yeah?
Next, since we want there to be a form to create new baskets, we should get the button to open a modal. To do this, click the settings icon on the button widget to see the property pane.
Property pane is where we can configure all the properties of the widgets. You can open this, by simply clicking on the widget, and you’ll see it docked on the right sidebar, just as shown in the above screenshot.
We need to update the onClick property of the button and set it to open a new modal. You can create it there or drag and drop a modal widget onto the canvas. Both options work. You do you.
Next, we need three types of inputs for the form, so I added three input widgets to this modal. You can set the labels as follows:
Basket Name Basket Image URL Basket Create On
Here’s a Loom on how it looks like:
https://www.loom.com/share/6b495a92e85545a18346ee554b6090df
Things look in great shape so far, in order to be able to track the index of the portfolios based on created time, I thought it was best to use a pre-installed library on Appsmith since it’s not possible to track this manually. I used moment.js to do this.
We can set the Basket Created On default value to:
{{moment().format(“MM ddd, YYYY HH:mm:ss a”)}}This will save time when the portfolio is created.
On Appmsith, we can write JS anywhere across the platform to add customization using the moustache {{ }} bindings. It also comes with the moment.js library; hence, calling the function will save time when these portfolios are created.
Lastly, I opened the buttons property-pane and set the onClick property to run a query and choose addBasket query.
With this, my UI is all set; lastly, I went back to addBasket query and set the Row Object to the following:
{ "Basket Name":{{Input1.text}},
"Basket Image URL": {{Input2.text}},
"Basket Create On": {{Input3.text}}
}
Note that we will be collecting the values from the Input widgets and passing them to the Google Sheets via the addBasket query.
Next, to display all our baskets on this page, we need to create a new API. I created another one called getBasket, from the Google Sheets datasource. I updated the query method to Fetch sheet row list everything from the excel sheet. Here’s a screenshot:
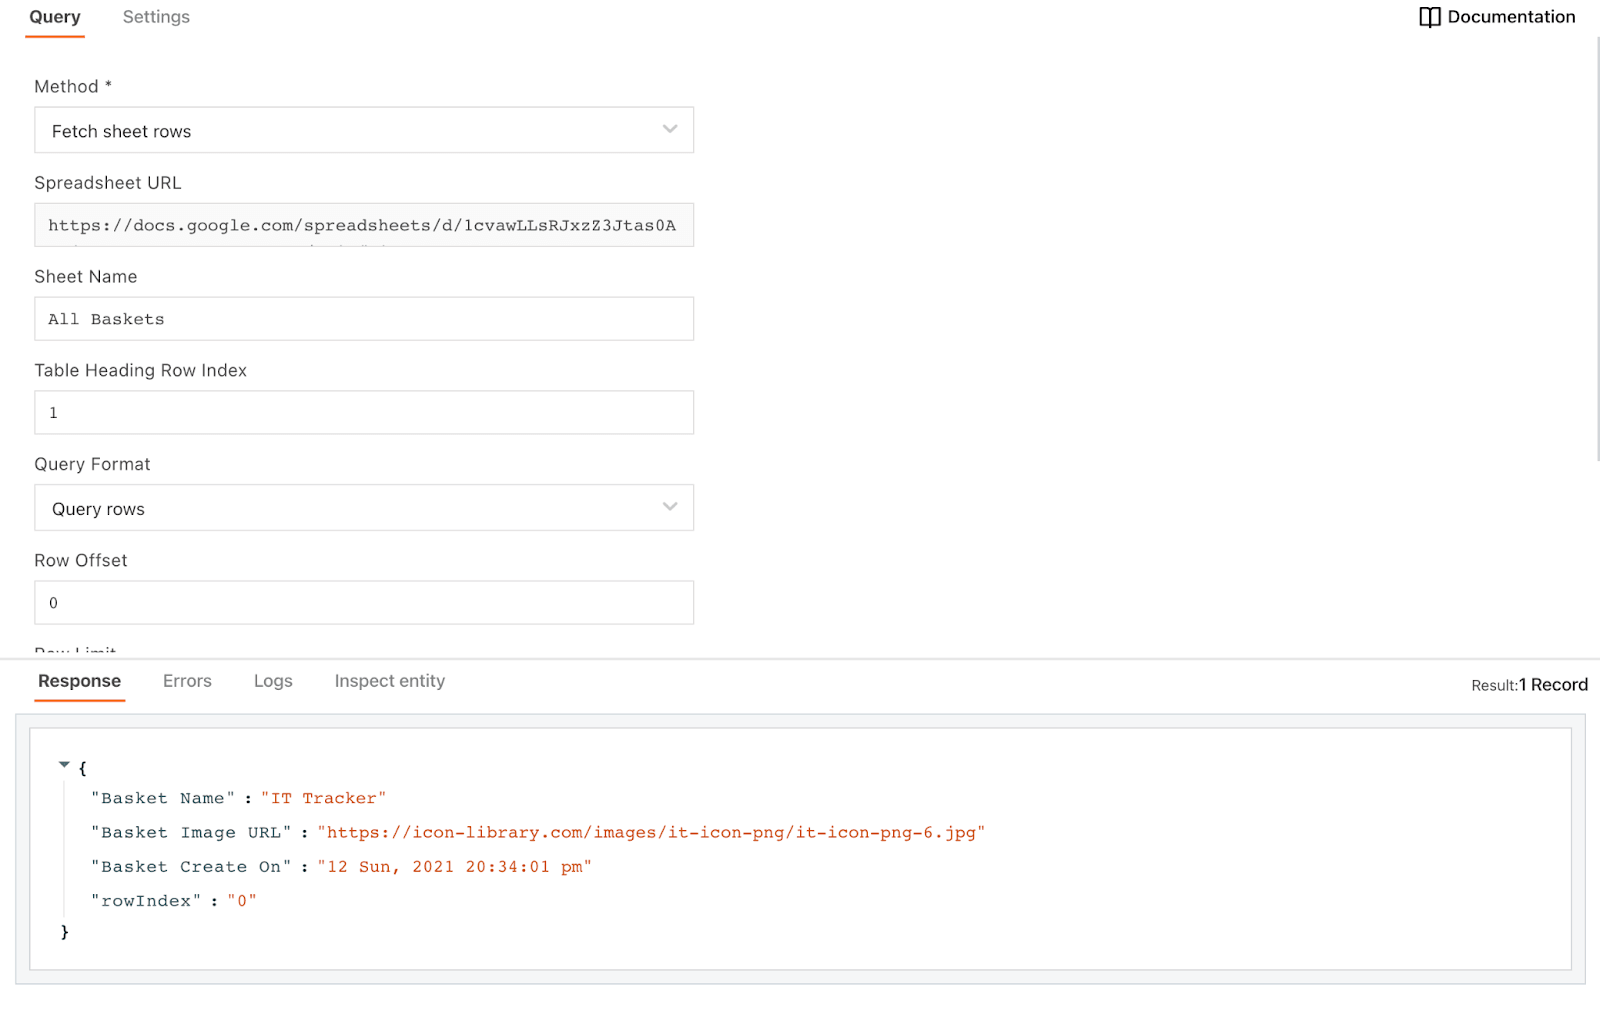
Screenshot of getBasket query
Next, we have to bind our queries to the UI widgets. This part can be done like this:
Open the property pane of List1 widget, and set the Items to {{getBasket.data}}
Inside the list widget, select the image and set the image property to {{currentItem[“Basket Image URL”]}}
Set the text widget properties to {{currentItem[“Basket Name”]}}, and Basket Created On: {{currentItem[“Basket Create On”]}}
This is how it looks now:
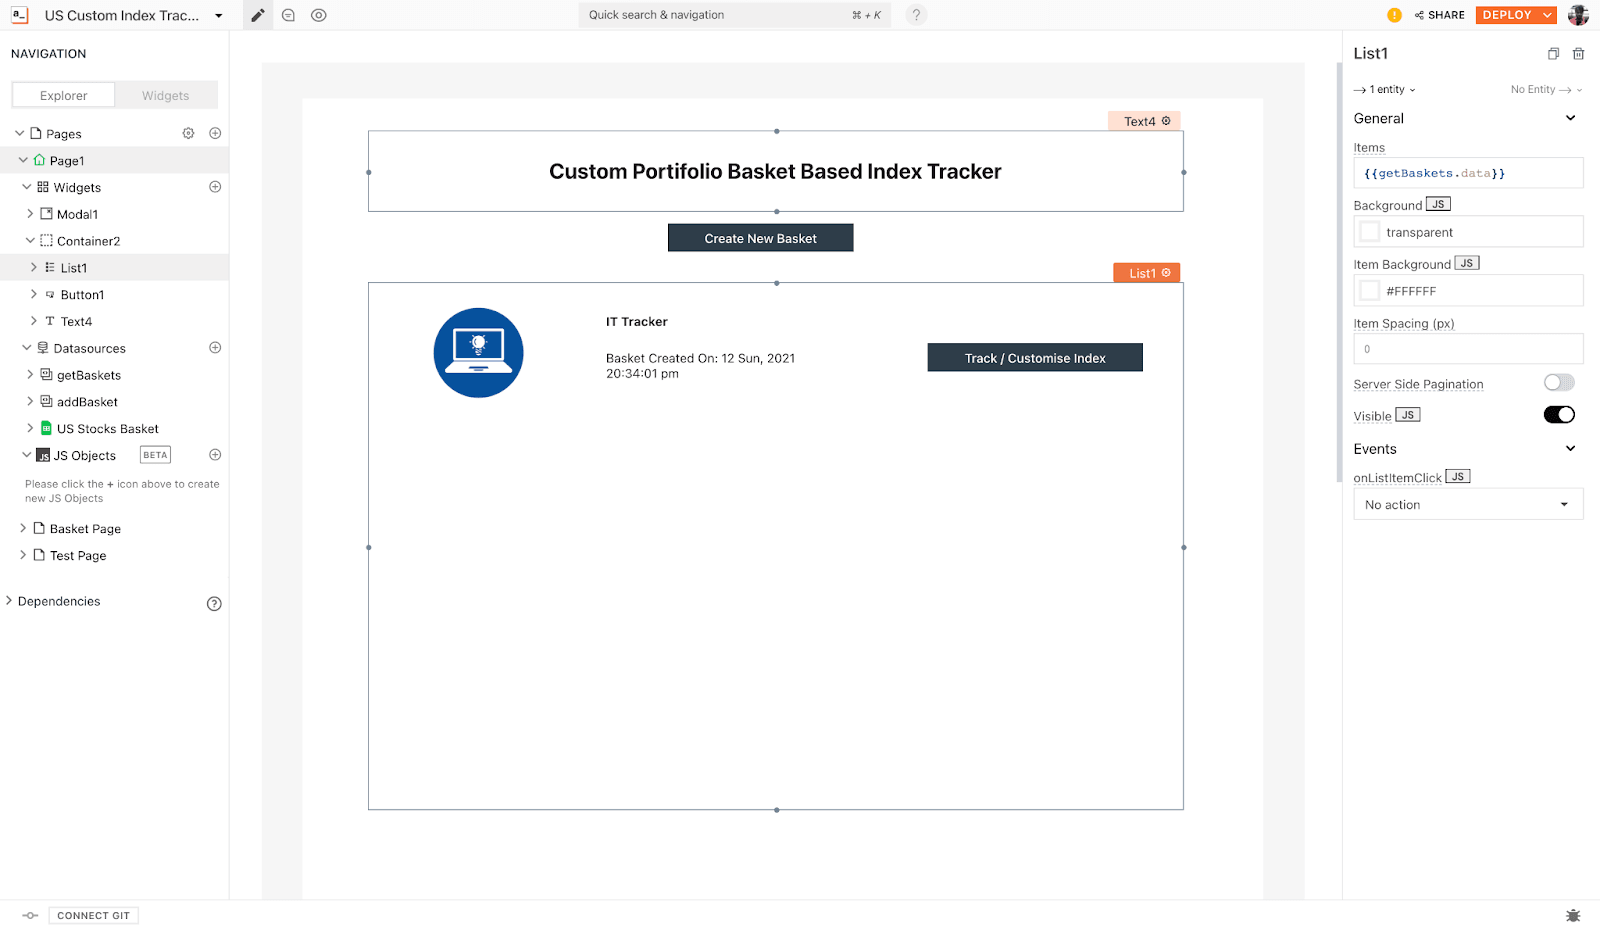
Screenshot of getBasket query
Here’s what we’ve been able to do till now:
Added functionalities to add a new portfolio/basket and list them on Appsmith.
Now, we will work on adding stocks inside these portfolios. For this, it would be best to create a new page to search for stocks and add them to baskets.
Let’s create a new page; you can choose the option on the left sidebar and name it as ‘Basket Page’. The idea is to redirect to this page from Page1 and filter all the stocks present in the basket.
But how do we filter stocks? Usually, we do on a regular backed to consider an id and filter based on it. Similarly, on Appsmith, while navigating to Basket Page, I stored the value of the basket page to filter and display data on the Basket page.
I can use the code snippet I mentioned below on a new button widget placed on the list widget. So, when clicked, it should save the selected item on the list, redirect to the basket page, and filter accordingly.
We need to the button’s onClick property to:
{{(function () {
    storeValue("selectedBasket", List1.selectedItem["Basket Name"]);
    navigateTo("Basket Page") })()
}}
Here, we need to use the storeValue from Appsmith to store the basket name in a variable named selectedBasket, the List1.selectedItem copies the data from the selected list item.
Next, we need to use the navigateTo function to redirect to a new page.
Adding Stocks into Baskets
Before we add any stocks into our portfolios, we’ll have to ensure that this page filters my stocks according to the selected basked from page one. So let’s add a container and a text widget to display the Basket name.
Note that this value comes from the global store, so on the Text property from Text widget’s property pane, we will have to bind value from the Appsmith store, and this can be done with a simple line:
{{appsmith.store.selectedBasket}}
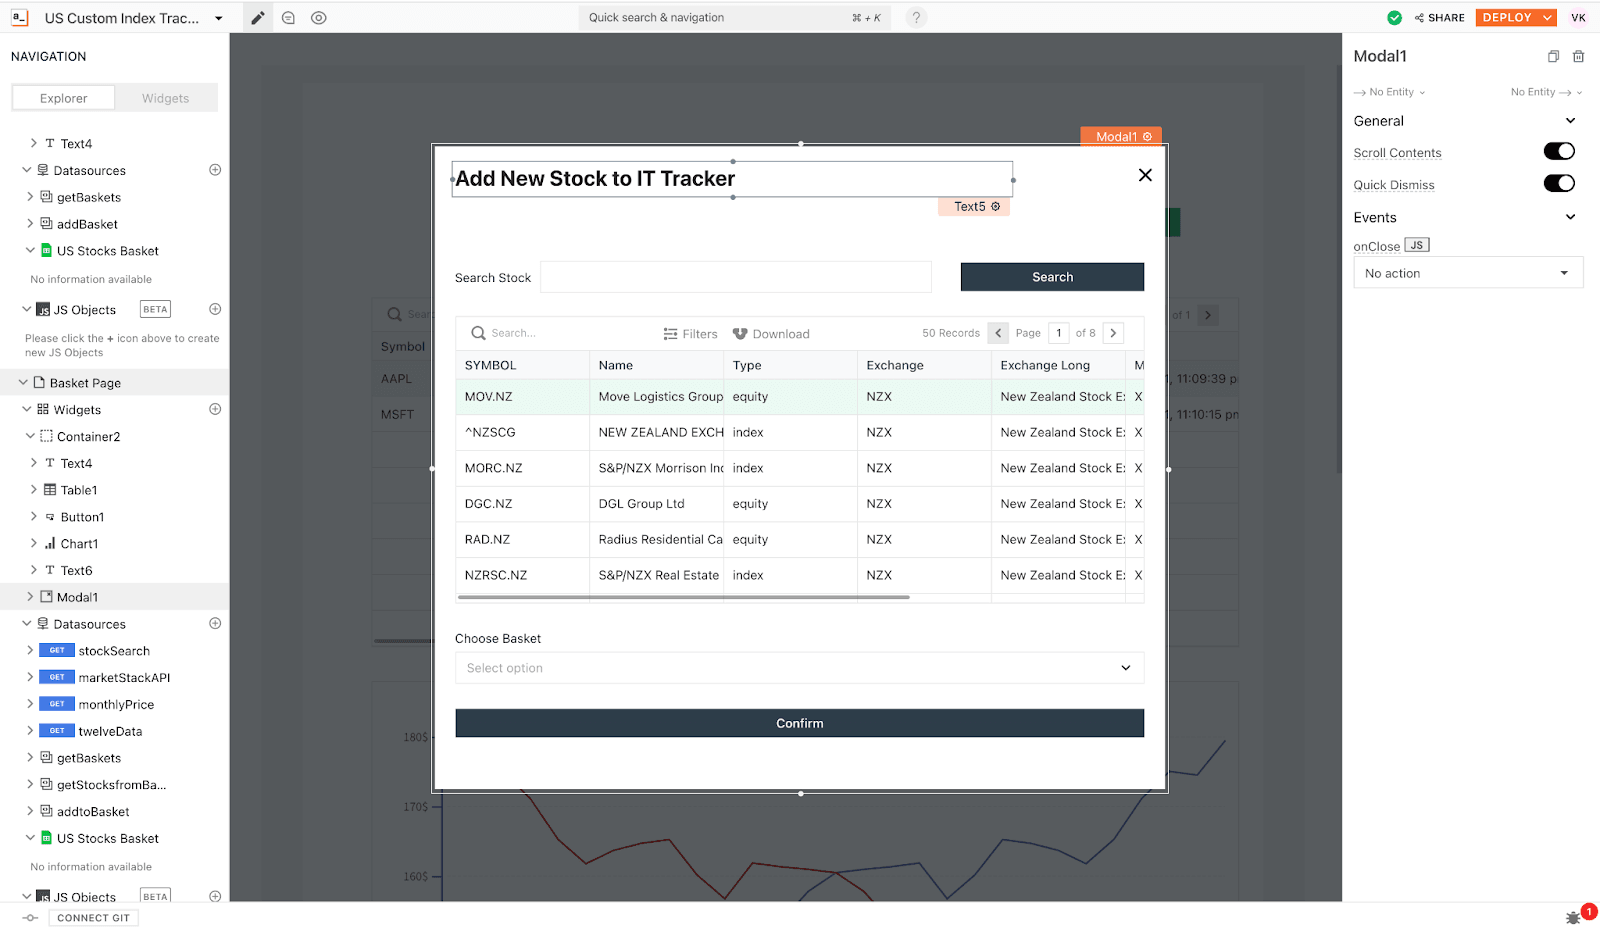
Alright, the next cool feature for us to add is a search function. This way, we can easily search for stocks and add them to baskets; for this, we need to add another button and modal with the following fields:
An input widget
A button labbeld as Seach
A table widget to list out all the results
A select widget to add them to the list of baskets I created
The table widget definitely deserves high praise. It allows us to add filters and sort results. We can add relevant stocks based on where they are listed on. For example, I could simply search NASDAQ, which filters stocks listed there. If you want to know everything that you can do with a table widget, you’ve got to check out this detailed blog.
Before I tell you how I built this, here is how it looks like:
The search feature works with a simple API from Stockdata, to integrate this, I followed the following steps:
Click on the + icon next to the Datasources
Select Create New API, and paste the following URL:
https://api.stockdata.org/v1/entity/search?search={{stockcode.text}}&api_token=YOUR_API_HERE
Rename the API query to stockSearch
To get this working, make sure you add API token from Stockcode here. Please note that I use moustache bindings here. This adds the values I’m searching for from the input widget dynamically. Now, let’s head back to the modal and update the names of the widgets.
I renamed the widget names to the following, to make it easy while pushing data onto sheets:
Input Widget: stockcode
Table Widget: stockSearchTable
Now, the search API takes the value from the input widget, and on the table widget, we can bind the results from the API for the following functionalities:
Set the buttons onClick property to run a query and choose stockSearch query.
Bind the stockSearch query to the table widget, using {{ stockSearch.data }}
Next, we want to select which basket we want to add the searched stock to; for this, I just copied my API (getBaskets) from Page1, and bound it onto the selected widget with the following code:
{{
    getBaskets.data.map((row) =>
    {
    return {
    		label: row["Basket Name"],
        value: row["Basket Name"]
     }  })
 }}
Last, we need to save all this information onto a Google Sheet, so let’s create a new spreadsheet under the same Google Sheet and create a new API from the connected data source. I named this sheet Watchlisted Stocks and named the query addtoBasket.
These are the columns I have on my Google Sheet:
symbol name type exchange exchange_long mic_code country watch_listed_on basket
Now, on the query to collect all this information, we have to update the Row Object to the following:
{"symbol": "{{stockSearchTable.selectedRow.symbol}}","name":"{{stockSearchTable.selectedRow.name}}","type":"{{stockSearchTable.selectedRow.type}}","exchange":"{{stockSearchTable.selectedRow.exchange}}","exchange_long": "{{stockSearchTable.selectedRow.exchange_long}}","mic_code": "{{stockSearchTable.selectedRow.mic_code}}","country":"{{stockSearchTable.selectedRow.country}}","watch_listed_on": {{moment().format('MMMM Do YYYY, h:mm:ss a')}} ,"basket": {{Select1.selectedOptionValue}}}With this last step, our watchlist will be ready. However, in order to show it on the page, we have to add a new table widget. Wait, I still had to pull all the watchlisted stocks from the google sheets. This is pretty straightforward, I create a new query from the GSheets datasource, set the method to Fetch Sheets Row, copy my GSheets URL, and update my Sheet Name to Watchlisted Stocks.
Now, we have to bind it on the new table widget, but here, it should only filter stocks that are added to this basket or portfolio, I do this by using a simple transforming when binding using the following code snippet:
{{
    getStocksfromBaskets.data.filter((item) => {
    return item.basket == appsmith.store.selectedBasket
    })
 }}
As you can see, we’re now filtering our stocks based on the selectedBasket value from the Appsmith store that we saved while redirecting!
We now have all the portfolios and stocks ready. Now it’s time for data visualization!
Building Time Series Charts and Tracking Index
As mentioned, Appsmith’s chart widget comes with the Fusion Chart configuration, which makes it much easier to build time-series charts. The other thing I love about this is, I can even create candlestick charts for the stocks I watchlisted inside the application. These charts are used by traders to determine possible price movement based on past patterns.
First, let me show you how to fetch details of all the stock prices, using the MarketStack API:
Inside the basket page, I created a new API (marketStackAPI), with the following URL:
http://api.marketstack.com/v1/eod?access_key=YOUR_API_KEY&symbols={{appsmith.store.current}}&date_from=2021-11-01&date_to=2021-12-12
Note: I’m filtering the data from 2020–11–01 to 2021–12–12, you can update this API accordingly based on your requirements.
In the API, as you can see, I have added an Appsmith store variable named current; this is to dynamically fetch the stock prices of the symbol or stock we wanted to analyze or add to our tracker.
Now, we need to write a code snippet under JS Objects, that stores all the data for all the stocks that are there inside my portfolio.
This is what I’ve used:
exportdefault {

getBasketGraph: () => {let stocks = getStocksfromBaskets.data.filter((item) => item.basket == appsmith.store.selectedBasket)    let stockcodes = stocks.map(item => item.symbol)    let allStockData = [];    stockcodes.map((item, index)=> {    storeValue("current", item);     marketStackAPI.run(()=> {     let tempData = marketStackAPI.data;     allStockData.push(tempData.data);    }, () => {}, { allStockData });  })    storeValue("allStockData”, allStockData)    return appsmith.store.allStockData;
}}
Here is what this code snippet does:
Stores all the symbols that are present in the basket in the stockcodes variable
Iterates through the stockcodes array and stores all the stock prices in a new variable allStockData
Returns the store variable when the function is executed
To create a time series chart, we need to drag and drop a new chart widget onto the canvas, below the table widget.
This is how it looks like:
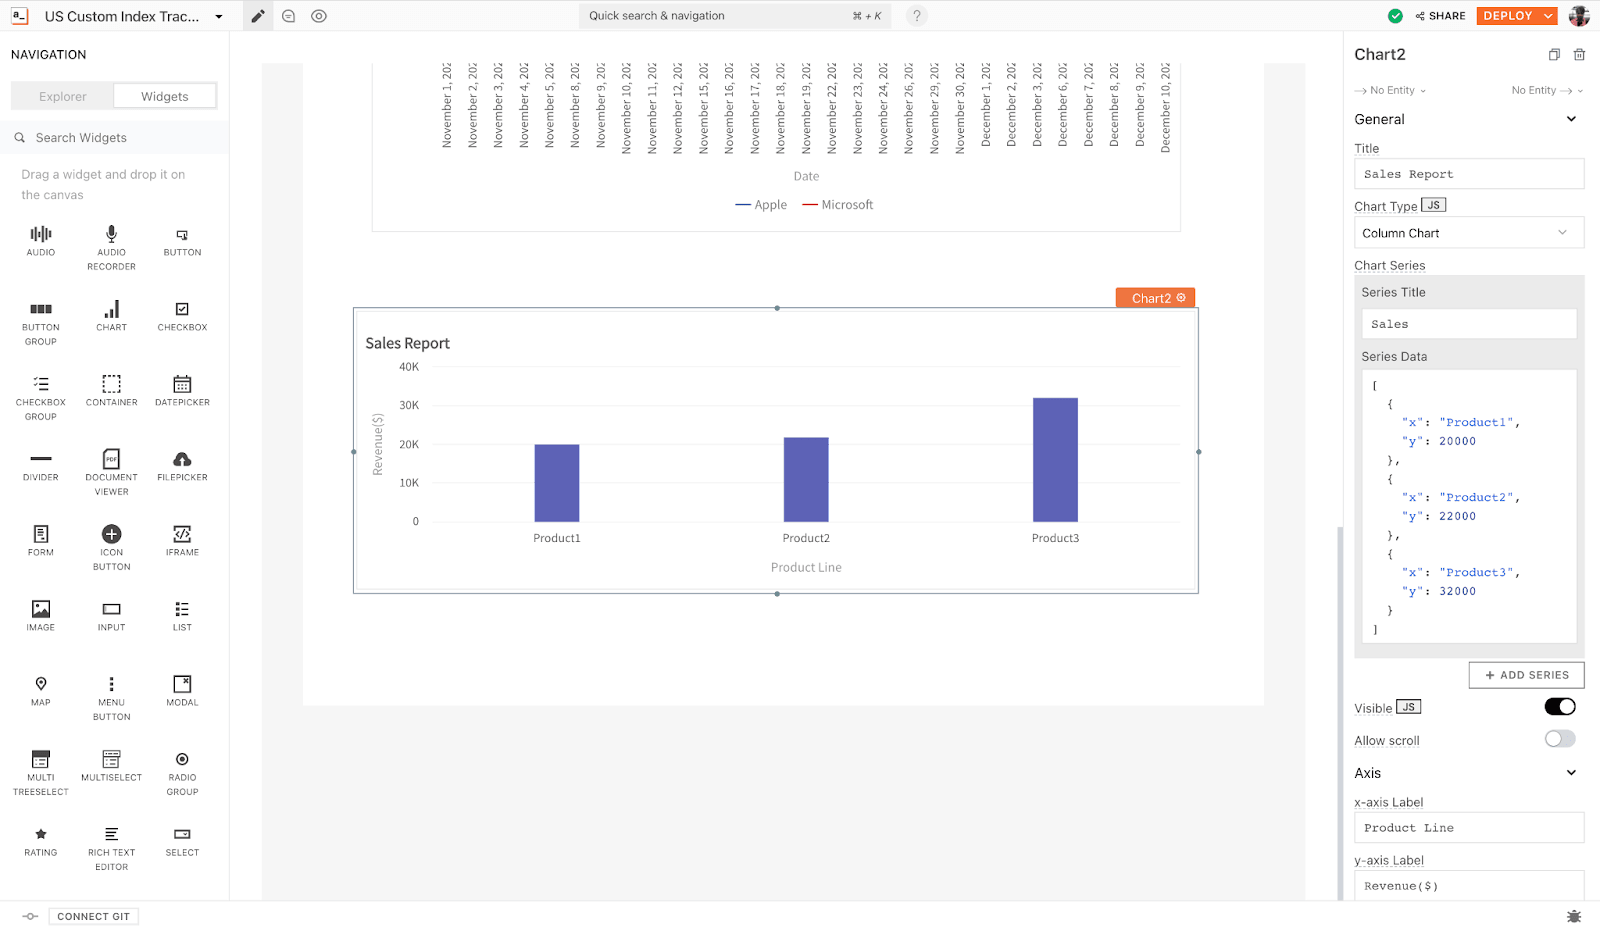
Image by Author | Chart Widget on Appsmith
It comes with a default configuration, so we will have to change the type to a Custom Chart to configure our data onto this. We will need to follow a particular format in order to do this. Here’s the basic config for Fusion Charts:
{ "type": "", "dataSource": { "chart": { }, "data": [ ] }}Here, we need to pass in three parameters, the chart configuration, data, and the categories that need to be displayed on the x-axis. Here’s the updated code:
{ "type": "MultiAxisLine", "dataSource": { "chart": { "xaxisname": "Date", "vdivlinealpha": "", "labeldisplay": "ROTATE", "theme": "fusion" }, "categories": [{ "category": { { marketStackAPI.data.data.reverse().map((row, index) => { return { "label": moment(row.date).format("LL"), } })} } } ], "axis": [{ "title": "Price", "dataset": [{ "seriesname": "Apple", "data": { { marketStackAPI.data.data.map((row, index) => { return { "value": row.close, } })} } }, } ] } }Finally, this is how our graph will look like with the aforementioned configurations:
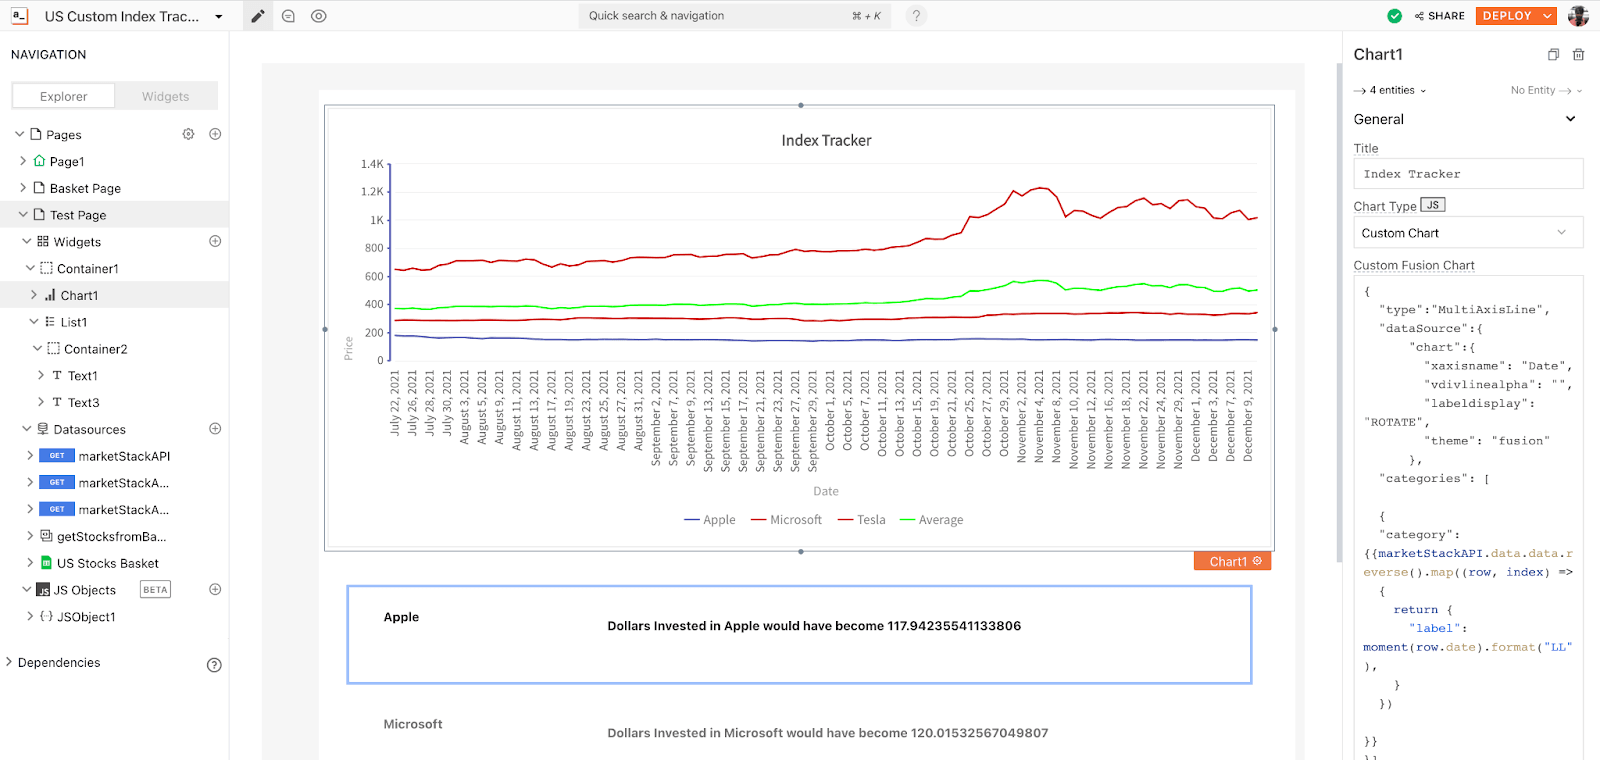
Image by Author | Charts from Custom Index
Additionally, I also created a list, that tells us the index value with simple math:
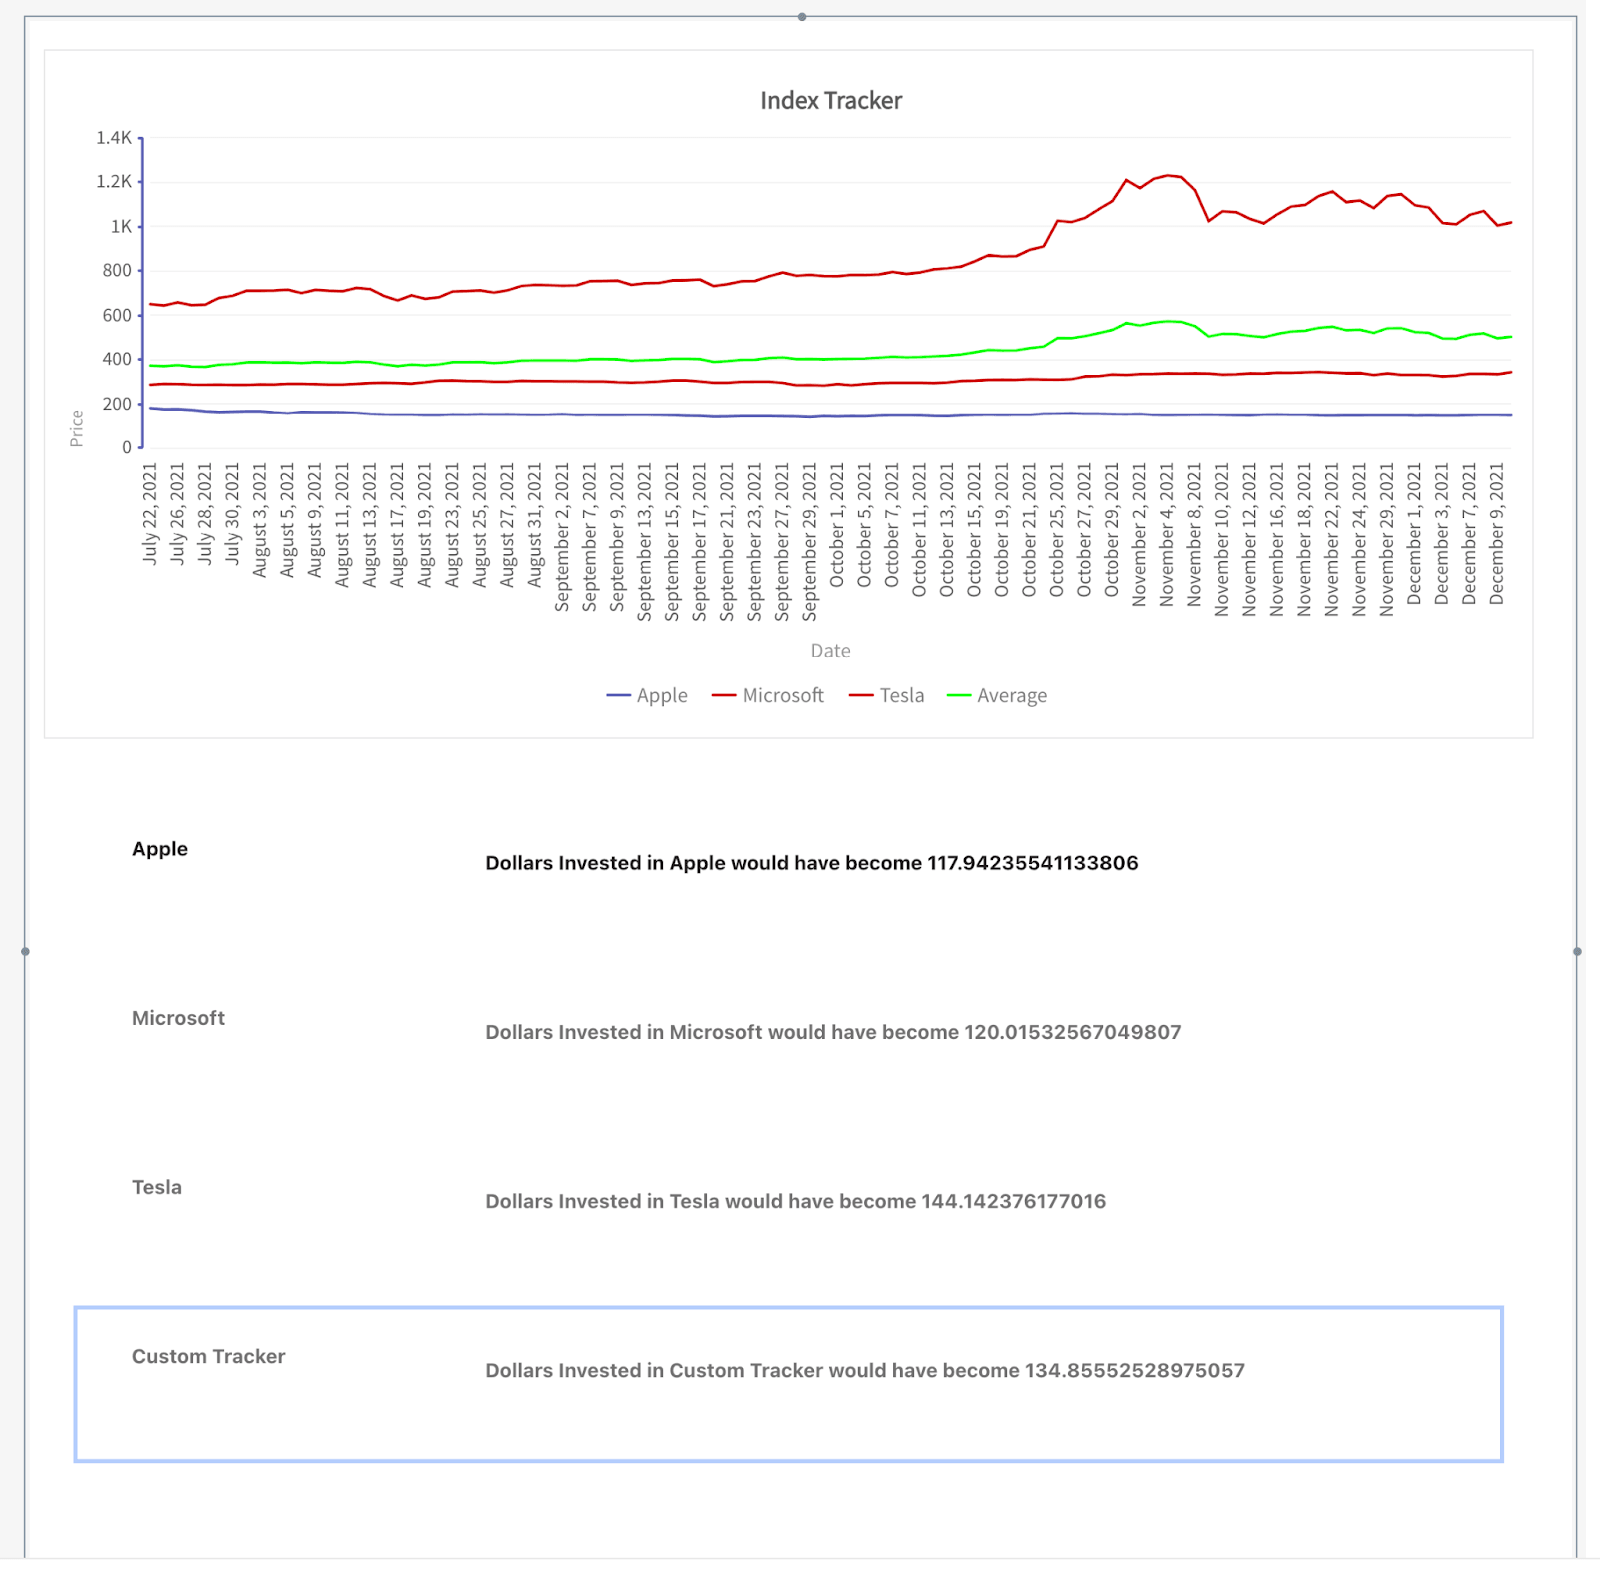
Image by Author | Custom Index and Predictions with Simple Math
Imagine having your own custom app terminal to track all your stock indexes in one place. If you’re into crypto, you can extend this app to even have a crypto tracker.
I hope that you had success following this tutorial and building your own app. If you got stuck somewhere, I’d be happy to help you out :)
More content at plainenglish.io. Sign up for our free weekly newsletter. Get exclusive access to writing opportunities and advice in our community Discord.


