How to Integrate Appsmith with Google BigQuery

Appsmith is the leading open-source internal app development platform. It allows you to build browser-based applications that can be easily integrated into your existing toolchains using a drag-and-drop interface. Appsmith's focus on extensibility means it has native integrations for many online services and datasources, as well as support for REST and GraphQL APIs.
Google BigQuery is one of the services supported in Appsmith through its Authenticated API Connector. Google BigQuery is an enterprise data warehouse that can store large amounts of data and is widely used for collecting data for analytics, marketing, and application logging.
This tutorial will demonstrate how to connect Appsmith to Google BigQuery. As you'll see, integrating your existing data into Appsmith is a straightforward task, removing a lot of the developer labor required in bootstrapping early-stage applications.
Appsmith integrations, APIs, and GraphQL
Appsmith supports industry-standard data stores like MySQL, MongoDB, and Snowflake, while its native integrations connect the platform to a number of popular services such as Airtable, HubSpot, and Twilio. While this covers many common usage scenarios, we can't support every tool that's out there natively — businesses rely on countless industry-specific tools that are relatively unknown, which would otherwise go unsupported without a specific request to our developer team.
This is why standards like REST and GraphQL exist — by implementing the same standards, development teams can make their application compatible with any other application, even those they may never have heard of, in use cases they hadn't anticipated.
Appsmith supports both REST and GraphQL APIs, as well as OAuth 2.0 for authorization, making it a highly extensible and flexible platform that can be readily used with most popular data tools. In the case of Google BigQuery, there is no need for a native integration at all as its REST API fully supports reading and writing data.
What you’ll need to connect Appsmith to BigQuery
You'll need a few things set up in advance to complete this tutorial:
- An Appsmith app: Sign up here for a free Appsmith cloud instance, or install locally or on your own server using Docker. Once you’re up and running, you can create your first app.
- A Google BigQuery project: Google BigQuery is part of the Google Cloud Platform (GCP). You will need to set up a Google Cloud project to hold your BigQuery dataset. If you’re unfamiliar with BigQuery you can follow a quickstart guide.
- An OAuth 2.0 app set up on GCP: OAuth 2.0 will authorize Appsmith with GCP, creating a secure connection between them. Follow these instructions to register your app on GCP. As the app you’re creating an OAuth 2.0 connection for is your Appsmith app, you can select the internal user type, and add the
.../auth/bigqueryscope. - OAuth client ID credentials: Once you have configured OAuth 2.0 for your app, you need to generate the OAuth client ID credentials that Appsmith will use to connect. The authorized redirect URIs you specify when configuring your OAuth client ID credentials will differ depending on whether you’re using the self-hosted or cloud version of Appsmith — see the configuration table in Creating and configuring an authenticated API datasource in Appsmith. After the credentials are created, click Download JSON to save them for later use.
Note that the permissions granted to your OAuth client will be quite broad — in production you will want to be more restrictive, limiting access to only what your app requires.
Connecting Appsmith to Google BigQuery
Once you’ve met the above requirements, follow the steps below to connect Appsmith to Google BigQuery. Links to the relevant documentation are provided in the text.
Step 1: Populate Google BigQuery
This tutorial will use the following sample dataset, presented in CSV format. You will need to copy and paste it into a text file and save it as a CSV file so that it can be imported into BigQuery:
This mock dataset is small, but sufficient for the purposes of this demonstration. It includes sales information that, in a real-world scenario, may have been collected from across several sales channels and integrated into BigQuery for analysis. Our goal in this tutorial is to connect Appsmith to this data, hosted in BigQuery, so that it can be used to build dashboards, reports, or an interface for interacting with the data.
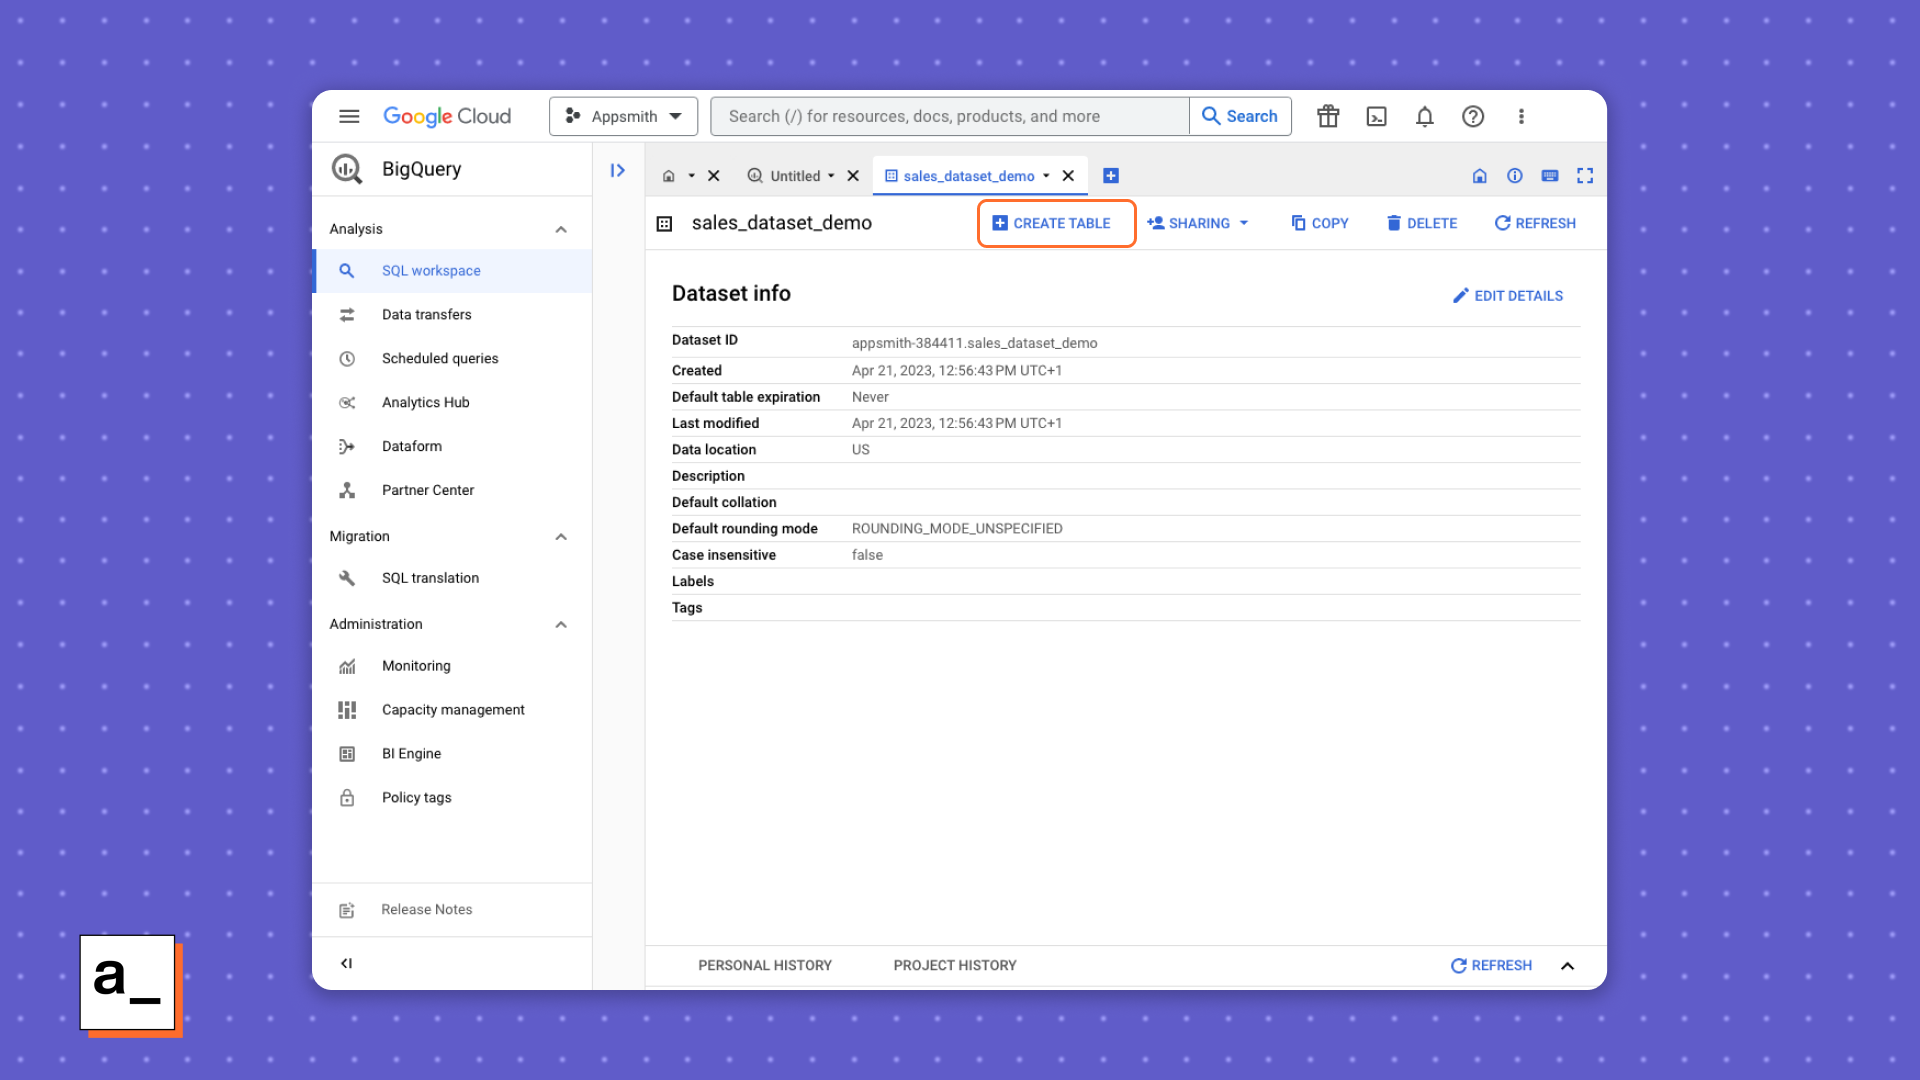
To import this data into BigQuery, you will need to log into the Google Cloud console and navigate to BigQuery. Then, select your Google Cloud project. The dataset will be created in the project that is currently active in the Google Cloud console web interface. Take note of the Project ID (the project name followed by a series of numbers) — you’ll need it later.

Selecting the GCP project (1) and creating a new dataset within it (2), noting the Project ID for later (3).
The next task is to create a new dataset in your project.You will need to provide a unique Dataset ID for use within your project. Once it’s created, you will be prompted to go to the newly created dataset, or you can navigate there using the Explorer pane.
Creating a new table in a BigQuery dataset.
Import the CSV file into the new dataset by creating a new table, selecting the Upload option as the table source and CSV as the File format, and then selecting your CSV file.
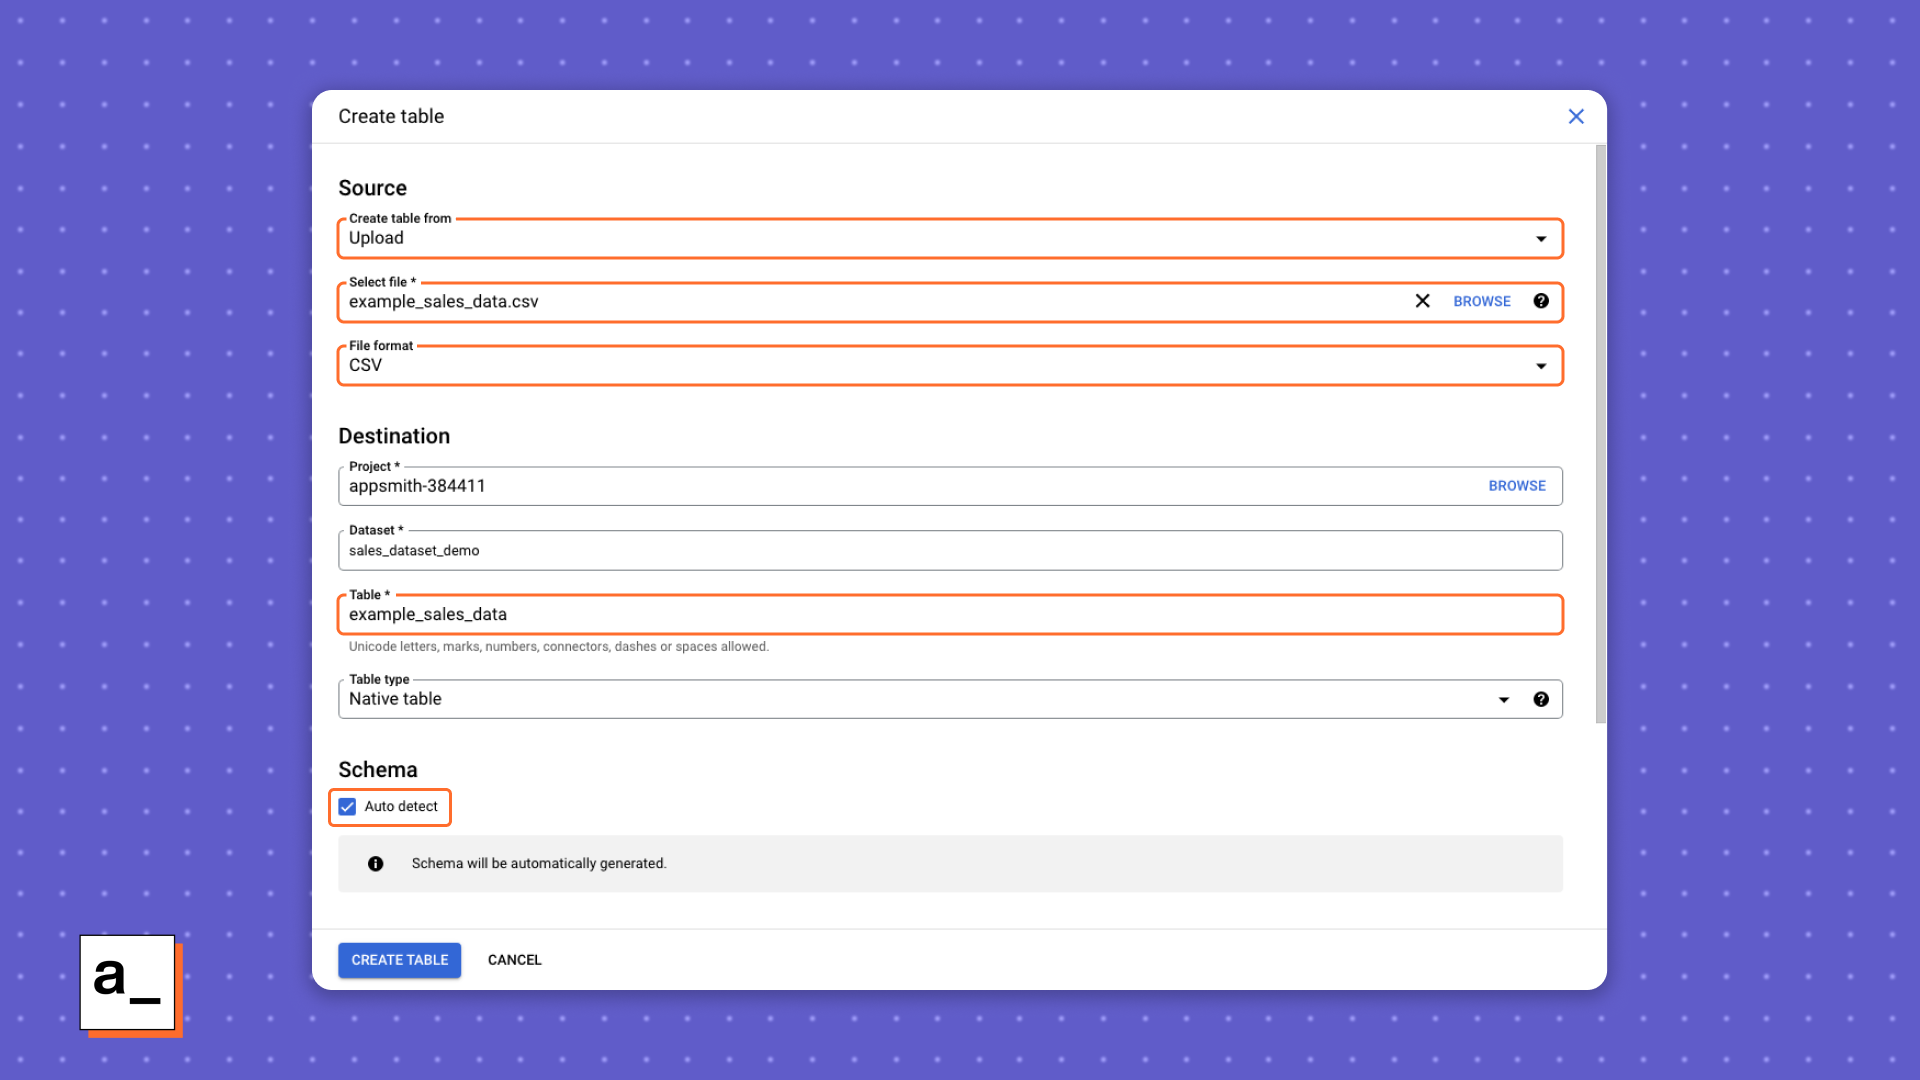
Creating a new table — the fields that you need to fill in are highlighted.
You will need to set a name for the table in the Table field and check Auto detect for the Schema, unless you want to manually specify the columns that will be imported. When the table has been created, you will be prompted to view the table, or you can find it in the Explorer pane.
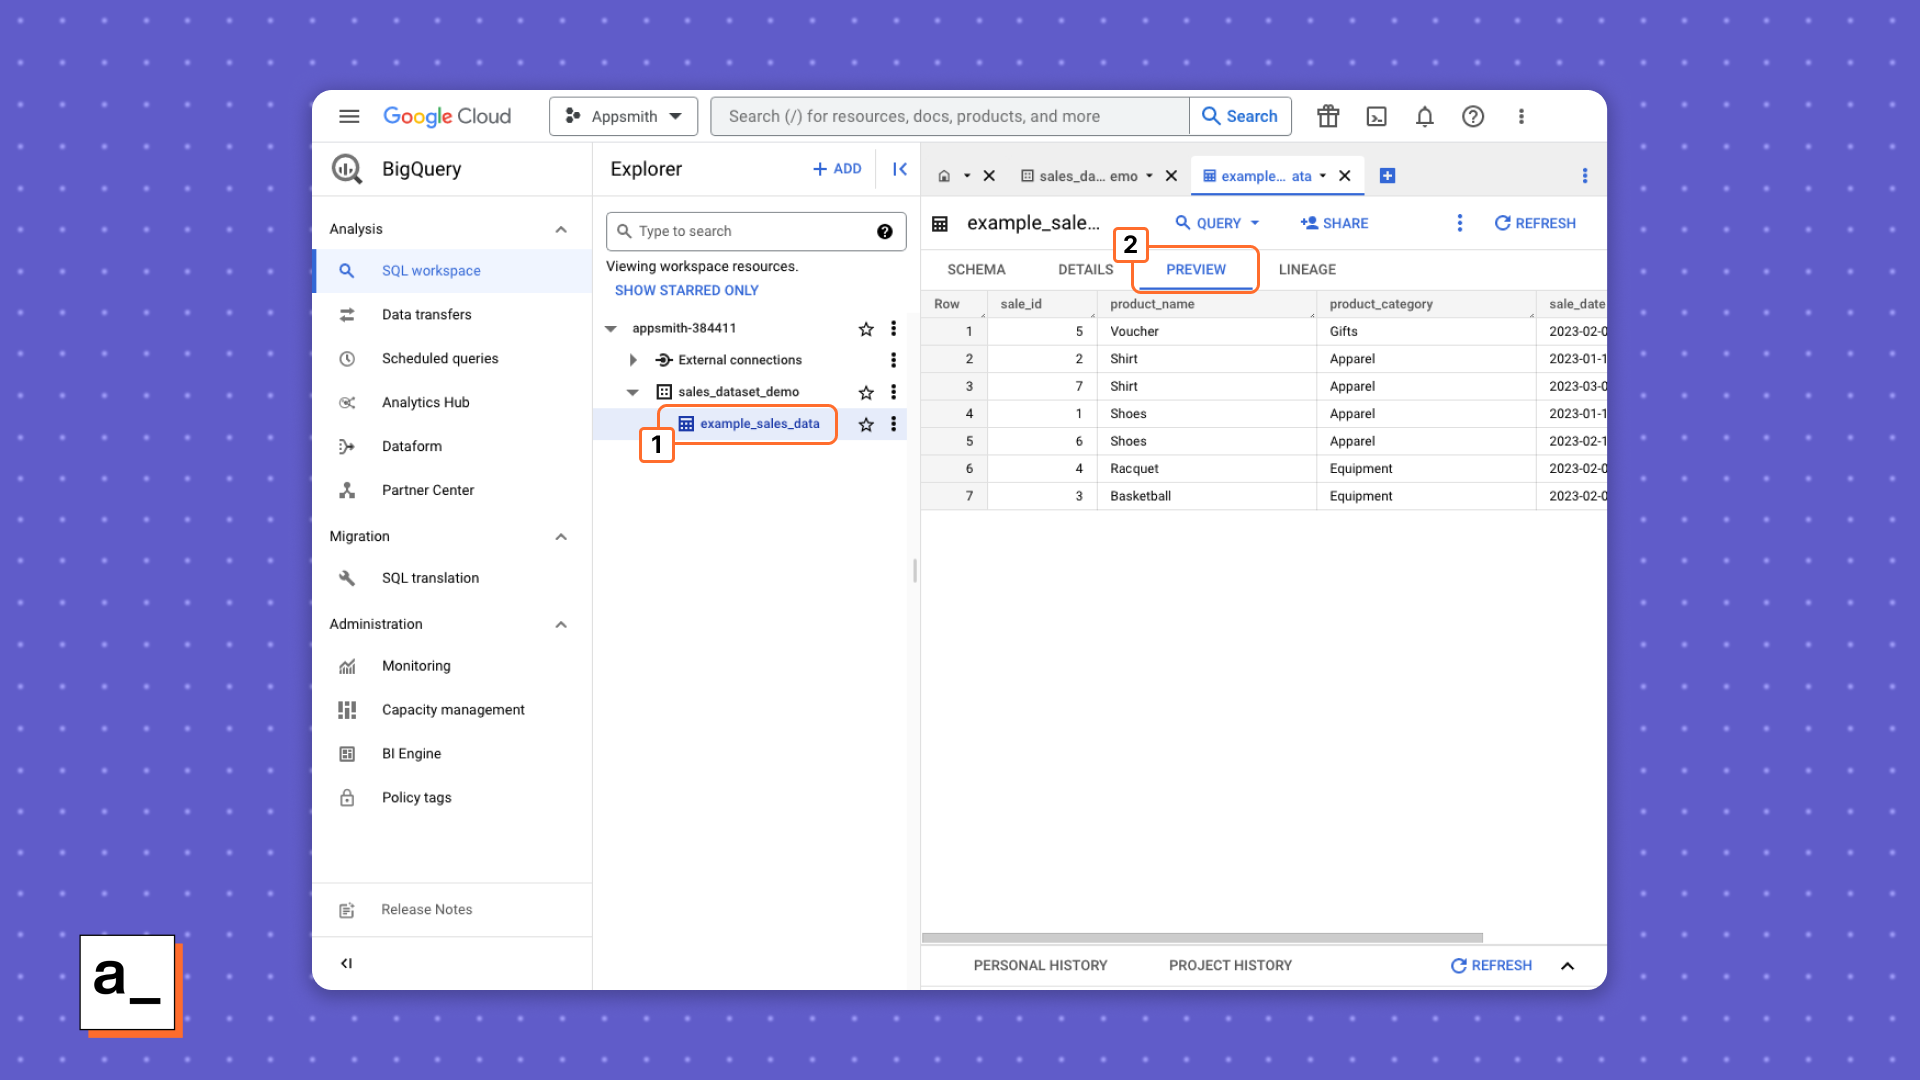
You can find your imported table in the Explorer pane (1) and use the Preview tab to view the imported data (2).
Once you have a populated dataset in BigQuery, you can view it and manipulate the imported data. The next step will show you how to connect to it from Appsmith using your OAuth client ID credentials.
Step 2: Creating and configuring an authenticated API datasource in Appsmith
To create an authenticated API datasource, you need to follow these steps in your Appsmith app:
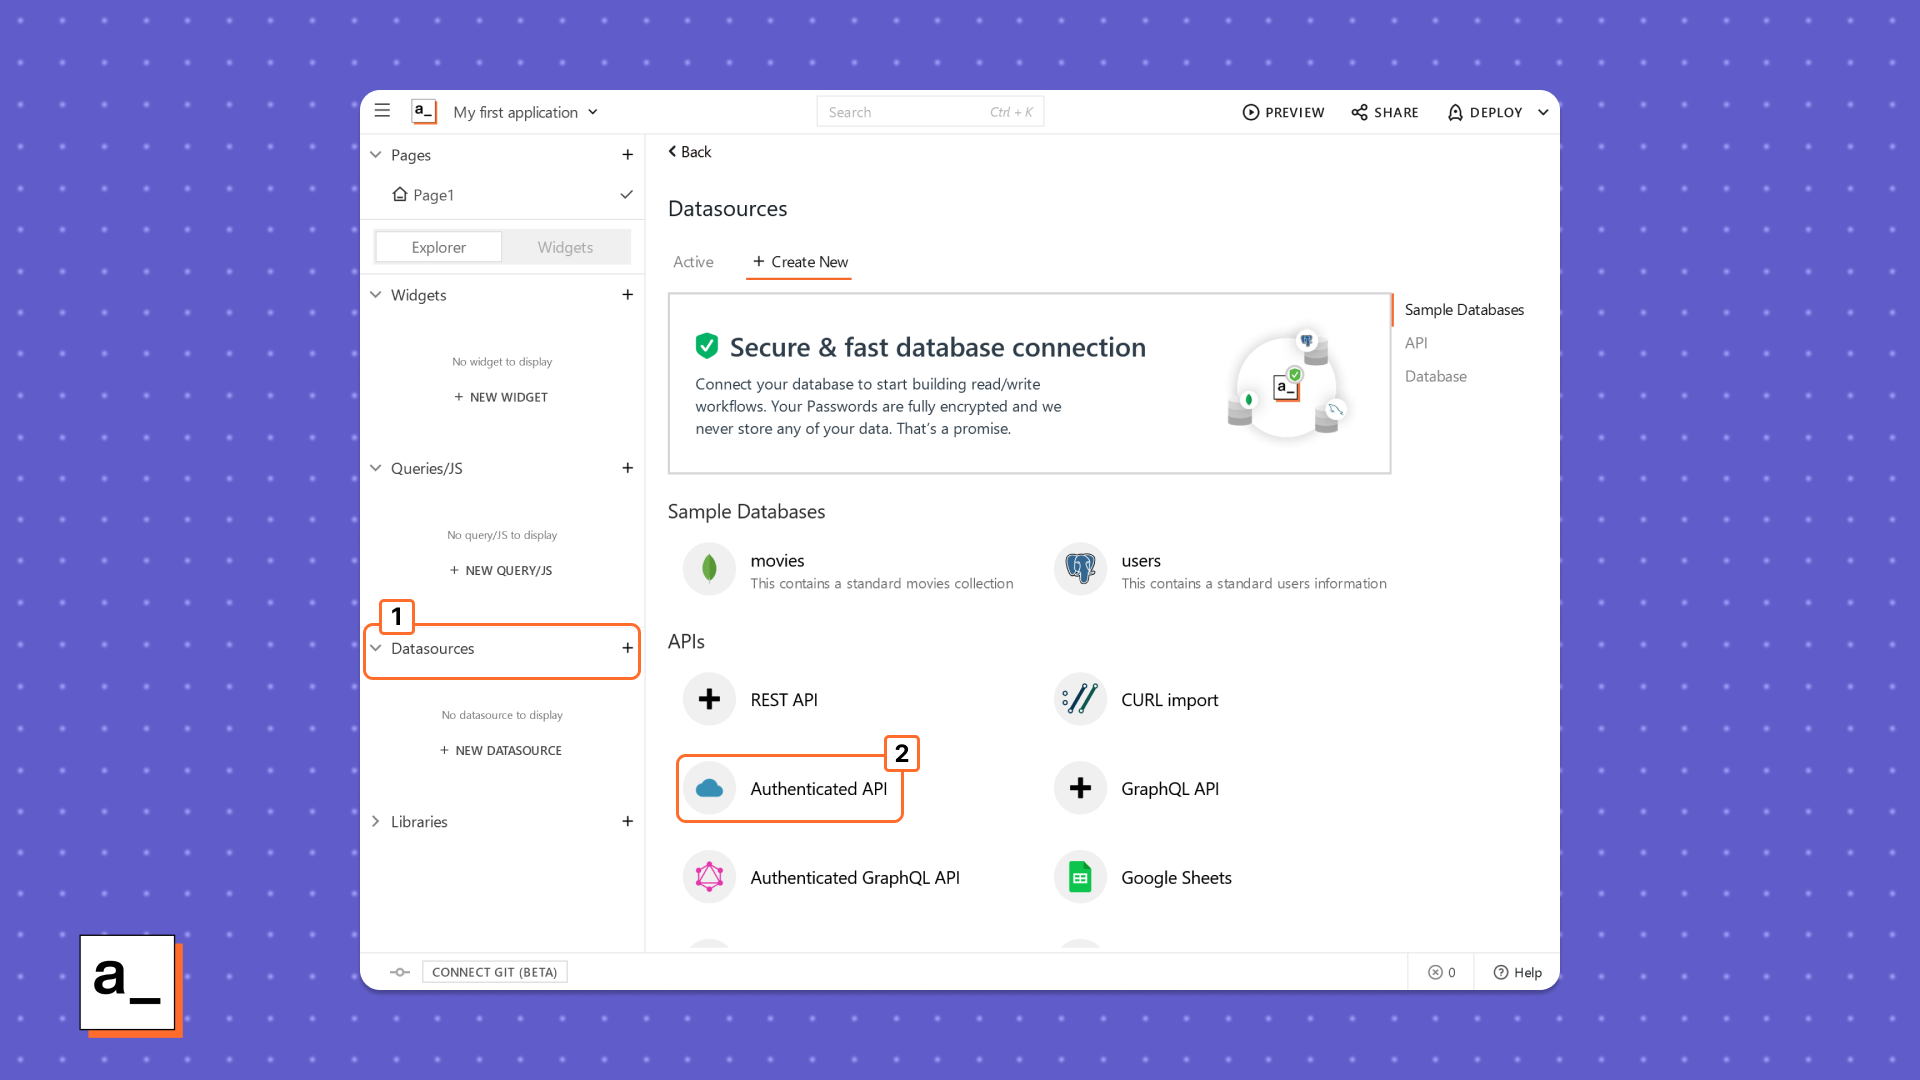
From the Datasources section of the Explorer (1), add a new Authenticated API (2).
In the Explorer panel, click on the_ + icon_ next to Datasources to add a new datasource and then select Authenticated API. It’s recommended that you rename the datasource to something descriptive, so you can easily identify it.
Next, you must provide the configuration information required to connect to the BigQuery API. This includes the OAuth client ID credentials required to authorize your Appsmith app, and the BigQuery project ID noted in step 1 of this tutorial.
| Attribute | Value |
|---|---|
| URL | https://bigquery.googleapis.com/bigquery/v2/projects/projectID/queries |
| Headers | Content-Type - application/json |
| Query parameters | None |
| Send Appsmith signature header | No |
| Authentication Type | OAuth2.0 |
| Grant Type | Authorization Code |
| Add Access Token To | Request Header |
| Header Prefix | Bearer |
| Access Token URL | https://oauth2.googleapis.com/token |
| Client ID | <<Your OAuth Client ID>> |
| Client Secret | <<Your OAuth Client Secret>> |
| Scope(s) | https://www.googleapis.com/auth/bigquery |
| Client Authentication | Send client credentials in body |
| Authorization URL | https://accounts.google.com/o/oauth2/auth |
| Redirect URL | Cloud users will need to use the URI for Appsmith’s cloud hosting: https://app.appsmith.com/api/v1/datasources/authorize
Self-hosted users will need to specify the fully qualified domain name (FQDN) to their Appsmith deployment: https://<\>/api/v1/datasources/authorize
Note that this field is automatically populated using the URL being used to access Appsmith — this can be copied and pasted to the authorized redirect URIs when setting up the Client ID credentials in GCP, if not done already. |
| Custom Authentication Parameters | access_type = offline
prompt = consent |
After having configured the datasource options to match the above values (any values not present in the table should be left blank), click the Save and Authorize button to finalize the creation of the authenticated API datasource. If successful, you will be presented with a Sign in with Google OAuth 2.0 login screen. Once approved, this will grant Appsmith API access to your BigQuery data.
Step 3: Execute SQL queries with the API in Appsmith
With the authenticated API datasource configured, you can make queries to the BigQuery REST API. To do so, within your Appsmith app, follow these steps:
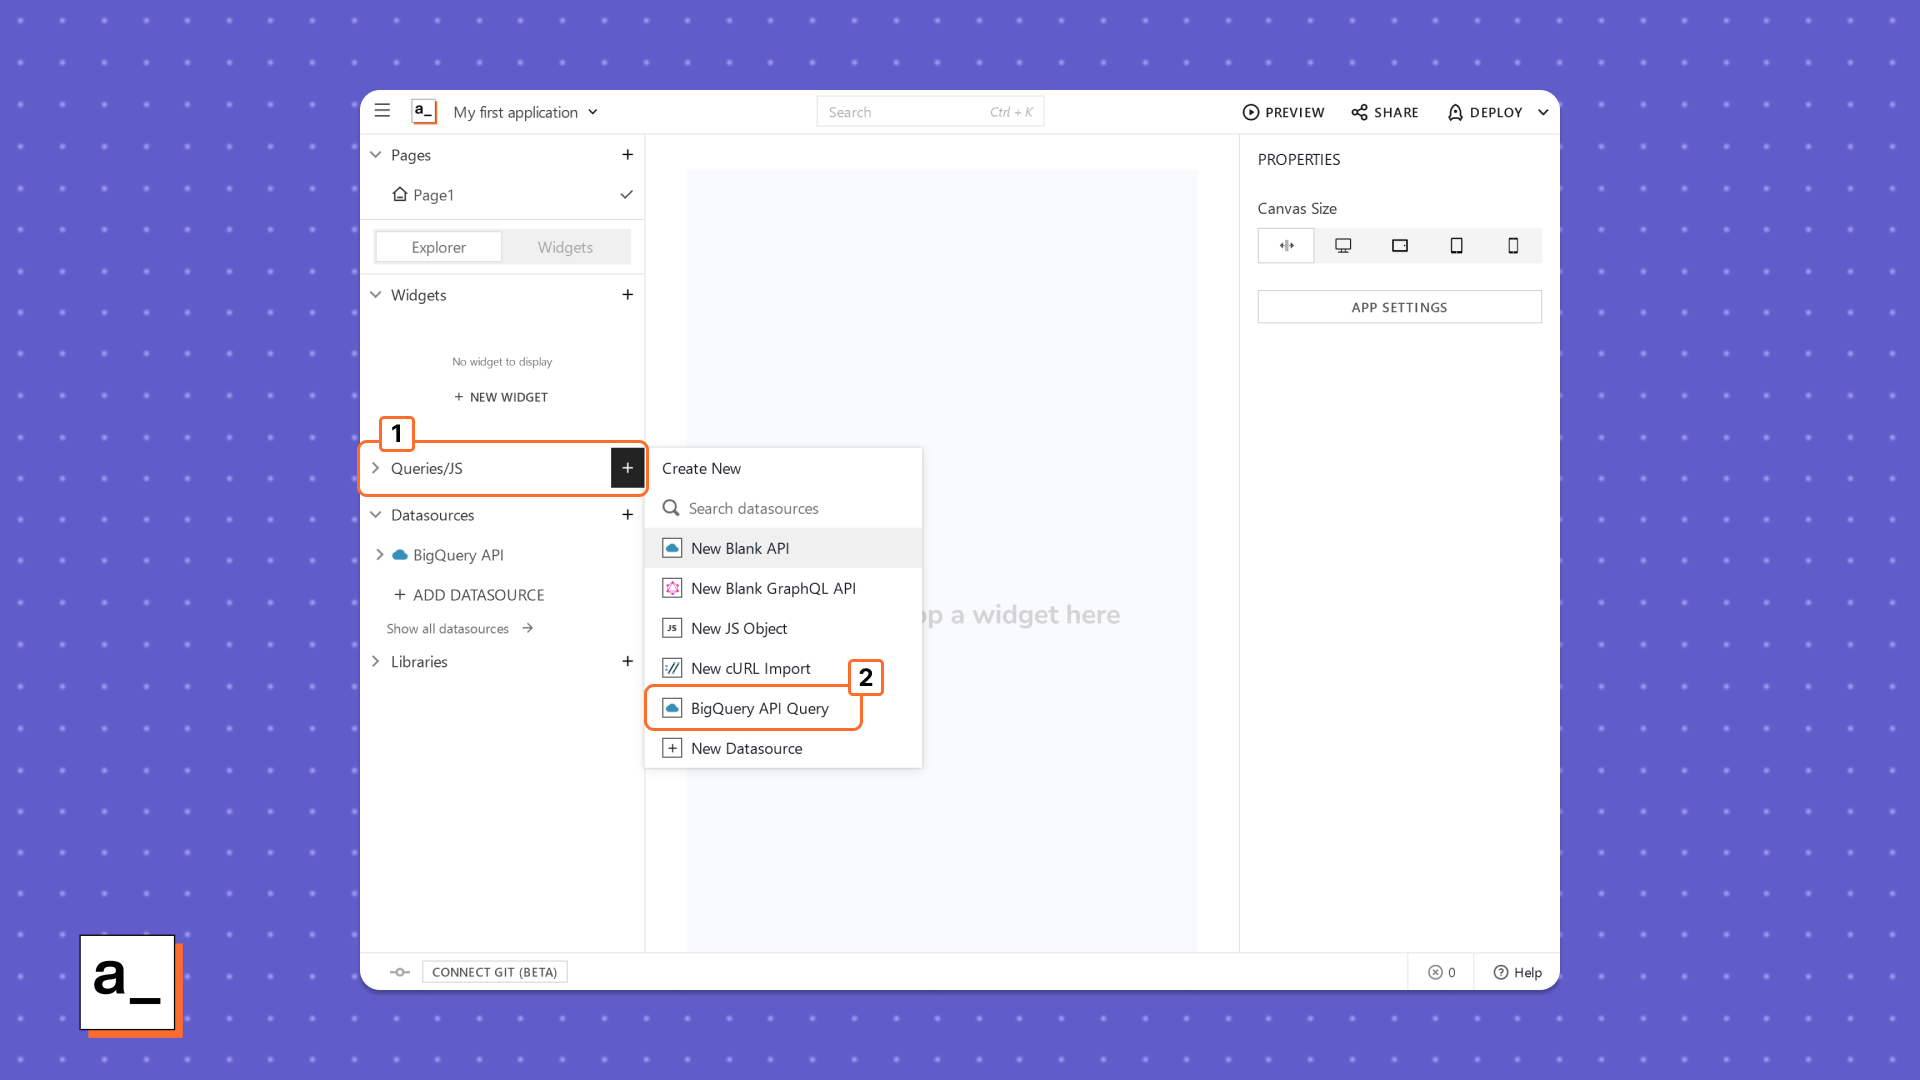
Adding a new query (1) for the BigQuery API datasource (2)
In the Explorer panel, click on the + icon next to Queries/JS to add a new Query. Under Create Query, select the name of the datasource created in the previous step to create a new query for it.
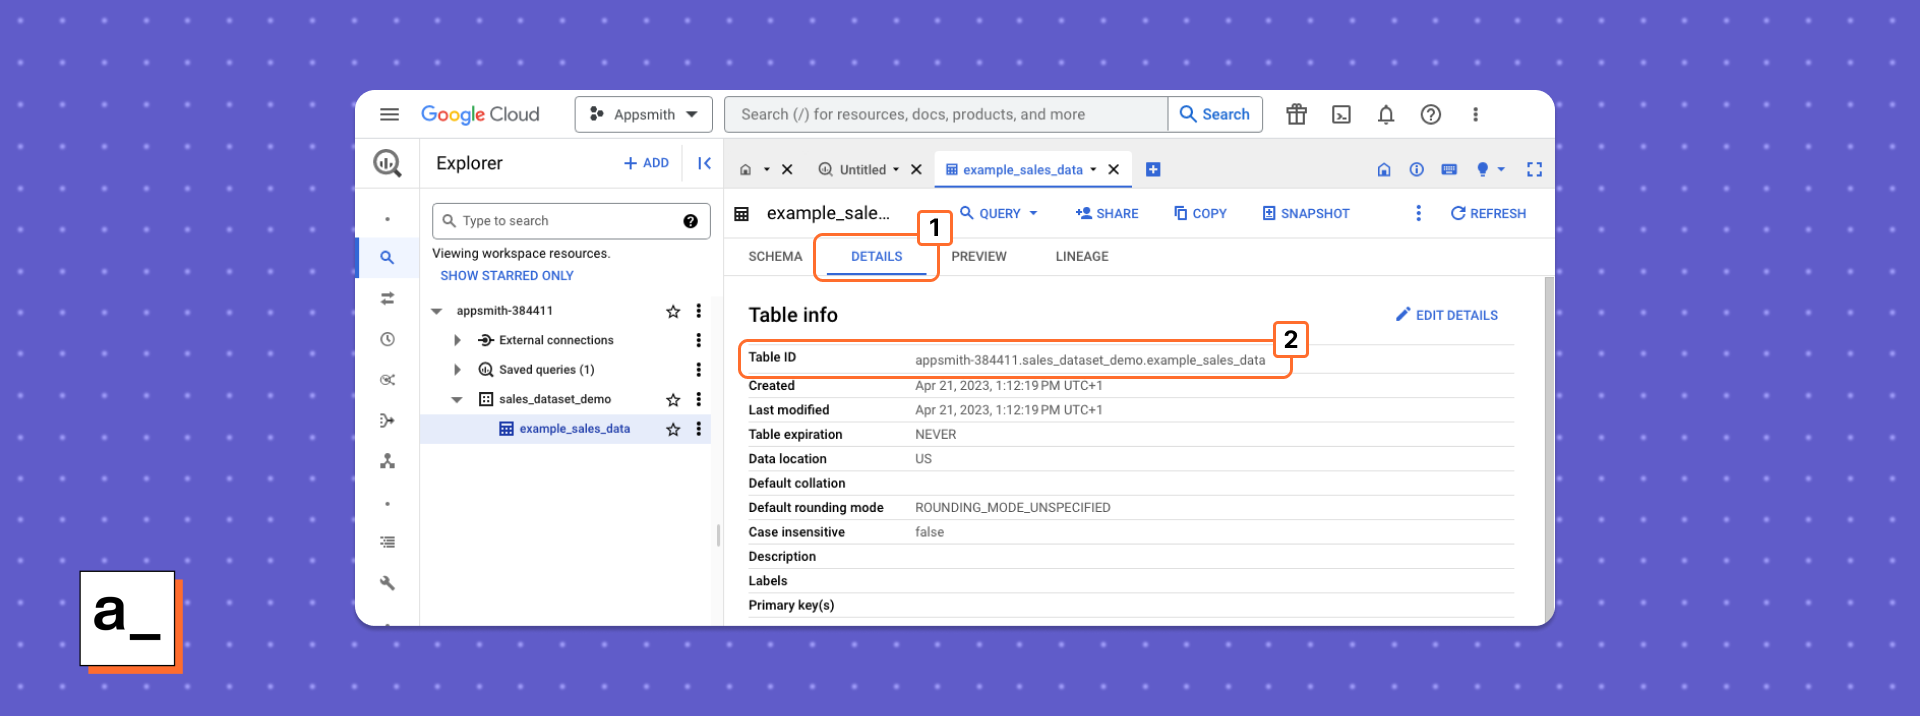
Navigating to the Table Details tab (1) in the BigQuery console to find the Table ID (2).
To query your BigQuery table, you will need to know the path to it, which includes the Project ID, and the name of the dataset and table. These details are available in a combined format that can be copied and pasted into the Table ID field in the Details tab for the table in the GCP console, shown above.
You can now enter a query to SELECT, INSERT, UPDATE, or DELETE data from your BigQuery dataset from Appsmith. All REST API calls to BigQuery are made using the POST request method using JSON data containing GoogleSQL query syntax. Ensure that the query method is set to POST and the format is set to JSON before entering your query into the query body.
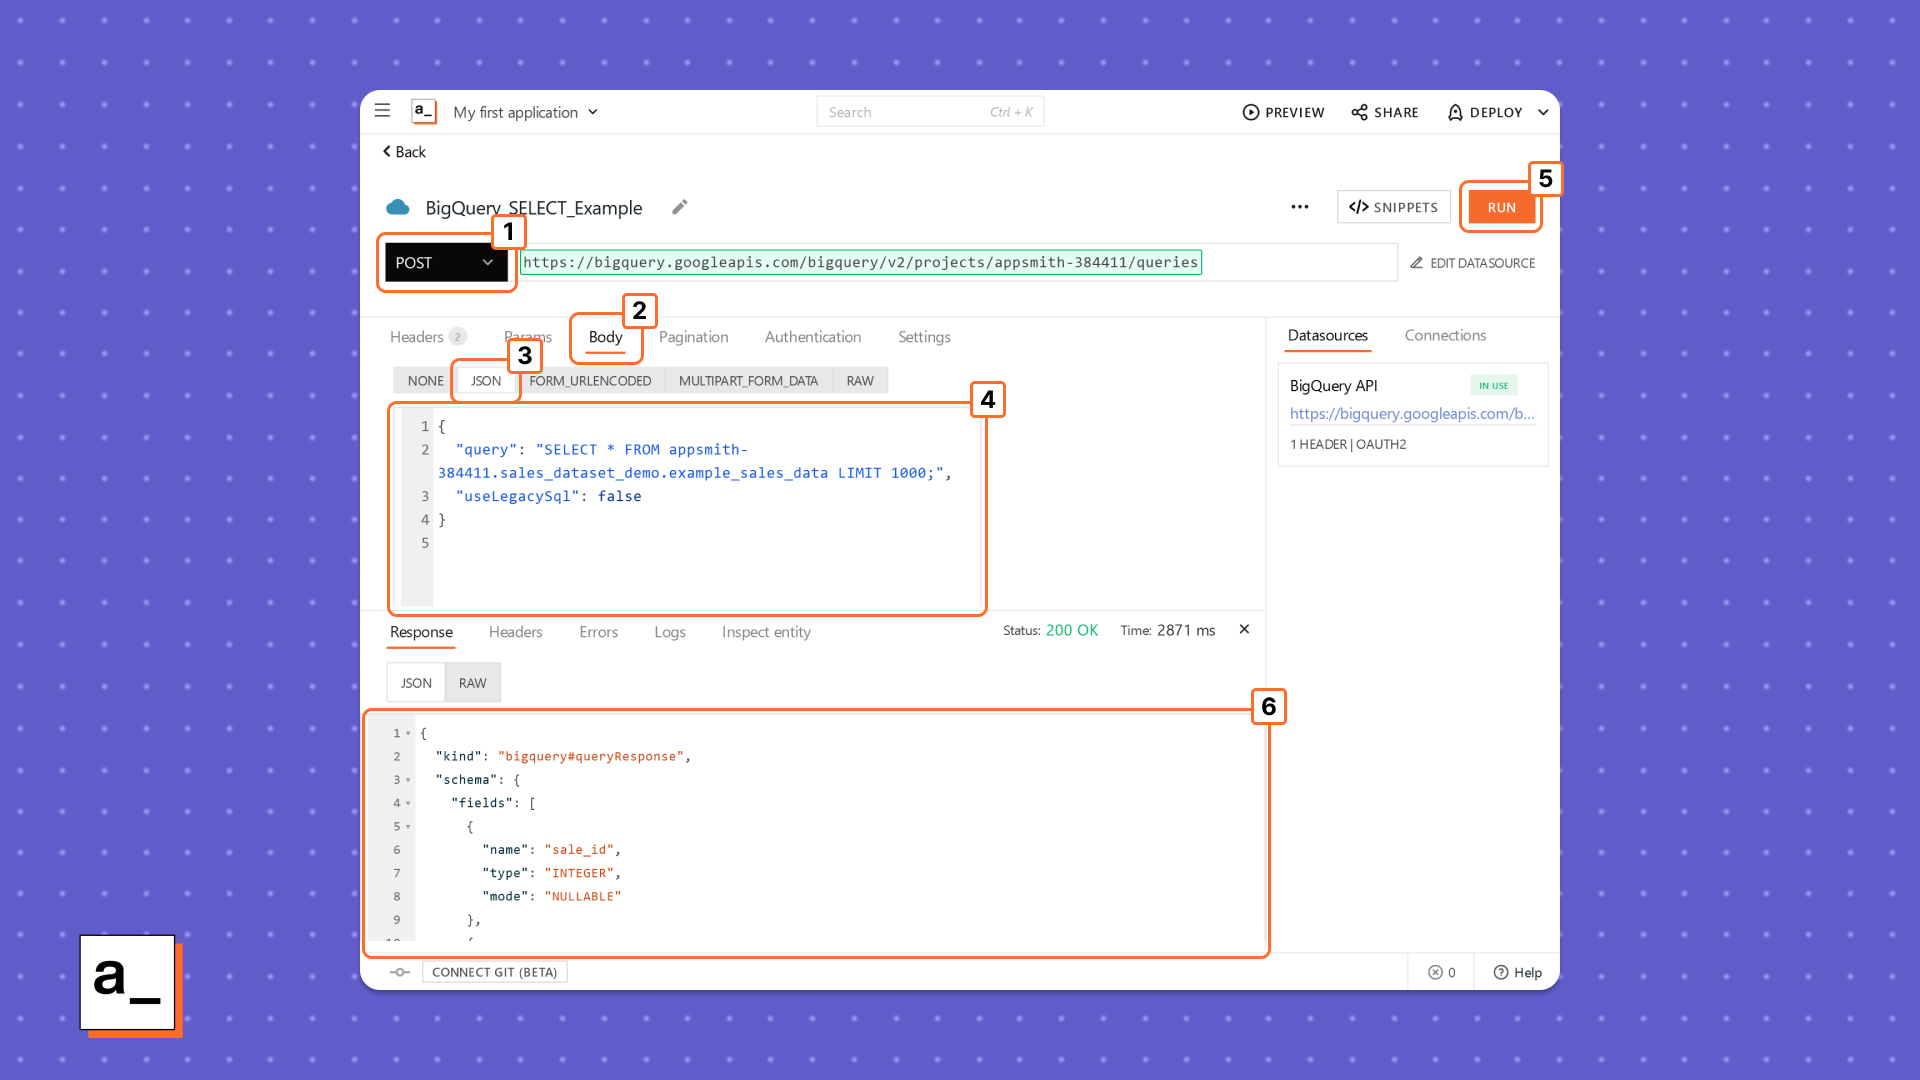
Selecting the POST request method (1) and JSON body (2, 3), entering the query JSON (4), running the query (5), and finally viewing the response (6).
When you have entered your query, click the Run button to execute it. A successful query will return a status code 200 OK, with the JSON response containing the query results shown in the Response body. Note that you will need to write your own query using the table details from your own Google Cloud project, which will differ from the ones in the screenshots above..
Appsmith BigQuery query templates
To assist you with writing your own queries, here are some templates for basic SELECT, INSERT, UPDATE, and DELETE queries that can be copied and pasted into the query body in Appsmith and then adjusted to your needs:
SELECT query
{
	"query": "SELECT * FROM <<Your Project ID>>.<<Data Set>>.<<Table Name>> LIMIT 1000;",
	"useLegacySql": false
}
INSERT query
{
	"query": "INSERT INTO <<Your Project ID>>.<<Data Set>>.<<Table Name>> (column1, column2, ...) VALUES ('value1', 'value2', ...);",
	"useLegacySql": false
}
UPDATE query
{
	"query": "UPDATE <<Your Project ID>>.<<Data Set>>.<<Table Name>> SET column1 = value1, column2 = value2, ... WHERE <<condition>>;",
	"useLegacySql": false
}
DELETE query
{
	"query": "DELETE FROM <<Your Project ID>>.<<Data Set>>.<<Table Name>> WHERE <<condition>>;",
	"useLegacySql": false
}
This process demonstrates how easy it is to connect Appsmith to existing datasources. Whenever you need to run a new query on BigQuery, you can add a new query that references the existing datasource. You don’t need to reconfigure the entire datasource for each new query, saving you time and effort. Once you've connected your data, Appsmith lets you start building interfaces, forms, and reports to interact with it, with immediate results.
Appsmith connects to your existing data, wherever it is
When choosing the tools for the internal apps your business relies on, you need to consider how they will connect to your existing databases and services, such as the customer feedback, analytics, and e-commerce platforms that you already rely on. It would be unnecessary and wasteful to have to re-engineer your current datastores to upgrade your toolchain — instead, your new tools should be flexible enough to integrate seamlessly with your existing infrastructure.
Appsmith lets you build apps your way and connects to your data wherever it’s hosted. As shown in this tutorial, it’s possible to connect your apps to almost any datasource — such as Google BigQuery — that supports industry-standard APIs. This makes Appsmith a future-proof choice for your organization's internal apps, as it will be able to connect to any emerging, cutting-edge products or services that support REST or GraphQL.
If you're looking to try Appsmith out, our cloud hosted edition is free, with unlimited users, apps, and datasources — sign up and start building now! If you prefer to keep things local, you can also deploy our app using Docker in seconds.


