How to Build Complex, Sortable, Paginated, Searchable HTML Table Widgets


By: Veronica Stork
This tutorial will show you how to quickly build an HTML table that can paginate, sort, and search data, connect it to almost any data source, and embed it on a web page.
Rather than developing all of this functionality from scratch, this guide will show you how to implement complex HTML table functionality with Appsmith as a faster alternative to using React, Angular, or jQuery.
Using Appsmith allows you to focus on the logic behind your tables. You can also see your table working in real time as you build, a feature that is incredibly useful when you’re trying to develop something quickly.
Responsive HTML tables take hours to implement in JavaScript, React, Angular, and jQuery
Data tables are one of the most common elements in both business internal tools and customer-facing web applications. Some example use cases include:
Browsing customer and analytics data
Browsing user and employee management records
Providing an interface for customers to browse product, service, or real estate listings
Providing staff with a web interface to core company data that can be edited inline or using a form
Integrating and browsing data from multiple sources in complex tables: for example, matching customer success records with sales records and presenting them side by side
Implementing tables is therefore one of the most common tasks front-end developers perform. This is repetitive and time-consuming to do from scratch — each table will require writing boilerplate code, then adding customizations for the specific purpose of the table.
Even though popular libraries like React, Angular, and jQuery all have libraries intended to expedite the development process, tables built with these tools still require significant development time to adapt and maintain.
Appsmith lets you create complex tables, built on your own custom queries, in minutes
Many developers instead choose to use app platforms like Appsmith to build their table-driven interfaces. By leveraging pre-built table widgets, developers are able to focus their time on real problems instead of re-implementing table functionality.
When working with Appsmith, all of the UI components you need to create powerful data-driven dashboards, workflows, and CRUD apps are already built, including tables, modals, buttons, and form inputs — you just need to tell Appsmith where your data is and what to show.
Appsmith connects tables to a wide array of data sources including MySQL, PostgreSQL, and MongoDB (as well as platforms like Shopify, Airtable, and HubSpot, and REST/GraphQL APIs).
Step 1: Get Appsmith and create an app
To create your custom table, you'll first need to sign up for Appsmith. Appsmith is available as a free cloud-hosted version, in addition to self-hosted Business or Enterprise versions.
Once you're up and running in Appsmith and have created a user account, just click + New to the right of the screen to create a new application.
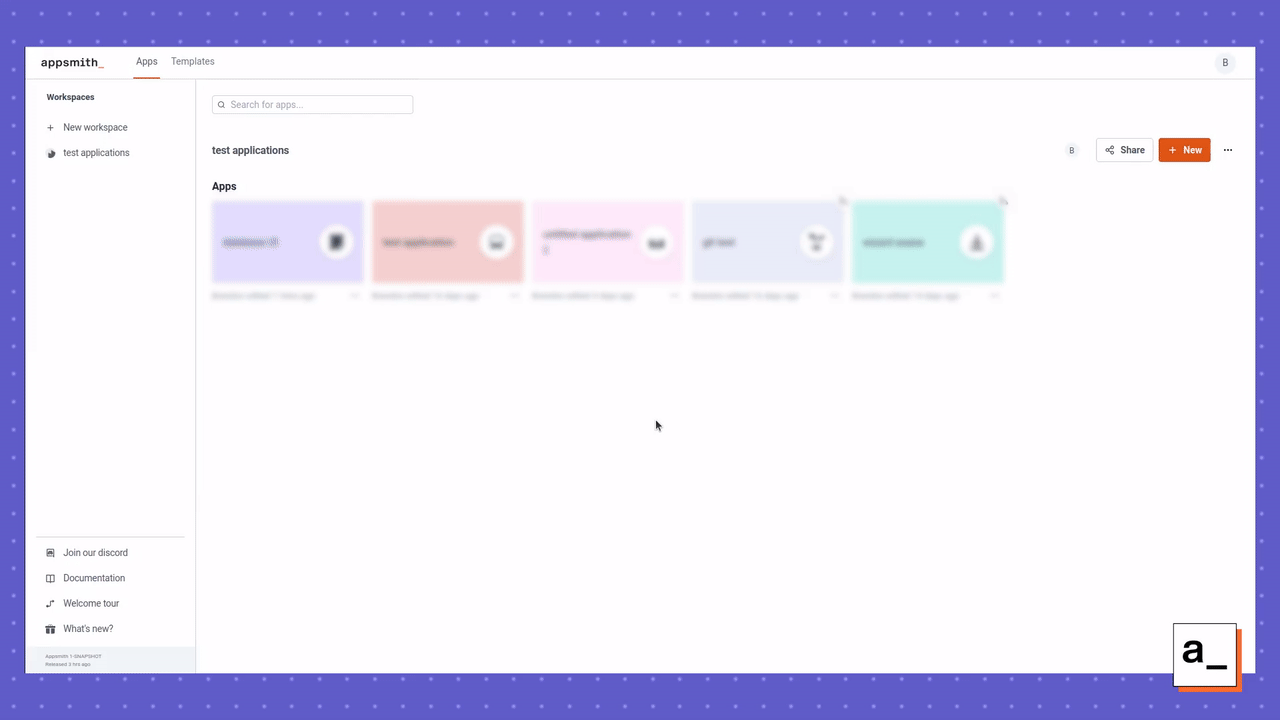
Then, name your application by clicking on the ⌵ icon and clicking on Edit Name. Your blank application will so far consist of an empty page that you will add your table to.
Step 2: Create a table and add it to the canvas
Appsmith user interface elements are referred to as widgets. To add a table widget, open the Widgets directory in the sidebar panel to the left of the screen.
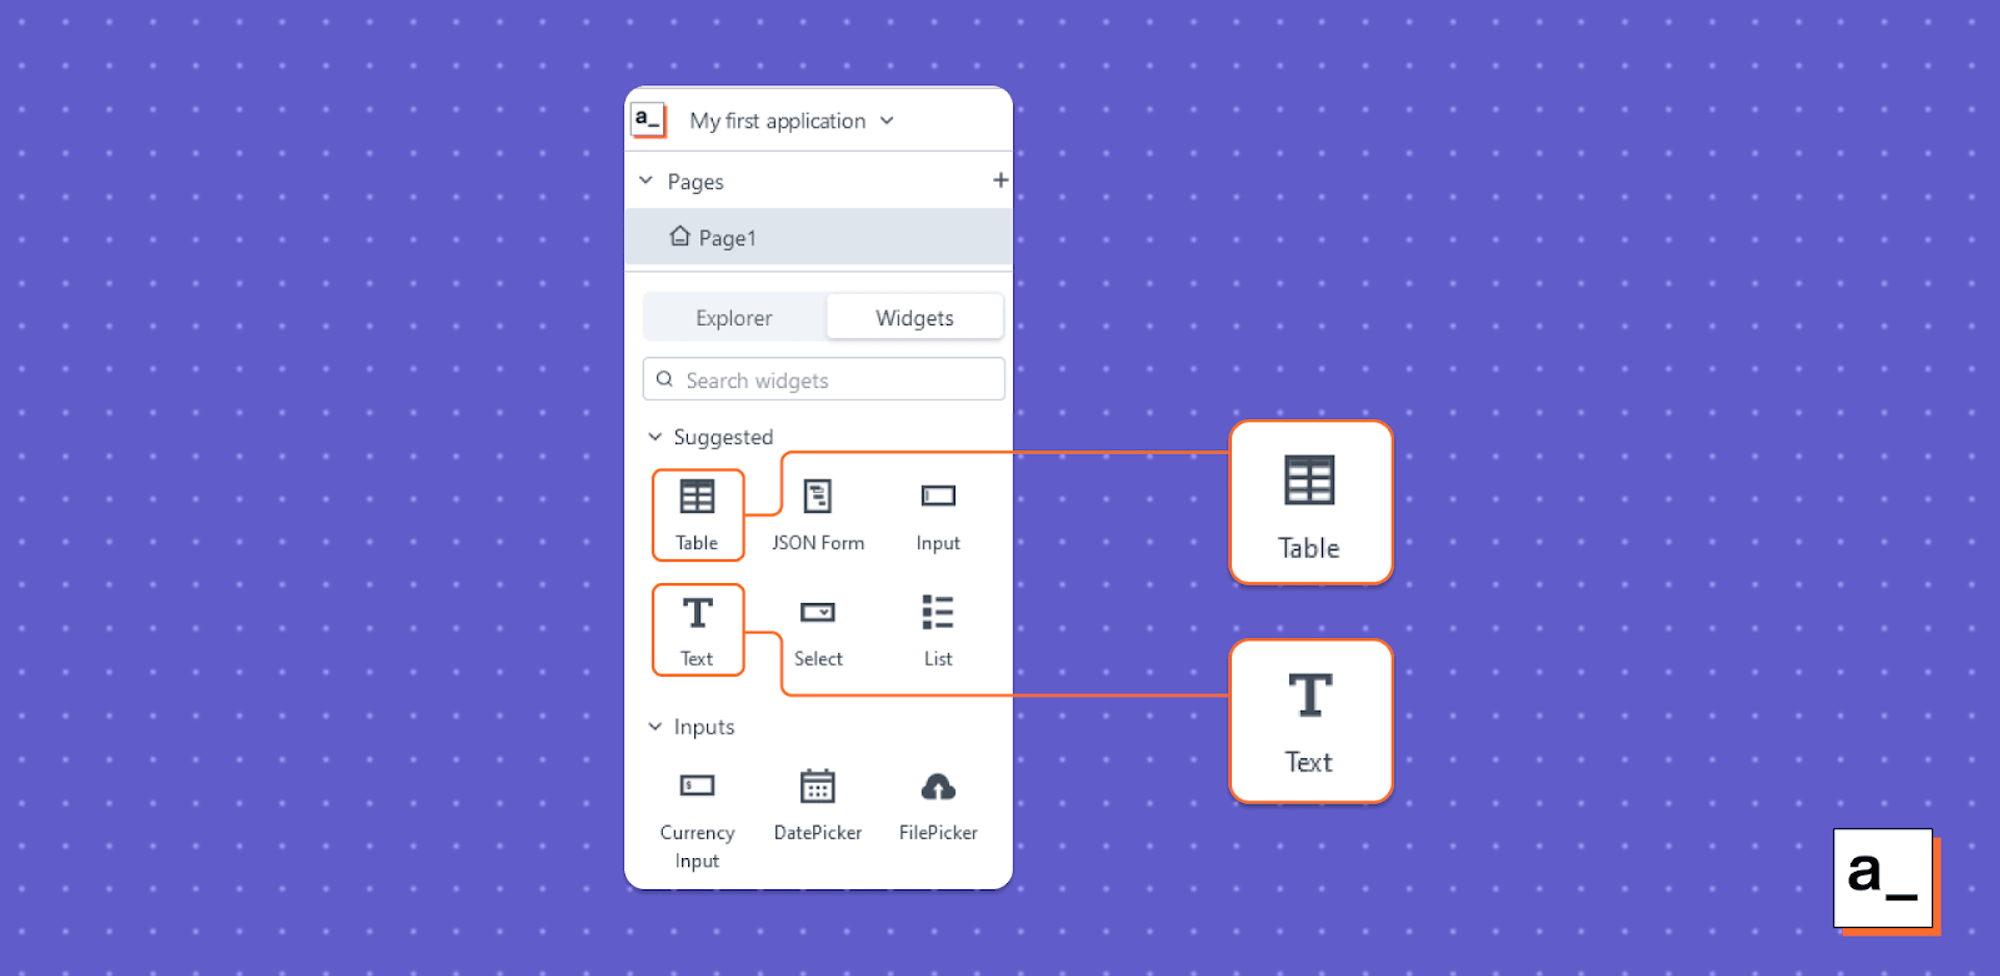
Then, drag a table widget onto the canvas. By default, a new table widget will not be populated with any data. To add data to your table, you will need to either connect a datasource, or enter data manually in the table's properties (displayed on the right of the screen when the table is selected) by clicking the JS button next to the Table Data field and entering your data.
For this tutorial, we'll manually add the following example data that contains information about four pets:
    {
        "id": 1,
        "name": "Buddy",
        "type": "dog",
        "favorite_food": "beef",
        "color": "brown"
    },
    {
        "id": 2,
        "name": "Mittens",
        "type": "cat",
        "favorite_food": "tuna",
        "color": "black"
    },
    {
        "id": 3,
        "name": "Charlie",
        "type": "dog",
        "favorite_food": "chicken",
        "color": "black"
    },
    {
        "id": 4,
        "name": "Polly",
        "type": "bird",
        "favorite_food": "seed",
        "color": "green"
    }
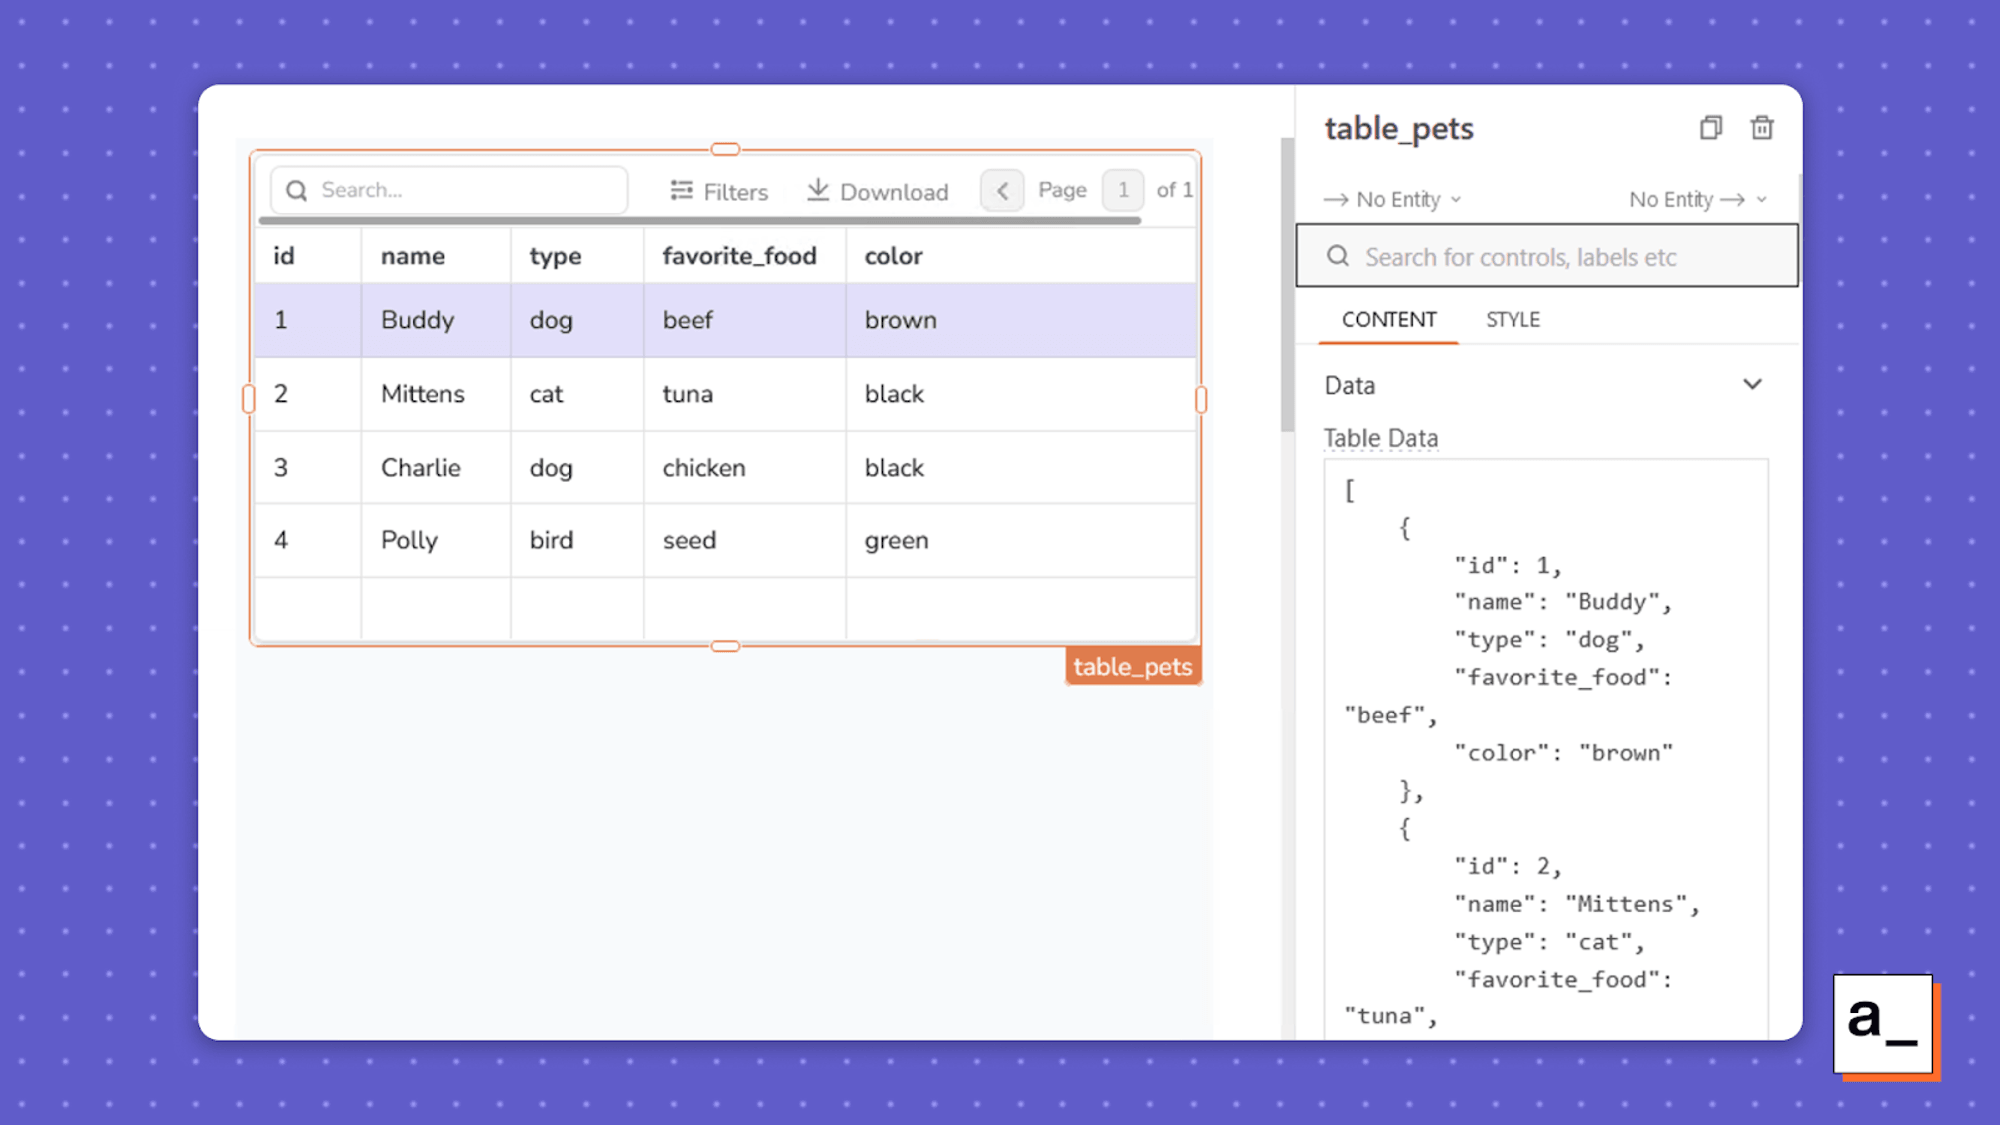
You can rename the new table in the property panel to the right of the screen. You should be descriptive with your widget names so that you know what they are when you see them referred to in your code, and you should be consistent in the format you use to name them. For this example, the table is named table_pets.
Step 3: Connect your table to a API or database
You can populate your table with data in a few different ways:
Typing the data directly into the Table Data field manually (as shown above)
Connecting to a REST or GraphQL API
Connecting your table to a database
If you are manually adding data or connecting to an API, the object keys will be interpreted as column names.
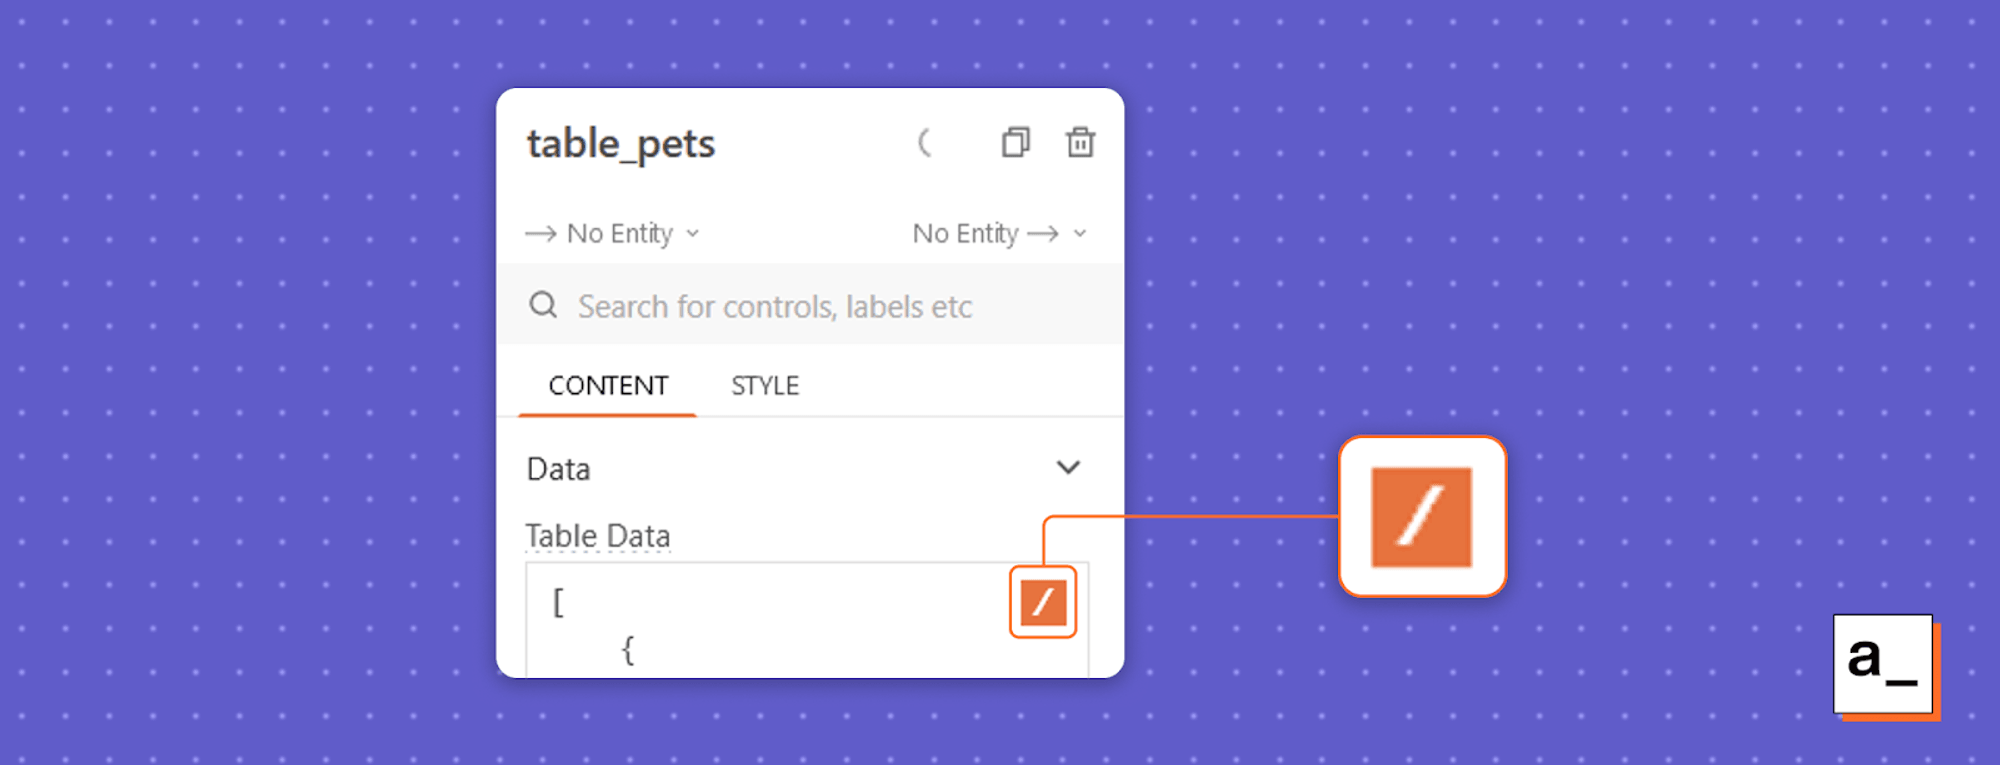
To connect to an API, hover over the table data field of the property pane, click on the / icon in the top right, and click + New Datasource. You will be presented with several options. Choose the type of API you want to pull your table data from, and then enter the URL and other details required to connect to it.
To connect to a database, repeat the above steps but instead, when presented with the option to create a new datasource, scroll down and select the type of database you are connecting to (options include MySQL, PostgreSQL, MongoDB, Snowflake, and Redis), and then enter the database details.
Once your datasource has been bound to your table, you will see your data immediately. You can then edit the table's properties to show your choice of UI elements and columns to customize it for your use case.
And that's it! You have now created a user-friendly, responsive data table for use in HTML pages and web apps. Now, you can continue to add extra functionality to customize your table further.
Embedding Appsmith tables in your web pages and apps
To embed a table in an external app or HTML web page, you can embed it by following these instructions. If you need your Appsmith app or table to be able to communicate with the parent app or page, don't worry — we've thought of that too.
Adding pagination, sorting and searching
Appsmith table widgets include the following built-in features:
Pagination
Searching
Filtering
Downloading data as a spreadsheet
Selecting rows
Adding rows
Inline editing
This greatly reduces the work required to create user-friendly tables. You can also use JavaScript to customize these features based on your own use cases or add your own entirely bespoke functionality.
Client and server-side pagination
Pagination is often required to display large amounts of data. If you have more data than there are rows visible in your table, you will need to split the data into separate pages.
Client-side pagination means that the data being supplied by an API is not paginated on the server, so it must be broken up into pages by the Appsmith app. This functionality is available for all data sources — just check the Show pagination option in the table properties to enable it.
Server-side pagination is often implemented to reduce the size of the API responses from the server. Rather than the client receiving all records from the server and breaking them up on the client side, the client tells the server which page it wants and how many records to retrieve. This is called offset pagination.
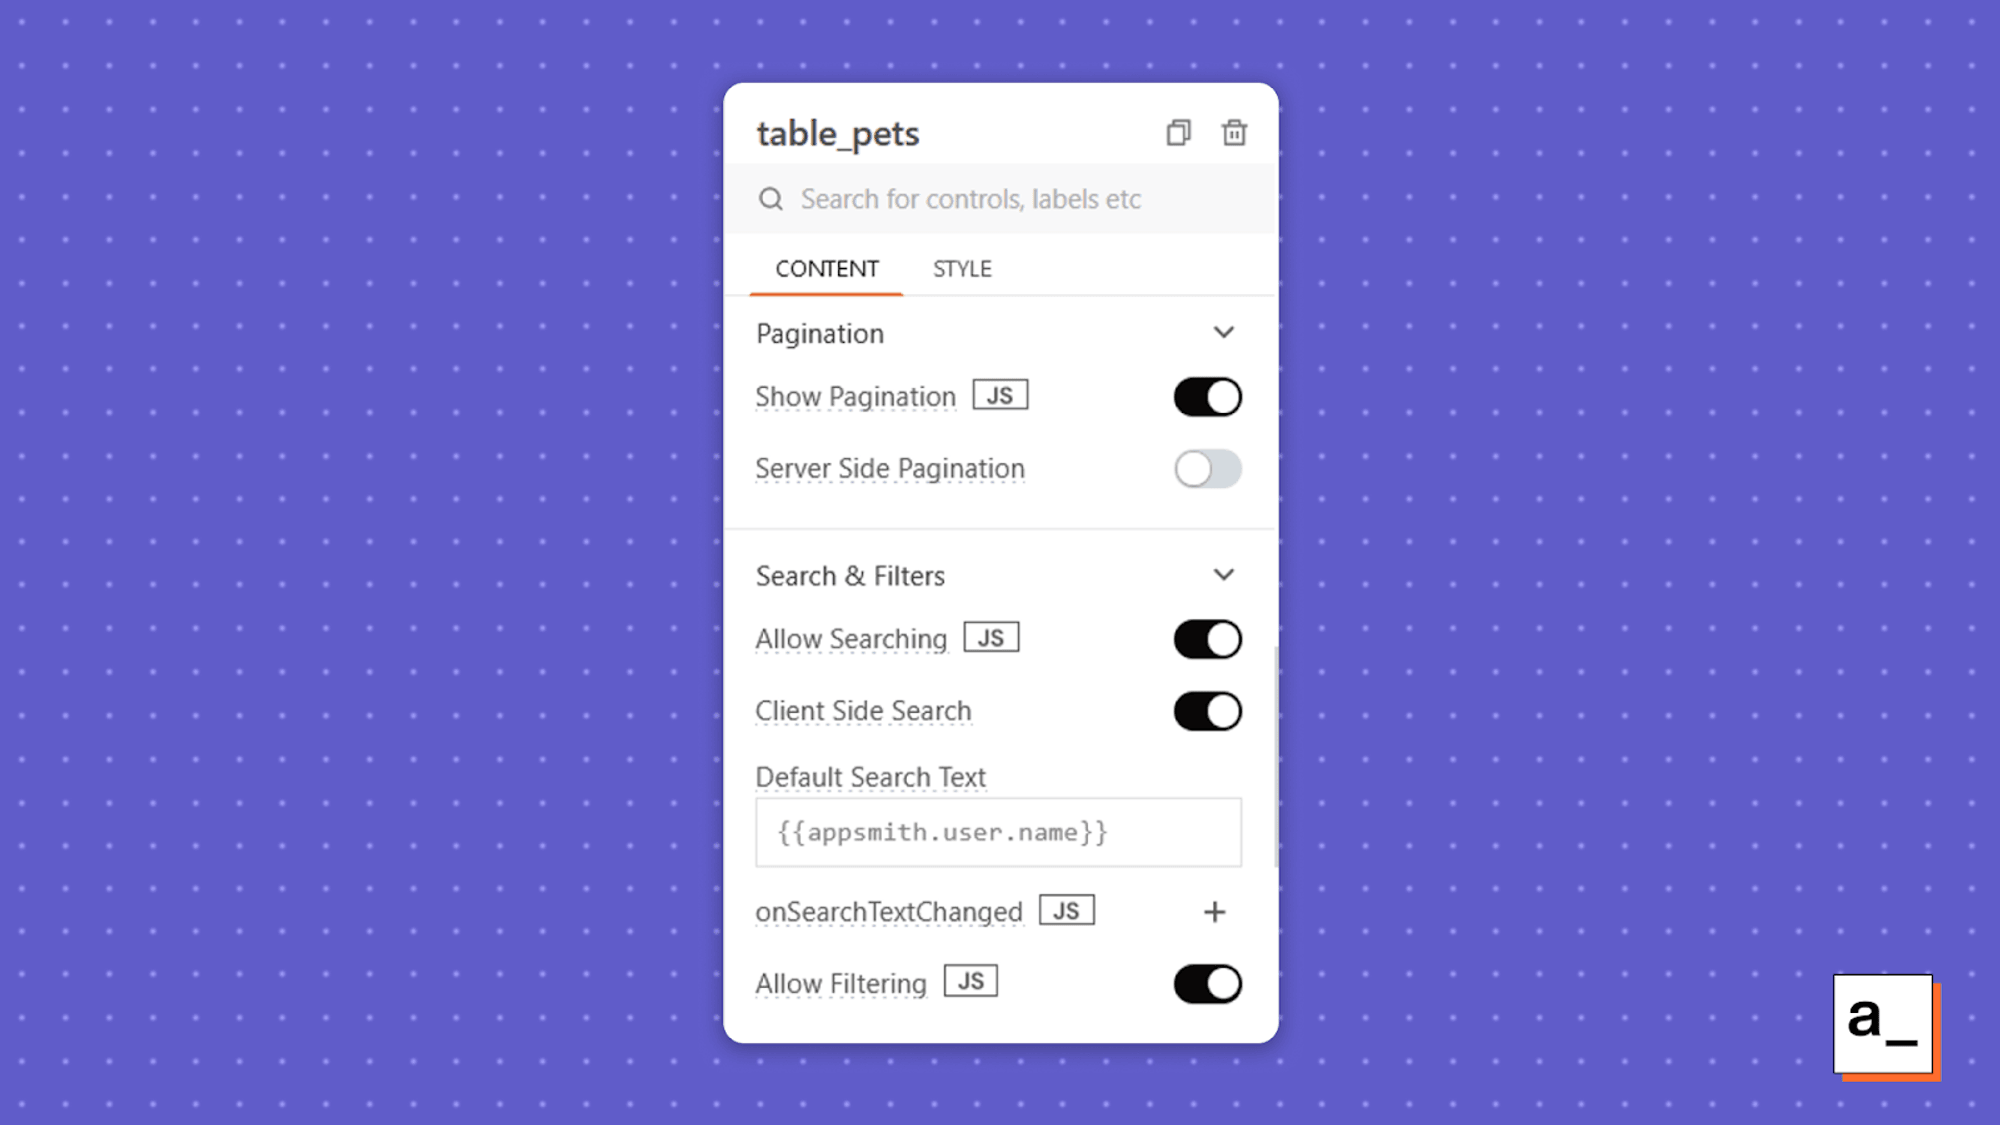
To enable server-side pagination, check the Server Side Pagination option in the table properties. Then, update your REST API URL or database query to reference the table’s pageSize, pageOffset and pageNo variables. Appsmith automatically constructs these values based on the parameters of the table widget, so you just need to supply them to your back-end queries.
For example, a paginated REST API URL would look like this:
https://mock-api.appsmith.com/pets?page={{pets_table.pageNo}>}&count={{pets_table.pageSize}}
A paginated database query would look like this:
SELECT * FROM pets LIMIT {{ pets_table.pageSize }} OFFSET {{ pets_table.pageOffset }};
Cursor-based (or key-based) pagination uses a value returned by the API to make the next page’s API call. If the API’s response includes URLs for the next and previous pages, you can enter those on the API settings.
Filtering
Filtering limits the records in view to those that meet certain simple criteria, usually supplied by a drop-down of predefined values that need to be frequently looked up. Client-side filtering is included in Appsmith out of the box and can be enabled or disabled by toggling it in the table properties.
Implementing server-side filtering requires a few additional steps, which are detailed in this tutorial.
Searching
As with filtering, client-side searching is included in Appsmith out of the box; you just need to enable it in the table properties.
To implement server-side searching, you must call the datasource API or query whenever onSearchTextChanged is triggered from the table and pass in the search box contents, represented by the searchText property. This tutorial shows how to implement server-side searching in more depth.
Adding the option to download table data
Downloading table data as a .csv file or Excel spreadsheet also works with no additional coding required: just enable the Allow download option in the table properties and a download button will be added to the table for you.
Inline editing
You can also allow your users to edit data right in the table, with the changes being reflected in your database. Just check the Editable option in a table column’s properties and then set an update query.
Using custom actions to download and inspect individual records
Appsmith lets you define custom functionality that is triggered when your users perform certain actions. You can set the app to call an API, open a pop-up, and more.
The available action triggers for table widgets are:
onRowSelected– triggered when a user selects a rowonPageChange– triggered when a user navigates to the next page of dataonSearchTextChanged– triggered when a user types in the search bar
Using actions to display the full details of a record in a pop-up modal
Tables will often not display all of the details of a record as there may be too many columns to fit horizontally on screen. This is usually addressed by having the user click on a record to view the full details in a separate panel or pop-up screen (known as a modal).
This can be done in Appsmith by creating a modal containing text widgets that have their Text values bound to the different column values of the currently selected table item.
For example, to show the value in the color column of the selected row from the example table_pets in a text widget, you would give it the value:
{{table_pets.selectedRow.color}}
Your modal can contain multiple widgets, each bound to a column value of a table row.
Modals need to be triggered by a user action before they are displayed. You can use the onRowSelected trigger for this:

This allows you to drill down into your table data in detail, without having to try and fit every column on screen.
Using actions to download specific data
Rather than using the built-in table download function, you can use actions to customize the format, file name, and captured data. Below, custom download functionality is attached to the onRowSelected trigger:
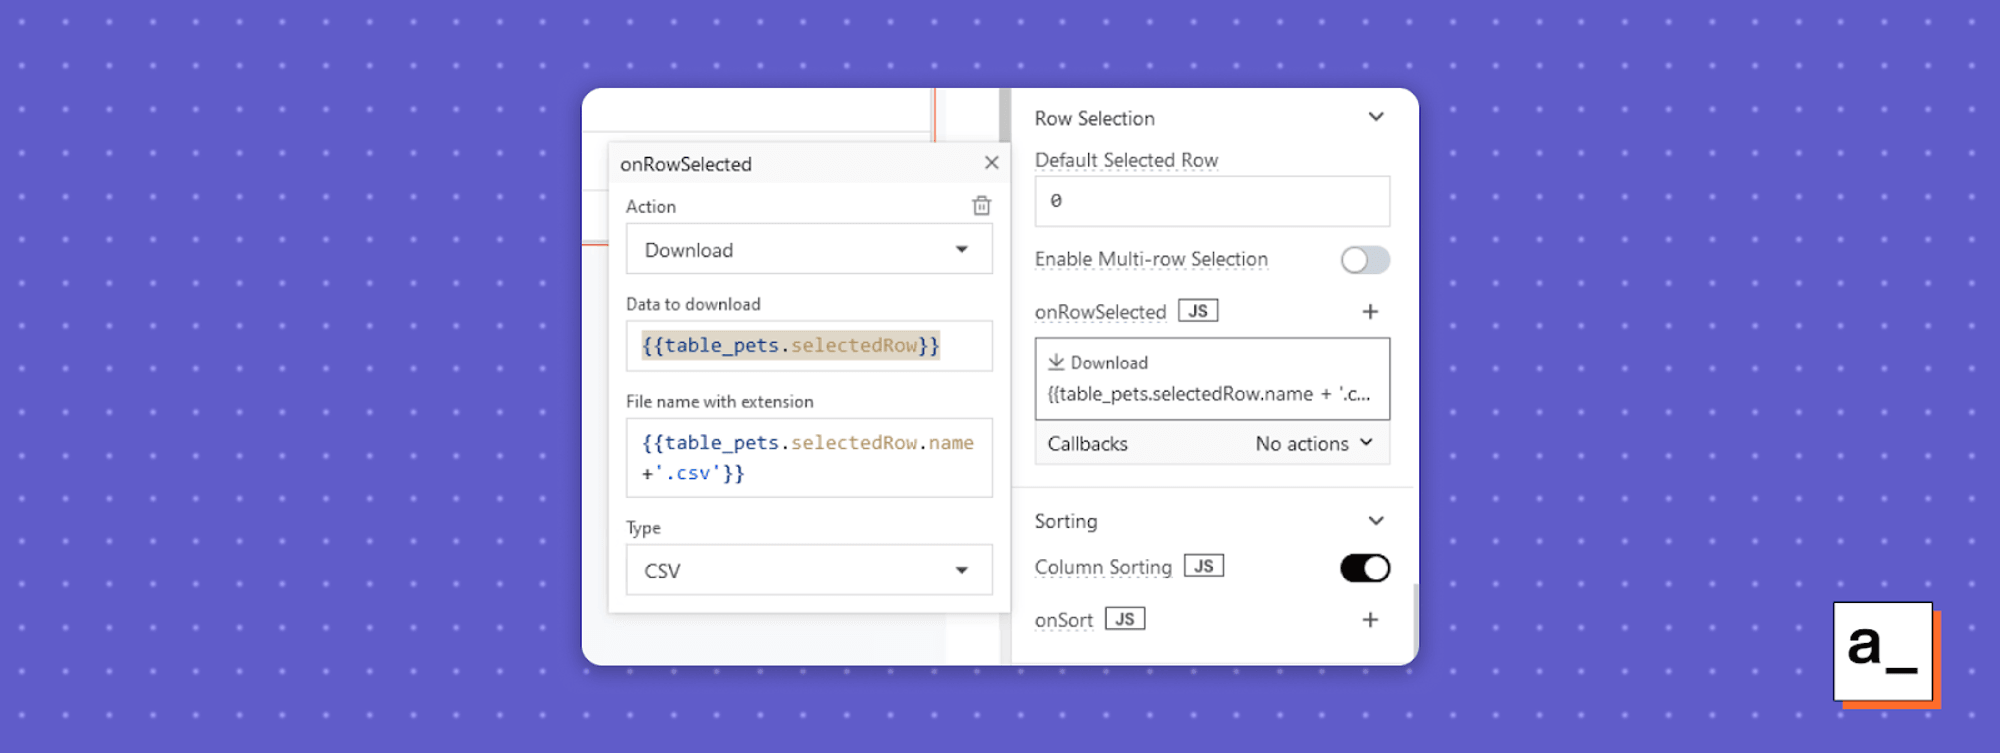
You can trigger many other actions the same way, including copying data to the clipboard, storing data in the session, navigating to other areas of the application, or defining your own fully custom behaviors using JS Objects.
Developers don’t want to spend all of their time building tables
Re-implementing boilerplate sucks — especially tables. Developers want to be able to focus on solving real problems rather than adapting tables and managing the dependencies introduced by React, Angular, and jQuery libraries.
You can use Appsmith to build simple or complex embeddable tables to show, paginate, and filter data, query databases, and edit data in your existing applications. You can build your entire internal tools stack on the Appsmith platform by adding your own pages, forms, custom application logic, and automations, all pulling data from your existing databases, customer success, e-commerce, and other tools.
You can get started with Appsmith with our 100% free managed service, or host it on your own infrastructure by following our guides — it takes only minutes to get up and running.


