Build Your Own Centralized UTM Manager and Tracker


In today's fast-paced digital landscape, marketing professionals face numerous challenges when managing and optimizing their campaigns. Do you find yourself wasting precious time navigating between UTM (Urchin Tracking Module) builders, URL shorteners, spreadsheet trackers, and analytics platforms? It's time to put an end to the chaos and take control of your marketing efforts. In this tutorial, we'll guide you through the process of building your very own UTM management and tracking tool using Appsmith. By the end of this blog post, you'll have a powerful and customized solution that will revolutionize how you plan, execute, and track your campaigns.
Appsmith is a cloud-based platform for developers to build internal apps like support tools, dashboards, and management applications. It offers a comprehensive workbench with graphical interface creation and seamless integration with third-party services. These also make Appsmith a great tool for marketers. This tutorial will outline the building of one such app.
Imagine an app enabling you to create UTM links, shorten URLs, and track their performance seamlessly within a unified interface. In essence, you’d be combining Google’s URL builder, Bitly, and a lighter and clearer version of Google Analytics all in one place. With Appsmith as your development platform, you have the power to develop a comprehensive marketing toolkit tailored to your unique needs without relying on disparate platforms or spending a fortune.
During this tutorial, we'll delve into:
- Constructing a UTM link builder
- Integrating the Bitly API for URL shortening
- Implementing a link management system that simplifies tracking and analysis.
We'll also explore how you can leverage the Contentful API to seamlessly integrate your marketing tool with your website's CMS, allowing for effortless content management and distribution.
Let’s dive into the UTM link-building process!
UTM link builder
Building the UI
- Head to https://www.appsmith.com/ to sign up for a new account or log in to an existing one and create a new application in your desired workspace.
- Choose a theme from the App Settings option in the Properties pane on the right.
- For the UI, add the following widgets:

- Container, Text, Icon Button, and Image widgets for the app header
- Tabs to contain the different modules of the app
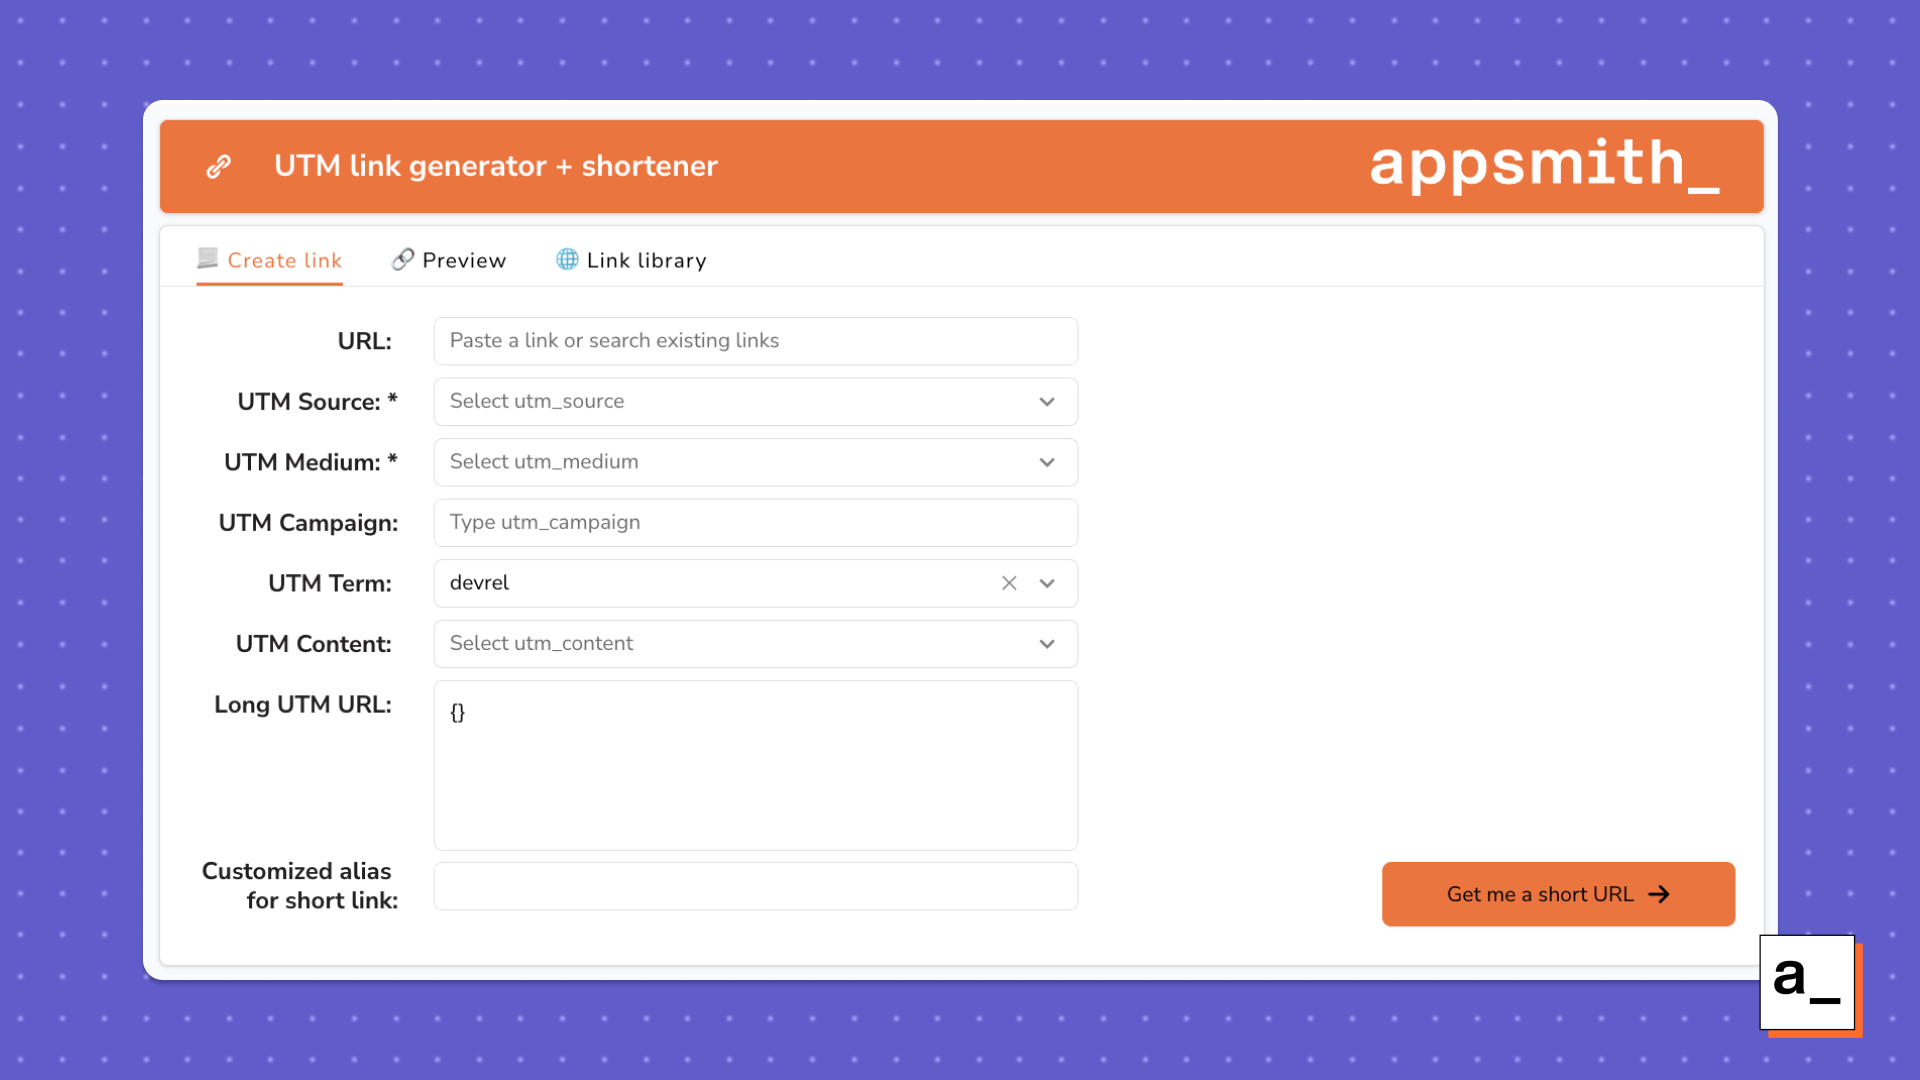
- Input, Select, and Text widgets for the UTM link builder form.
Creating a Google Sheet
We suggest a Google Sheets back end for this tool because:
- Sheets are easier to edit
- Most organizations are familiar with using spreadsheets
- They are easy to view and understand
- They are easy to integrate with other tools
- It allows easy updating of UTM parameter variables without having to edit the app.
Since the UTM parameter variables need to be available as options in the Select dropdown, format the spreadsheet as per the syntax of the widget.
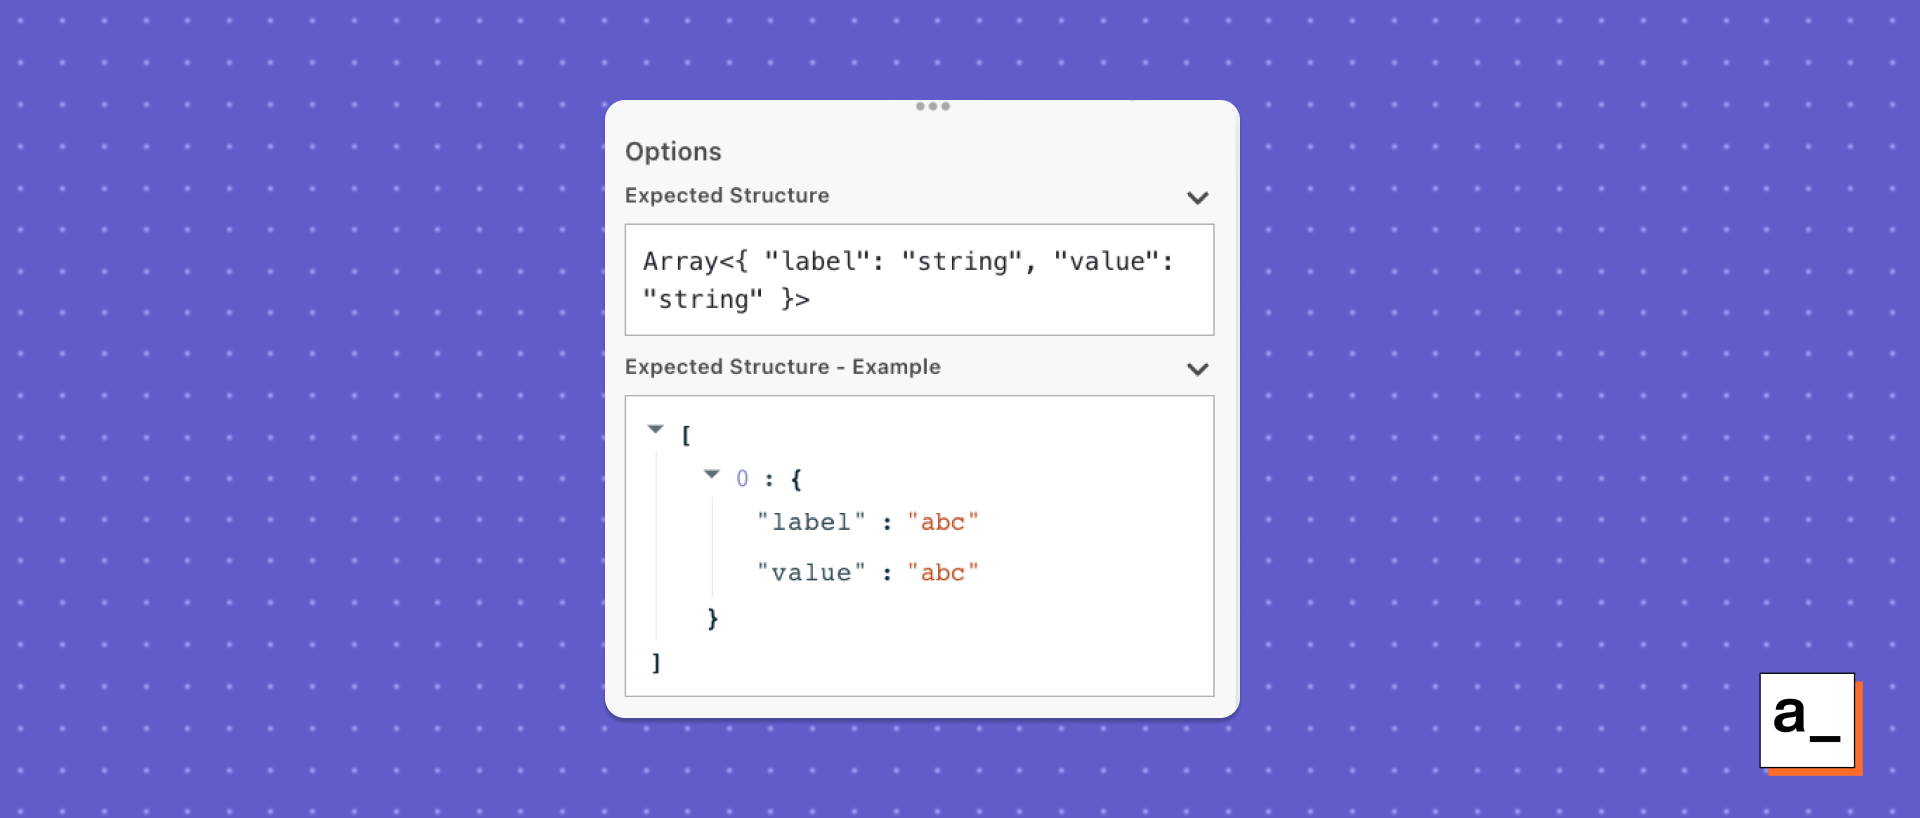
According to the expected structure, the Select widget requires label-value pairs.
To add the UTM parameter variables as options in the Select widget:
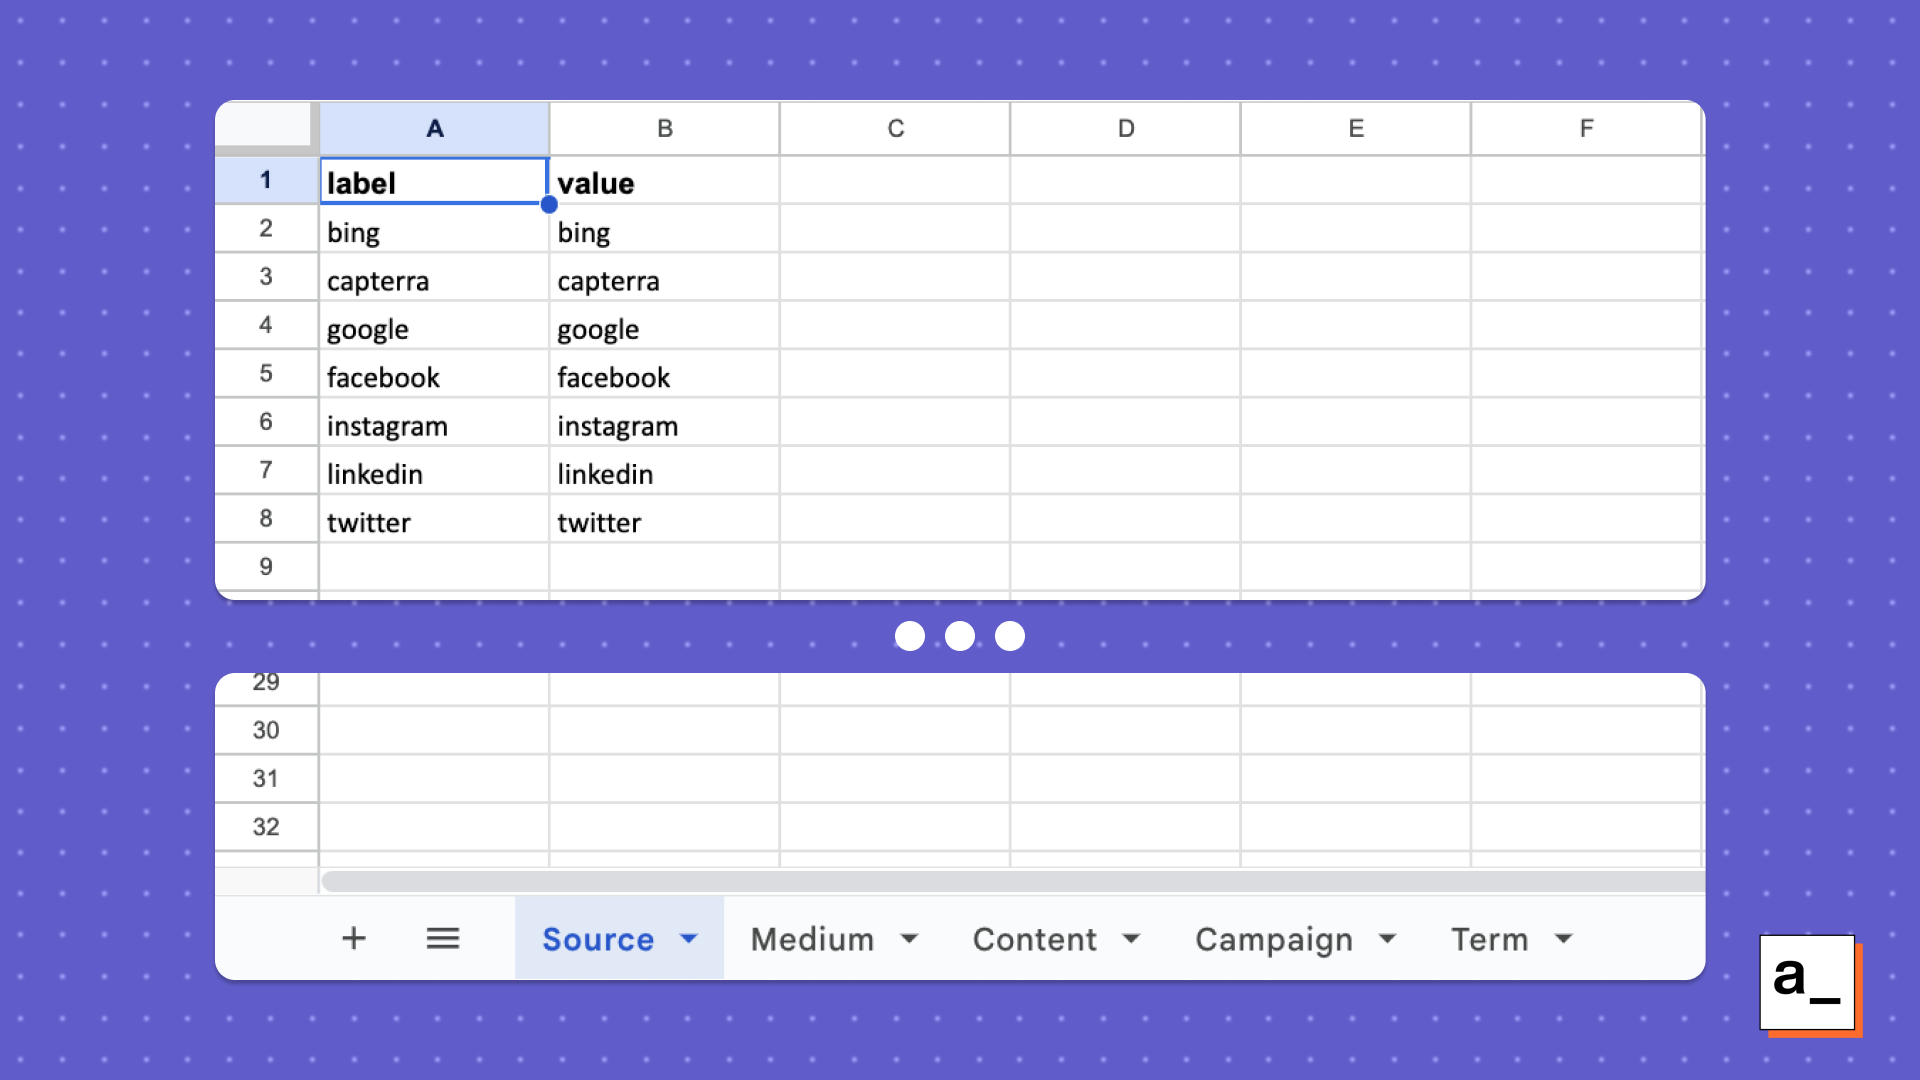
- Create a spreadsheet with sheets for every UTM parameter. Here is a sample spreadsheet that you can copy and customize.
- Create label and value columns as seen in the screenshot above.
Connecting with Google Sheets
Now connect to Google Sheets to fetch the variables for each UTM parameter. This will also enable easy management of the dropdown values for each.
Check out our docs for creating a new Google Sheet datasource and connecting with the desired spreadsheet for more help.
- Connect and query from this spreadsheet as a datasource on your Appsmith app.
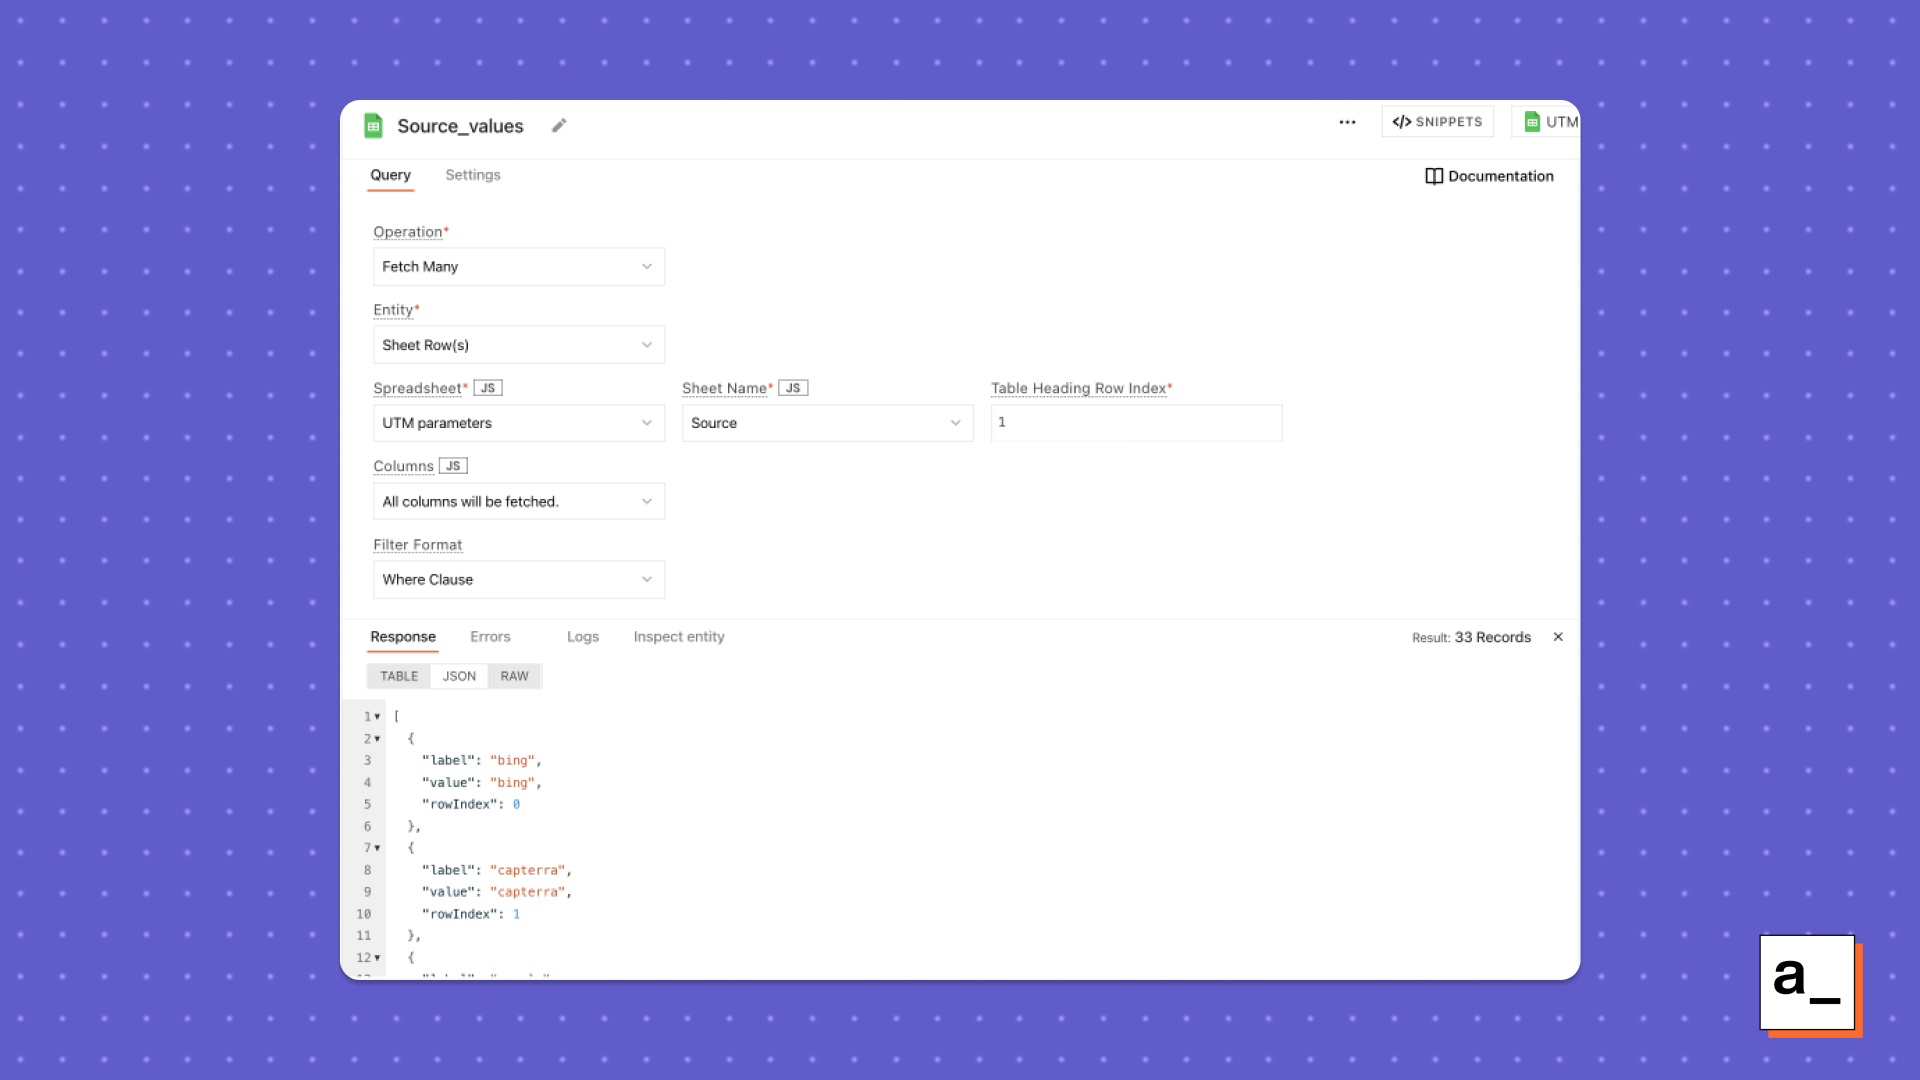
- Query variables from all the UTM parameter sheets similar to the one shown above.
- Bind the responses from each of these queries in the dropdowns of the respective UTM parameter in the form using
{{queryName.data}}.
Here’s what it looks like after the binding:

The Input widgets for the URL and dropdowns have been set up for each UTM parameter. Now you can query to get the long UTM URL.
Here is what a typical UTM URL looks like: https://www.appsmith.com/?utm_source=twitter&utm_medium=tweet-thread&utm_campaign=intent-driven-design&utm_term=feature&utm_content=website
In order to get the long URL, our use case mandates the occurrence of the utm_source and utm_medium parameters in every link, thereby making the other parameters optional. This means we would have to query the parameters in the long URL only if the user entered them.
- Create a new JSObject in the application.
- Create a function to check if there exists a value in the optional UTM parameters (and to return them if there are any) similar to the one shown below.
  contentUTM: () => {
    let addition = `&utm_content=${content.selectedOptionValue}`;
    return content.selectedOptionValue.length > 0 ? addition : "";
  }
Here, the function checks if the Select widget (named content in our app) has a selected option using the ternary operator and returns a value accordingly.
Write similar functions for all the optional UTM parameters that exist in your use case.
- Write a function that returns the long URL with the two necessary UTM parameters (
utm_sourceandutm_medium) and append any optional parameters entered by the user at the end.
 longUTMUrl: () => {
    let urlWithSpace = `${baseURL.text}?utm_source=${
      source.selectedOptionValue
    }&utm_medium=${
      medium.selectedOptionValue
    }${JSObject1.campaignUTM()}${JSObject1.termUTM()}${JSObject1.contentUTM()}`;
    let urlWithoutSpace = urlWithSpace.replace(/\s+/g, "_");
    return urlWithoutSpace;
  }
The longUTMUrl function follows the format of UTM links like the one shown above. It first returns the base URL that the user pastes into the Input widget, then the source parameter value, followed by the medium. After that, this function calls the optional UTM variable functions from the JSObject objects.
To avoid the possibility of a space occurring in the URL due to human error, the function uses replace() to replace spaces with underscores and finally returns the UTM link.
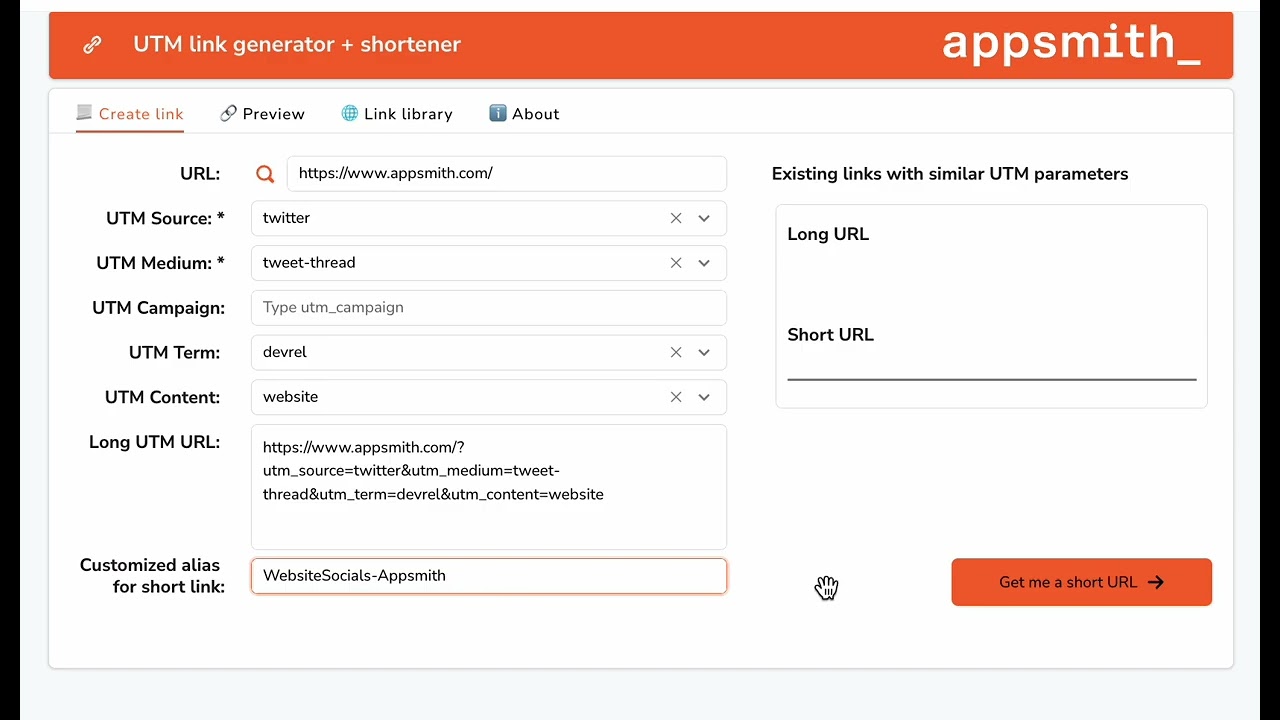
Here is what the UTM link builder looks like:

Now that we have the link builder, it’s evident that the links are too long to be shared conveniently with users. Enter Bitly.
Shortening the UTM link
Check out Bitly and Appsmith’s docs for API connection and querying.
- Connect with the Bitly REST API on Appsmith and save it as a datasource.
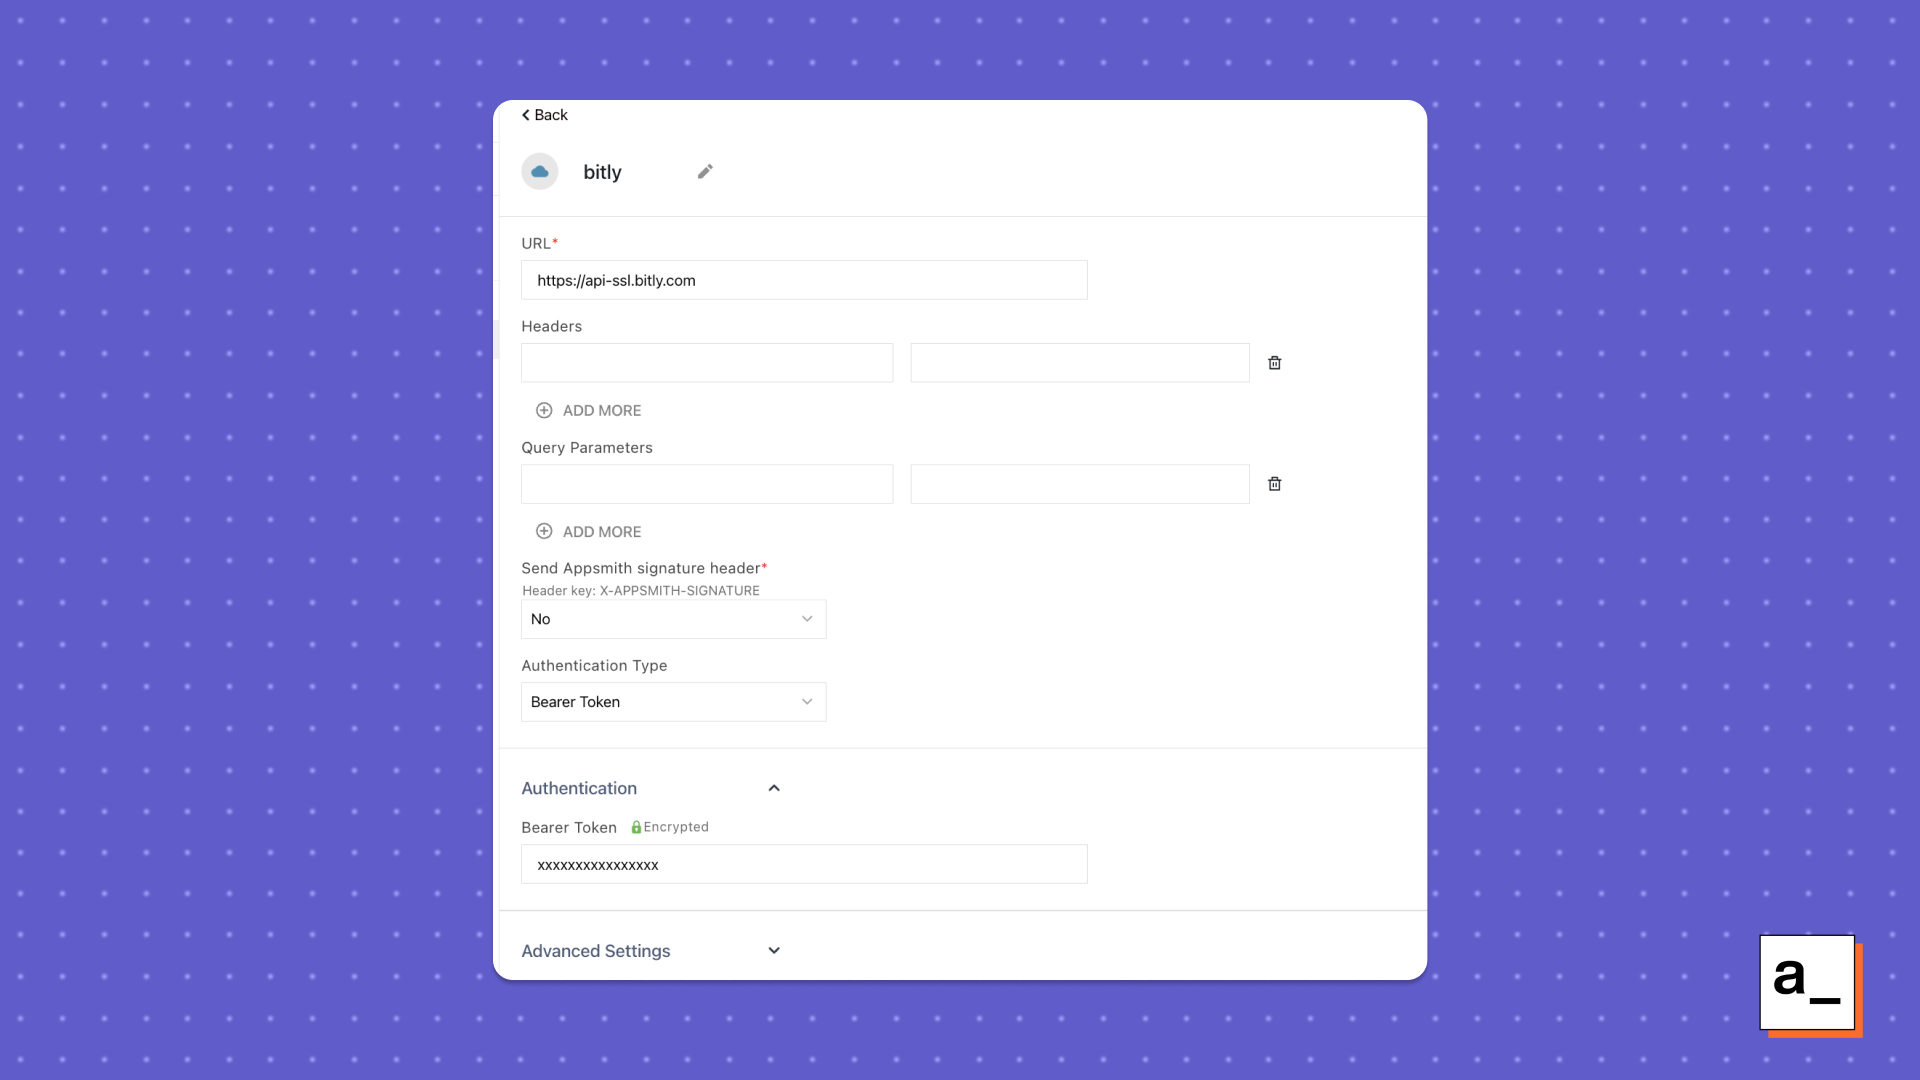
- Query the API to shorten the long UTM link that was created in the last step using the shorten endpoint. Create a new query from the REST API datasource and make a POST request to the API with the domain and long UTM link in the body.
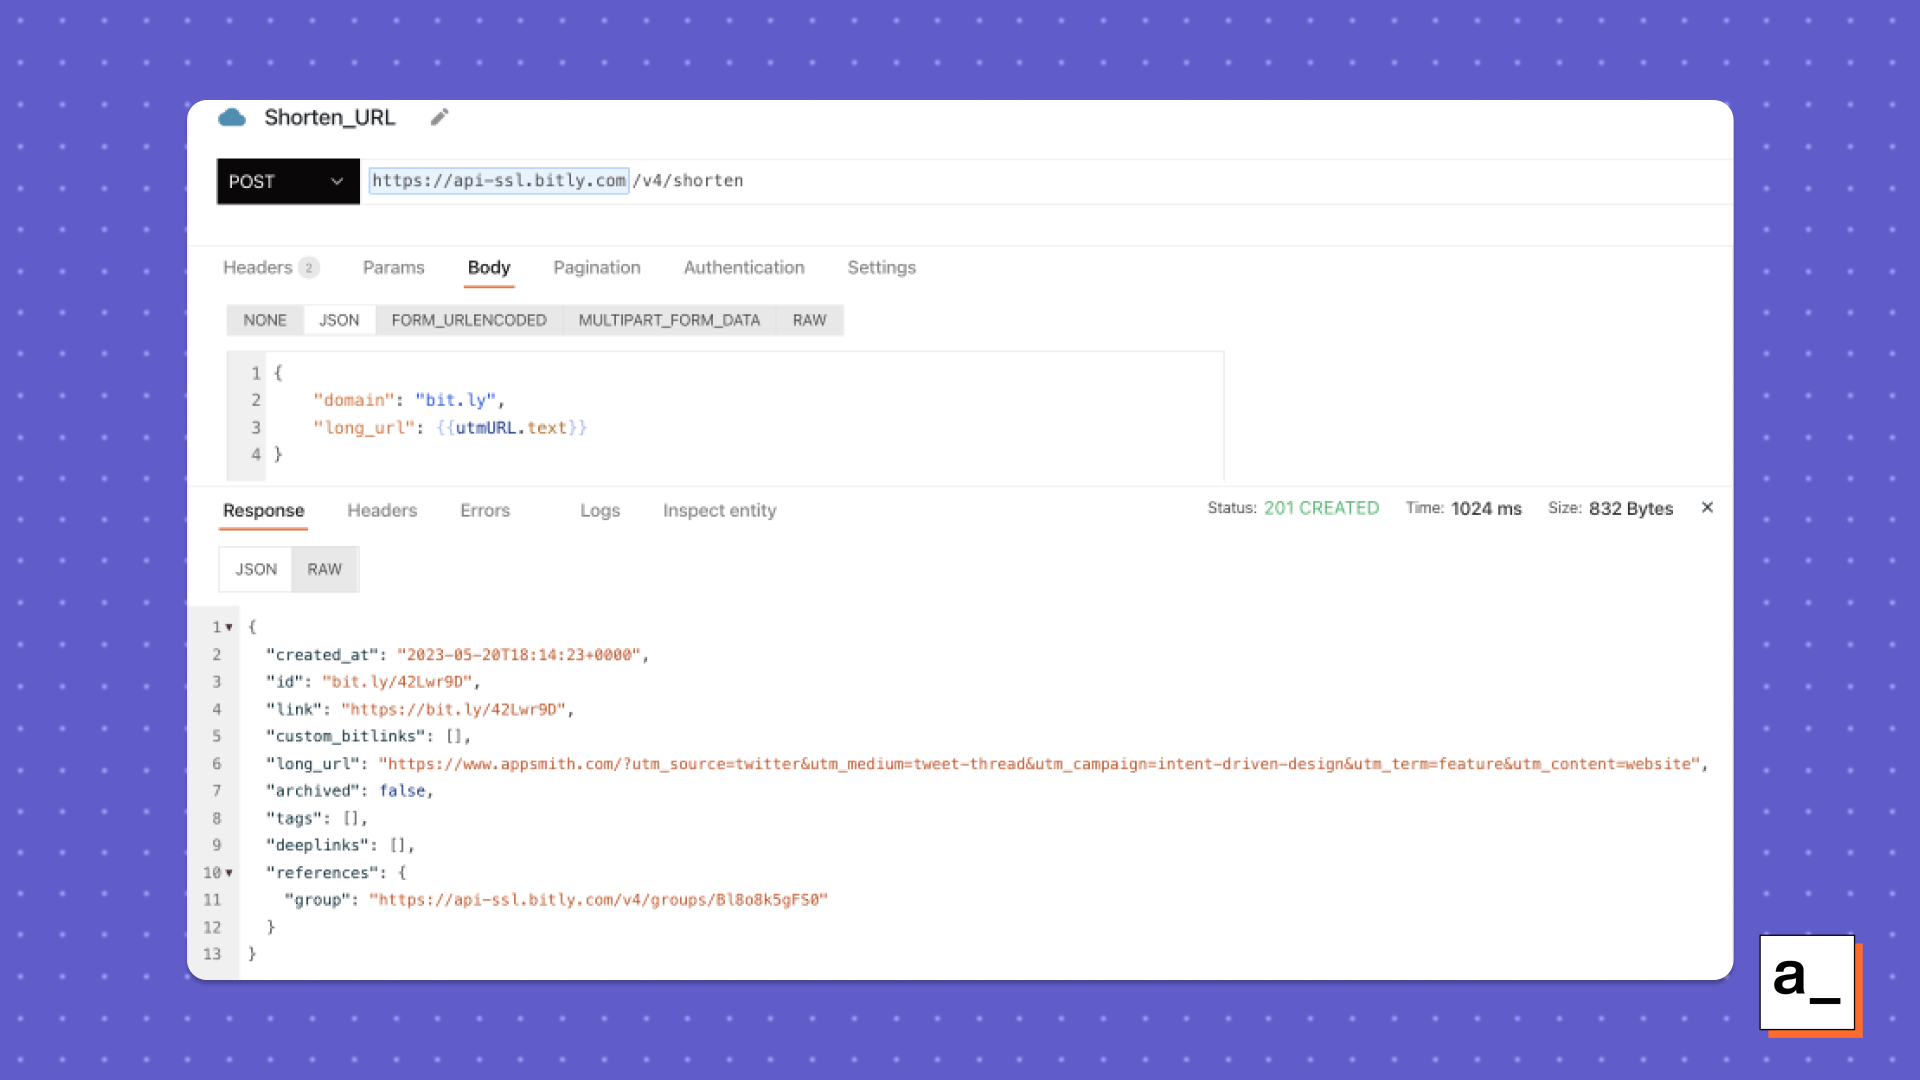
You can customize the domain based on the subscription on your Bitly account.
This query helps with shortening the long UTM URL.
Now, let’s preview the link to the user in a new tab. To do so:
- Create a new tab in the Tab widget. Add Text widgets and the iframe widget as shown in the screenshot below to display the information.
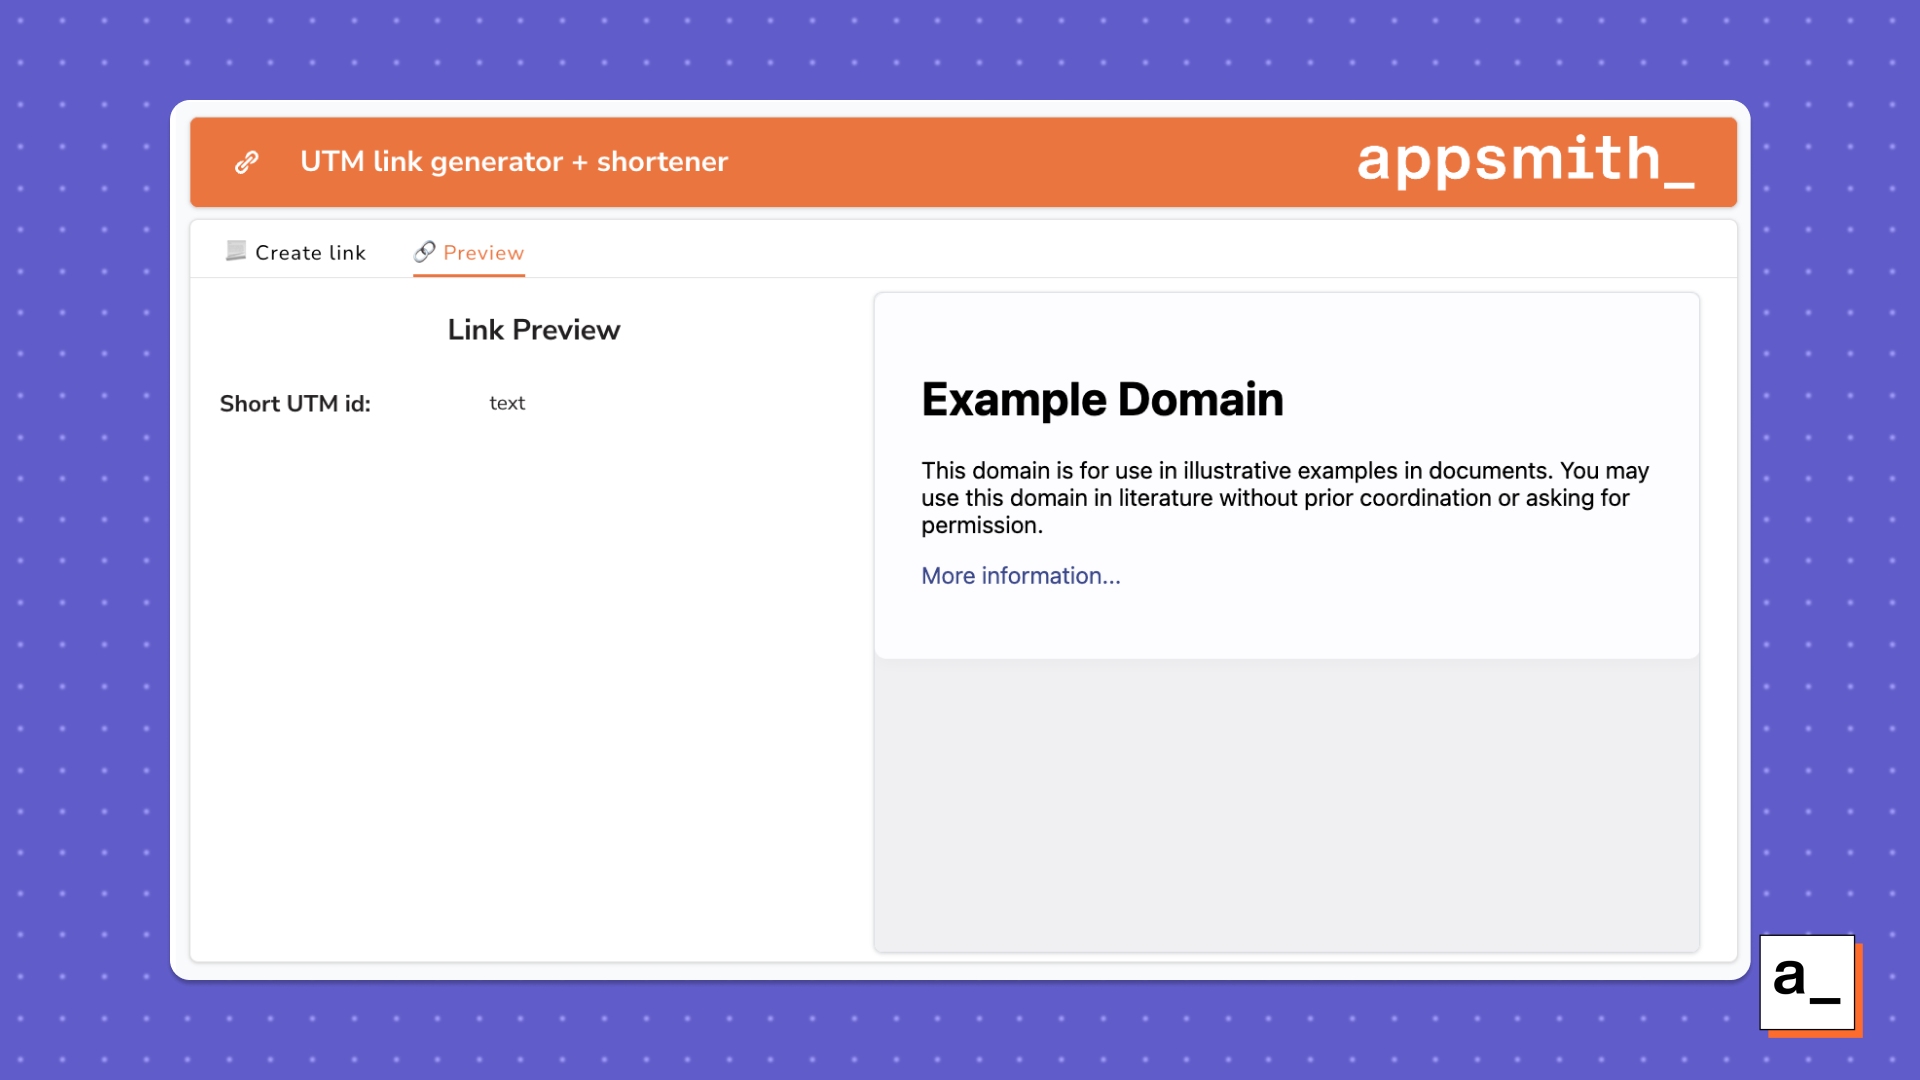
- Bind the Text widget with the response from the
Shorten_URLquery, which displays the shortened Bitly link using{{Shorten_URL.data.id}}.
You should now see the shortened URL in the text widget. However, the shortened URL https://bit.ly/42Lwr9D does not give any information about the URL and is not convenient for sharing amongst users.
Go ahead and customize the back half of the shortened URL with an alias using the custom_bitlinks endpoint. To achieve this, do the following:
- Add an Input widget in the form for providing a custom alias for the link.
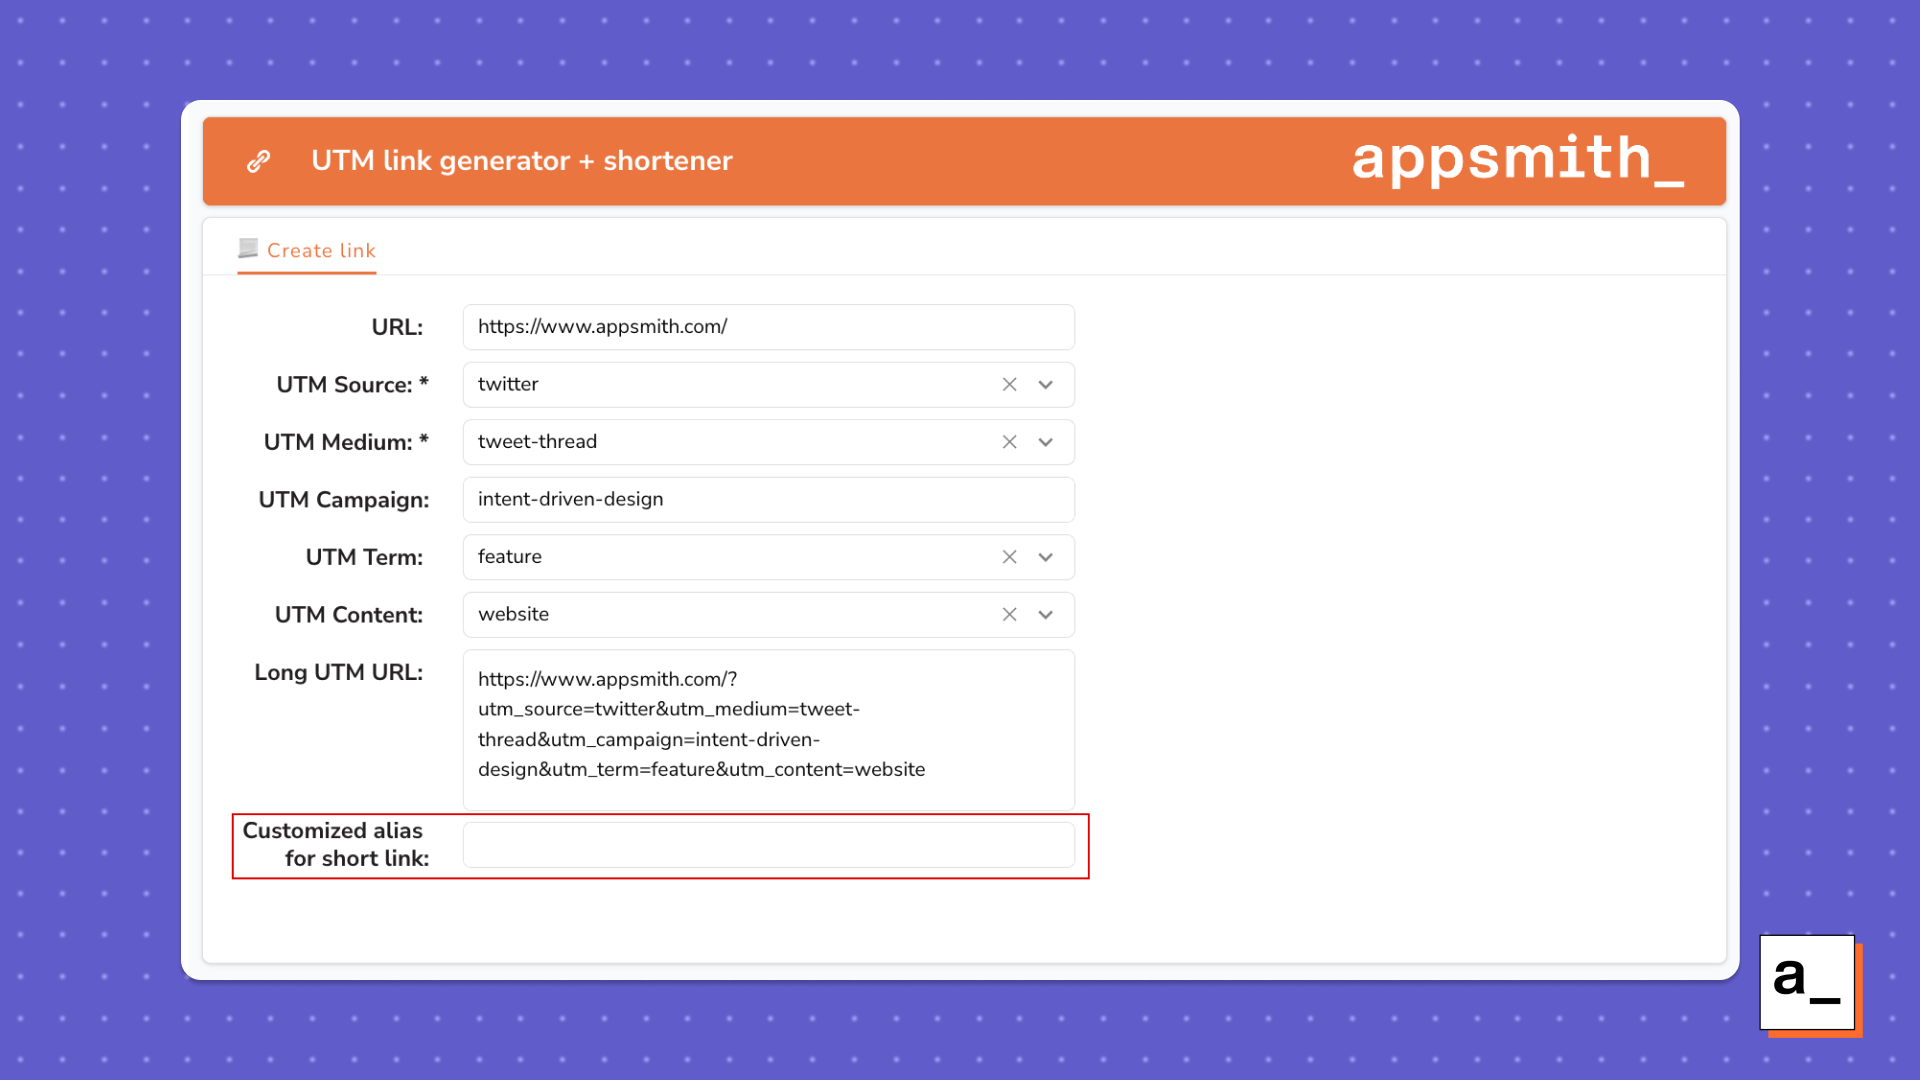
- Create a new query from the Bitly API datasource that helps with customizing the back half of the shortened URL.
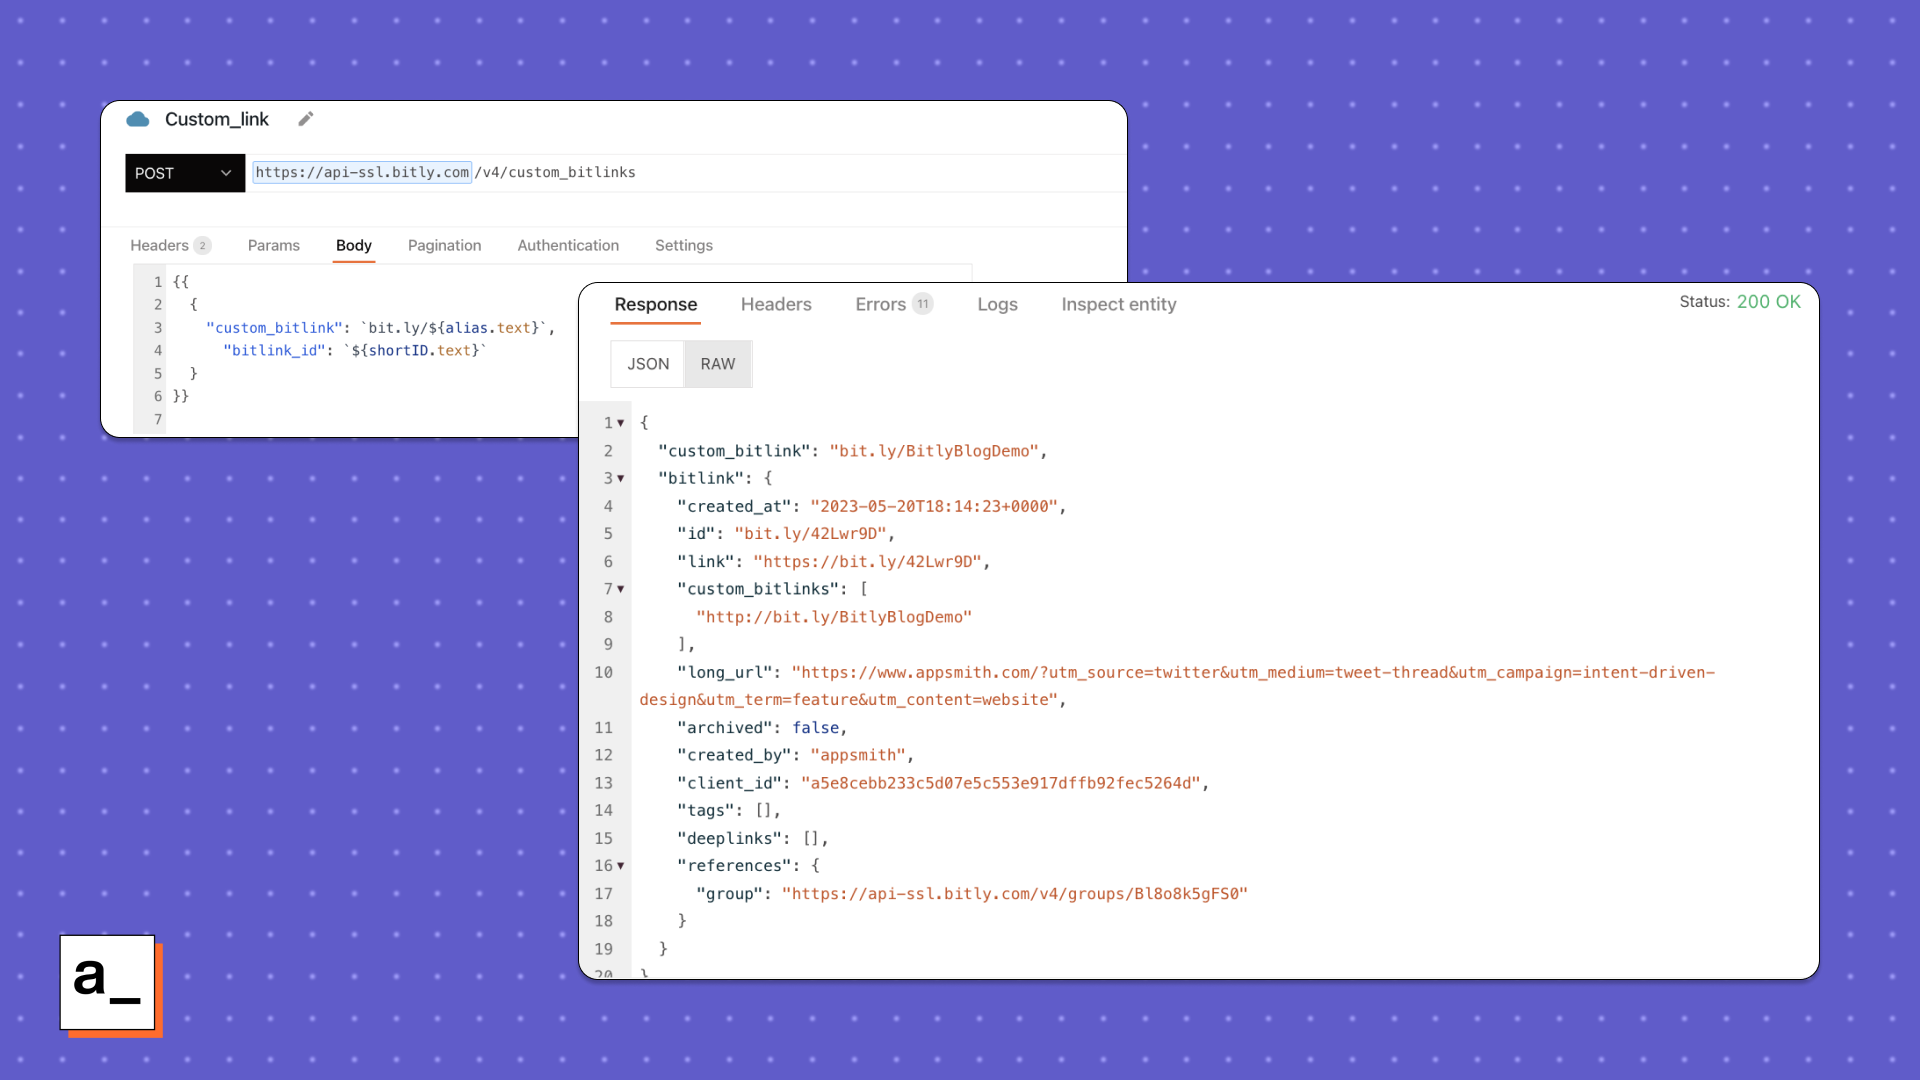
In the POST request to the custom_bitlinks endpoint, bind the Input widget containing the customized alias and the bitlink_id from the Text widget in the Preview tab in the API’s body.
When you run the query, it generates the custom bitlink.
Let’s display all this relevant information in the Preview tab.
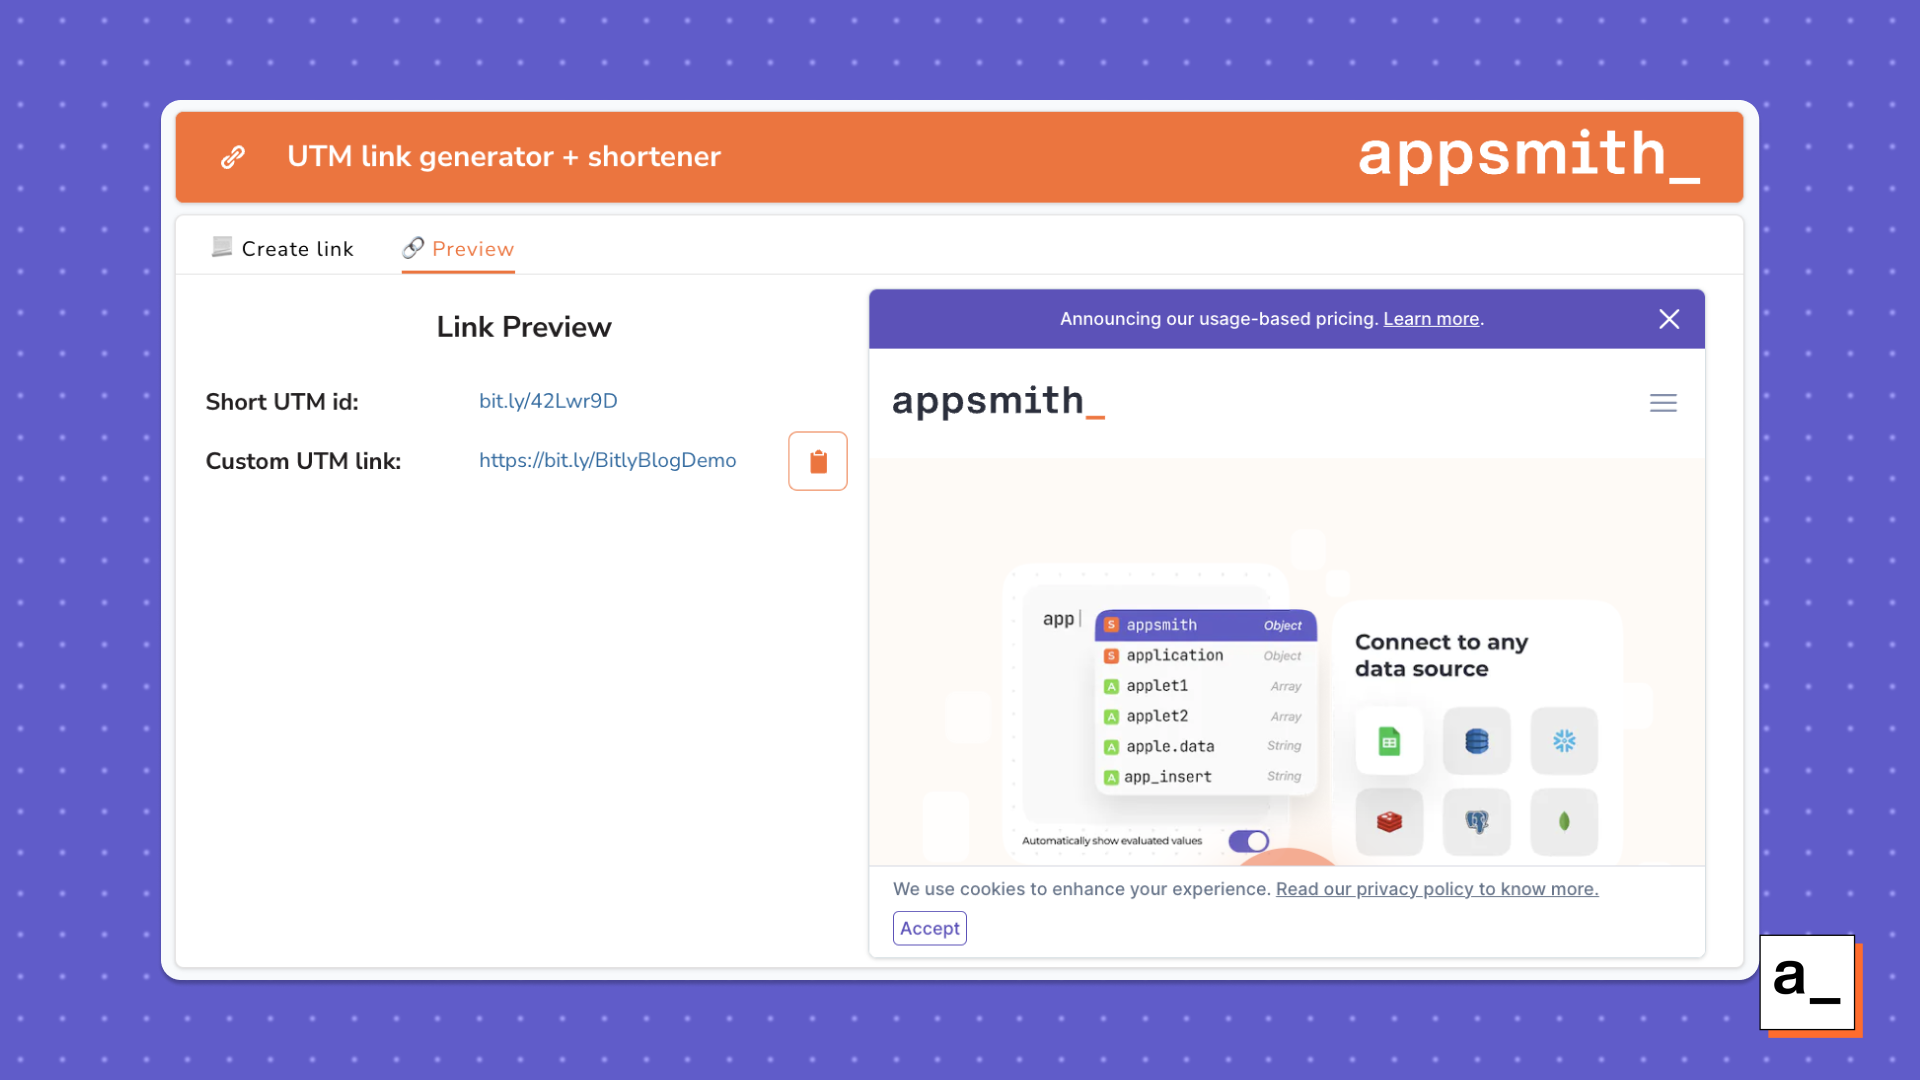
Bind the custom UTM link generated from the last API response to the Text widget using [https://{{Custom_link.data.custom_bitlink][23]}} and also on the iframe using {{Custom_link.data.bitlink.long_url}}.
Create a new function in the JSObject to copy the URL generated:
  copyURL: () => {
    copyToClipboard(shortLink.text).then(() =>
      showAlert("Link copied", "success")
    );
  }
Now bind this JSObject to the onClick of the clipboard icon button.
Phew! So far, you’ve been able to UTM a link, shorten it, customize the back half and preview it to the user. Let’s go ahead and build a link management system using Google Sheets and the Bitly API.
Link management
Bind a Google Sheet with the app to save and display the URLs that have been shortened.
You can choose to add a new sheet in the existing spreadsheet with the UTM parameter variables or connect a new Google Sheet.
To save the link that was previewed in the last step, insert a new row in the Google Sheet.
- Create a new query on the Google Sheets datasource.
- Select the sheet to insert rows and bind the widgets for the values corresponding to each column in the sheet.
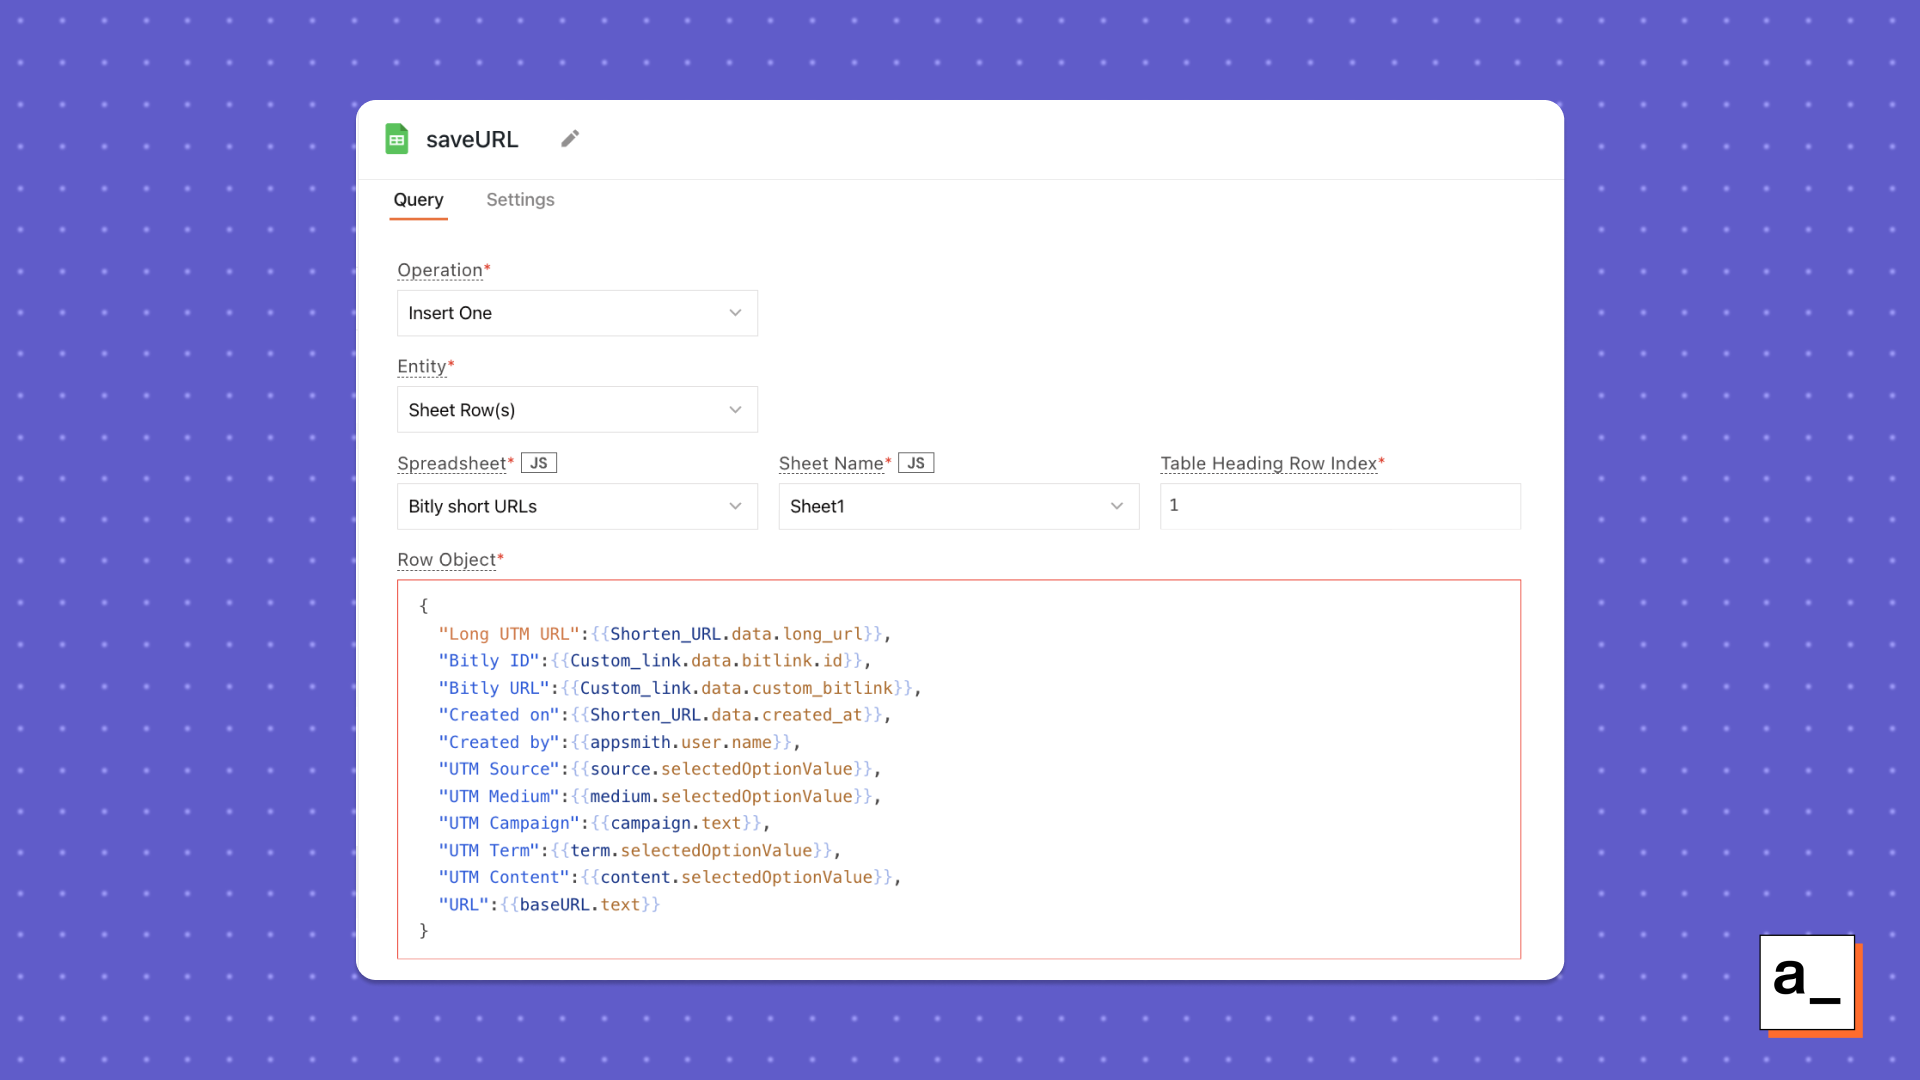
{
	"Long UTM URL":{{Shorten_URL.data.long_url}},
	"Bitly ID":{{Custom_link.data.bitlink.id}},
	"Bitly URL":{{Custom_link.data.custom_bitlink}},
	"Created on":{{Shorten_URL.data.created_at}},
	"Created by":{{appsmith.user.name}},
	"UTM Source":{{source.selectedOptionValue}},
	"UTM Medium":{{medium.selectedOptionValue}},
	"UTM Campaign":{{campaign.text}},
	"UTM Term":{{term.selectedOptionValue}},
	"UTM Content":{{content.selectedOptionValue}},
	"URL":{{baseURL.text}}
}
Alternatively, check Appsmith’s docs on inserting a new row in Google Sheets.
- Hit _Run _to test the query.
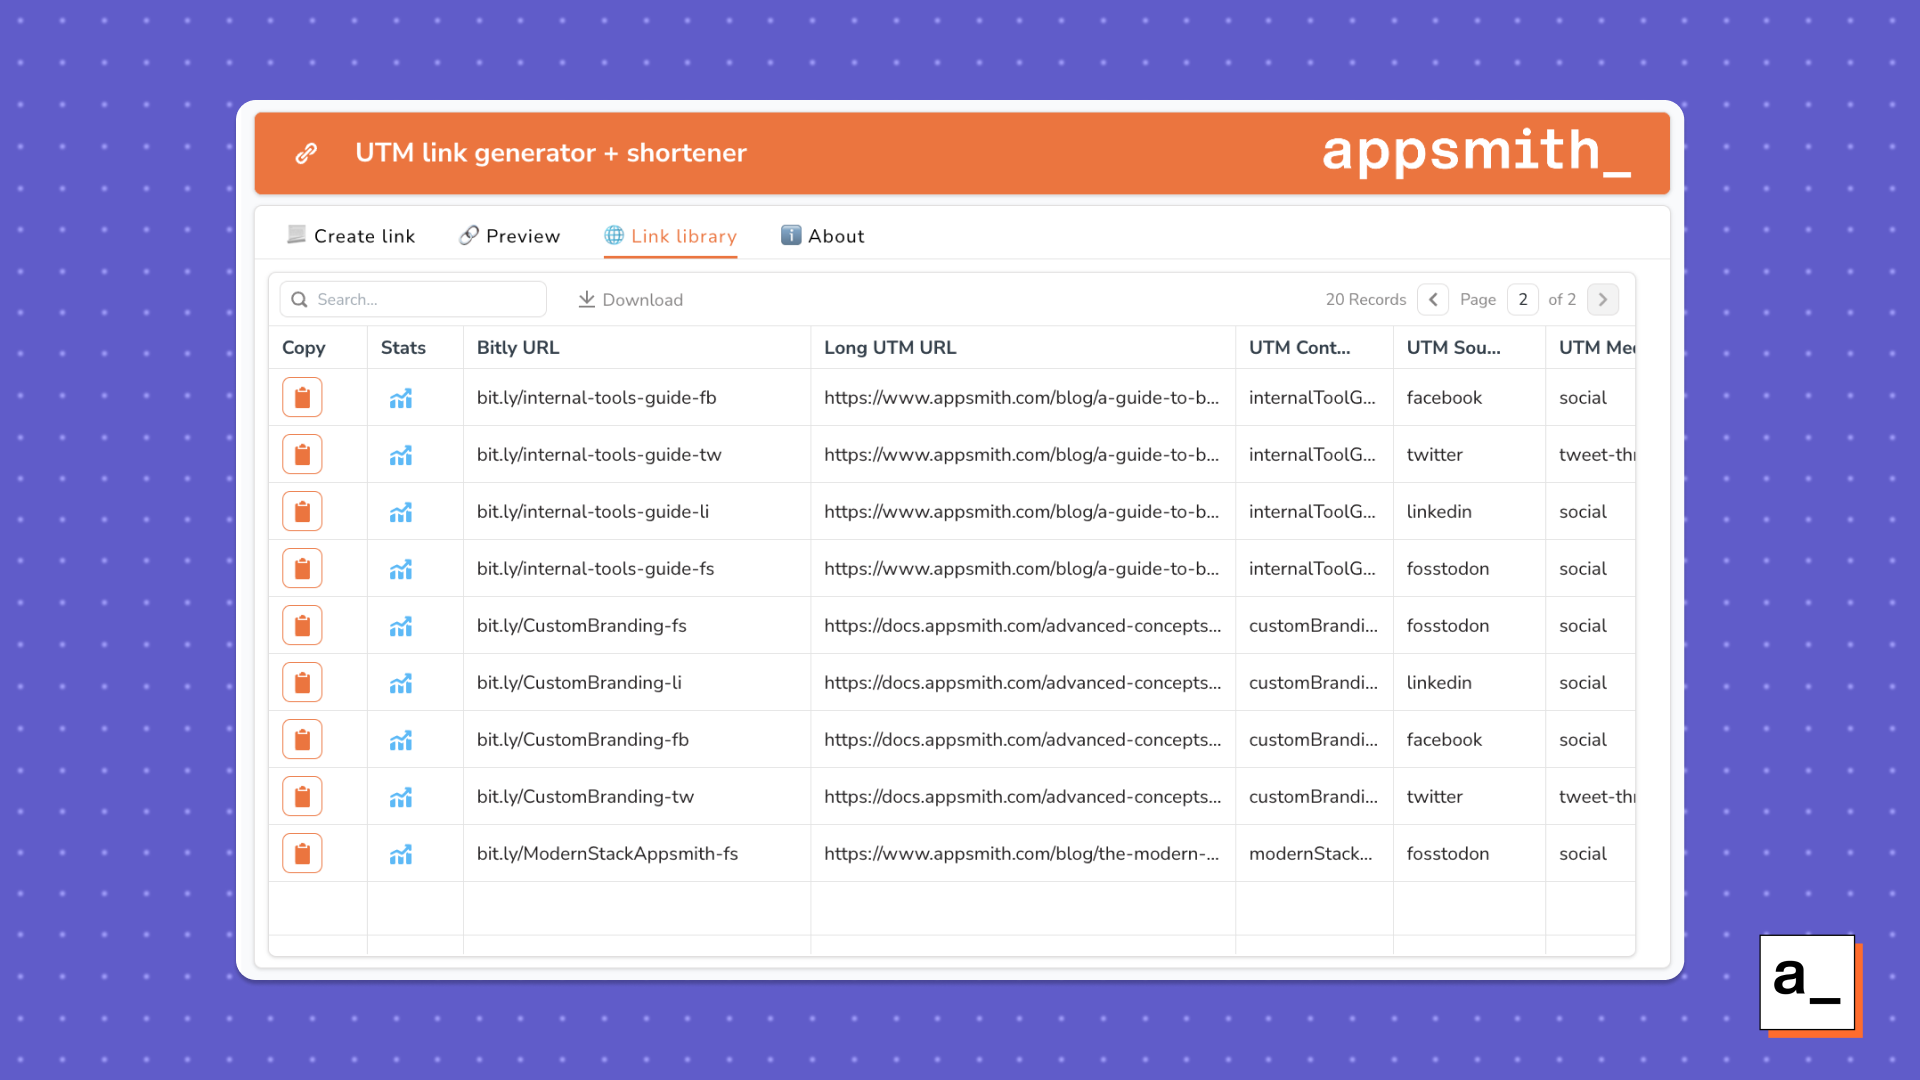
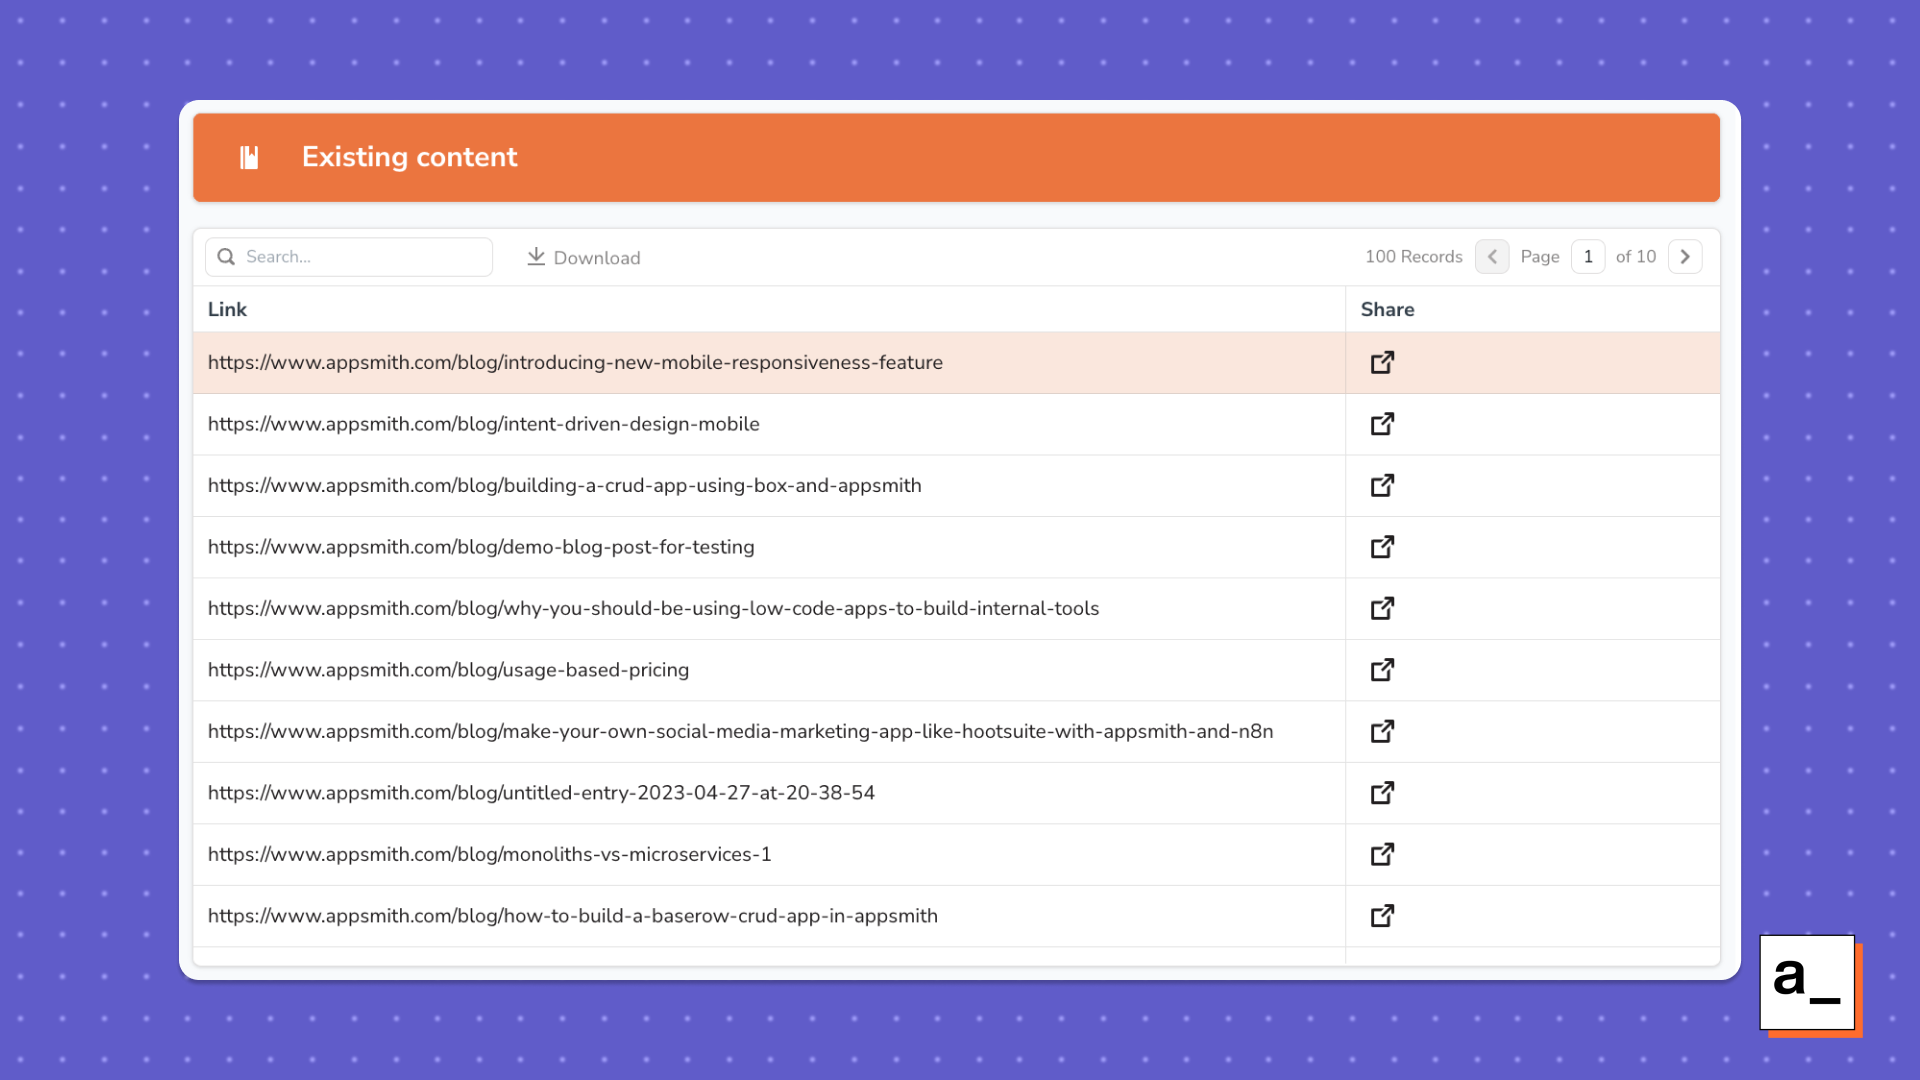
Now let’s see all the links at a glance.
- Add a new tab in the Tab widget and add a Table widget.
- Fetch all the URLs saved in the spreadsheet using the Fetch Many operation.
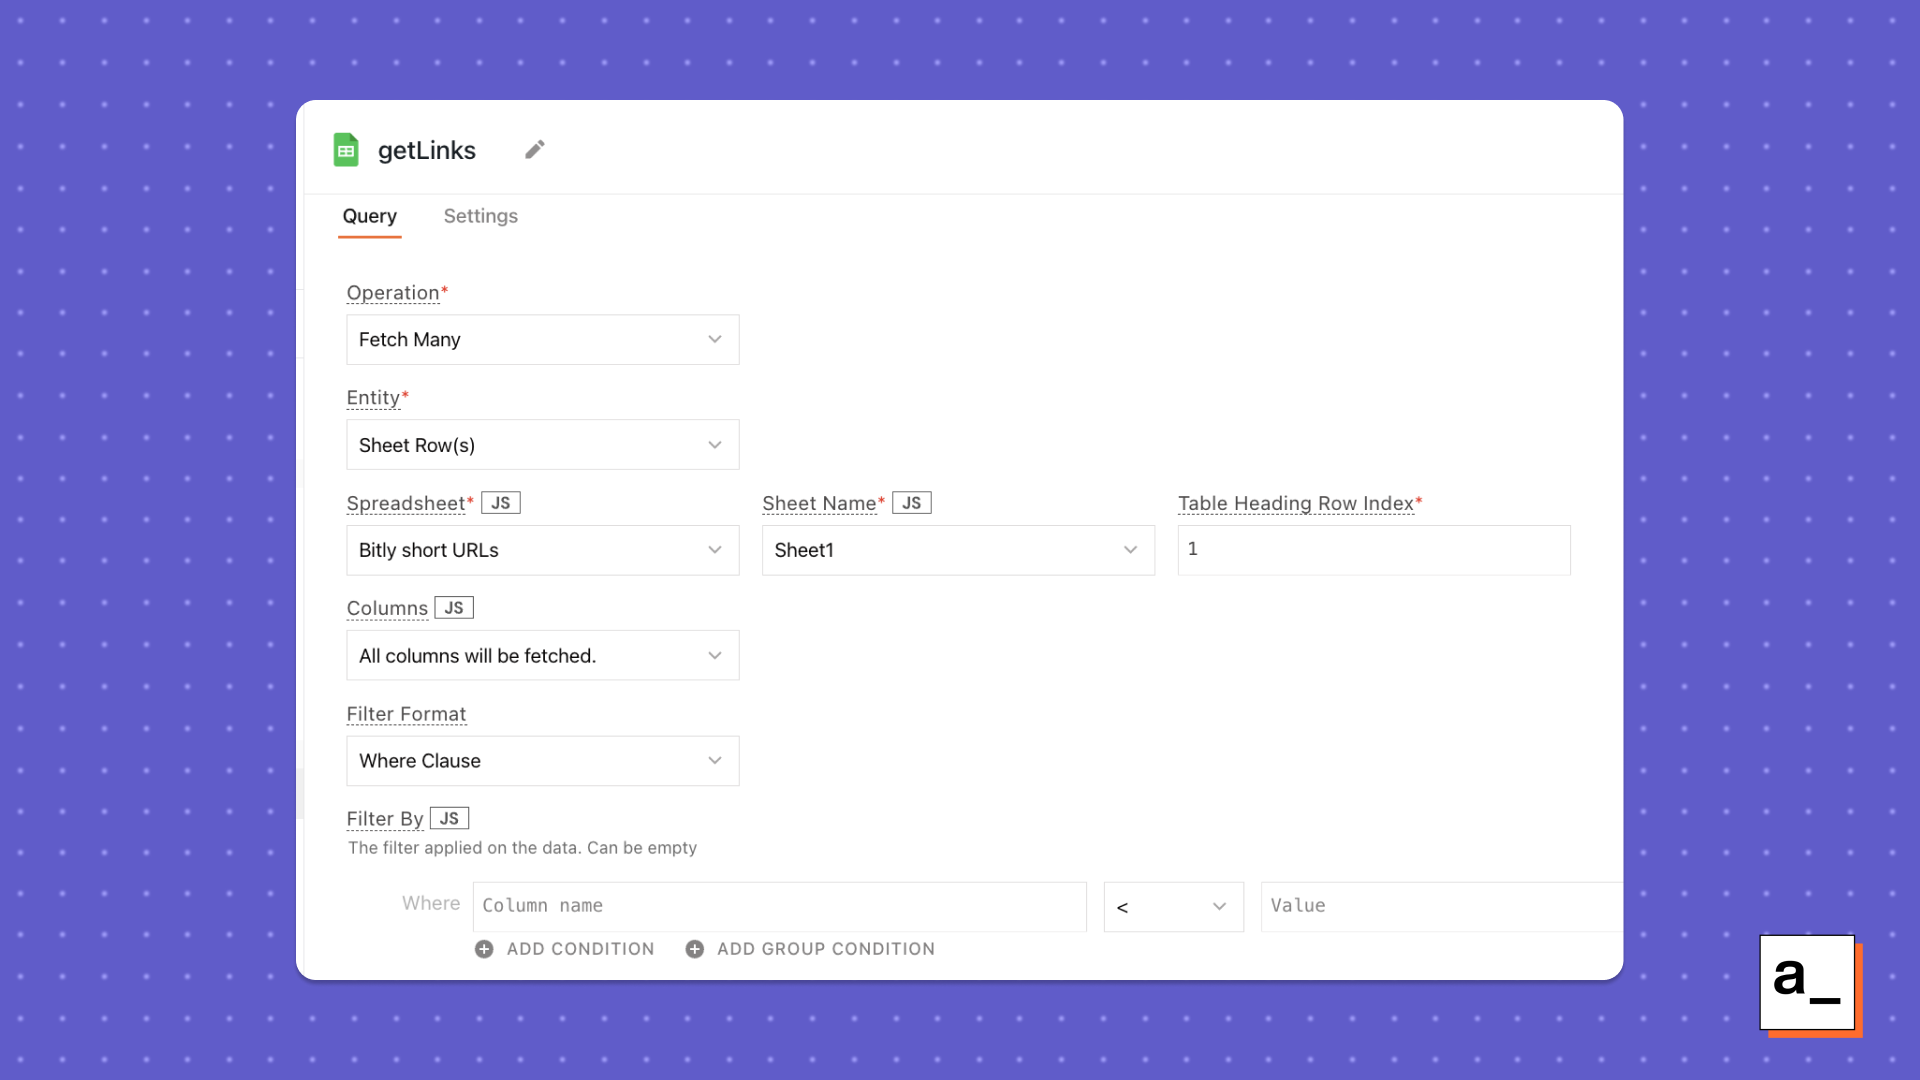
- Bind the response of the
getLinksquery onto the Table widget in the Link Library Tab using{{getLinks.data}}in the Table data field . - Add two custom Icon Button column types in the Table widget – one to copy the link and the other to check the statistics of the link. To do so, click on the Add a new column option in the property pane of the Table widget and select the type to be Icon Button. Choose the icons and other visual aspects of the button.
- To copy the short URL from the triggered row of the table, create a new function in the JSObject that uses the
copyToClipboard()function and then displays a message.
  copy_table: () => {
    copyToClipboard(Table1.triggeredRow["Bitly URL"]).then(() =>
      showAlert("Link copied", "success")
    );
- Bind the JSObject to run when the clipboard icon in the table is clicked, using
JSObjectName.copy_table()in theonClickfield of the copy custom column.
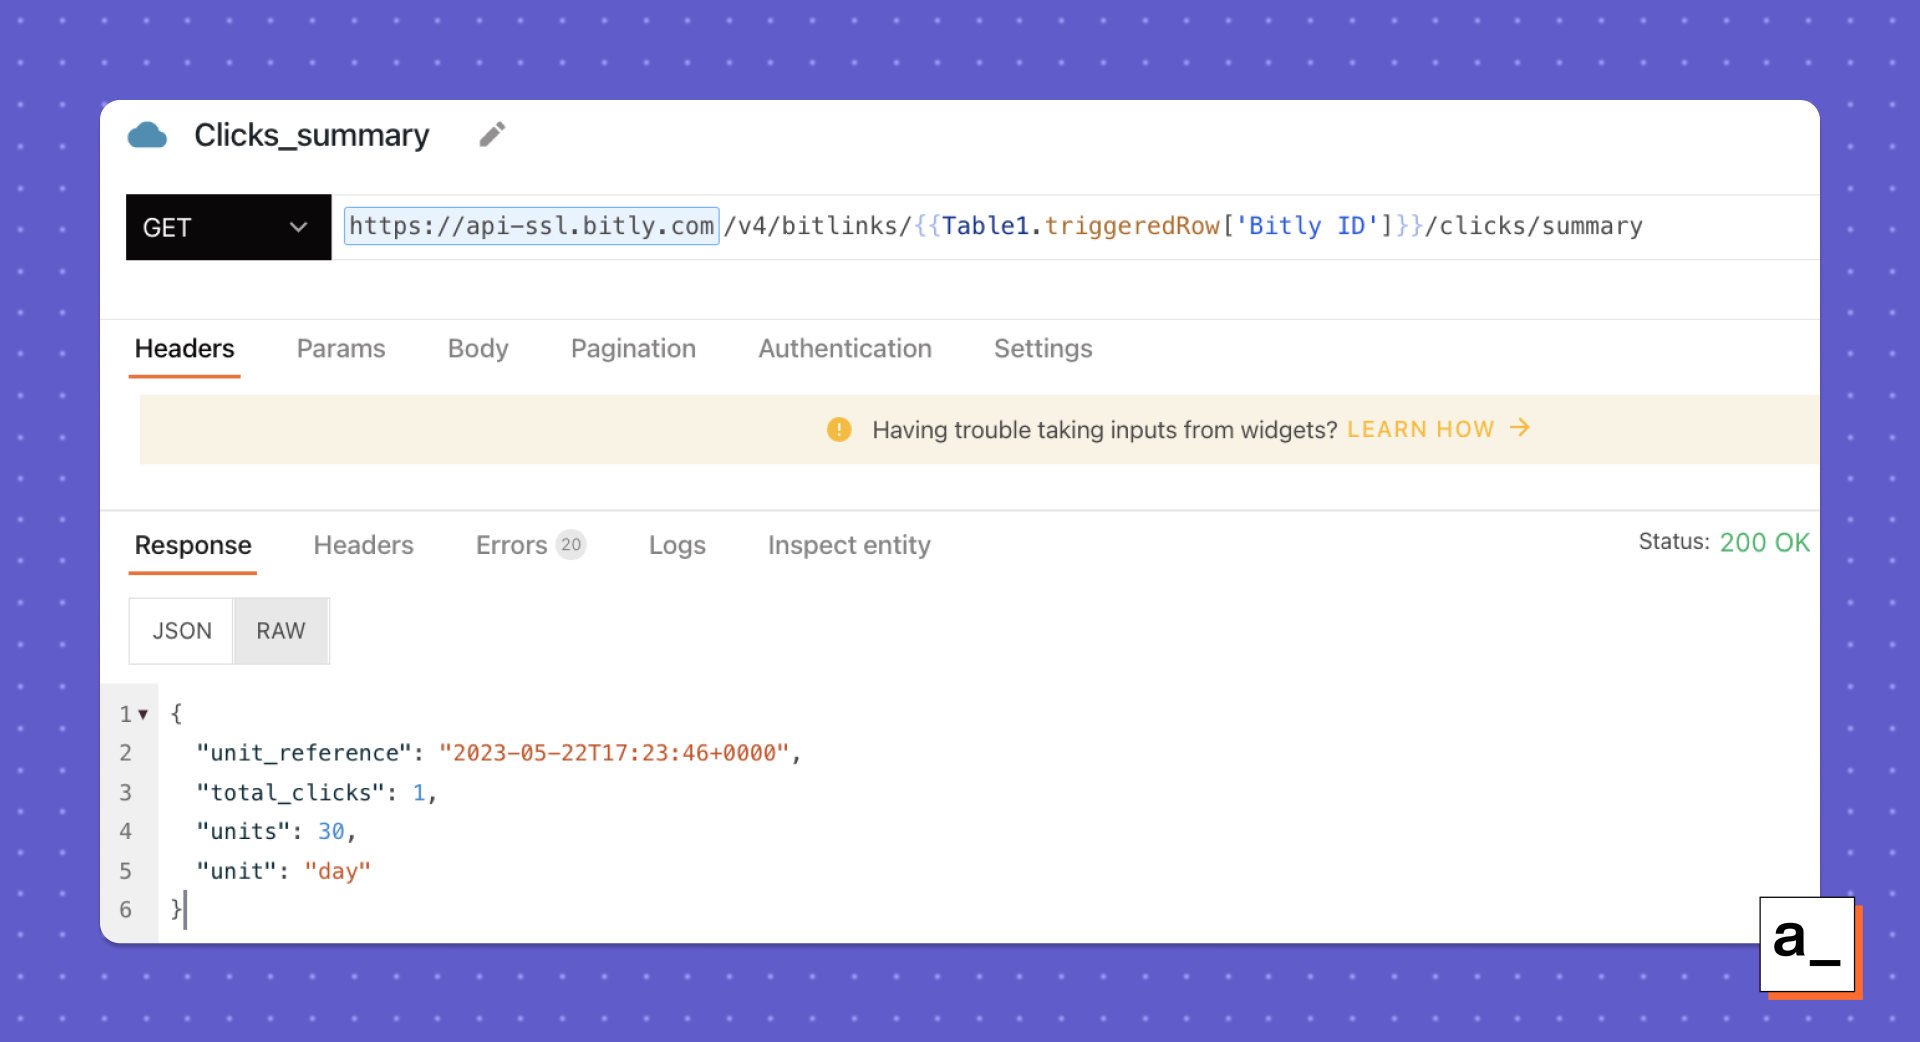
To get statistics of the link from the triggered row of the table widget, use the Bitly API to retrieve metrics using the clicks/summary and /countries endpoints.
- Create a new query on the Bitly API datasource to get the clicks summary.
- Use the
GEToperation with the endpoint ashttps://api-ssl.bitly.com/v4/bitlinks/{{Table1.triggeredRow['Bitly ID']}}/clicks/summary. - This uses the Bitly ID from the triggered row of the table.
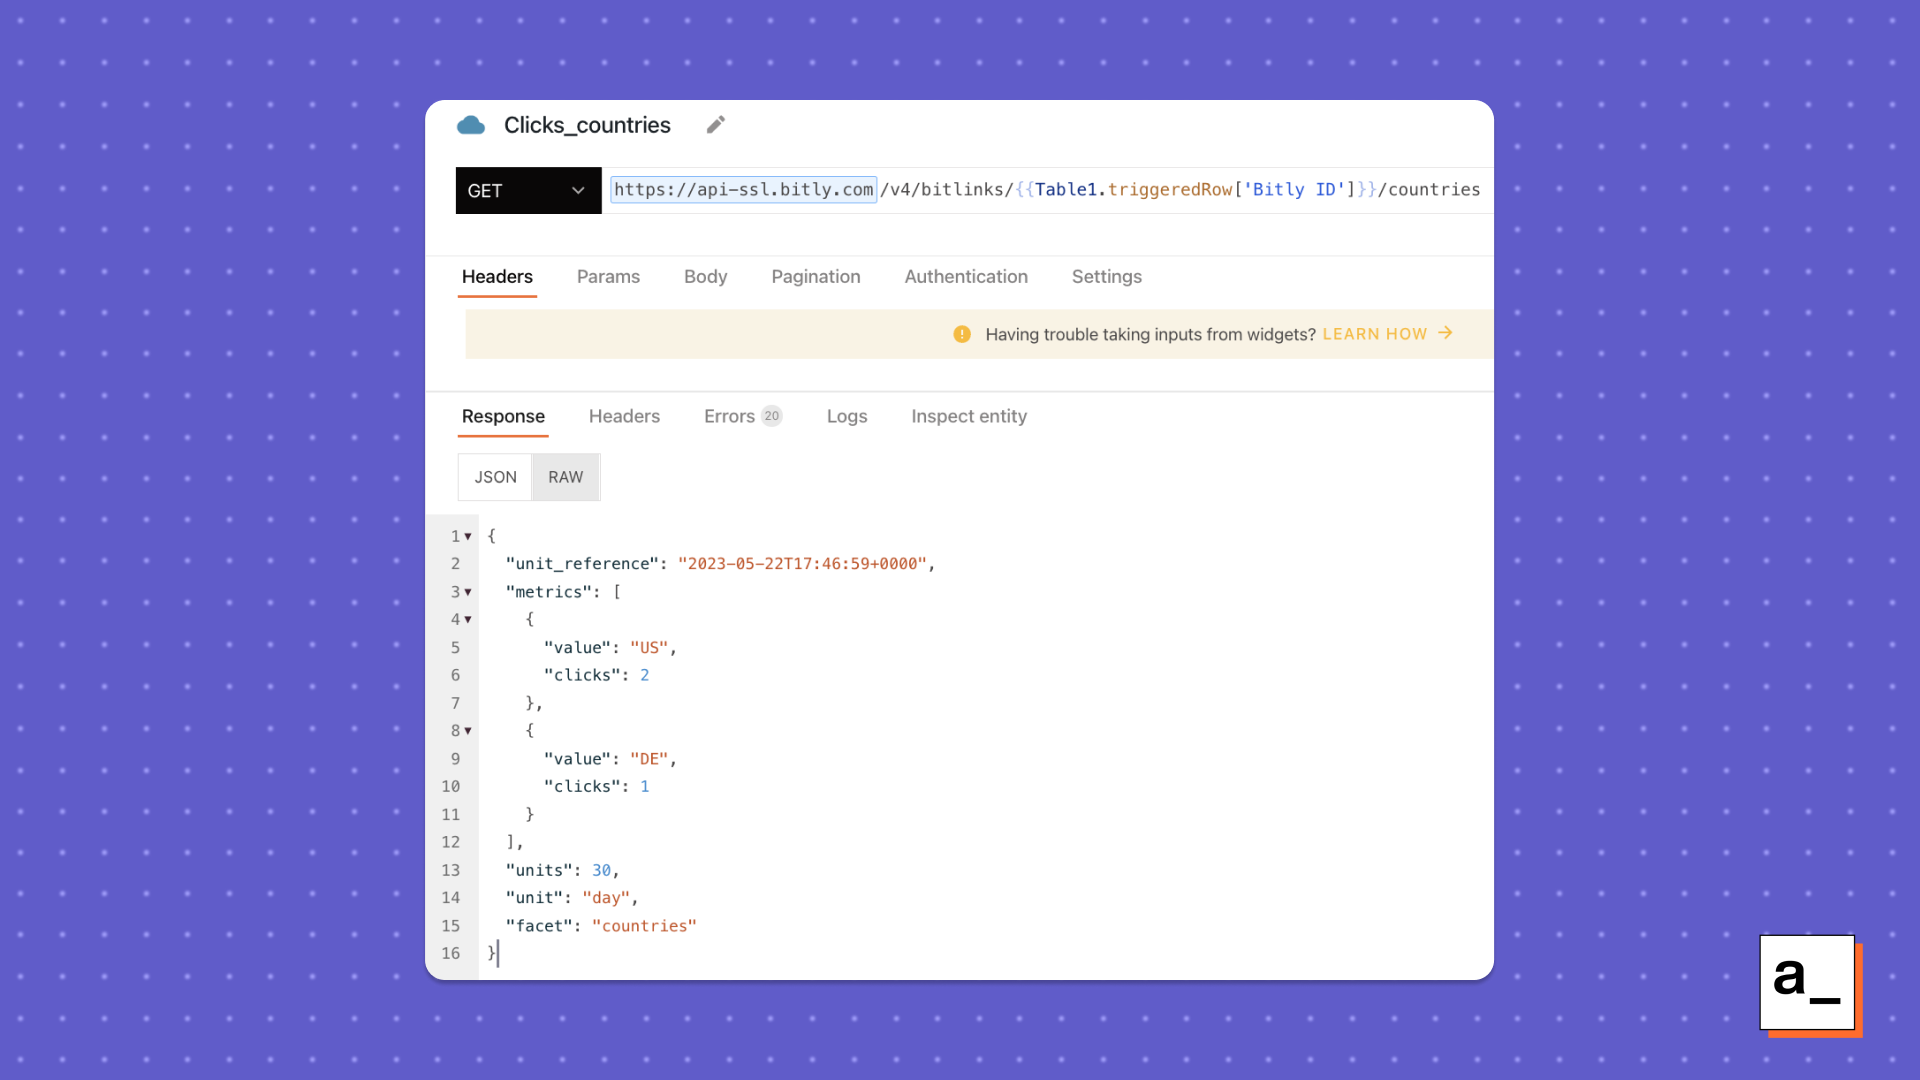
- Similarly, the list of countries and their clicks can be retrieved using the
/countriesendpoint. Create a newGETrequest on the Bitly API datasource with the URL beinghttps://api-ssl.bitly.com/v4/bitlinks/{{Table1.triggeredRow['Bitly ID']}}/countries.
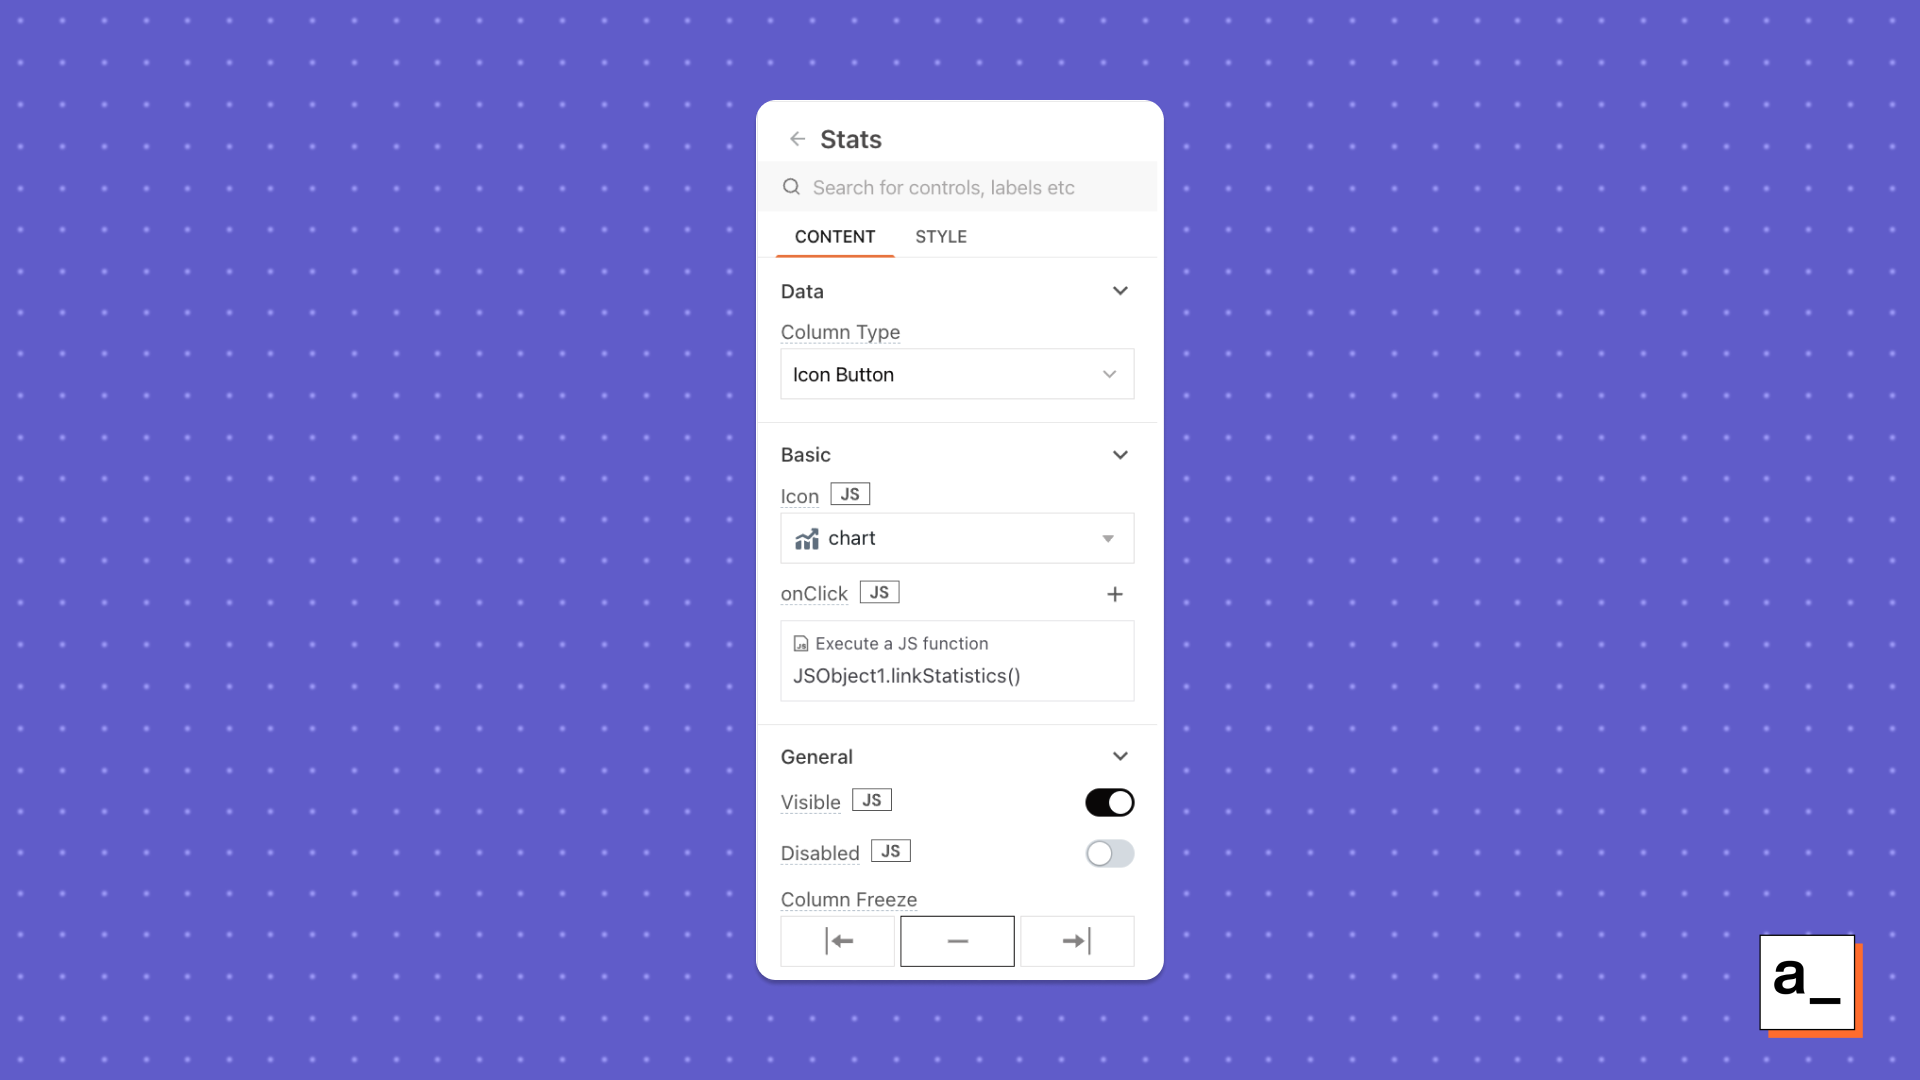
Let’s display this information in a modal that pops open when the Stats button is clicked in the custom column of the table.
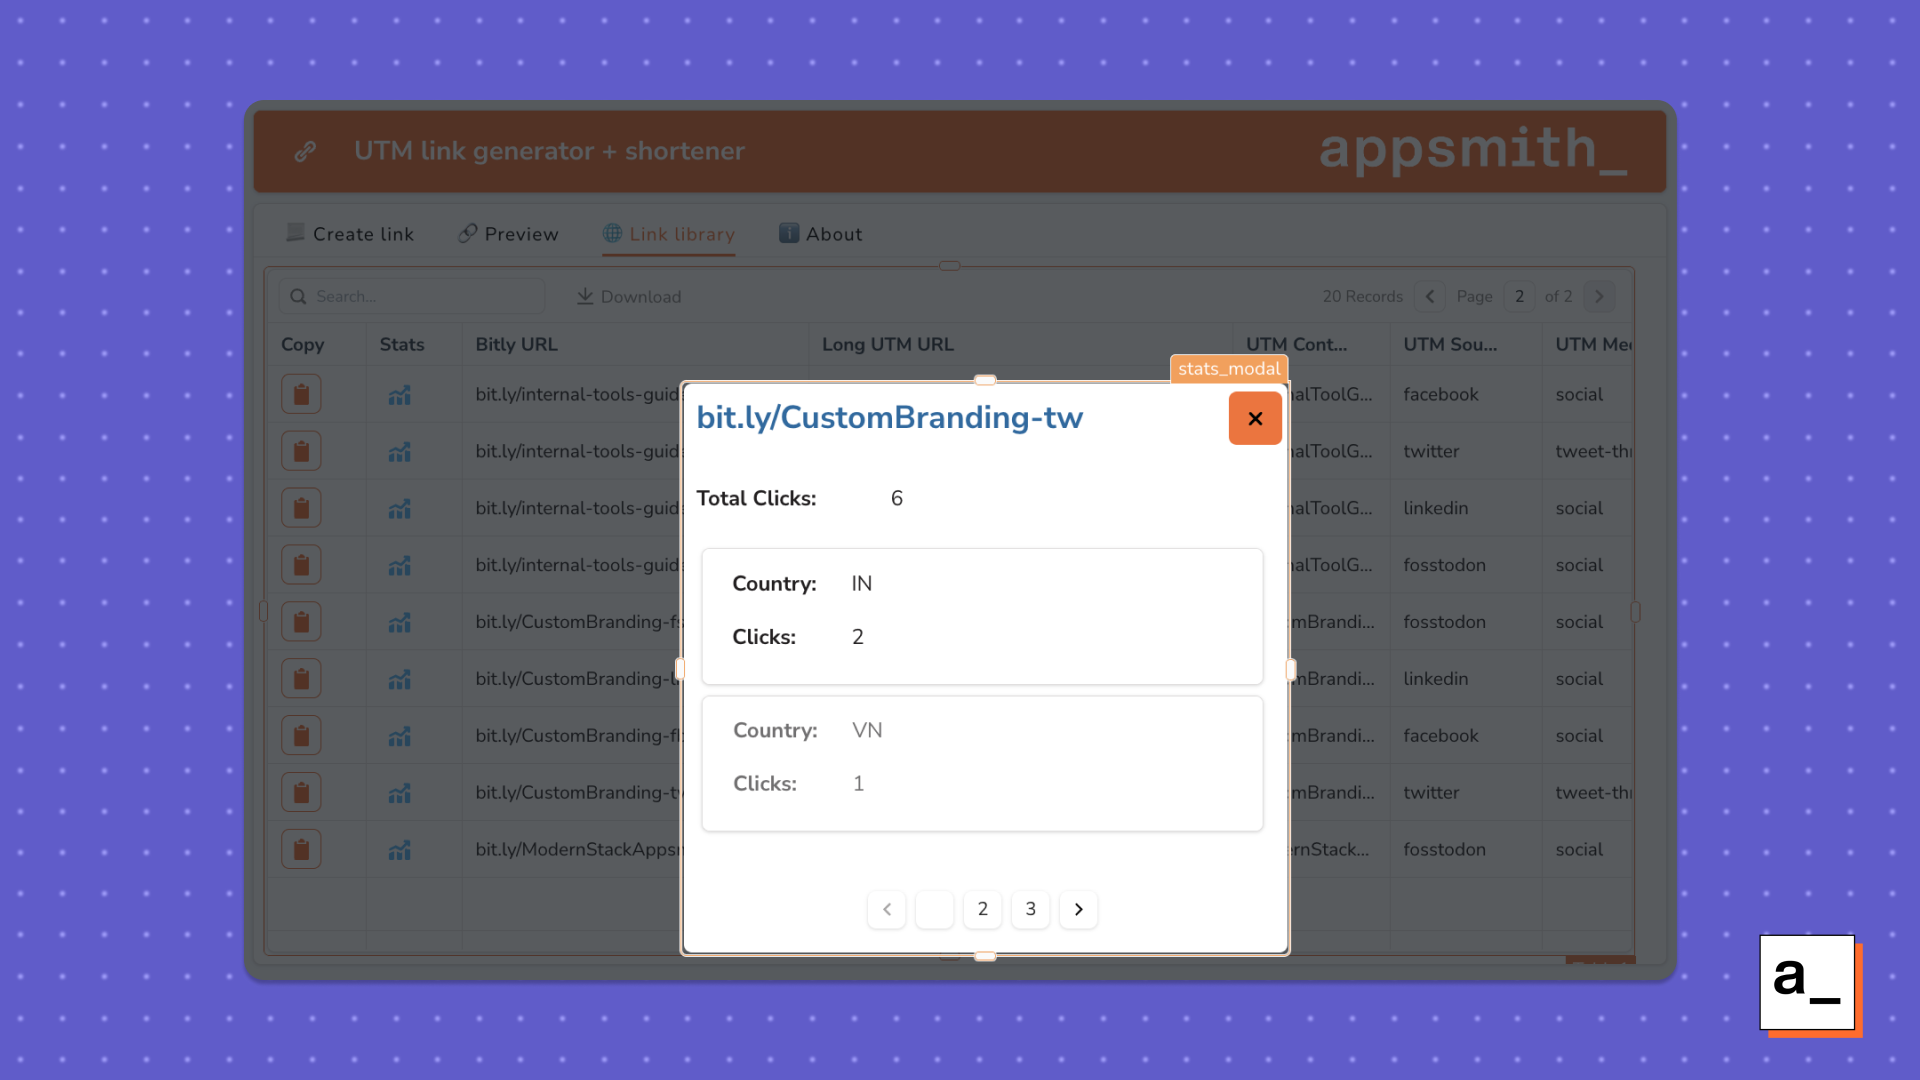
- Drag and drop a modal widget onto the canvas.
- Add Text and List widgets for displaying the information.
- Bind the API responses on the modal using
{{Clicks_summary.data.total_clicks}}and{{Clicks_countries.data.metrics}}. - To run both these queries and show the modal on click of the stats button, create a new function in the JSObject:
  linkStatistics: () => {
    Clicks_summary.run().then(() =>
      Clicks_countries.run().then(() => showModal("stats_modal"))
    );
- Bind this JSObject function to the onClick of the stats button.
- Hit the button to test both the queries and the modal.
You now have the link management system completed! Looks pretty, doesn't it?


Now let’s run the link generation and link saving queries serially on the click of a button.
- Add a button on the Create Link tab to run all the necessary queries serially.
- Create a function in the JSObject that first shortens the URL, then customizes the back half of the URL, checks for the alias to be unique, displays a success/error message, moves over to the preview tab, saves the link, and refreshes the link library.
  shortenURL: async () => {
    await Shorten_URL.run();
    await Custom_link.run();
    if (Custom_link.data?.errors?.length) {
      showAlert("Please use another custom alias!");
      return;
    }
    await showAlert("Custom link generated");
    await Qr_code.run();
    await storeValue("currentTab", "🔗 Preview");
    await saveURL.run();
    await getLinks.run();
  },
- Add this JSObject function to run
onClickof the “Get me a short URL” button. - Change the Default tab value in the Tab widget to be
{{appsmith?.store?.currentTab || '📃 Create link'}}so that it can be controlled from the JSObject function created in the last step. - Click the button after filling out the link builder form and voila, you have your link generated and saved in the sheet.
![How To Use [insert keyword] To Get [insert desired outcome]](https://img.youtube.com/vi/udAtRgizA3c/maxresdefault.jpg)
Want to make the app fancier?
You have the basic version of this marketing tool app set up. Go ahead and add other functionalities to tweak the app for your use case!
Link it to your CMS
At Appsmith, we use Contentful as the CMS for our website. In order to avoid copy-pasting links from our blog website to the Appsmith app over and over again, we used the Contentful API to get the list of the blogs on our website. This allows us to choose the blog post we want to share, shorten it, and customize it all from one app.
Similarly, you can link the app to your CMS’s API and use query parameters to avoid copy-pasting the links manually.
Here’s how we used Contentful:
- Create a new page with a header and a Table widget for displaying data from the website.
- Create a new datasource for the Contentful API. Follow the authentication documentation to save the API as a new datasource on Appsmith.
- Create a
GETrequest on this datasource to pull all entries of a content type from a unique space.
https://api.contentful.com/spaces/xxxxxxxxxxxx/environments/master/entries?content_type=contentTypeName
This returns a JSON response with details of all the entries.
- Parse the JSON in a JSObject to map over the fields that you would like to display on the app. We mapped over the slugs to get the URLs of all the blog posts on the Appsmith blog website.
cleanBlogs: async() => {
		var fields= JSON.parse(getBlogs.data).items.map(row => row.fields.slug)
		var title= fields.map(row =>({ slug: row["en-US"]}))
		return title
	}
- Bind the response from the JSObject function to the Table widget and add a “Share” custom column. The share button pre-fills the URL field in the UTM link builder form using query parameters.
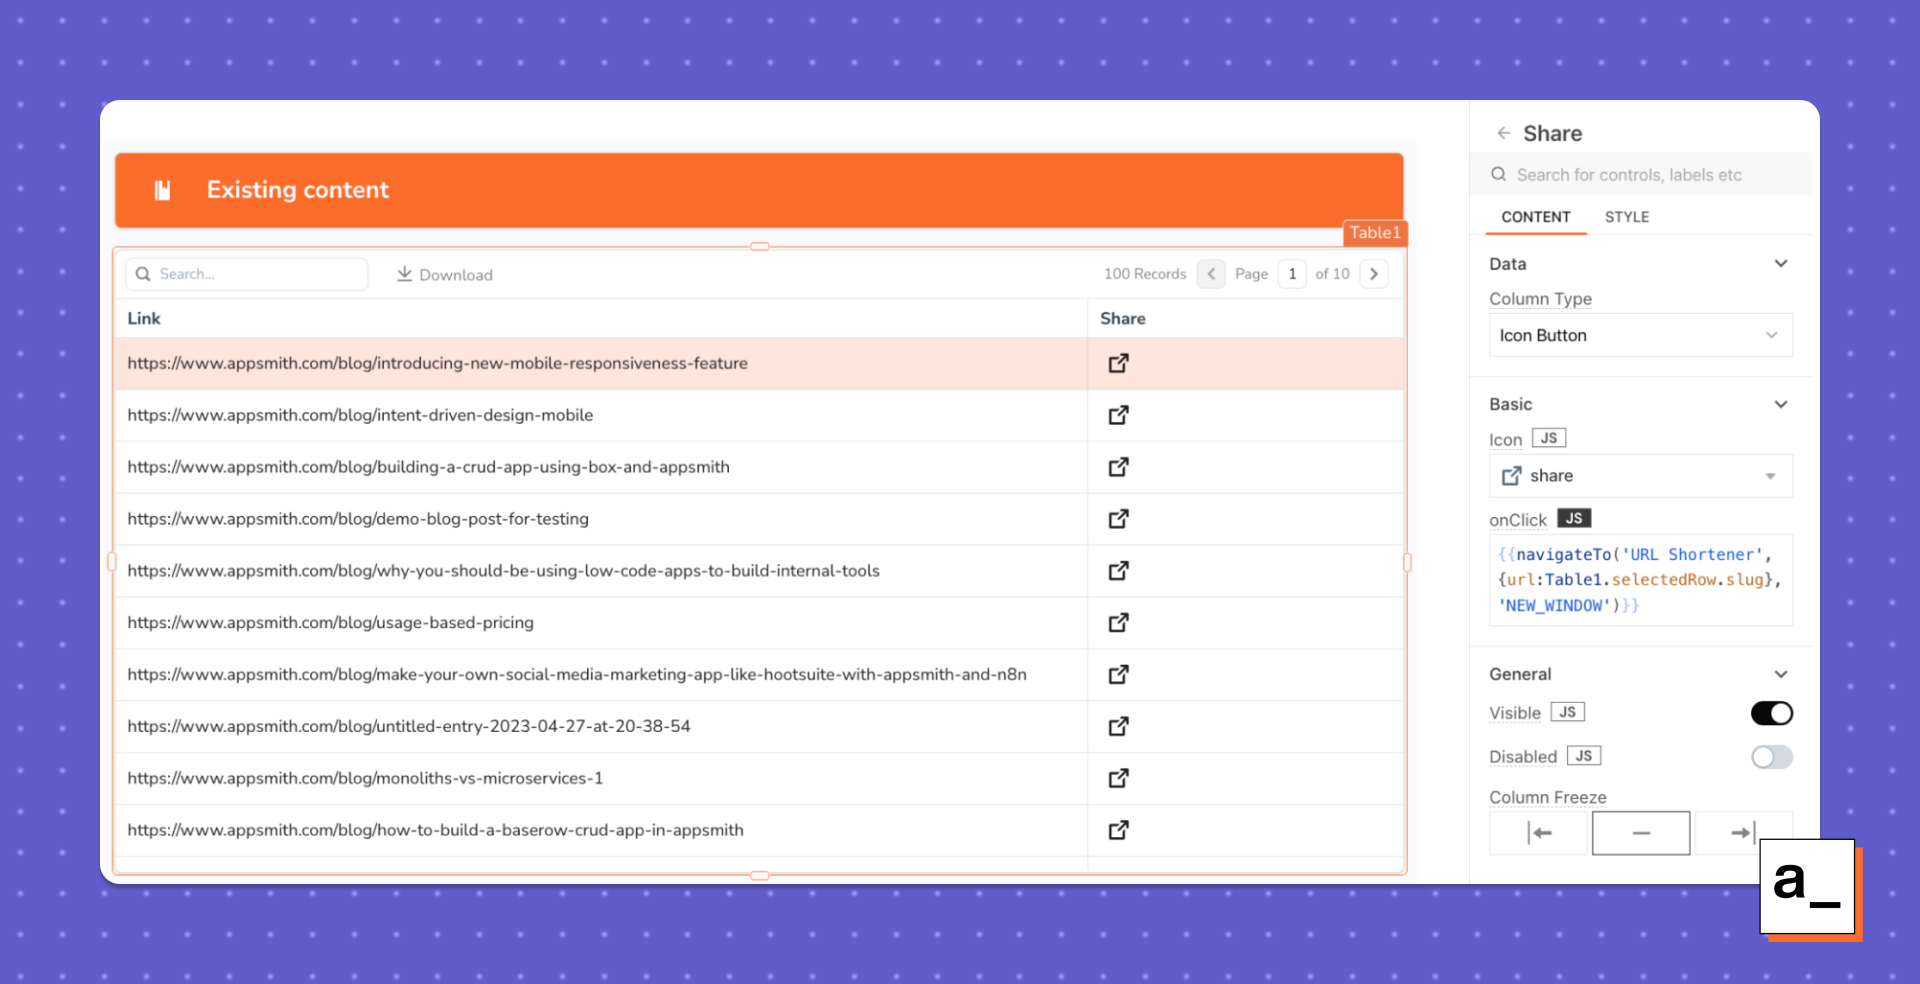
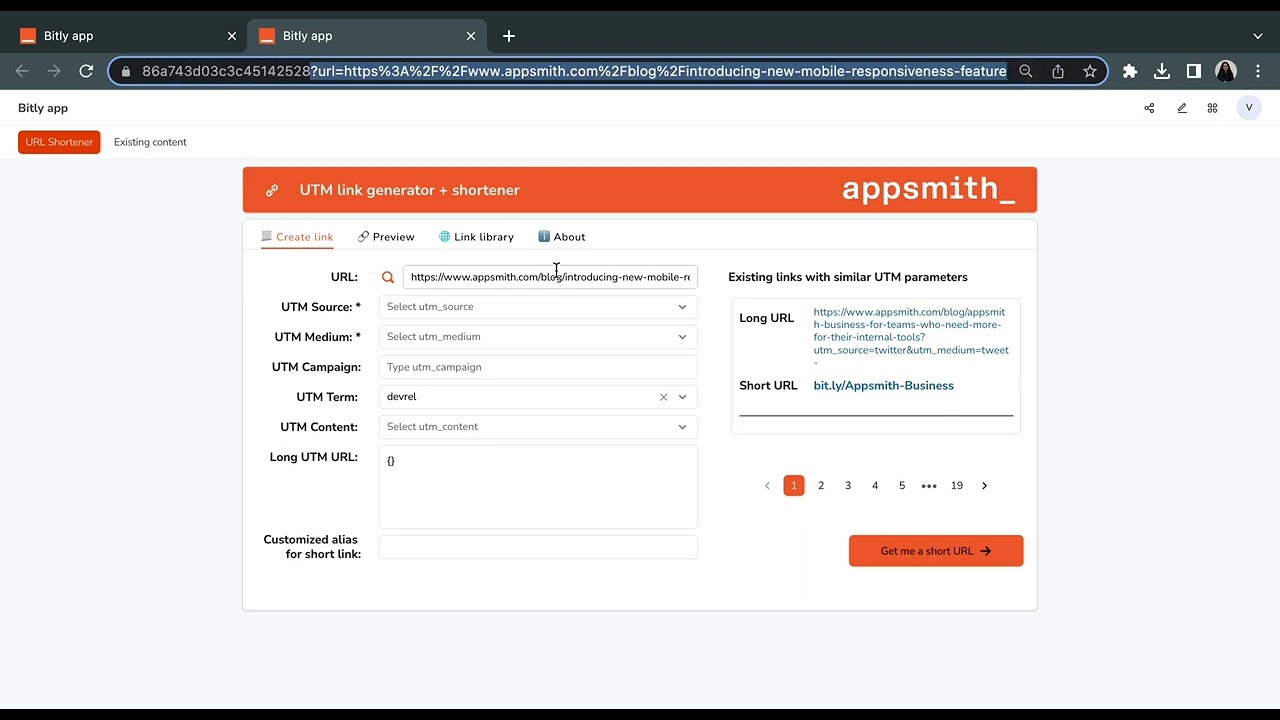
Now, you can search for the blog post you want to share, click on Share, and it redirects to the UTM link builder form with the URL field pre-filled from the query parameter.
Generate QR codes
You can also use the generate QR codes feature of the Bitly API to generate a QR code of the shortened link.
Hit DEPLOY and test the app!
This is the kind of app we wanted to build for our own needs, and many people on our marketing team were super excited about it. We were able to build it out in phases and start using it fast, but mostly because Appsmith makes it easy to build internal tools. Without the platform, we would probably not have been able to get the app we wanted.
This is a great example of how organizations often have very specific needs and problems where existing solutions either don't exist or are too expensive. Appsmith is the answer for these internal tools, making it easy to build, deploy, extend, and maintain these custom tools without taking a huge amount of time or other resources.
Pat yourself on the back because ✨YOU✨ just built a marketing tool that brings all the essential functionalities together, allowing you and your team to streamline your efforts and achieve remarkable results without spending a fortune.
If you haven’t already, sign up for Appsmith and start making your own tools for free!


