Building a Shopify Admin Panel: A Step by Step Guide

Hey everyone! I'm Joseph, the senior Shopify expert in the Appsmith Developer Relations team.
I've written several blog posts on Appsmith and I'm super excited to be sharing my API integration experience with the community. I've done a lot of work with the Shopify API over the last few years and I wanted to put together this guide that shows you how to build your own custom Shopify admin dashboard.
How to build a Shopify admin dashboard in Appsmith
This tutorial will show you how to connect Shopify to Appsmith and use Google Sheets to store extra order status information. You'll learn how to do the following:
Read order data from the Shopify API
Update data in Google Sheets based on order data from Shopify
Update an order’s status in Shopify from Appsmith
The goal of this project is that any employee can view the dashboard to see the status of an order and mark it closed (completing and archiving it), without having to log in to Shopify. Custom order status info can be tracked in the Google Sheet, so that additional information can be retained about an order that isn't present in Shopify (for example, internal manufacturing/progress notes) in a user-friendly spreadsheet, rather than having to deploy a custom database.
You can access almost any kind of data that is available through a REST or GraphQL API (or a native integration) in Appsmith, so you can adapt the steps in this tutorial for your own data and requirements.

Almost any kind of data.
How to connect Appsmith to the Shopify API and Google Sheets
Before you start, you'll need a Shopify account, an Appsmith account with a blank project, and as a Google Sheet copied from our sample sheet. This article assumes you already have a Shopify store with some open orders.
Step 1: Enable the Shopify API and get an Admin API access token
The Shopify API isn't enabled by default; you'll need to create and install a custom app and create the API token that Appsmith will use to connect. Make sure your custom Shopify app has the following permissions when setting it up:
write_ordersread_orders
Once this is done, make sure your new custom app is installed in your store by clicking the Install button in the App development screen. Afterwards, your Admin API access token will be displayed. Note that this token will only be displayed once, so save it somewhere safe. Otherwise you'll need to uninstall and reinstall your custom Shopify app to see it again.
Step 2: Add a Shopify datasource to Appsmith
Once you've generated your Shopify Admin API access token, you can use it to connect to Appsmith and read and write order data. In your blank Appsmith project:
Open the Data panel in Appsmith and create a new datasource by clicking Bring your Data.
Create a new Authenticated API, and name it “Shopify API”.
Set the new API's URL field to
https://YOUR_STORE_NAME.myshopify.com/admin/api/API_VERSION/— refer to the Shopify API documentation to find out how to get your unique API URL. Note that this tutorial uses the 2024-04 Shopify API version.Add a header with the Key set to
X-Shopify-Access-Tokenand paste your Shopify Admin API access token into the Value field.
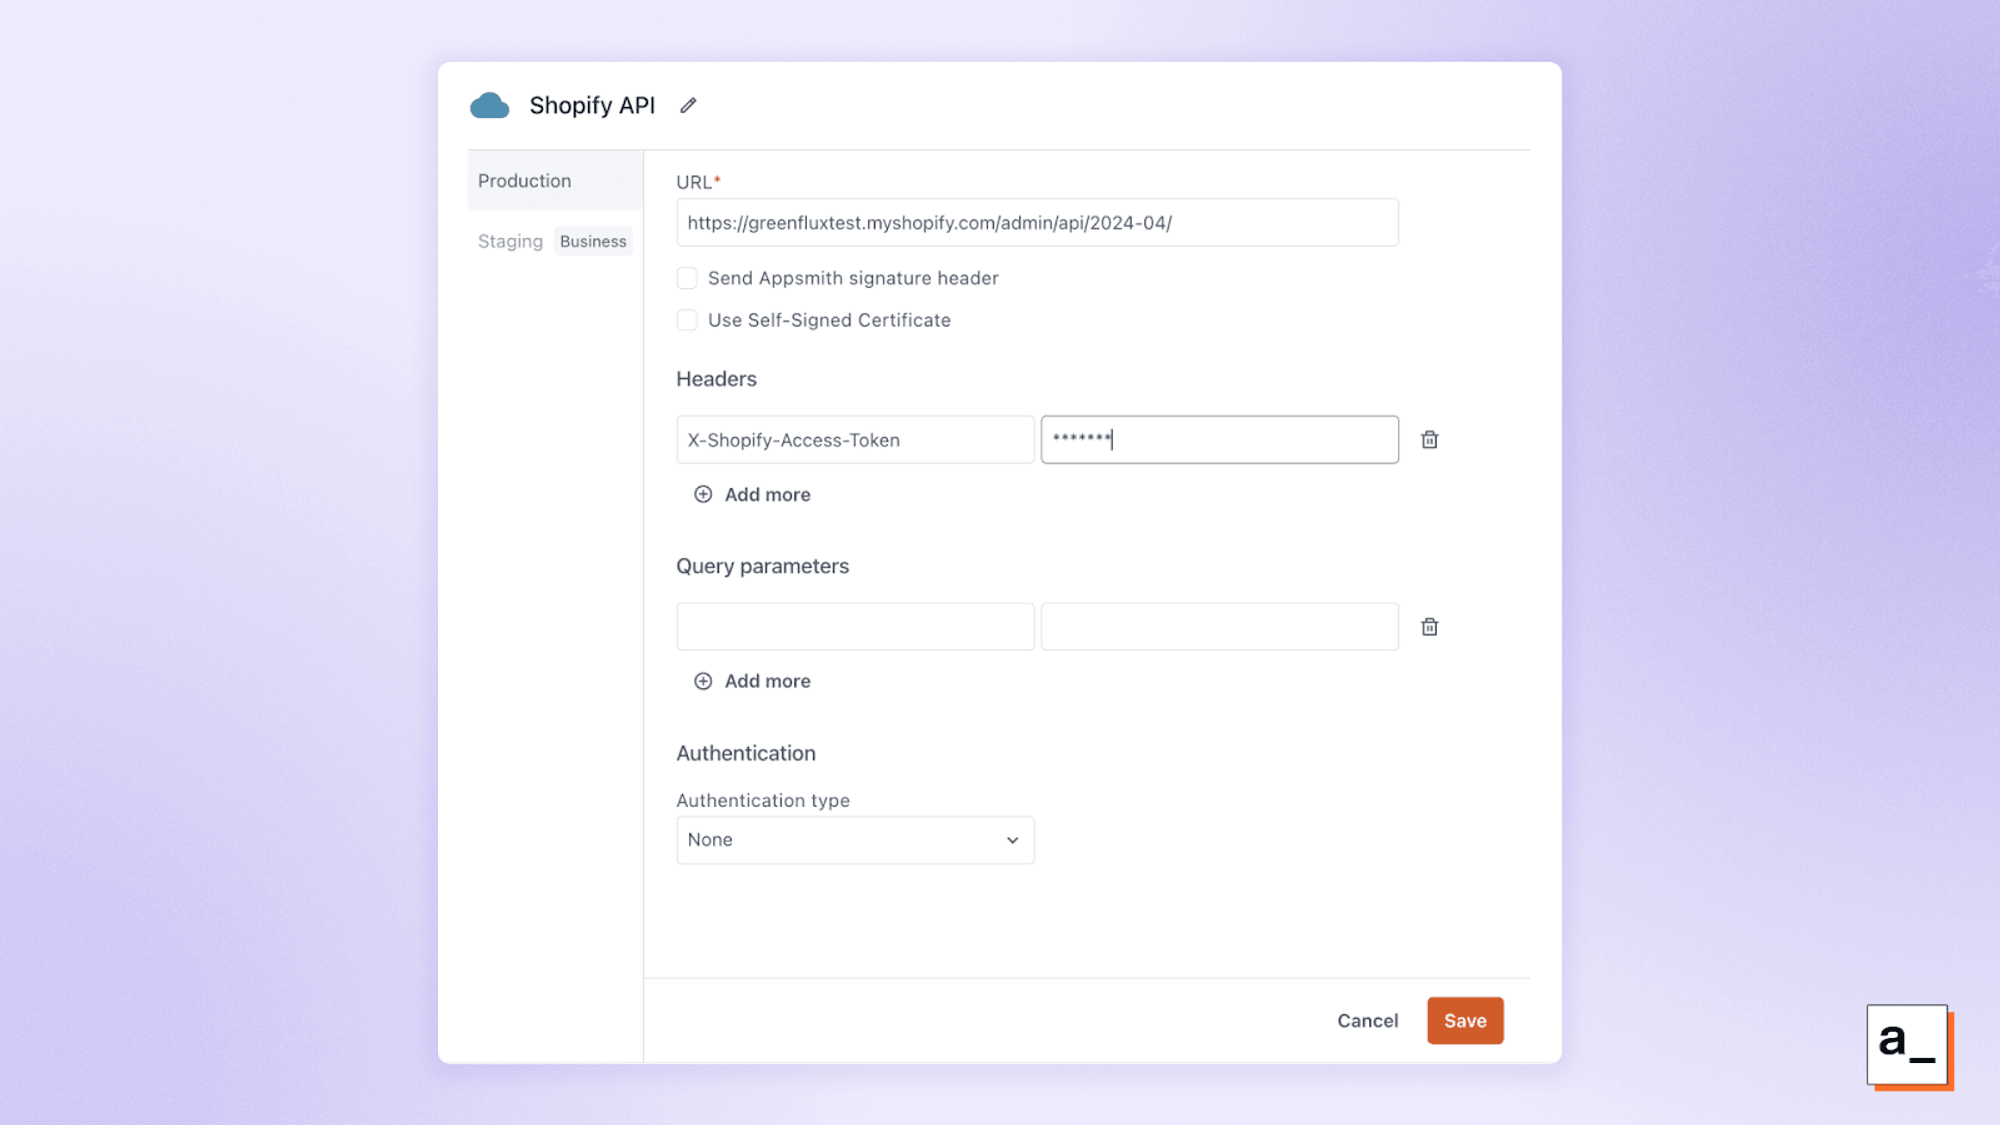
The Appsmith interface for adding an authenticated REST API.
Step 3: Querying the Shopify API
Next, create the first API query to retrieve orders from Shopify:
Under the newly created Shopify datasource, click + New API and add a new API query named
get_orders.Append the
API URLwithorders.json.Click the Run button to test it.
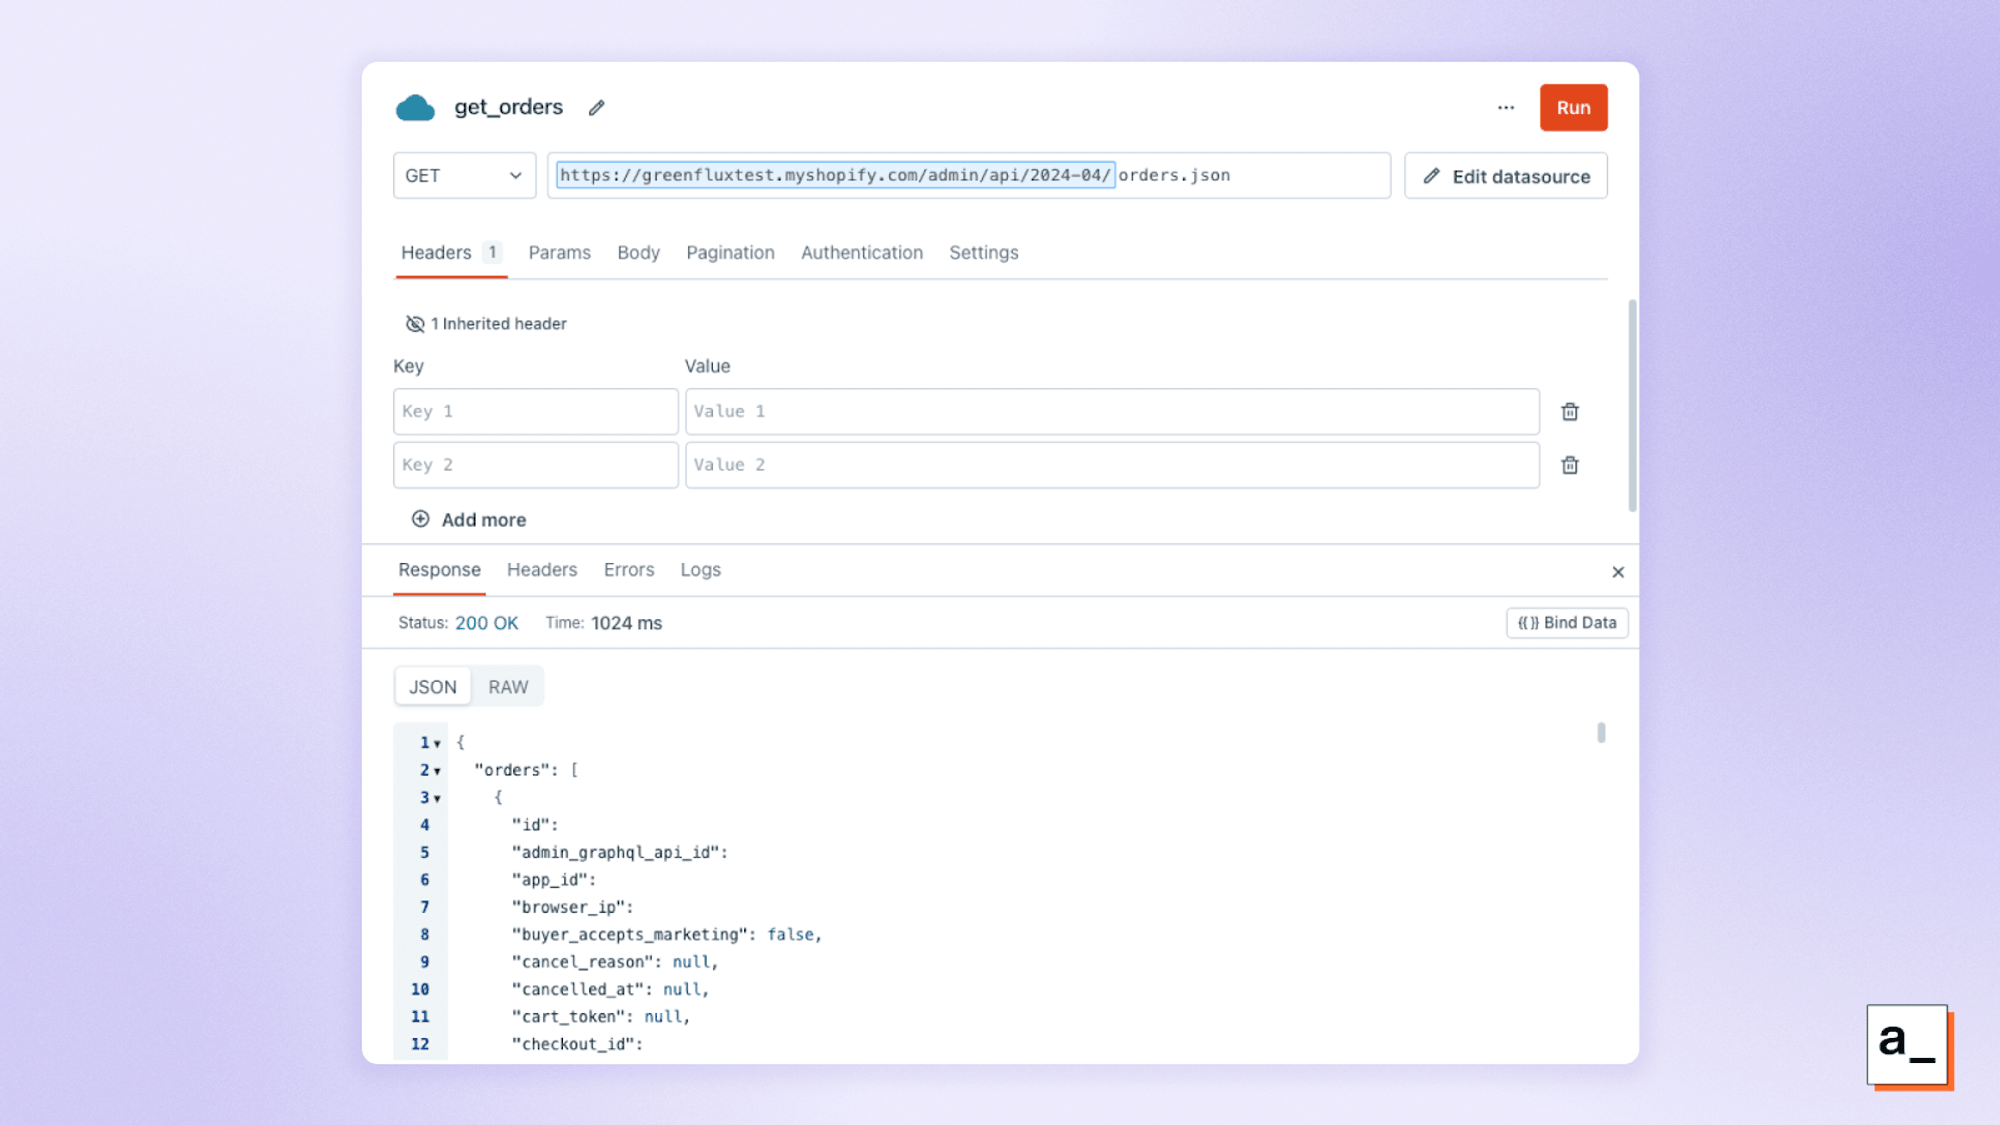
Querying Shopify orders from Appsmith.
Awesome! Your new app is now making authenticated API calls to Shopify and returning data. Note the response JSON format and structure: all orders are nested inside the orders property. This will be relevant later when you take this data and add it to the Google Sheet.
You can also add other Shopify data objects like products and customers by enabling them in the permissions for your custom Shopify app and then adding the API endpoints as a separate query.
Step 4: Creating a searchable, sortable table from Shopify data
Creating a table in Appsmith is easy — just drag it from the UI elements menu onto the canvas and choose where it should get its data from:
Go back to the Editor screen and click on the UI tab.
Click New UI Element on the left sidebar and drag a new table UI element onto the canvas.
Name the table
table_orders.In the new table's settings panel, click the Connect data dropdown.
Select the
get_ordersquery.Append .orders so that the Table data field is bound to the value
get_orders.data.orders— this is the orders array from the API response body.
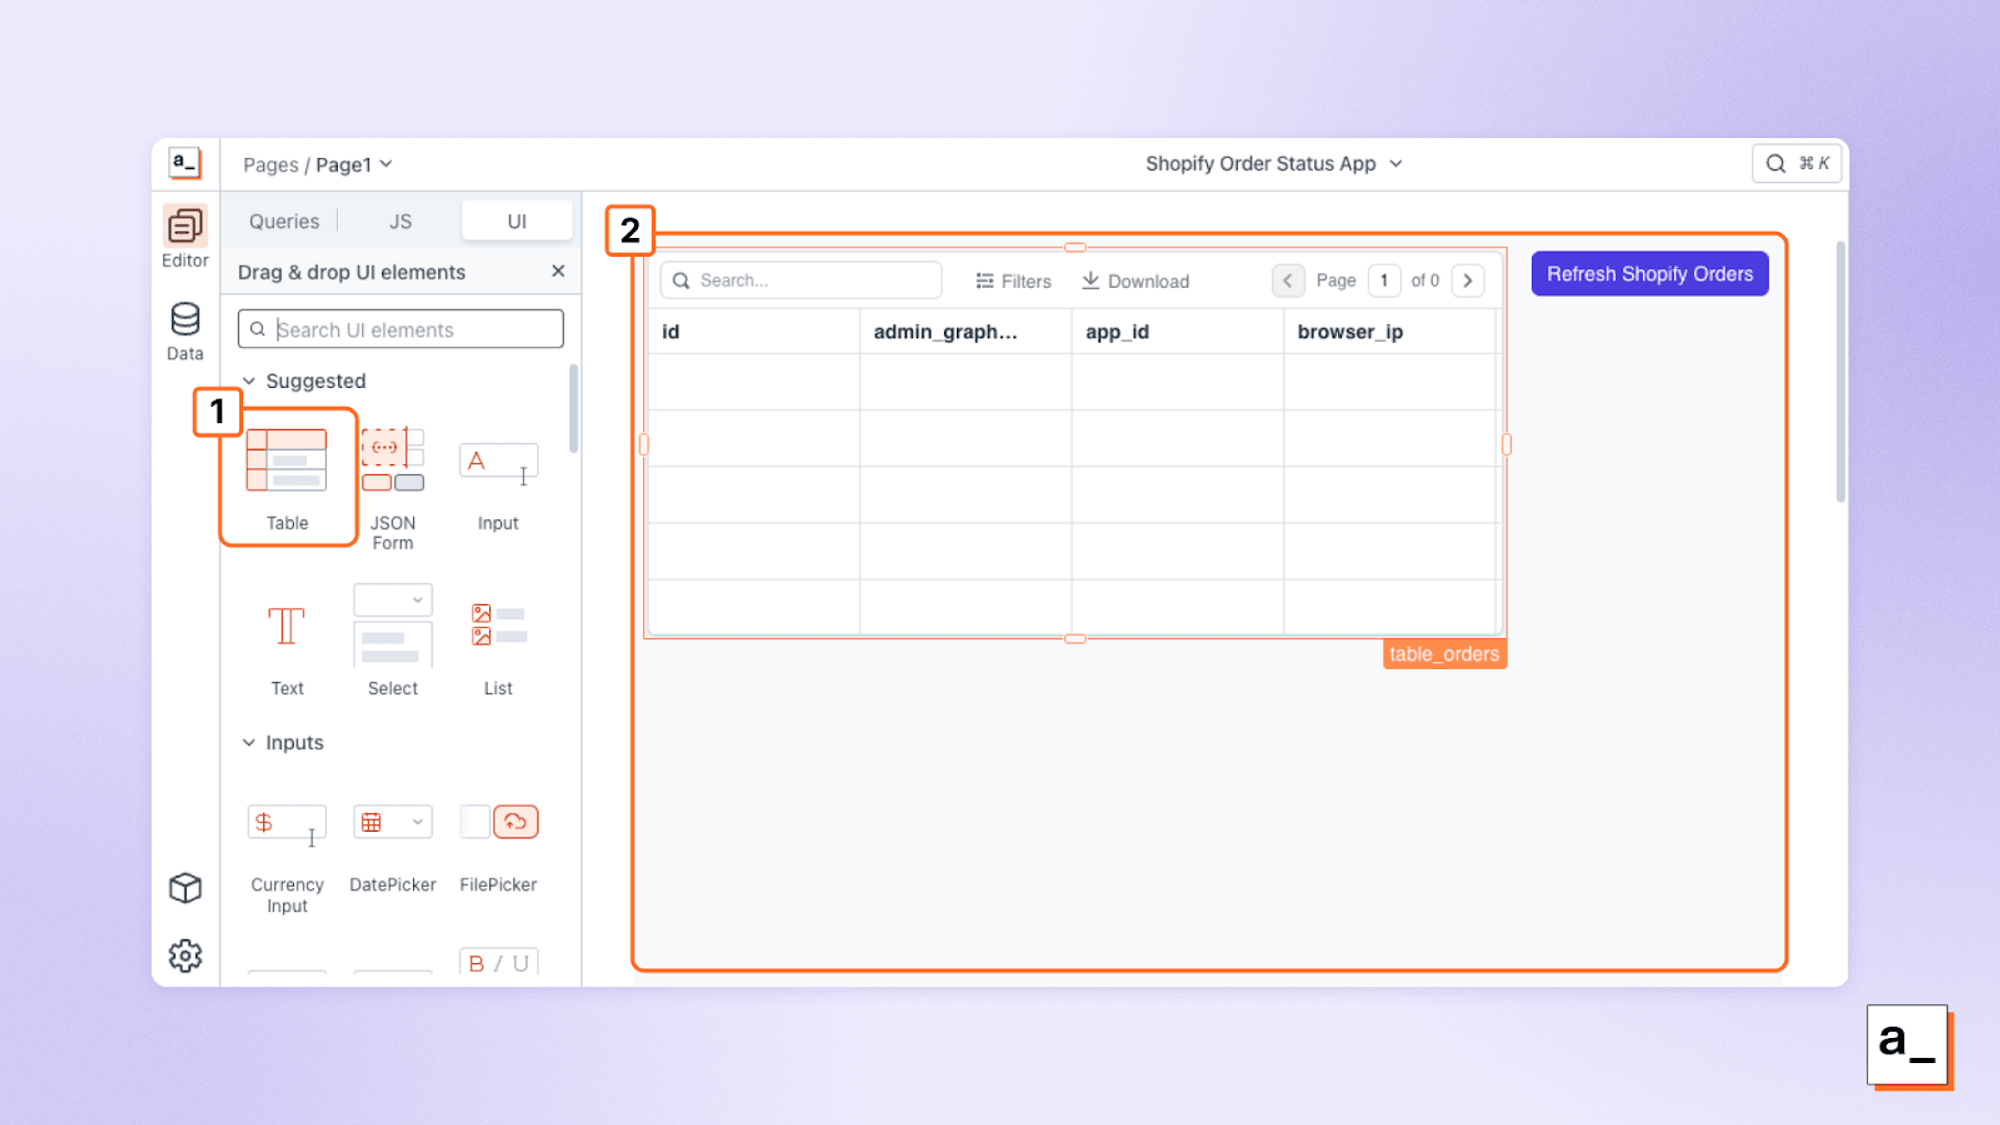
Click and drag a table UI element (1) onto the canvas (2).
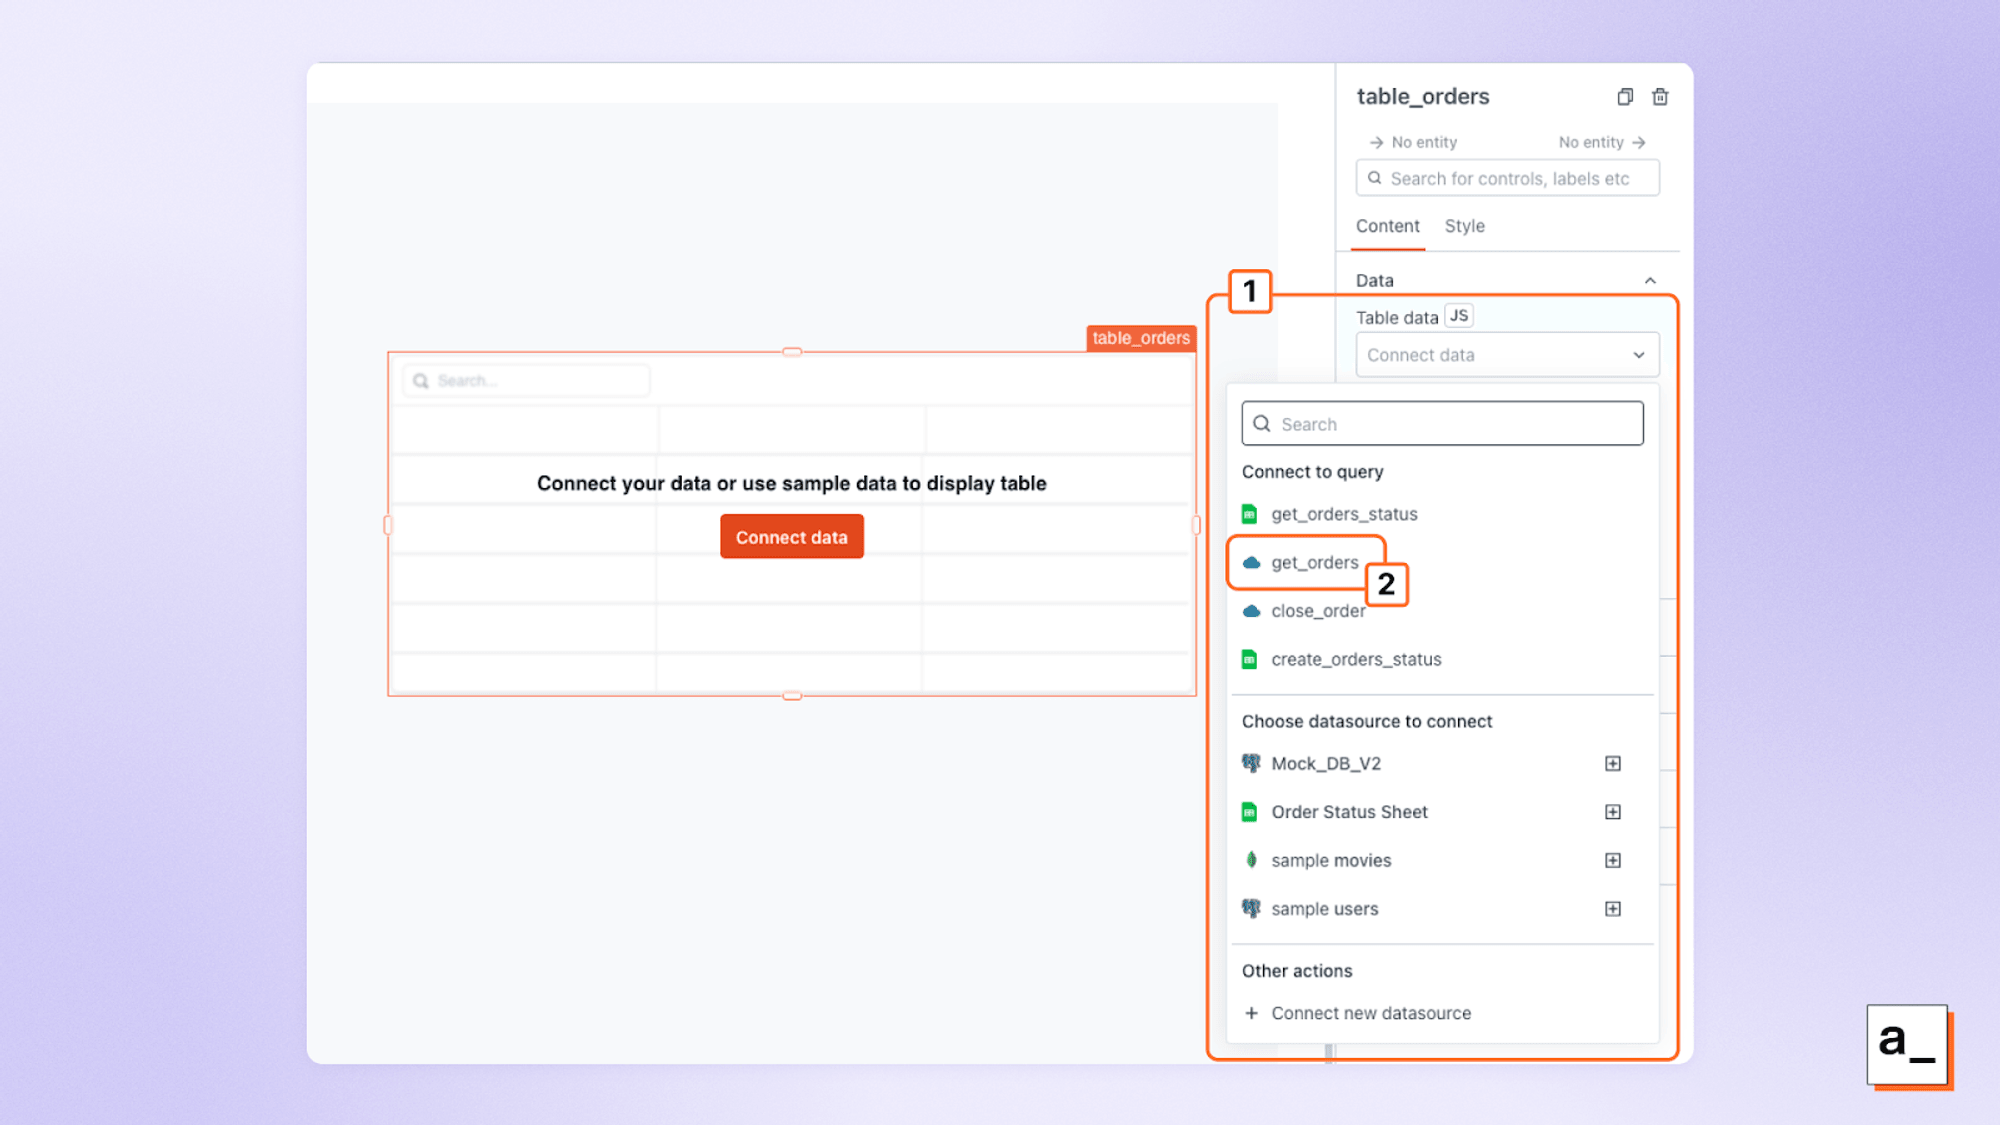
Click on the Connect data dropdown (1) and select a query to set it as the table’s datasource (2).
Next, drag a button UI element onto the canvas, name it button_shopify_refresh and set the label to “Refresh Shopify Orders”, and then click the + button next to the onClick field and select the get_orders query from the list, which will set the onClick value to get_orders.run. Clicking the button will now trigger the query to get order data, causing the table to update.
Note that if you have no orders in Shopify, the table will remain empty, so have a few test orders ready!
Step 5: Integrating Shopify, Appsmith, and Google Sheets
Google Sheets will be used to store additional internal order status data. Many businesses need to store extra information that doesn't have a spot in Shopify, and Google Sheets is easy to use. So being able to use Appsmith to sync orders from Shopify to Google Sheets is useful for businesses with needs that go beyond what Shopify offers.
To connect a Google Sheet to Appsmith, follow these steps:
Navigate to Datasources + > Create New > Google Sheets.
Follow the prompts and authorize Appsmith to connect to your Google account and read and write to your Google Sheets document.
Name the datasource “Order Status Sheet”.
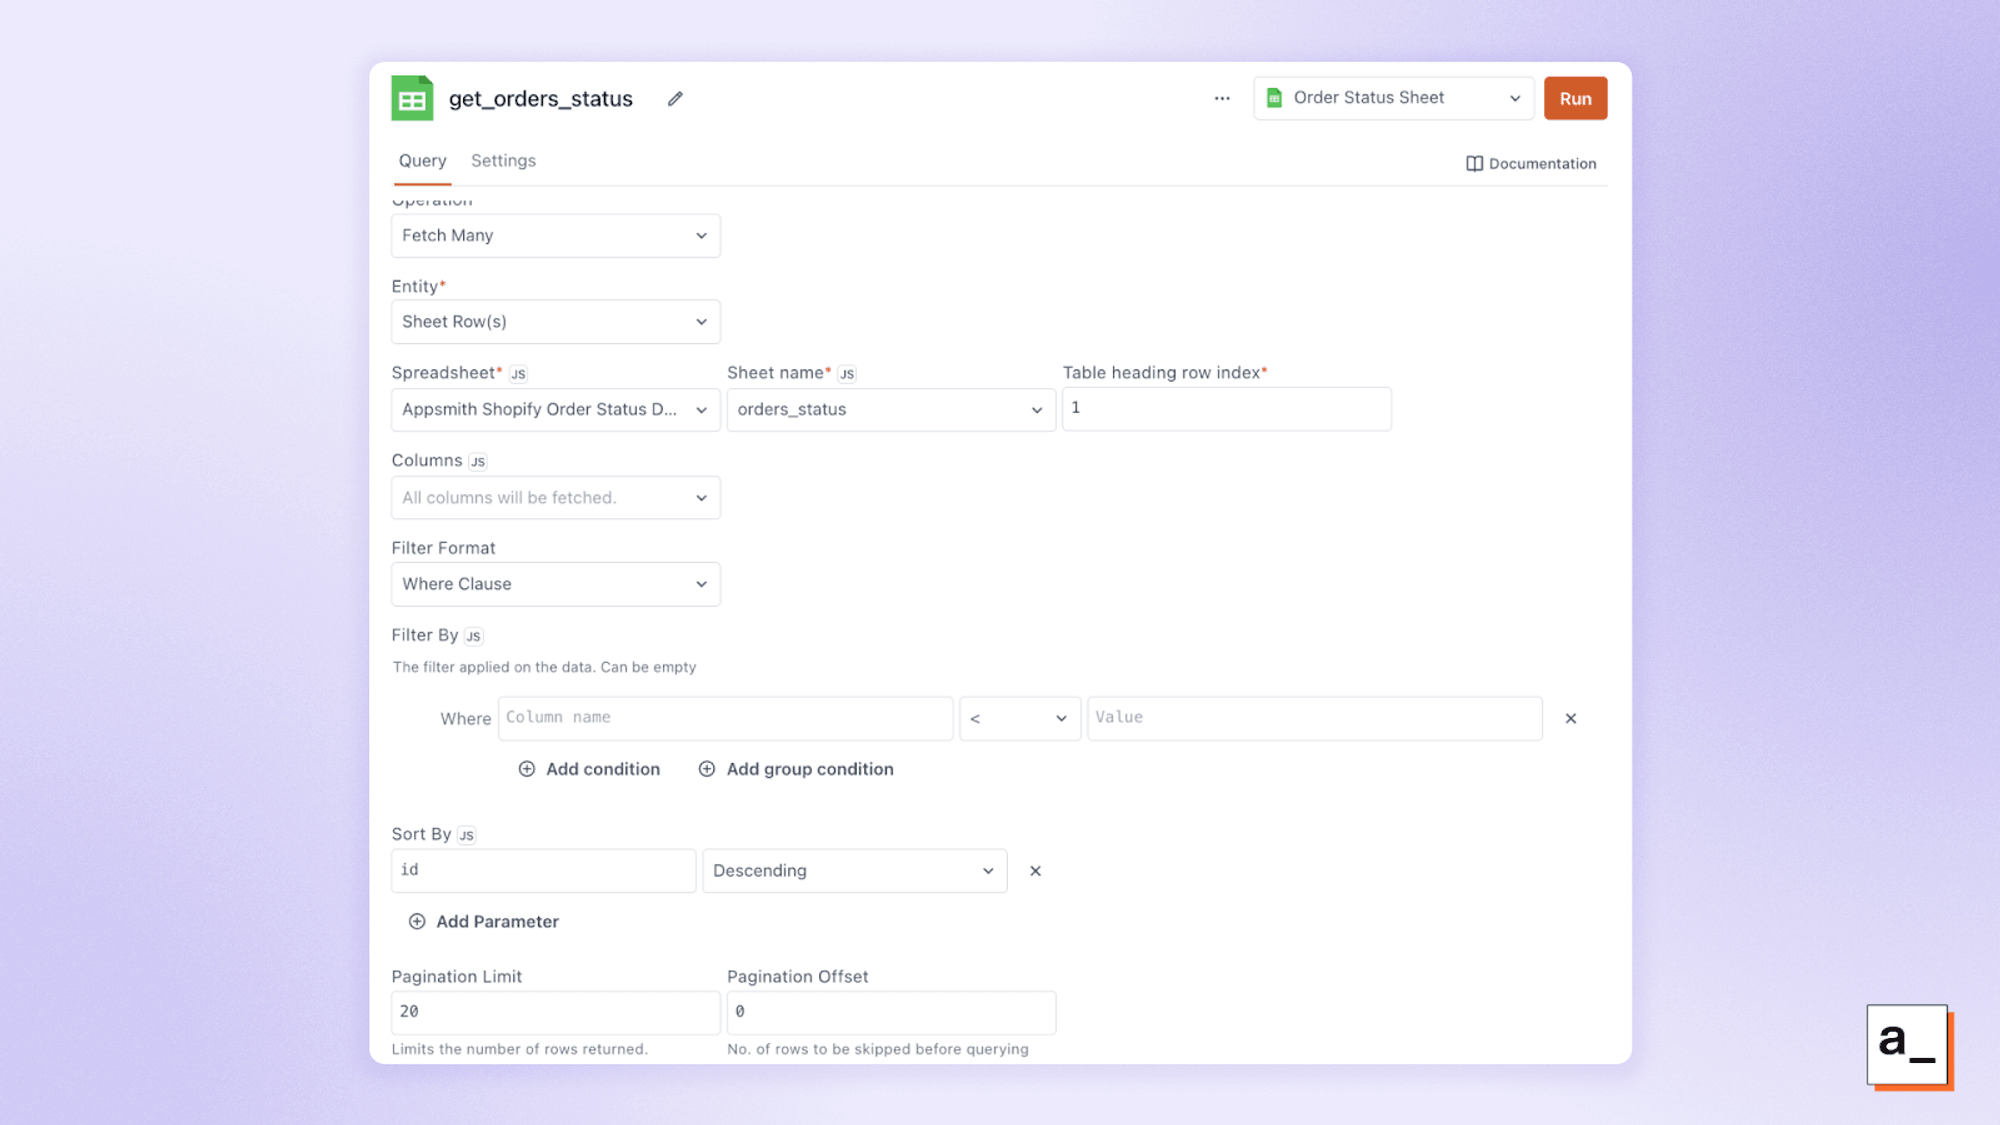
Add a new query named
get_orders_statusin the Google Sheets datasource. This will pull the internal orders status data from the Google Sheet for the orders that were originally fetched from Shopify by theget_ordersquery.Set Operation to Fetch Many, and Entity to Sheet Row(s).
Select your spreadsheet and the sheet name (
orders_statusin this case — this sheet contains the extracustom_internal_statuscolumn that can't be stored in Shopify).Leave Table heading row index set to 1 and Pagination limit to 100 (this means only the most recent 100 orders will be displayed).
Set Sort By to id and Descending.
Click the Run button (in the top right of the screen) to verify that your query is working.
Now you have API GET requests that can read order data from Shopify and read additional order status data from Google Sheets. You can now add a table to your Appsmith app for the extra order status data. Name this table table_orders_status — we'll be referring to it by this name later. Add another button as well, named button_sheets_refresh, and set its onClick action to execute the get_orders_status query.
Note, again, that the table will appear empty until the Google Sheet is populated.
Now you need a way to take data from the Shopify get_orders query and write it to Google Sheets. As get_orders returns an array of order objects, you can use the JavaScript map() method to iterate over it to create the rows to insert into the sheet. You can then make an API POST request to Google Sheets to store the rows:
Copy the
get_orders_statusquery for the Google Sheet datasource and rename it create_orders_status.Change the Operation for the query to Insert Many.
In the Row object(s) field, enter the following code:
   {{
       get_orders.data.orders.map(o => {
           return {'id':o.id, 'email':o.email, 'products':o.line_items.map(l => l.name).join()};
       })
   }}
This JavaScript code (wrapped in double braces so that Appsmith executes the code and inserts the returned data) creates an array of objects with keys that match the sheet column names. You can find out more about how to save API response data to Google Sheets here.
When this query is run, all open orders from Shopify will be saved to your Google Sheet!
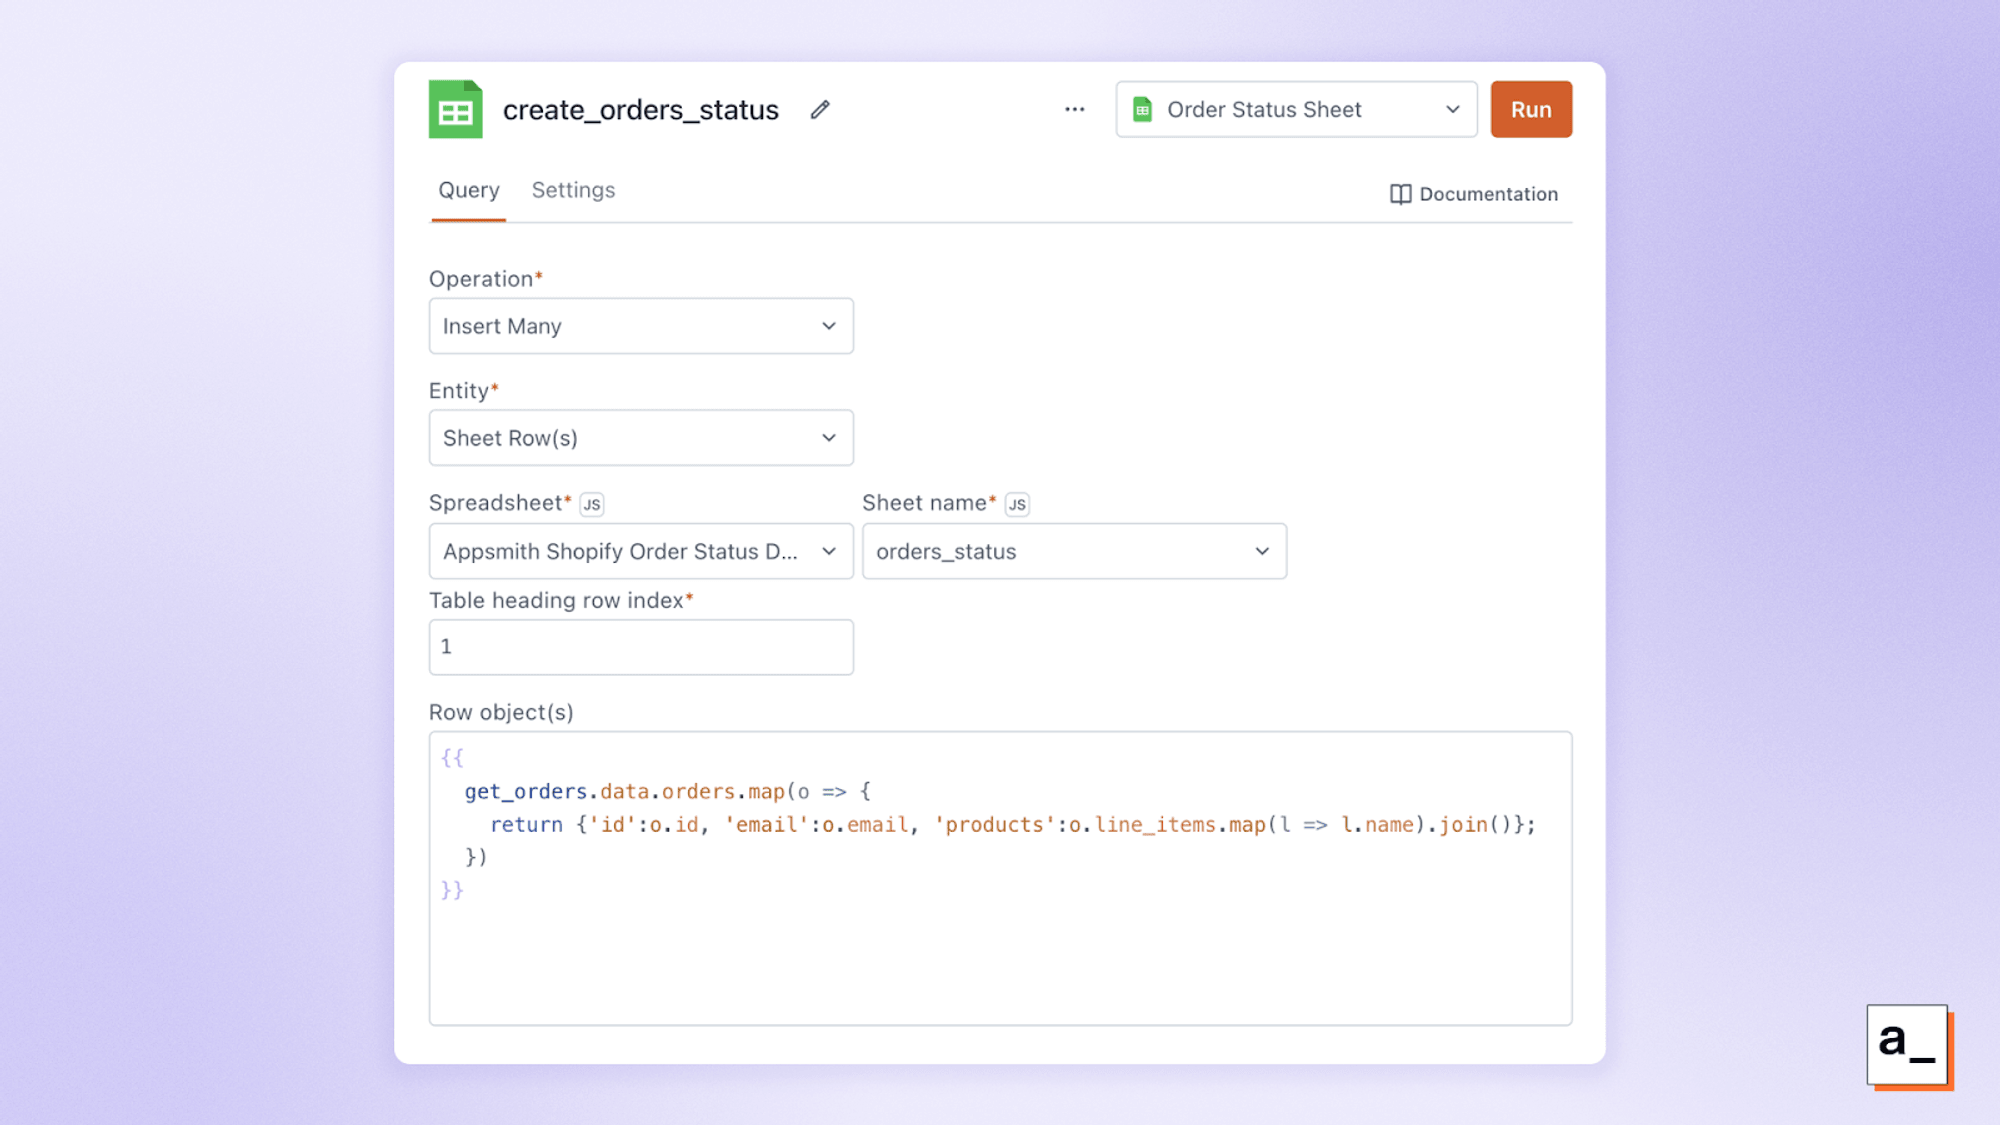
Running a query to save Shopify orders to a Google Sheet.
Your Queries panel in Appsmith should now look something like this:
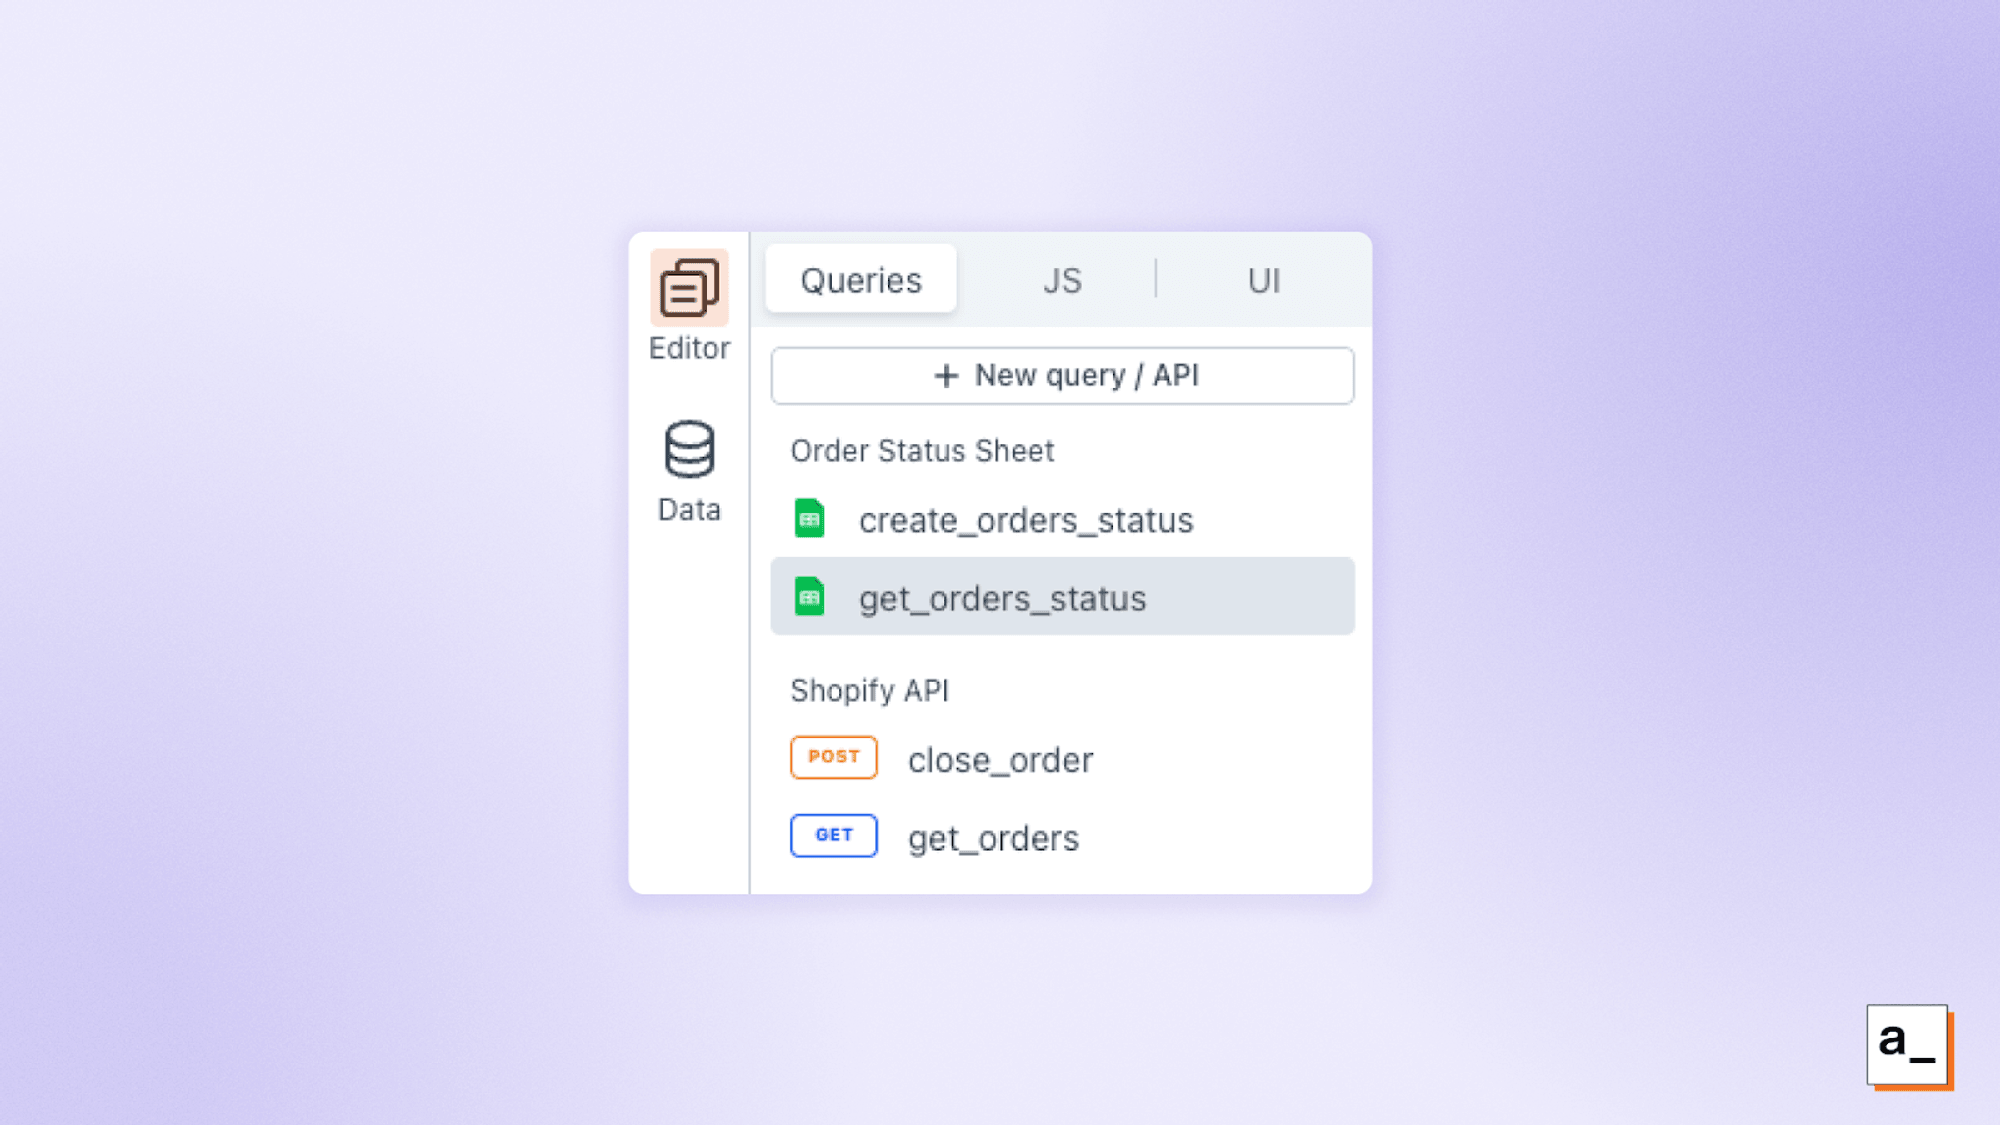
Google Sheets and Shopify API queries in the Appsmith interface.
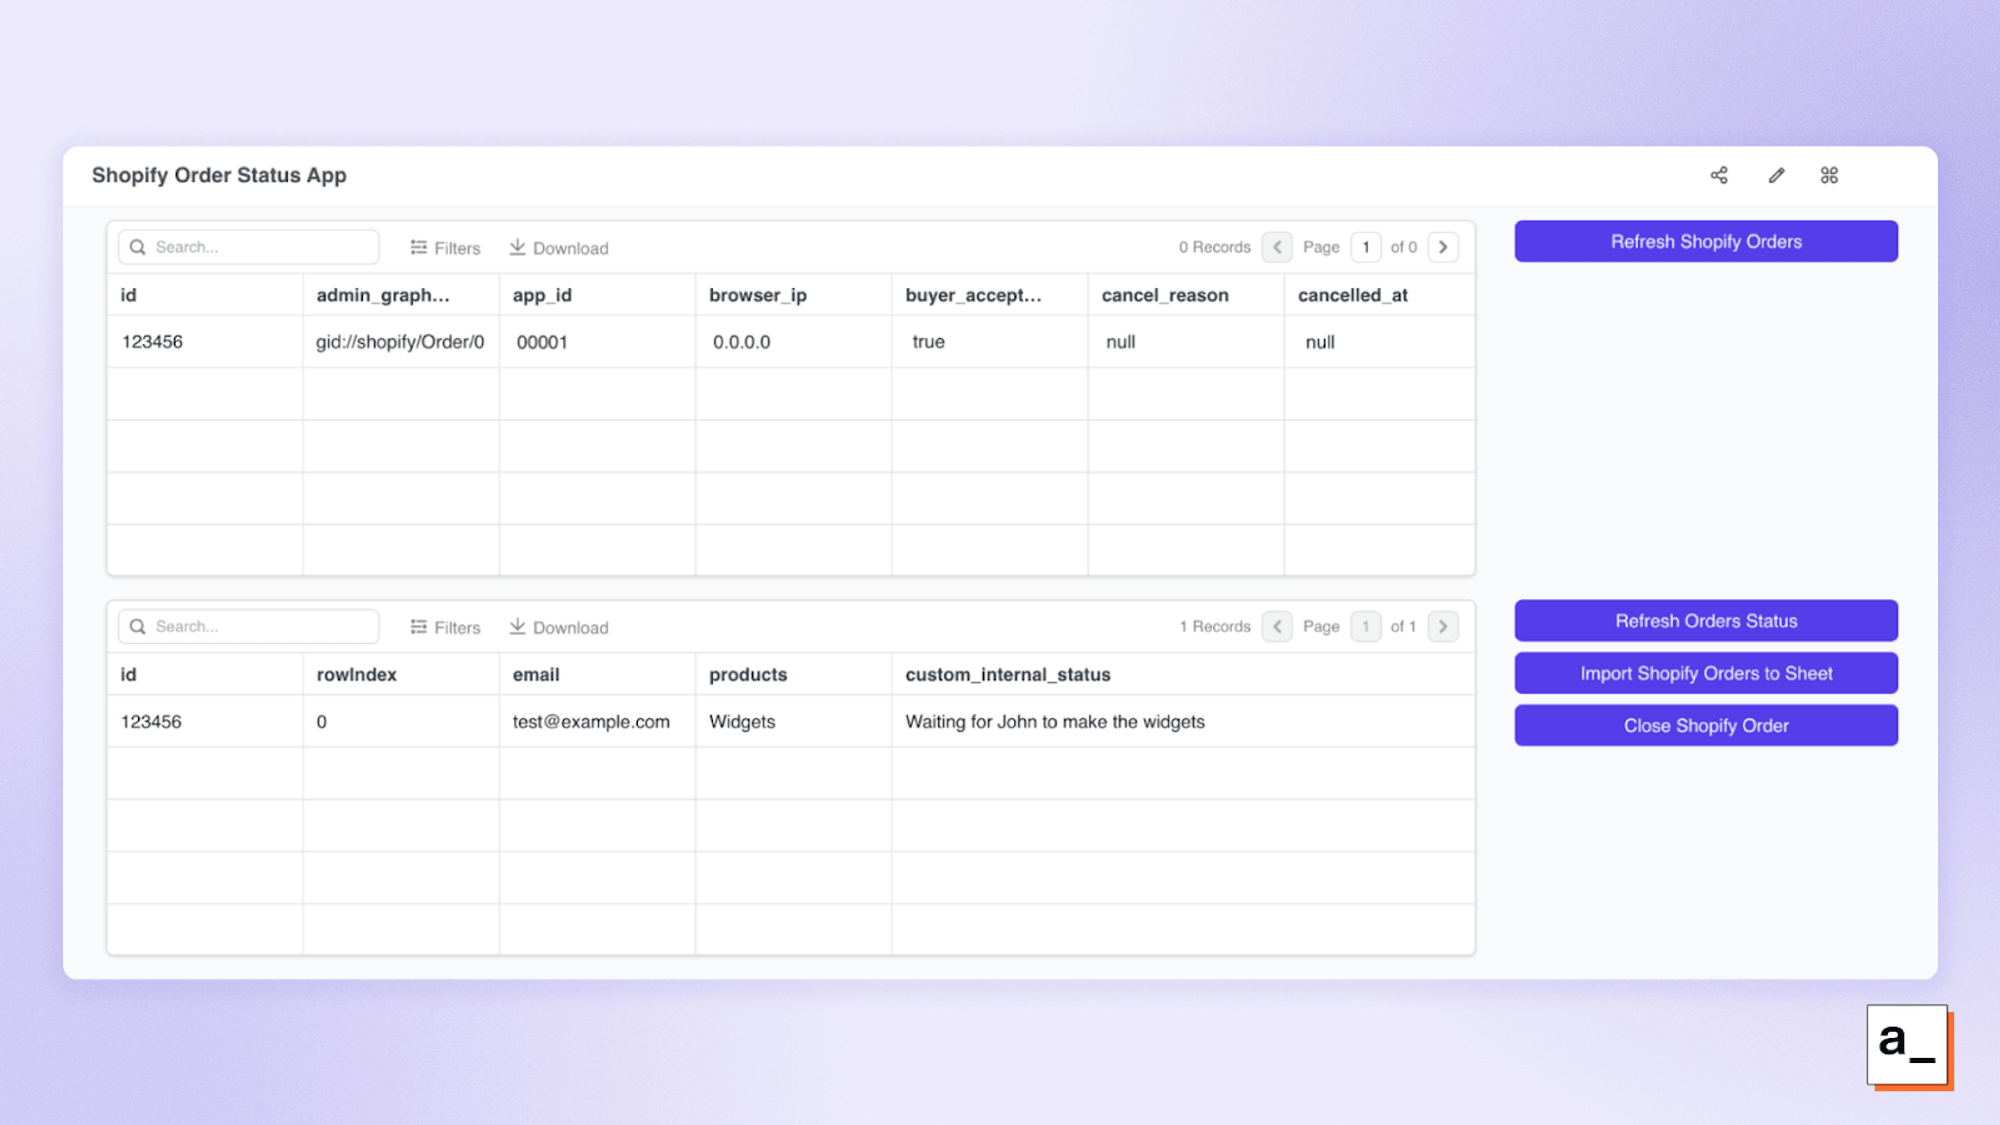
To complete this step, drag another button UI element onto the canvas, labeling it “Import Shopify Orders To Sheet” and setting its onClick action to run the create_orders_status query. When everything is in place, you should have two tables and a collection of action buttons resembling the below:
Filtering data from the API and completing your user interface
Whenever the create_orders_status query is run, it adds all open orders to the sheet — even if they already exist in the sheet. To avoid this, you need to track which orders you've already written to the sheet and only get the new ones.
Step 1: Finding the last Shopify order ID in the Google Sheet
You can use Appsmith’s JSObjects — containers for your own custom JavaScript code — to find the last read Shopify order so that only new ones are imported.
In the JS tab, create a new JSObject named
custom_logic.Add a function to the object named
getLastTableRowValueto handle the data fetched by your query. Your final JSObject should look like this:
export default {
   getLastTableRowValue() {
      const tableData = table_orders_status.tableData;// Work from the table_orders_status table
      if (tableData && tableData.length > 0) {
         // Access the last row's specified column value
         return tableData[tableData.length - 1].id;// Read from the id column
      }
      return 0; // Return 0 if no data in table
   },
}
Finally, update your get_orders query so that it passes the result of the above function as a request parameter named since_id. This Shopify API parameter will limit results to all orders after that ID value. To do this, edit the API query, go to the params tab, and add a parameter with the Key set to since_id and the Value set to {{custom_logic.getLastTableRowValue.data ?? 0}}.
Step 2: Updating orders in Shopify from Appsmith
This step will use the close.json endpoint to update the status of an order. Add a new Appsmith query for updating the order in Shopify:
Under the Shopify API datasource in Appsmith, add a new query named
close_order.Append the URL with
orders/{{Number(table_orders_status.selectedRow.id)}}/close.json.Set the Method to
POST.Add a new button to run the
close_orderAPI query, labeled “Close selected order”. When it is clicked, the Shopify order corresponding to the selected table row intable_orders_statuswill be closed and archived. (If no table row is selected the API call will fail, as no order will be found).
Now, your employees can access the Appsmith app you've created, click a button to import new orders, keep track of their custom internal status in the Google Sheet, and finally mark them as closed in Shopify — all without having to log into Shopify itself, limiting their access to only what they need in a streamlined interface.
Now that you're familiar with how API data is retrieved and presented in Appsmith, you'll probably want to delete the table that shows the raw Shopify data (as the relevant data is now imported to the Google Sheet) and tweak your interface to your liking.
Extending Shopify to Meet Your Business Needs
This is just a small sample of the awesome power of Appsmith. There's so much more you could do from here, like connecting to the Shopify fulfillments API to mark orders as fulfilled from your store locations, sending Slack messages or emails to each worker when an order is assigned from the Shopify admin panel, emailing pictures of the products to customers during production, or calculating average processing times per worker or product.
For each of these additions, you can repeat the same process from this tutorial: build a new query by following Shopify's documentation, add any custom logic to a JSObject, then add a button to call the query or function.
The sky really is the limit, so check out our free cloud-hosted App platform, or get in touch with our enterprise team if you have corporate requirements.


