Bootstrapping Your Own Zendesk Clone in Under an Hour Using Appsmith

Outsourcing your customer support infrastructure to services like Zendesk and Freshdesk can save time on implementation, but locks you into workflows and pricing contracts that might not suit your business goals. By building your own tools instead, you can ensure that you have the functionality you require, while retaining control of your data and keeping infrastructure costs predictable.
This tutorial will show you how to start building your own helpdesk portal for your customers and support agents to create tickets and interact, providing a foundation that you can use to implement your own fully bespoke support workflows.
How to build a Zendesk clone using Appsmith and GitHub Issues
Appsmith is a low-code application development platform that lets you build user interfaces with a drag-and-drop interface builder and connect to data from databases and APIs. This makes it an ideal tool for building customer support tools that interact with your existing support and communication channels.
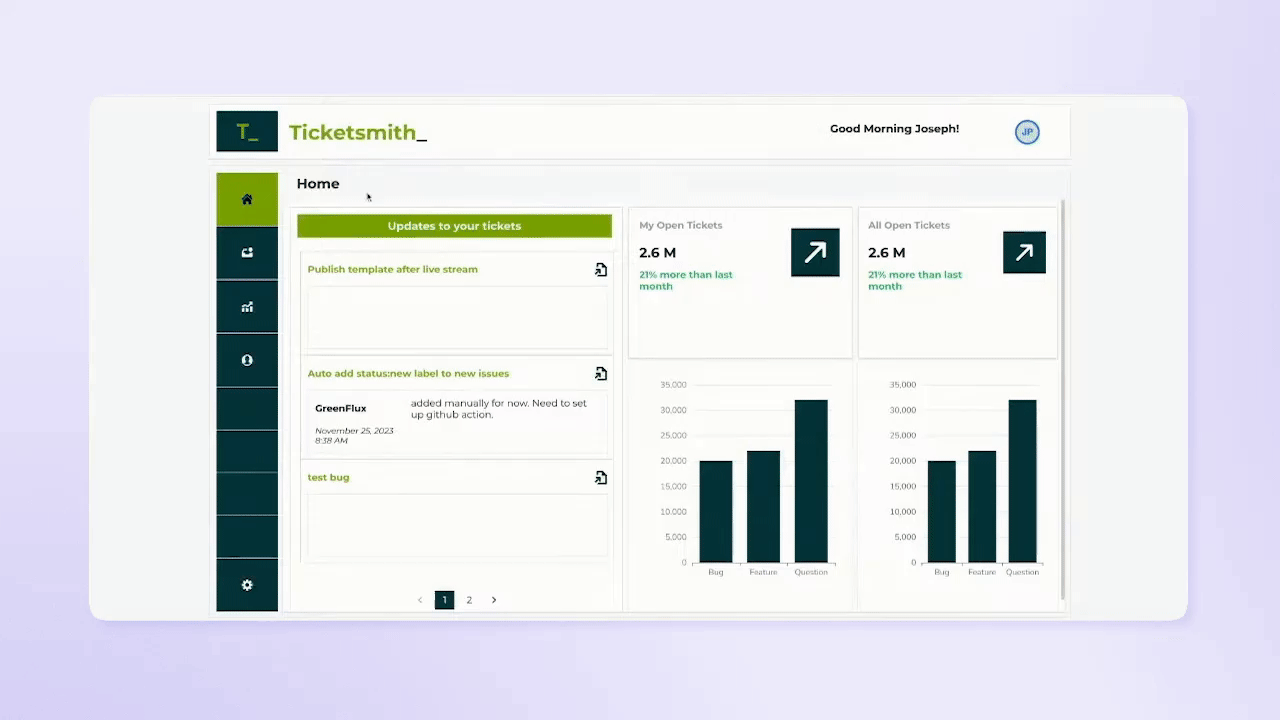
This tutorial shows you how to create a customer support ticket application using GitHub Issues as the customer support tickets, but you could connect to any tool that exposes its data through APIs. I’ve named our application “Ticketsmith.” Here’s what it will look like in action:
If you want to jump straight into the code, here’s the template for this tutorial, so you can fork it to start working with your own version. To see how we built this application step-by-step, read on!
Step 1: create a GraphQL datasource to connect Appsmith to GitHub
To complete this tutorial you’ll need a GitHub account and an Appsmith account.
Connections to external data in Appsmith are referred to as datasources. To connect Appsmith to GitHub Issues, you will need to create a new repository and add some issues so that you have data to query in the next step. Alternatively, later in the tutorial, you can just query the GitHub Issues in the default Appsmith repository for this tutorial.
GitHub supports fine-grained access tokens that let you grant granular access to resources. There are many GitHub resources that you could connect Appsmith to, like Events, Members, Projects, Webhooks, etc., but for now you should only request read-only access to the GitHub Issues API. This satisfies the principle of least privilege: the security best practice of limiting access to only what a user or service requires, reducing the surface area for security vulnerabilities.
Check our guide to connect Appsmith to GitHub using the GraphQL API. Here, we show how to set up a new Appsmith datasource with one of these fine-grained access tokens.
Step 2: create GraphQL queries to GitHub in Appsmith
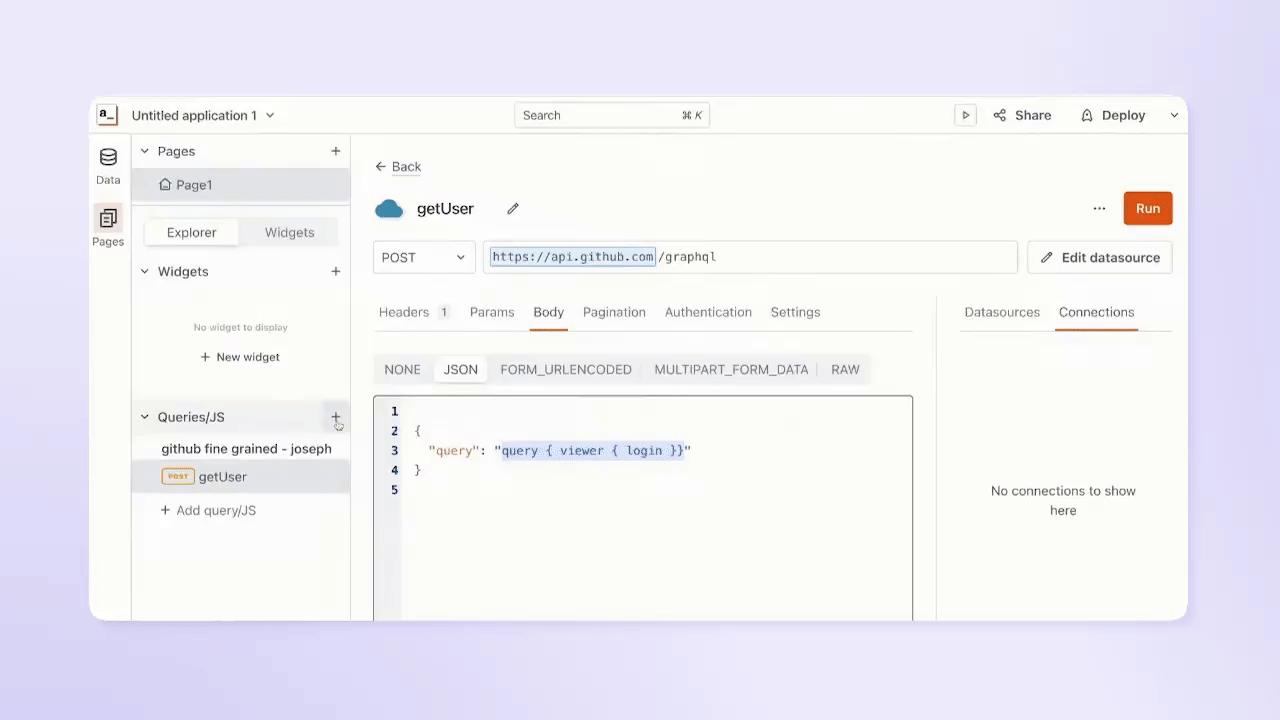
After you’ve added your GraphQL datasource to Appsmith, you need to construct the queries that will get the data you need from GitHub. GitHub’s GraphQL Explorer tool is very useful for constructing these queries, as it allows you to quickly test them and see what data they return based on the live data in your own GitHub account. This tool also gives very helpful error messages to help you efficiently fix any problems with your queries.
GraphQL is a powerful tool that allows you to completely customize the data that you get back from your API requests. Almost everything that you learn while working with GitHub’s GraphQL Explorer will transfer to working with other GraphQL APIs.
For your first GraphQL API request, create a GetIssues query to get a list of all of the open GitHub issues and their corresponding data. Note that all of the GraphQL queries in this tutorial use the public Ticketsmith repository from Appsmith. You can change the name and owner fields in your queries to match your own username and repositories. Here’s the query to use:
{
  repository(name: "ticketsmith", owner: "appsmithorg") {
    issues (last:100) {
      edges {
        node {
          id
          title
          bodyText
   	    state
          author {
            login
          }
          assignees (last:10) {
            edges {
              node {
                login
              }
        	}
          }
          labels (last:100){
            edges {
              node {
                id
                name
              }
            }
          }
        }
      }
    }
  }
}
You can test and make adjustments to this query in GitHub’s GraphQL Explorer or directly in Appsmith’s query editor. To add this query in Appsmith, create a new Appsmith query based on the datasource that you previously created and enter the code above into the body field.
Step 3: constructing your own customer support user interface
Now that you’ve connected to GitHub and created a GraphQL query for GitHub Issues, you can begin to construct your user interface (UI) to display and interact with this data. Here, you’ll be using Appsmith’s drag-and-drop UI builder that allows you to construct your own UI with more than 40 pre-built widgets, customize the widgets, and bind them to query data. You can create the UI for your application by dragging the widgets on the left side of the screen onto the canvas and altering their widget properties.
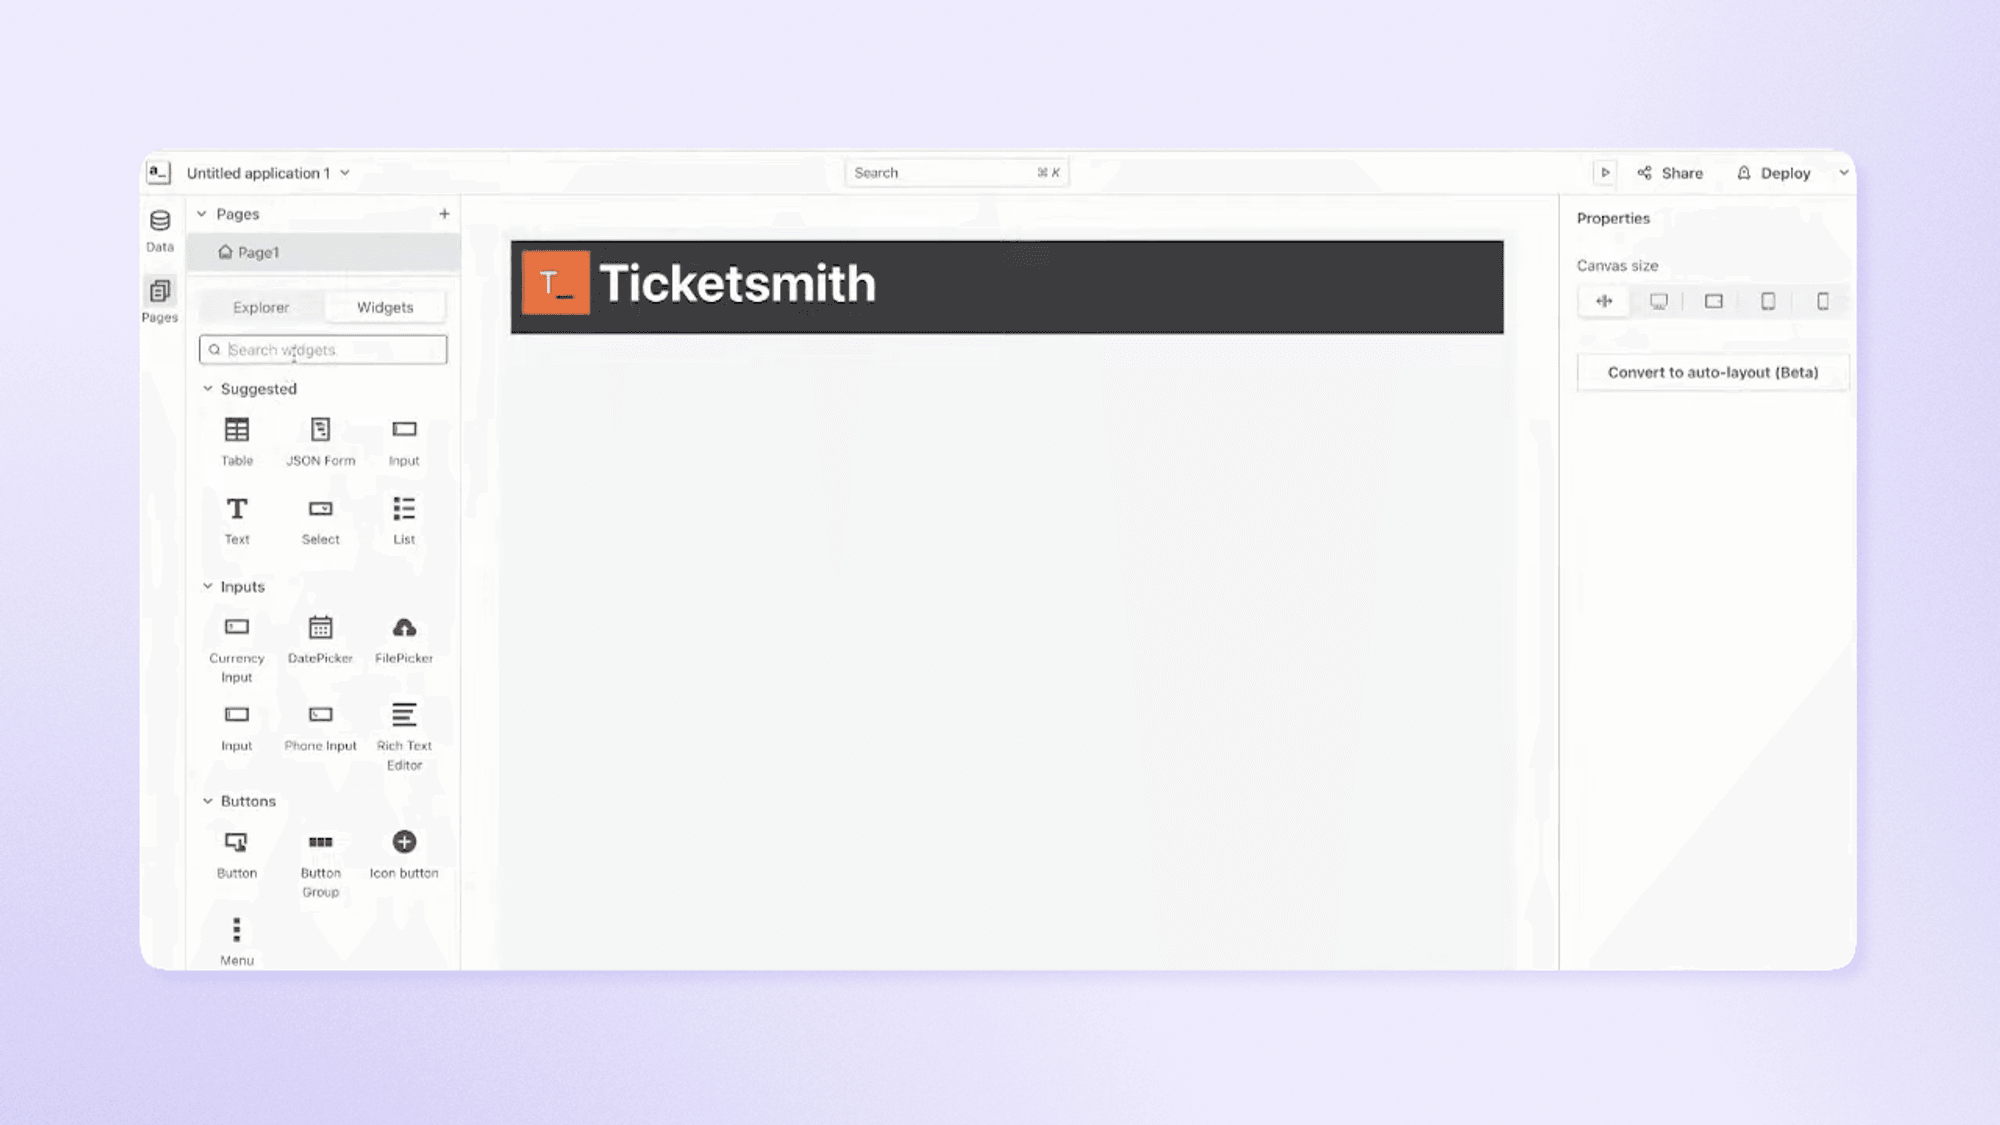
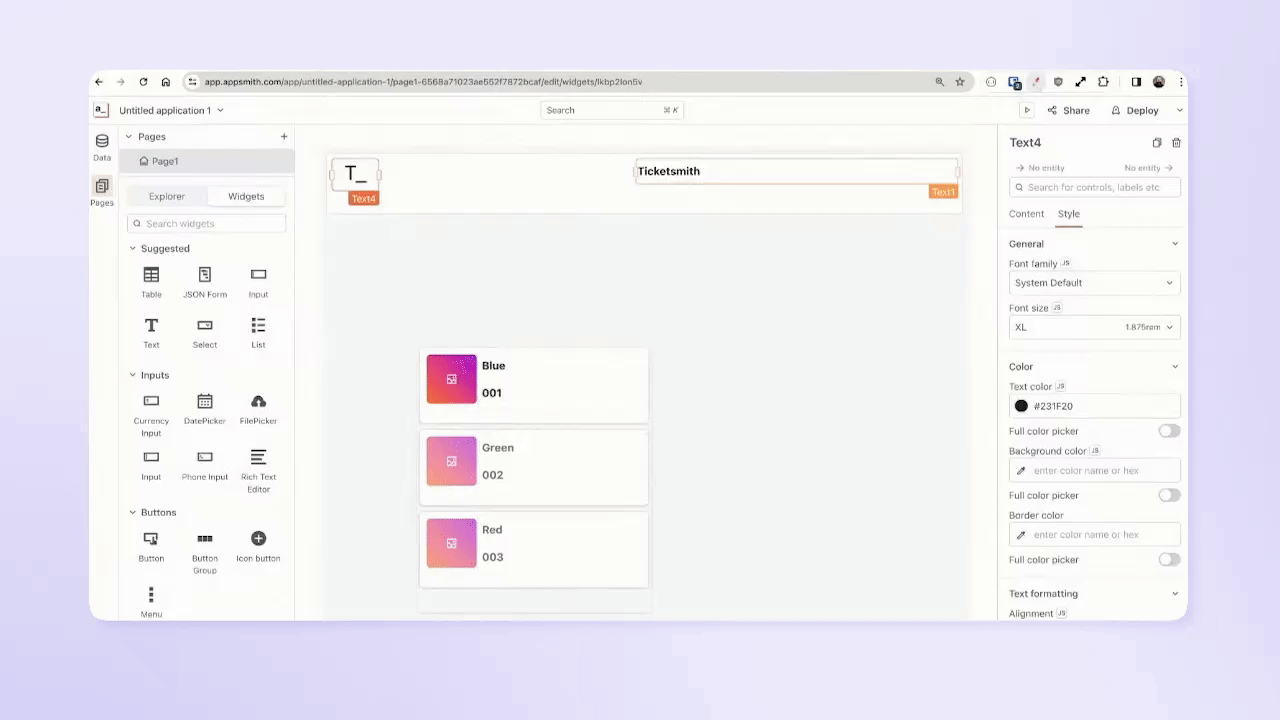
To start building your UI, create a basic header. This header is composed of two text widgets, grouped together inside of a container widget -- one contains the logo and the other the page title. You can change the properties of each widget like the font, text size, text color, background color, etc. with the panel on the right.
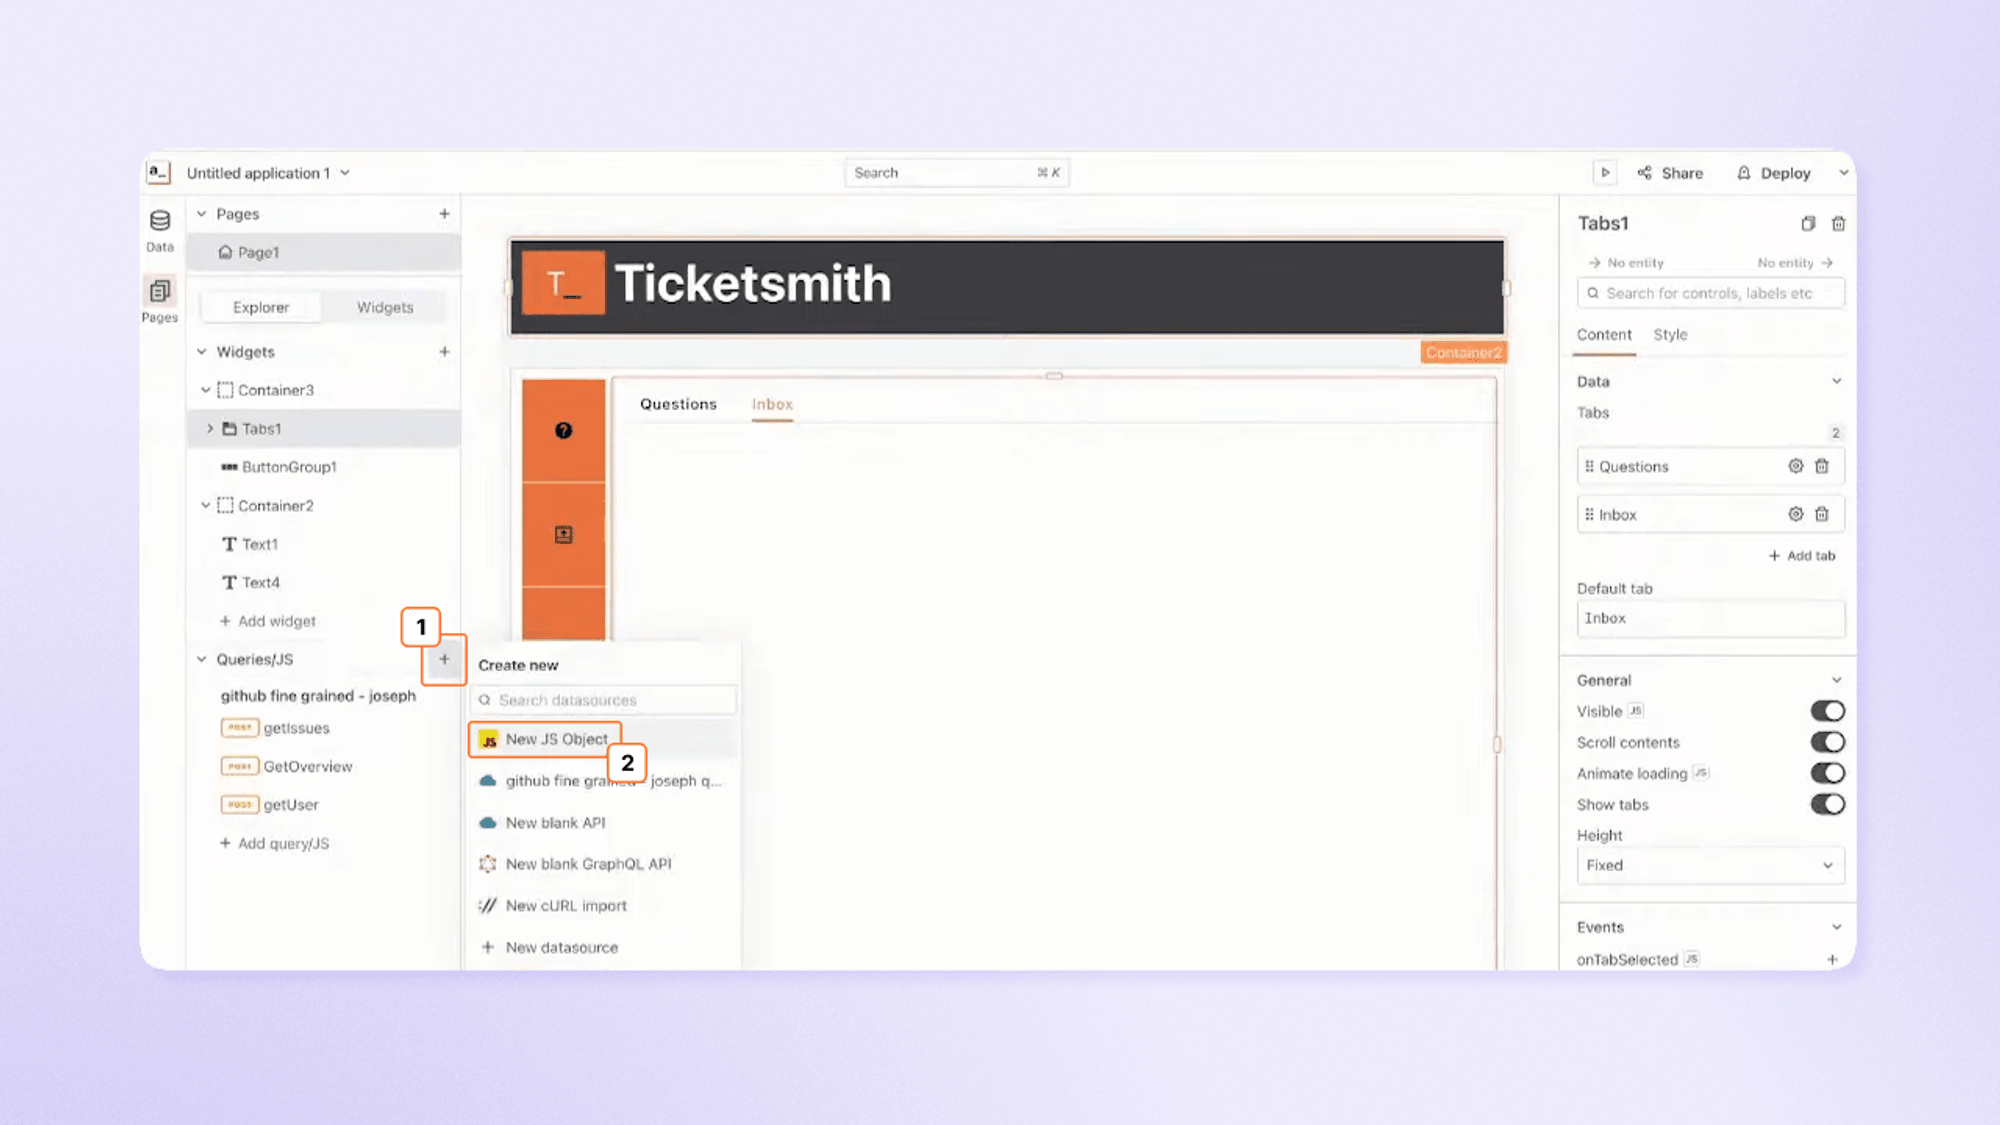
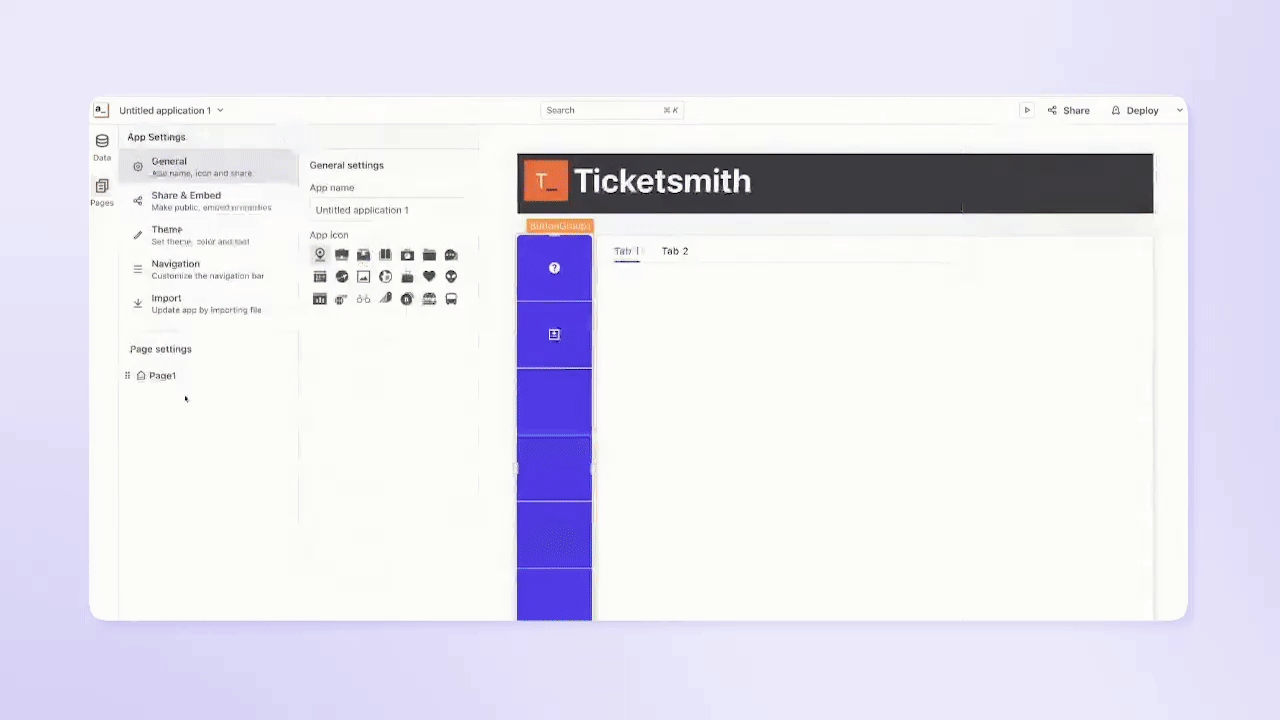
The overall structure of this application consists mainly of the button group widget paired with the tab widget. For this application, the button group acts as a radio button that controls which dashboard is displayed in the tab widget. You can drag and drop these widgets from the pane on the left and resize them as shown below, with the button group along the left of your canvas, and the tab taking up the remaining space.
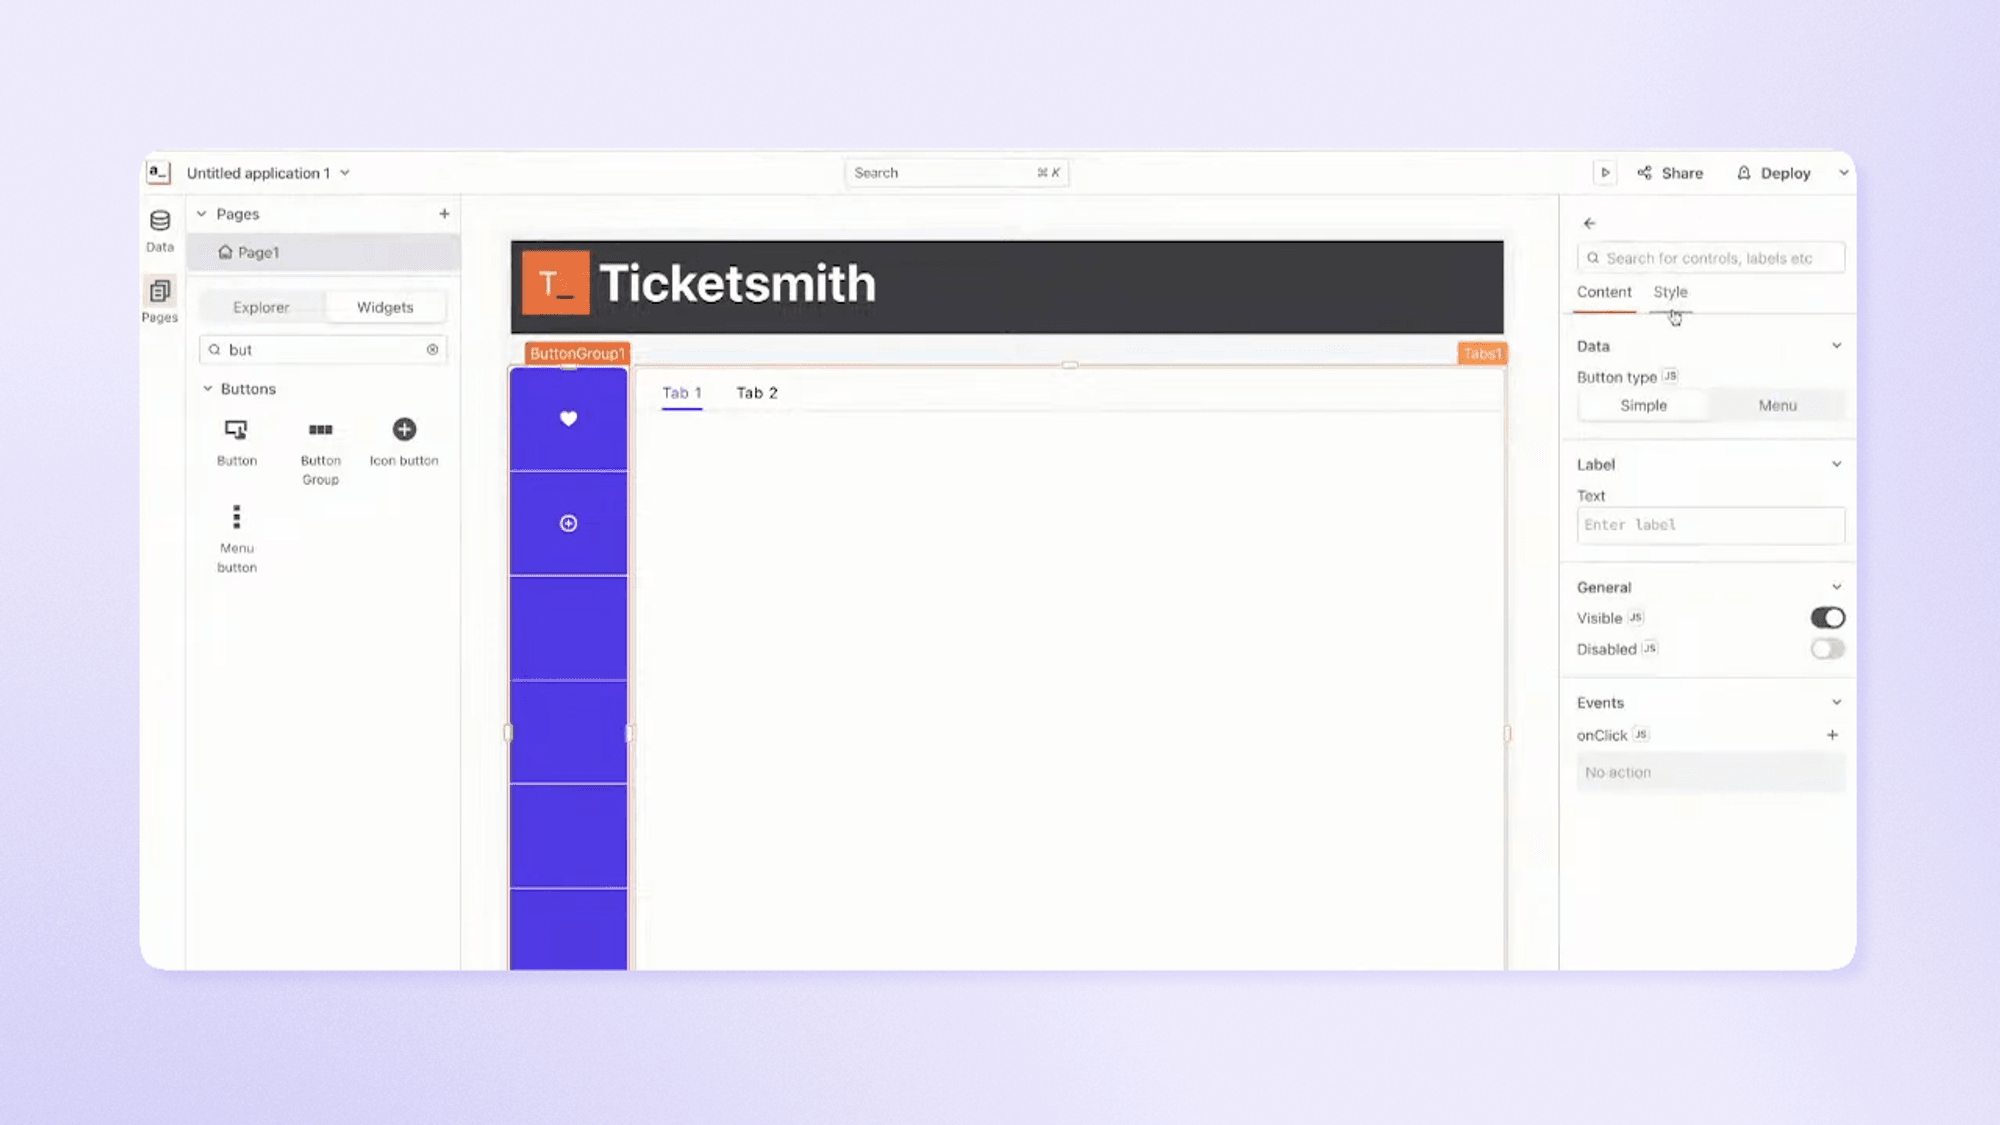
After you’ve added these widgets to the canvas, you need the tab widget to update based on which button in the button group is clicked. Appsmith uses JavaScript to power its front-end logic, which can be added directly to widgets or written as re-usable JS Objects that encapsulate variables and functions.
To start, create a JS Object to encapsulate variables and functions by selecting the + icon in the Queries/JS section of the UI builder.
In this case, you’ll just need a single variable to determine which tab the user should be on in the Tab widget. Here’s the source code you can place in your JS Object body to accomplish this.
export default { defaultTab: 'Inbox',
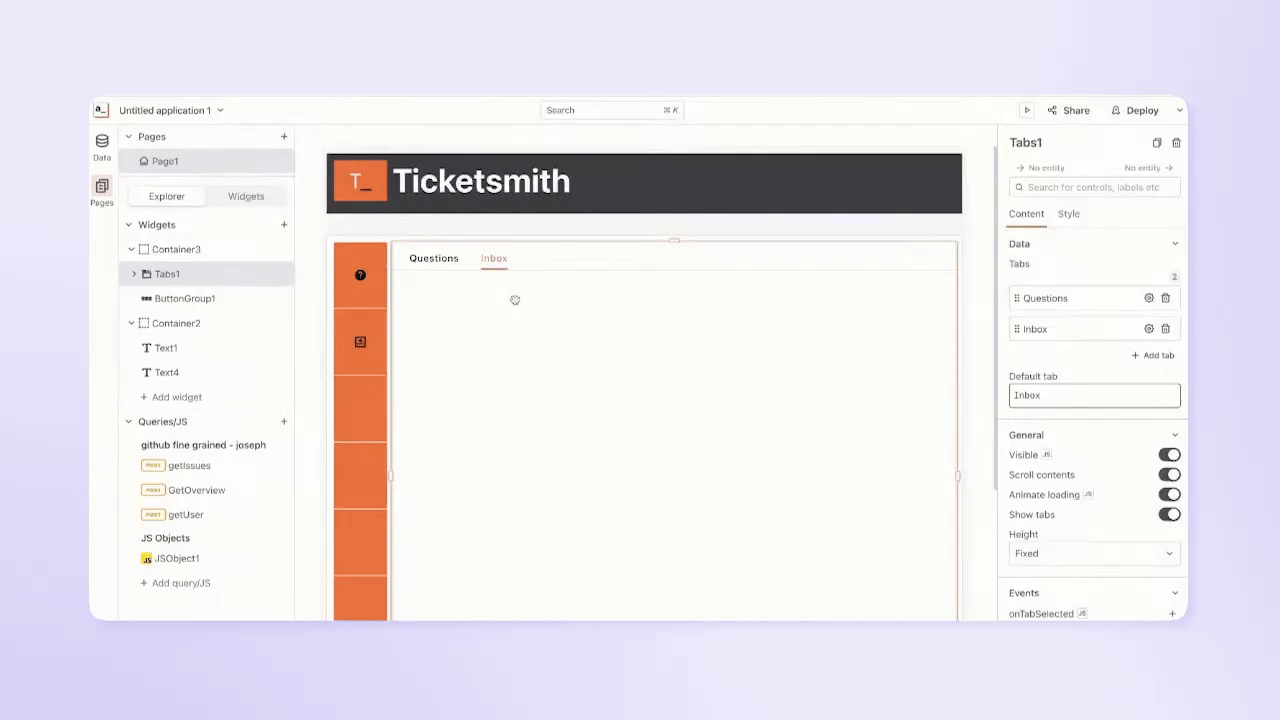
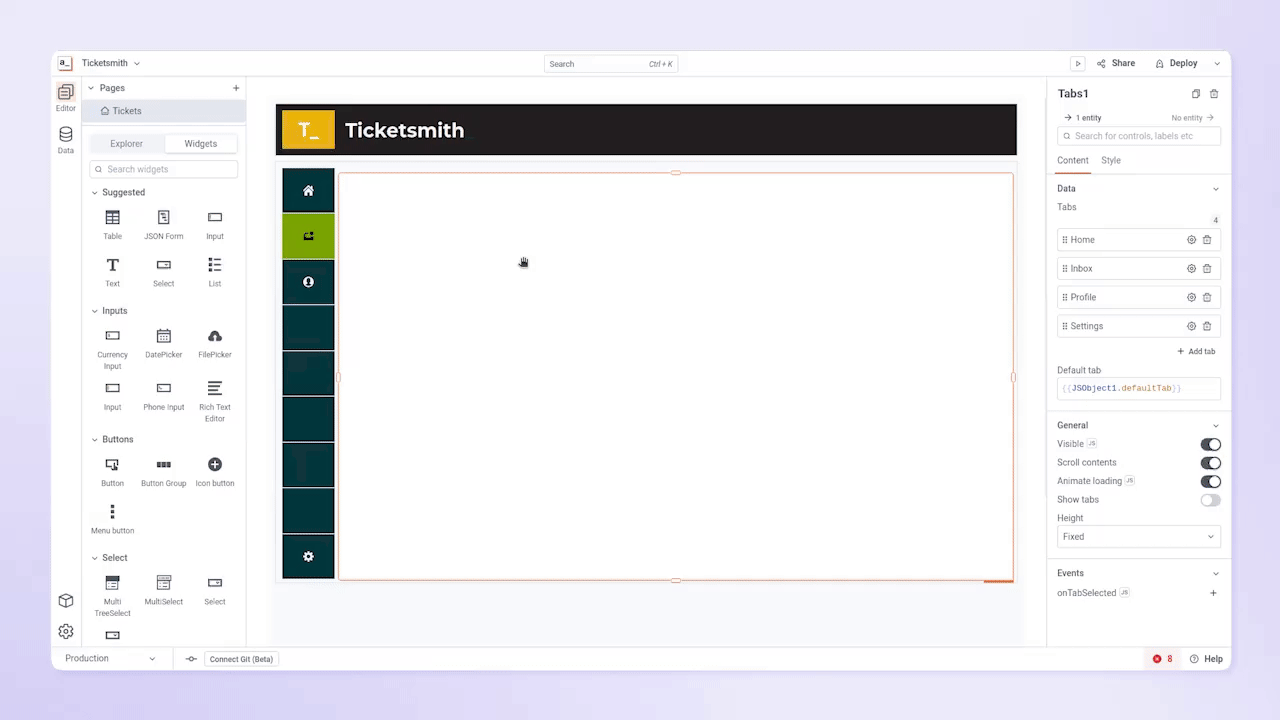
} Now change the Default tab field of the Tab widget to be based on the variable in the JS Object so that it updates automatically whenever that variable is changed.
After this is completed, you need to add logic to each button in your button group to mutate the JS Object variable every time the user clicks that button. You can do this by changing the JavaScript onClick method to update this variable as shown below. Note that you need to change the variable to a different string for each button so that your tab widget updates accordingly.

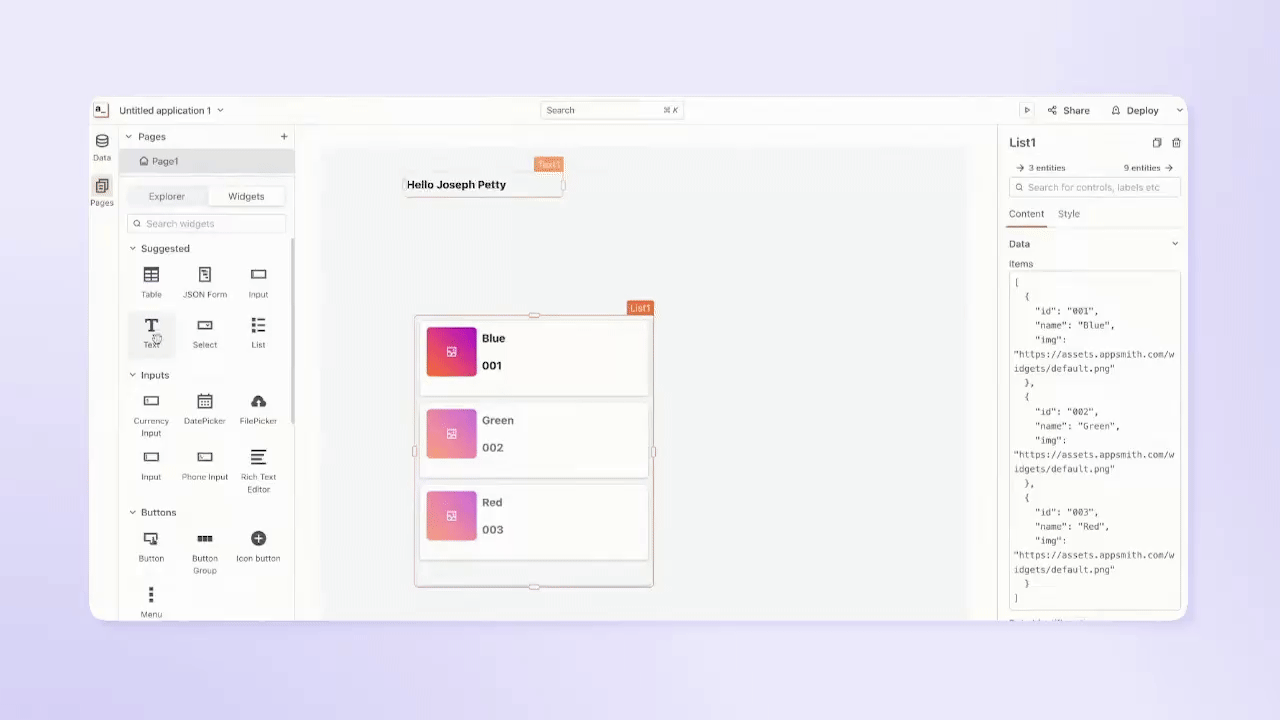
Now that you have a responsive dashboard that switches between different tabs, you can start populating each tab with different widgets. Some of the most common widgets are inputs (a text box combined with an input field), buttons, lists, and images. As mentioned before, there are many other widgets, but these are the ones that we’ll be focusing on in this tutorial.
Here’s how to add a list widget in the Inbox tab of the tab widget. Then you can add your GetIssues query from before to populate the list of issues on your canvas. You’ll need to add the following JavaScript code to the text widget to reformat your query to only display the titles of the GitHub Issues.
{{ getIssues.data.data.repository.issues.edges.map(issue => issue.node.title) }}
Now you have a functional dashboard that displays the current open issues from GitHub. And, of course, you can always build in more complex queries and front-end logic to make your app more powerful!
Next steps
So far, you’ve created a simple application with different tabs to represent different dashboards that can auto-update from your GitHub GraphQL datasource. This shows everything you need to build a basic customer support application, but the sky's the limit for what you could add to further customize it. You can construct queries for other GitHub resources, connect to other tools, or connect to your own MySQL, PostgreSQL, or MongoDB database if you want full control.
Adding additional queries
You can follow the same process to create any number of other queries from your GraphQL datasource. One example is a GetRepoOverview query, which you can use to display some key information like the total number of closed and open issues on your dashboard. Here’s the code for this query (again, you can change the name and owner fields to match your own):
{
    viewer {
        login
        avatarUrl
    }
    repository(name : "ticketsmith", owner : "appsmithorg") {
        id
        description
        homepageUrl
        stargazerCount
        issues {
            totalCount
        }
        issues_open: issues(states: OPEN) {
            totalCount
        }
        issues_closed: issues(states: CLOSED) {
            totalCount
        }
    }
}
After creating and validating a new query, you can easily drag and drop any widgets and display the results to your dashboard, just as you did with the GetIssues query.
Advanced Appsmith UI tricks
You could also make your UI look more visually appealing with some advanced design tricks/techniques.
One helpful trick to match the look of your Appsmith app to your logo or website is to use the Color Dropper browser extension to quickly extract color values. It allows you to select any pixel on your screen and automatically copy its hex color code to your clipboard. You can then paste that hex code into widget properties to match the foreground and background colors exactly.
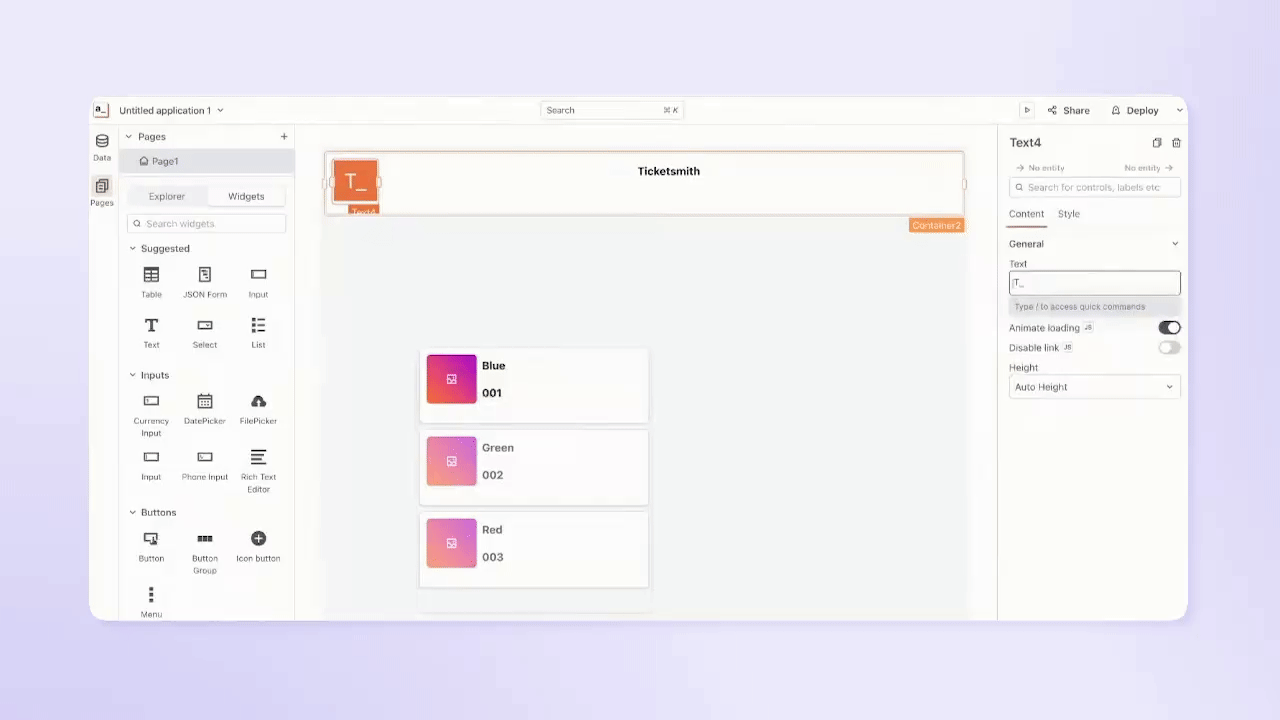
Another trick is to use inline CSS to style your text widgets (so they look more like icons). To mimic the two-color logo used in this example, add the following HTML in your text widget’s Text field and feel free to change the color if you are using a theme with a different background.
T<span style="color:black">_</span>The tag styles the underscore separately from the rest of the text, allowing you to use different text styles within the same text widget.
You can also take advantage of theming to quickly make all of your widgets match a general color scheme without manually changing the color property on every single widget. This can save a lot of time by overwriting colors for widgets whose properties you have not manually changed, while the color properties that you do manually set will not be overwritten.
One other cool trick is an SVG generator library that we developed for this tutorial. Based on the user who is logged in, it automatically creates an SVG icon with their initials and populates an image widget with the icon. You can import this library into your Appsmith applications to begin using it yourself.

Build your own customer support tools for free in Appsmith
This tutorial demonstrates how quickly you can get started building your own interfaces for your customer support data using Appsmith. You can build on this tutorial by connecting additional data sources (databases or APIs), building more queries, and adding more user interface widgets to grow your own fully bespoke customer support platform, tailored to how your business operates.
If you (or your team) want to get started prototyping, you can check out the full livestream this tutorial is based on or start working with the expanded community template for this application.
Appsmith is a flexible platform built to work the way you need it to. To find out more about how it can help you for your specific business needs, contact our enterprise team to discuss how we can help plan and implement your ideas. If you just want to start building now, sign up for Appsmith’s free hosted app platform or Business versions.


