Building an issue tracker using Appsmith and Airtable


Bugs are a non-trivial part of software development. There's no escaping it. And they quickly rack up (either while you're testing your software or when a user reports it). This is where issue trackers come in. They're a collaborative tool that helps a team identify and manage bugs better. Today we will learn how to build one quickly using Appsmith and Airtable.
Building an issue tracker with Airtable
Airtable is a popular choice for developers who want to manage tabular data easily. While it's easy to use Airtable as a backend, it can be challenging to build a custom UI from scratch. This is where Appsmith comes in. With Appsmith's native Airtable integration, you can create dashboards, CRUD apps, and internal tools in minutes.
In this tutorial, we'll use an Airtable base to build an issue tracker. We'll start by creating a database in Airtable and then importing our data into Appsmith and building on top of it using JavaScript.
Features of the Issue Tracker
Connect to their Airtable base.
Add a new bug/issue
Update the existing issue
View the current bugs in the management tool.
Let's jump in!
Getting started
Create a new Appsmith App
First, we need to create a new application in Appsmith so we can build it out.
Visit https://www.appsmith.com to create a new account or login in to an existing one.
Create a new application in your preferred organization and edit it.
Connect to Airtable
Now, we need to add your Airtable datasource to the app. In this case, we will clone an existing Airtable sample to provide our data.
Create a new datasource by clicking ‘+’ on the Datasources tab from the entity explorer and then select Airtable.
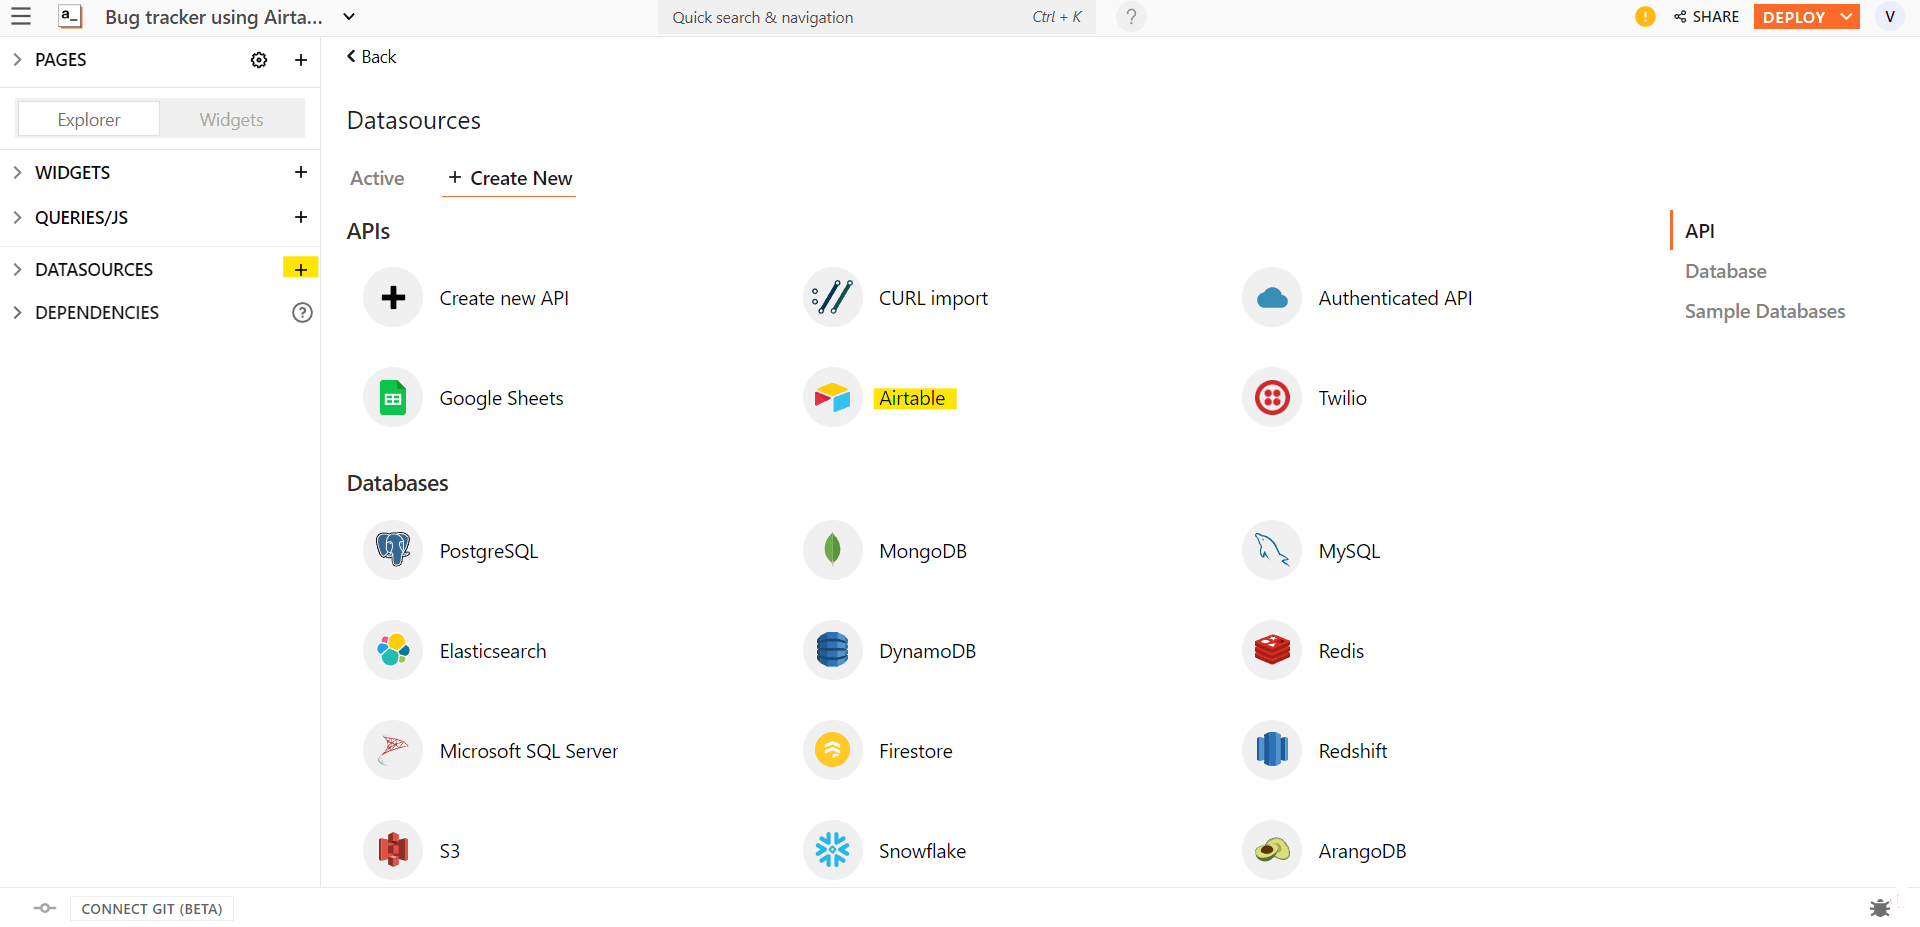
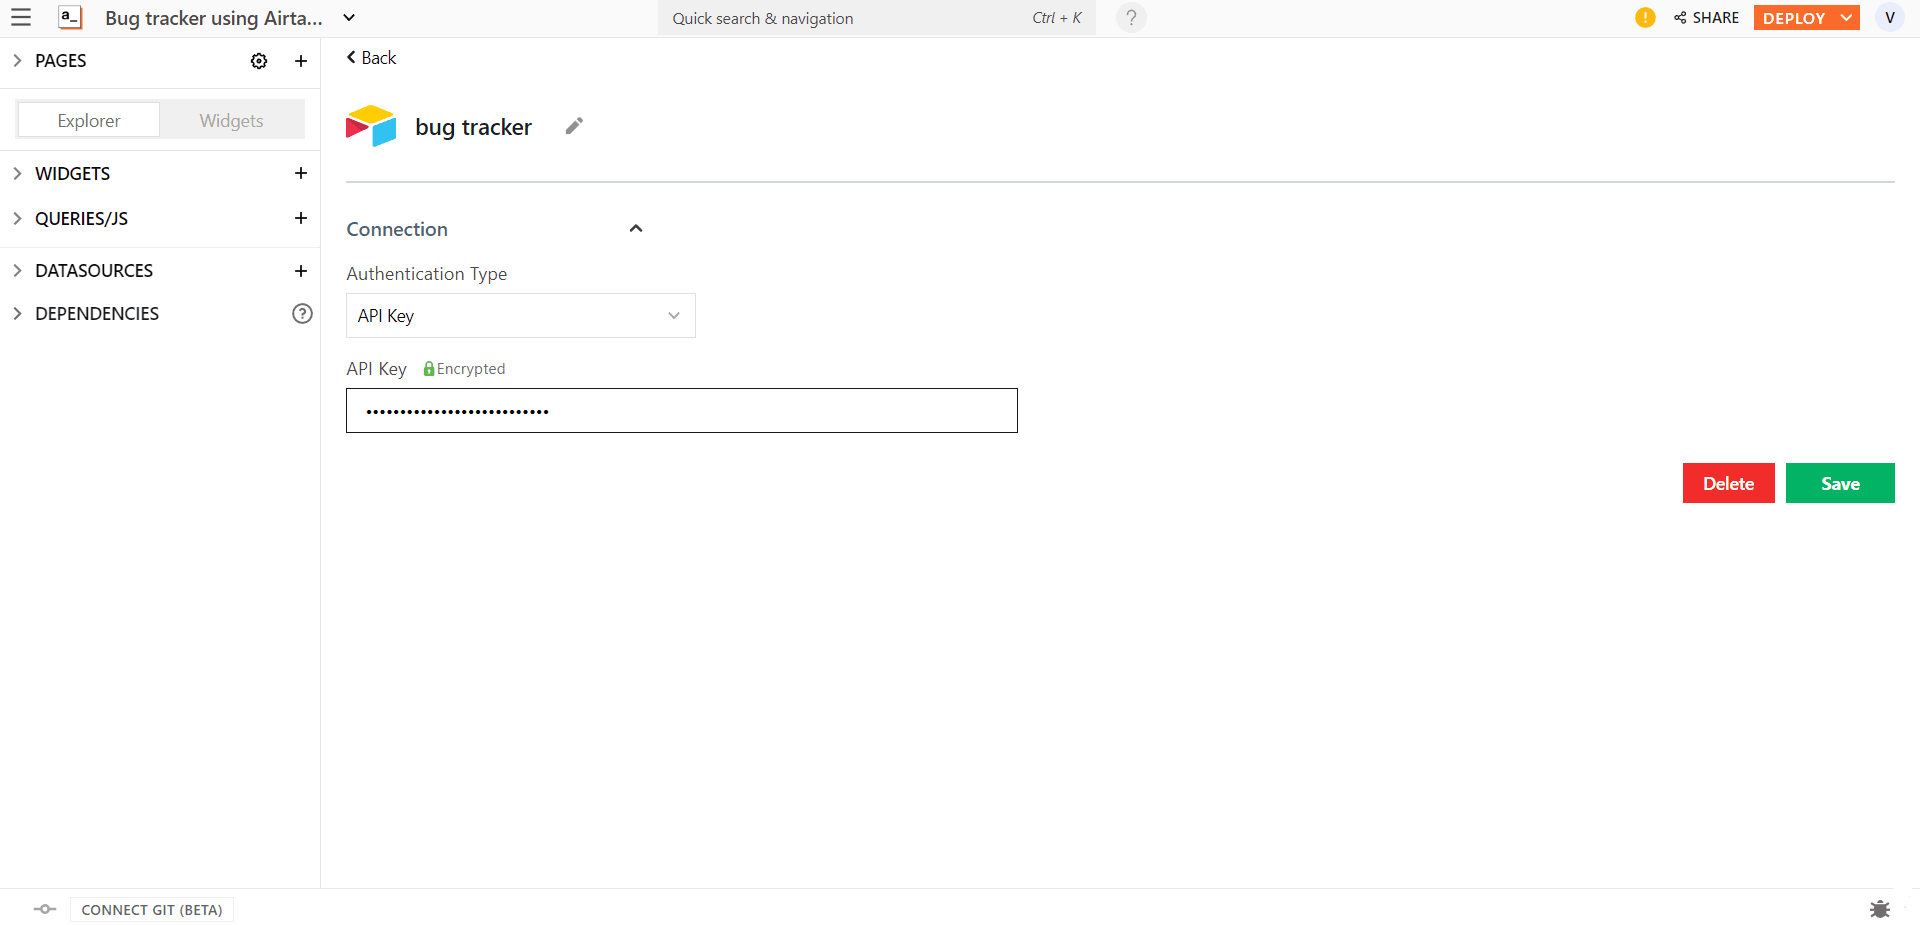
Rename the datasource. Select API Key as the Authentication Type and enter your API Key in the input field. Hit Save.
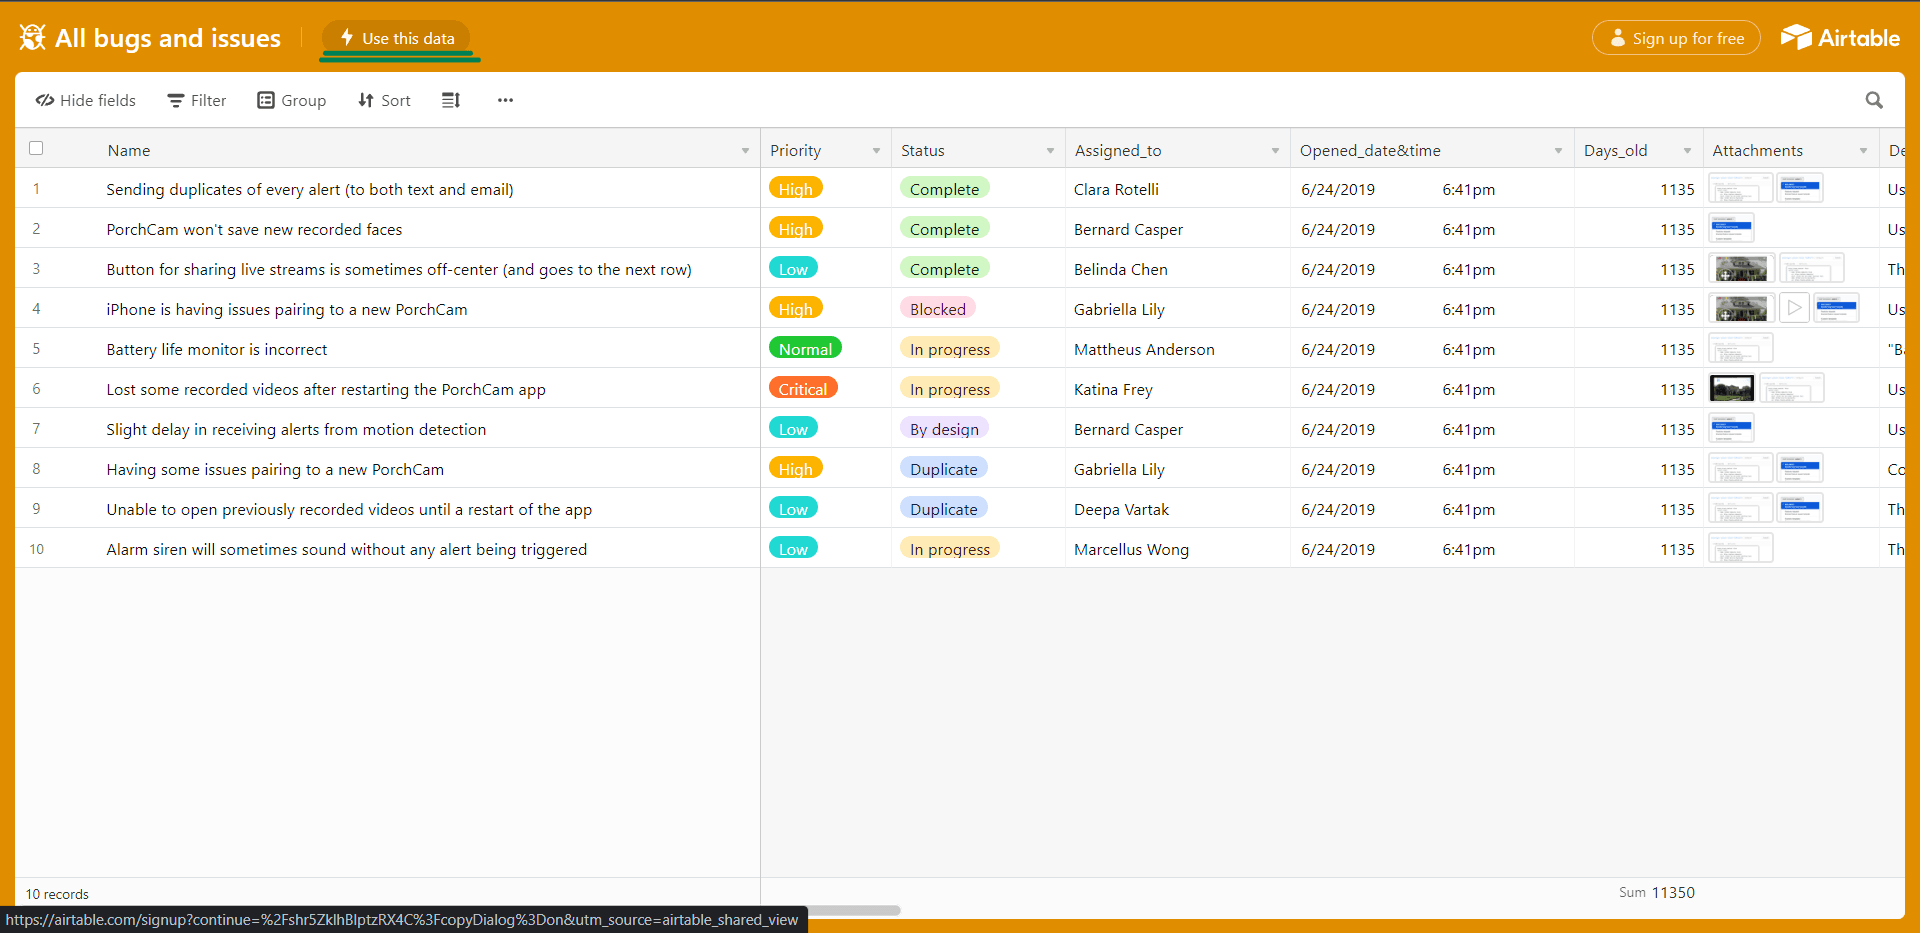
For the database, go to https://airtable.com/shr5ZklhBlptzRX4C and click "Use this data." Alternatively, you can also fork this Airtable template database
Choose a workspace and a base in the dialog box and hit 'Create Table.'
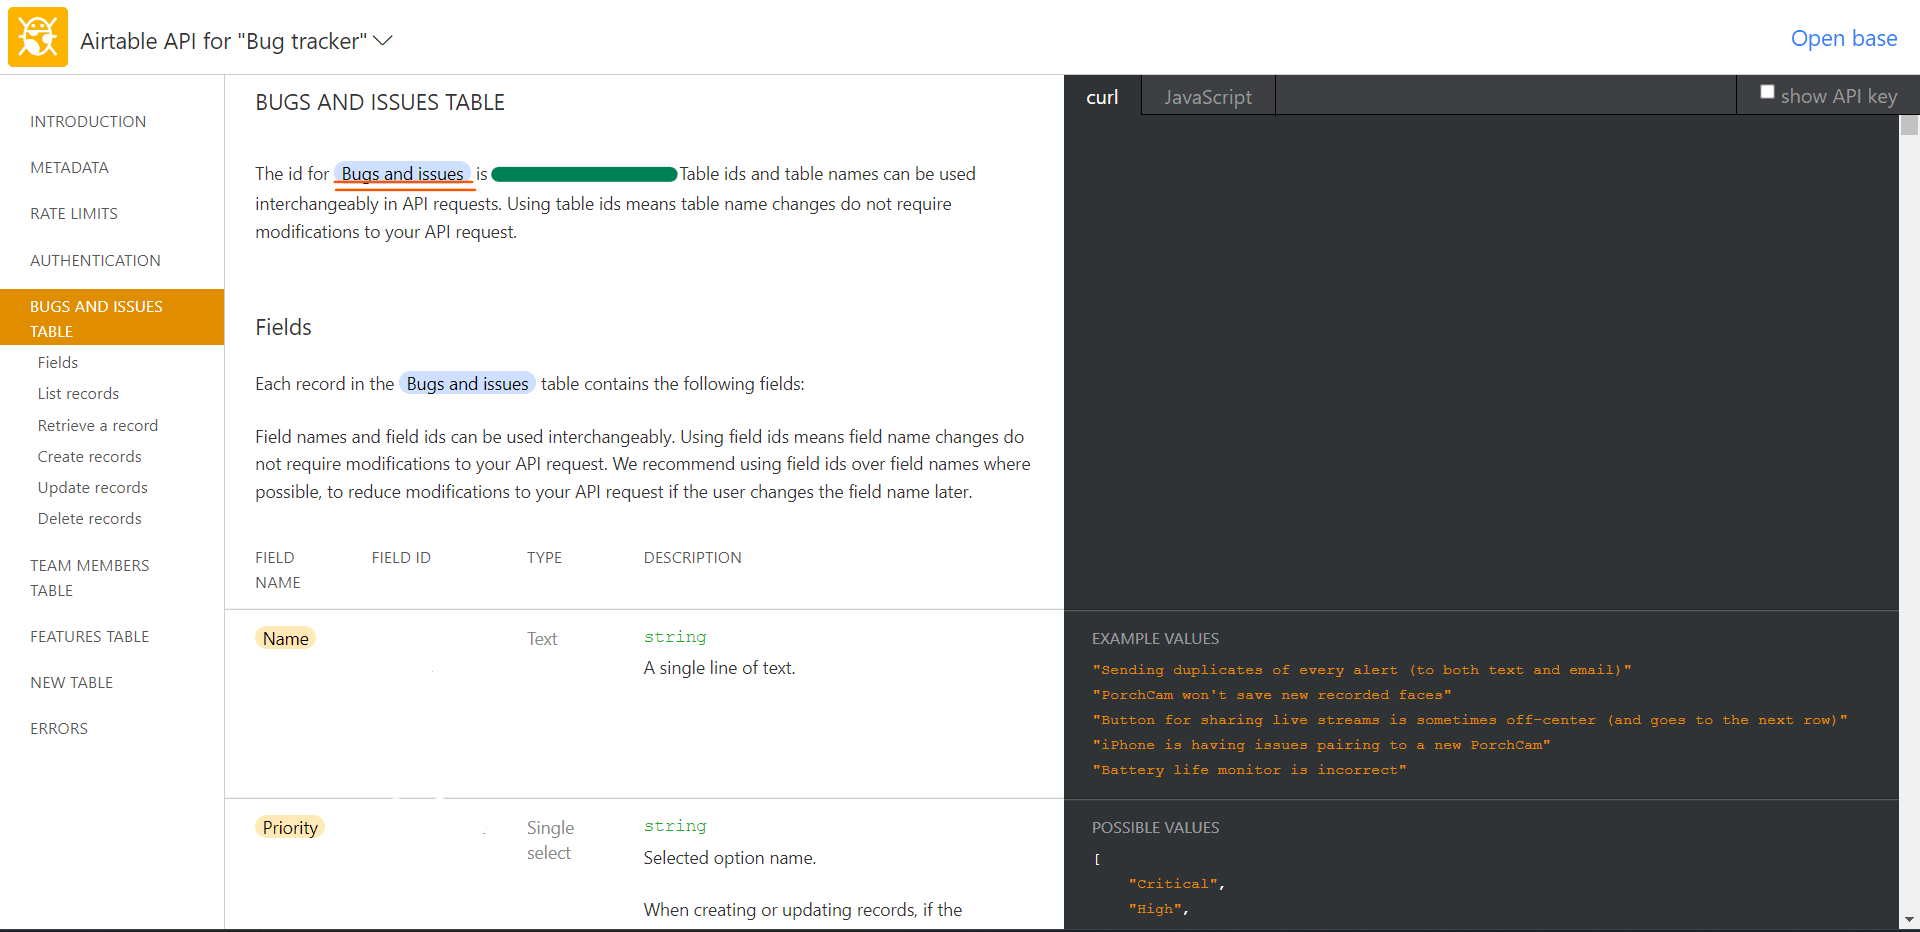
Go to https://airtable.com/api and select the base titled 'All bugs and issues'
In the 'Introduction' section of the documentation, copy the Base ID (highlighted in green in the picture below)
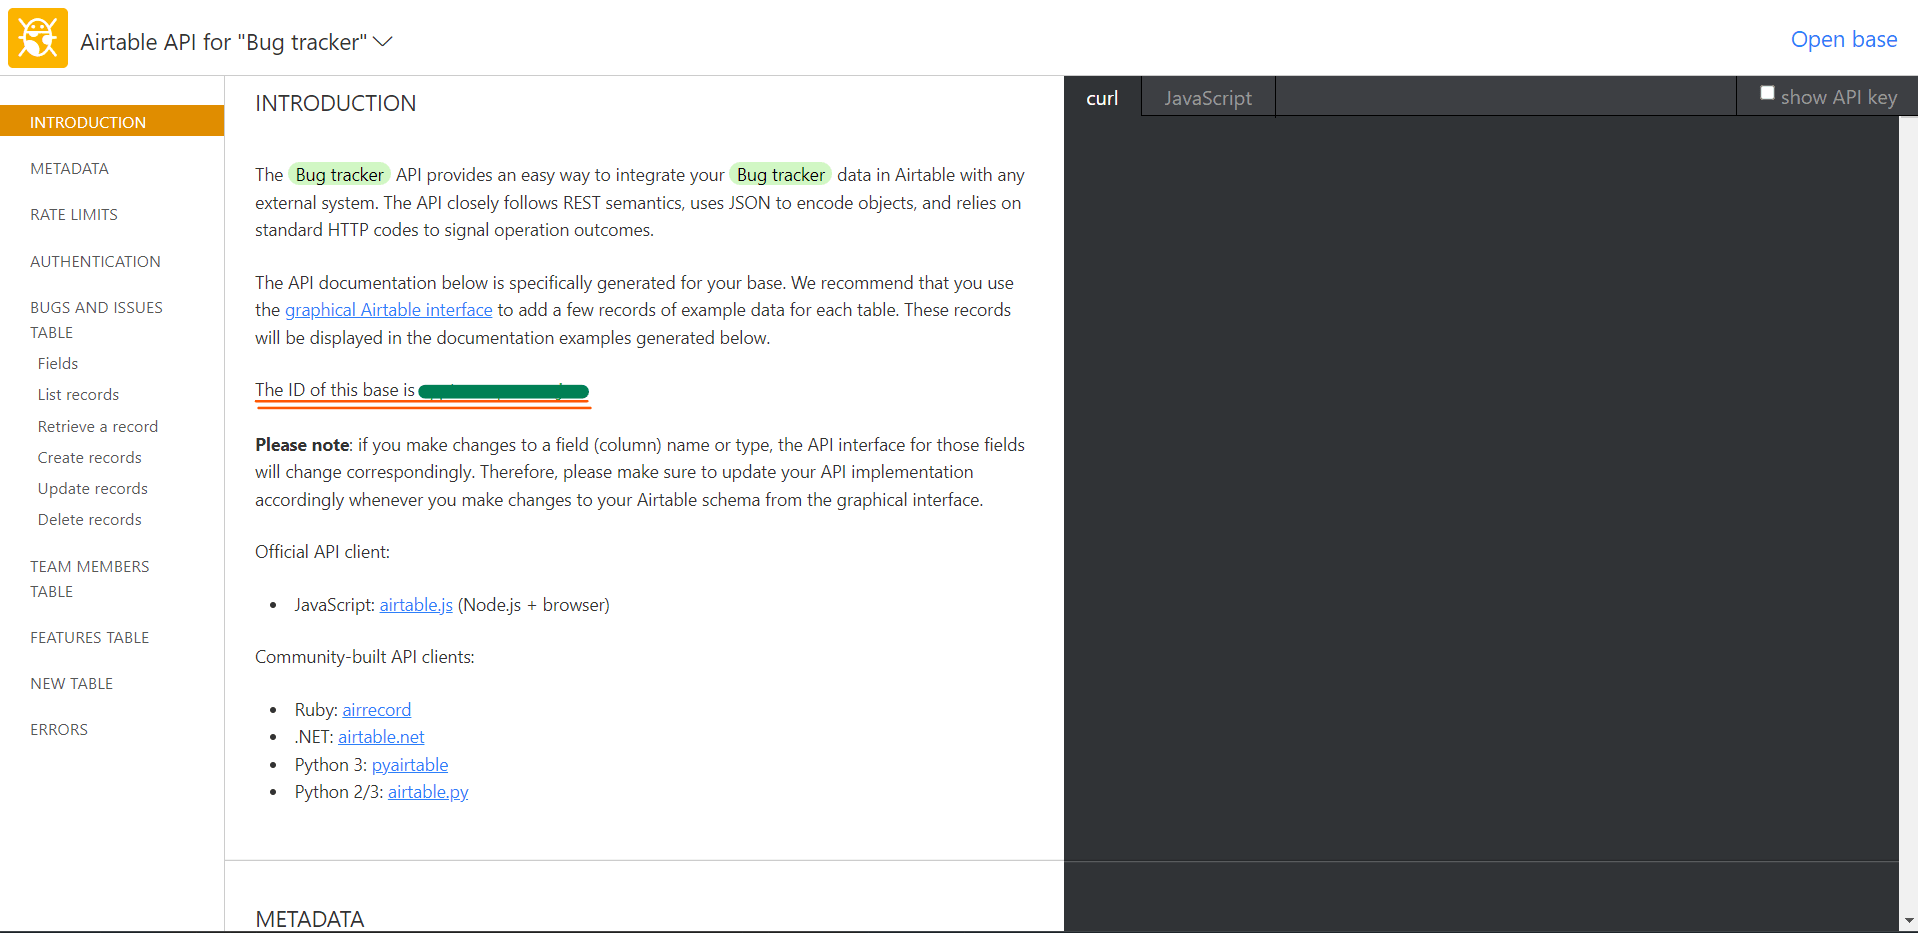
Select the "Bugs and issues Table" on the left pane. Copy the table name highlighted in green in the image below.
Set up UI for the App
Wireframe
Here is the wireframe for what we are trying to create.
Including the modal that is used to add new bugs.

Create your Widgets
Using the wireframe as a guide, create the UI for the application using the drag and drop editor. Here is a suggested process.
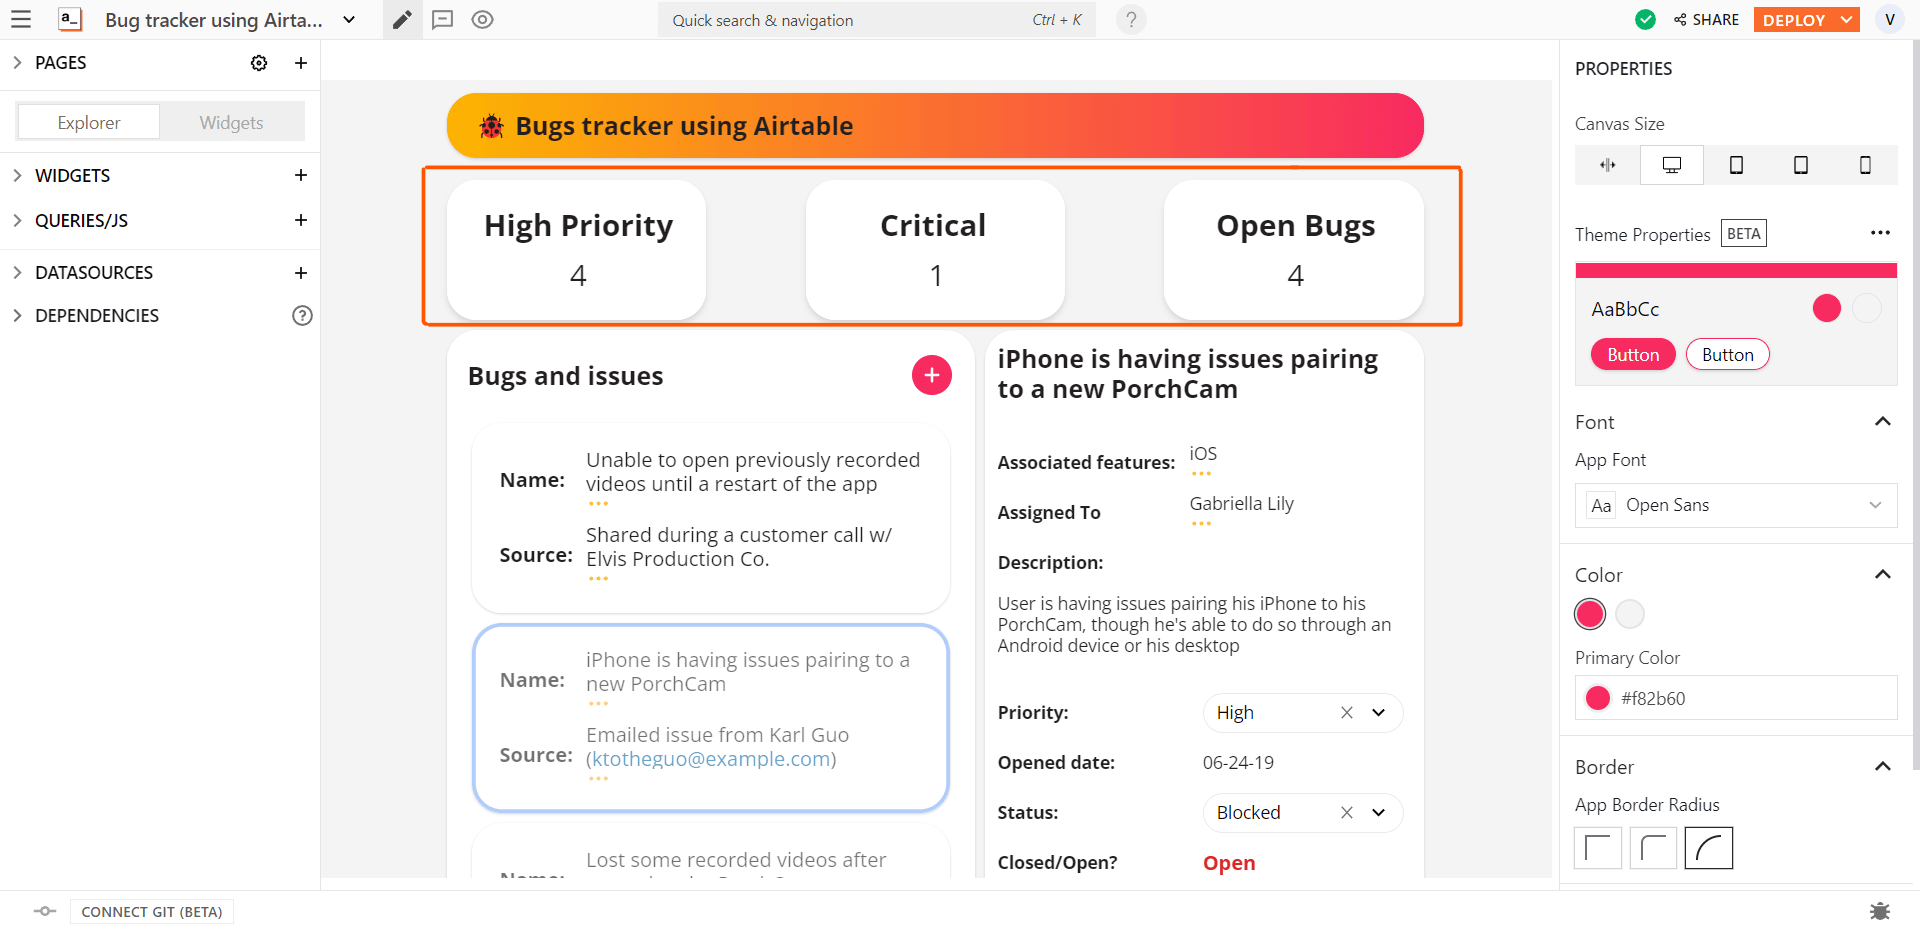
Choose a preferred theme from the Theme properties option in the property pane on the right.
Add a container widget with a text widget for your app's header.
Three (or as many as you like) stats boxes on the canvas to display essential statistics at a glance.
A container with a text, icon button, and list widget for showing a list of all the issues.
A container with text, button, select and list widgets for showing details of the selected issues.
A modal with a text, icon button, and JSON form widgets for adding a new bug entry.
Binding Data on Widgets
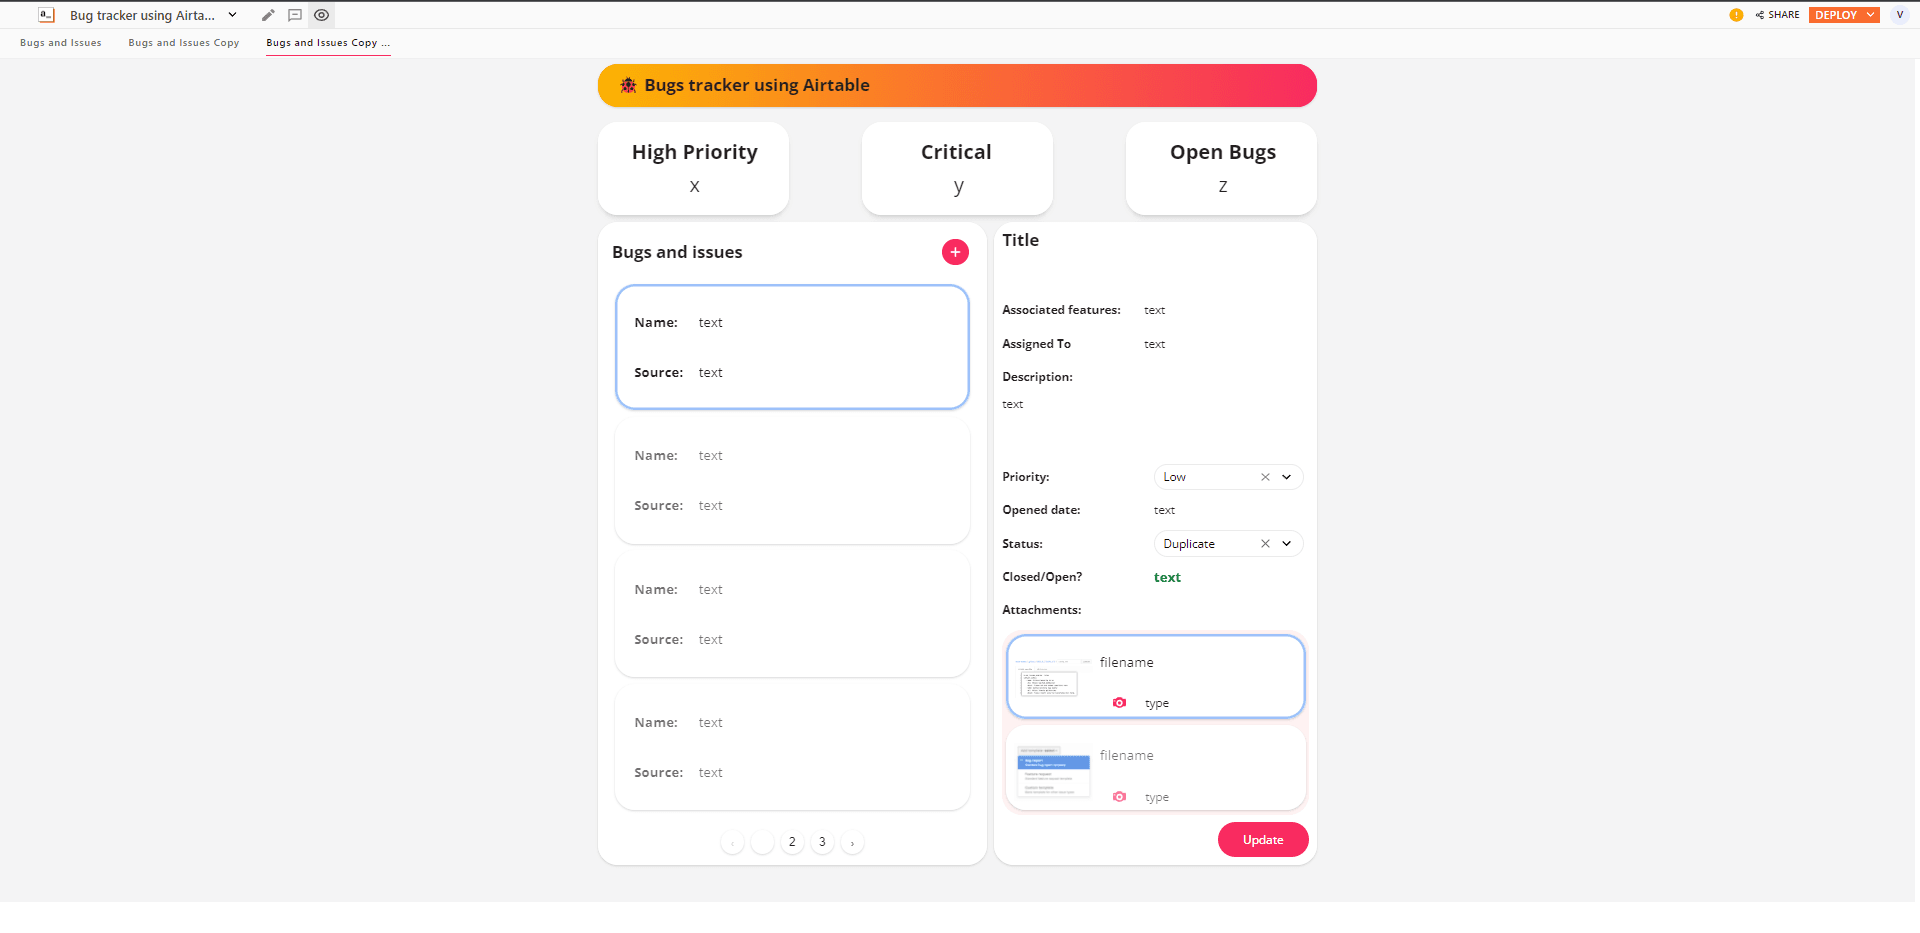
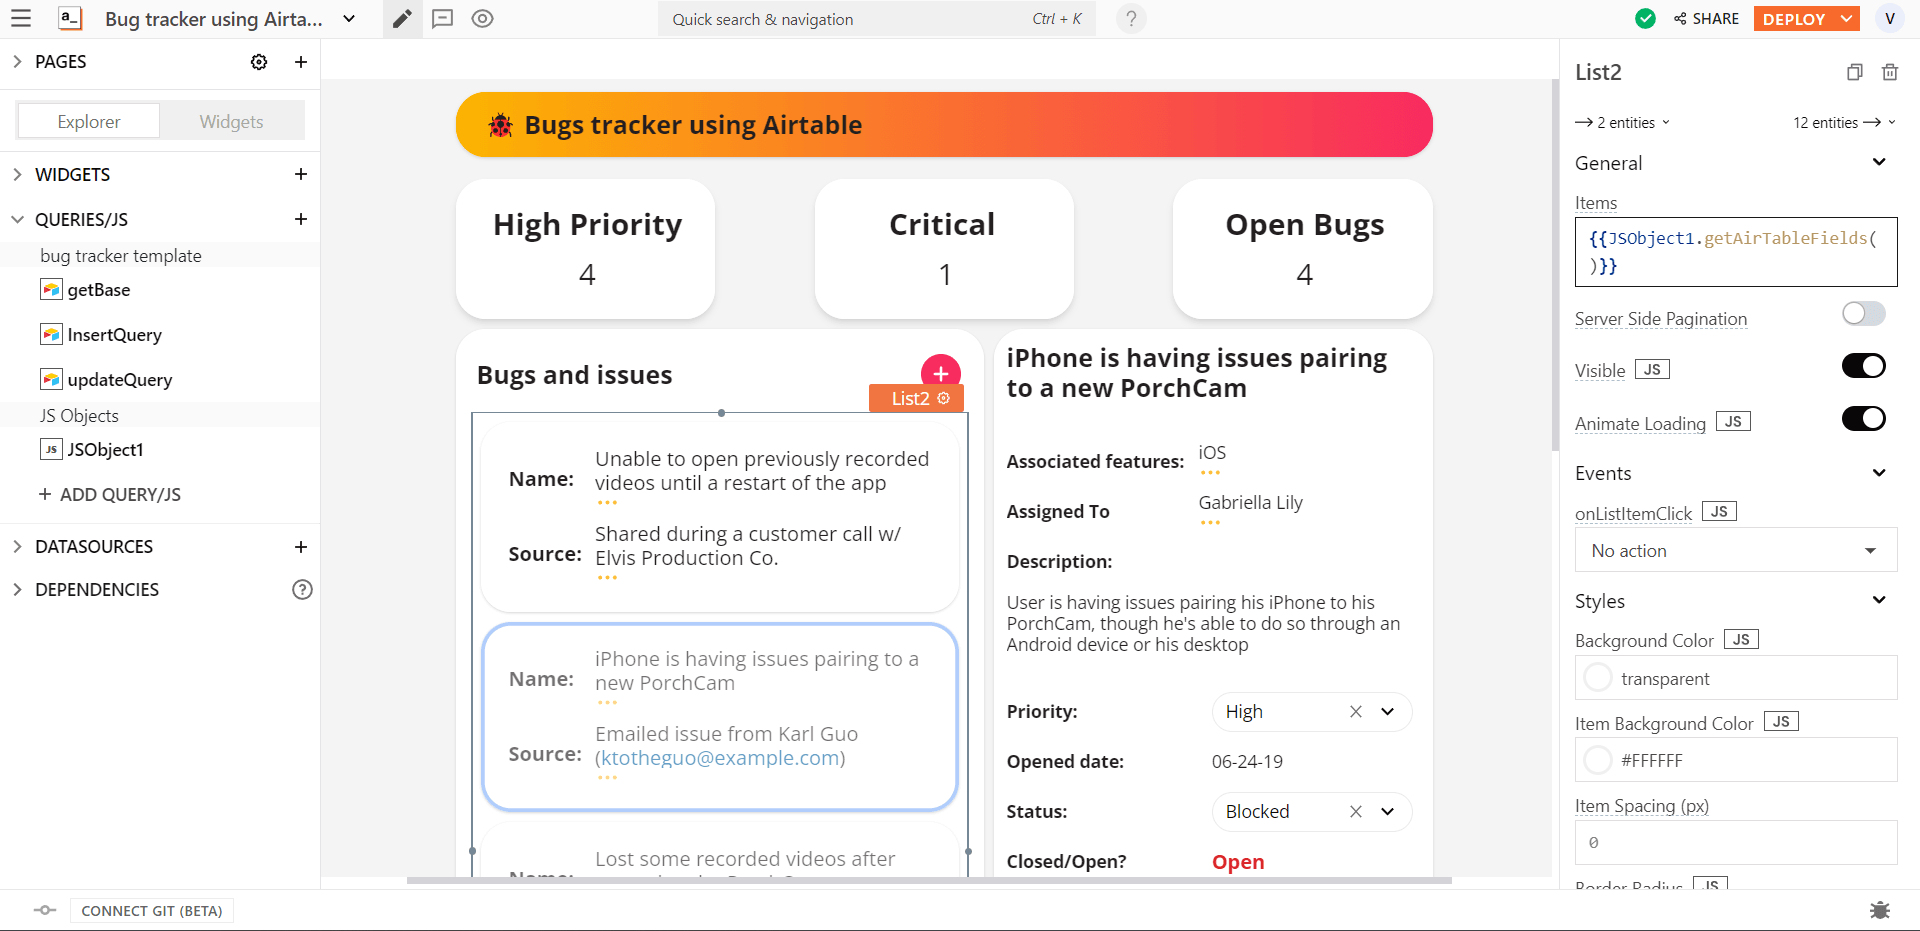
Listing Records on the List Widget
The list of bugs/issues should look something like this. In order to populate the data, create a new query and bind the results to the text.
Create a new query from the left pane which uses the Airtable datasource you created in the first step. Rename the query to getBase and choose the Commands to be List records. We chose this command because we would like to list all the bugs and issues in our app. Enter the Base ID and Table Name you copied in the steps above.
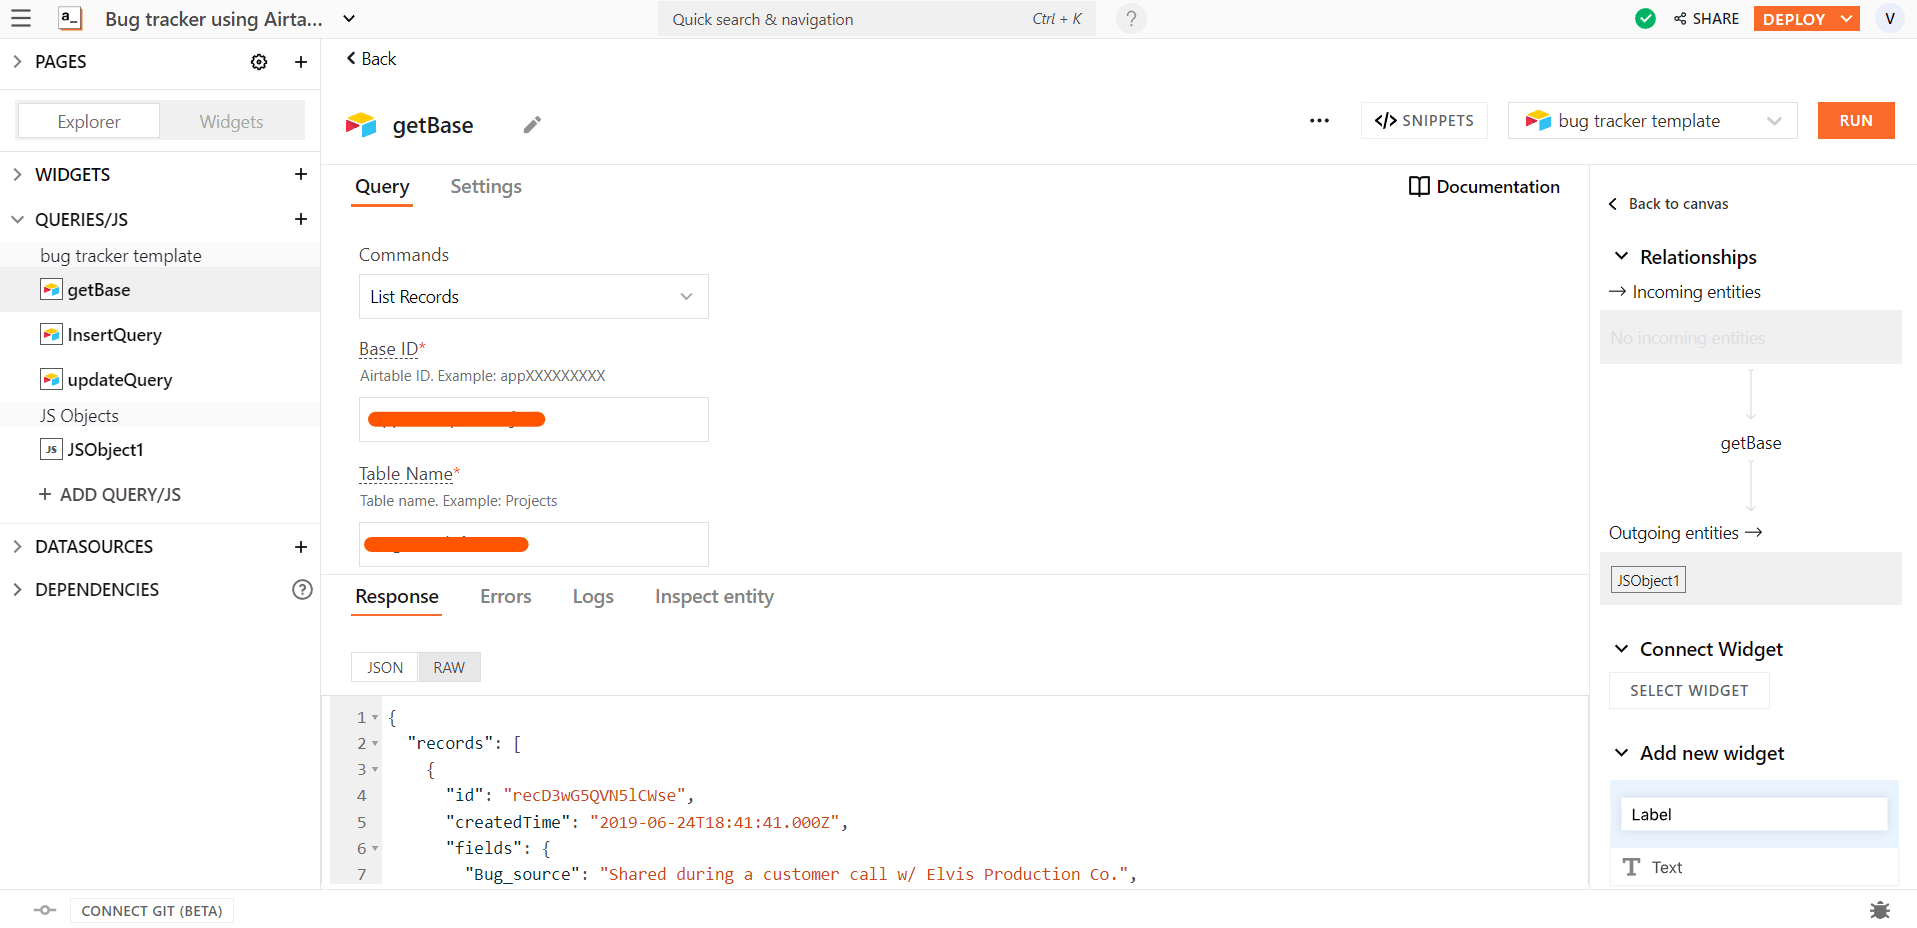
Hit Run and you should see a JSON response generated which lists the records.
To bind this response to the list widget, we would first create a JSObject that maps the fields from the records. Create a new JSObject and paste in the following snippet.
getAirTableFields: () => {
  return getBase.data.records.map((record) => {
    let row = record.fields;
    row["id"] = record.id;
    return row;
  });
};
In this JSObject, we get the response from the GetBase query, map the fields, and get the id for every row in the table.
Bind the list with this data using {{JSObject1.getAirTableFields()}}
For getting the bug name and the source, bind the text widgets within the list with {{currentItem.Name}} and {{currentItem.Bug_source}} respectively.
Getting Details of the Selected Bug
When we click on an item from the list, we should populate the view container with details of the selected issue
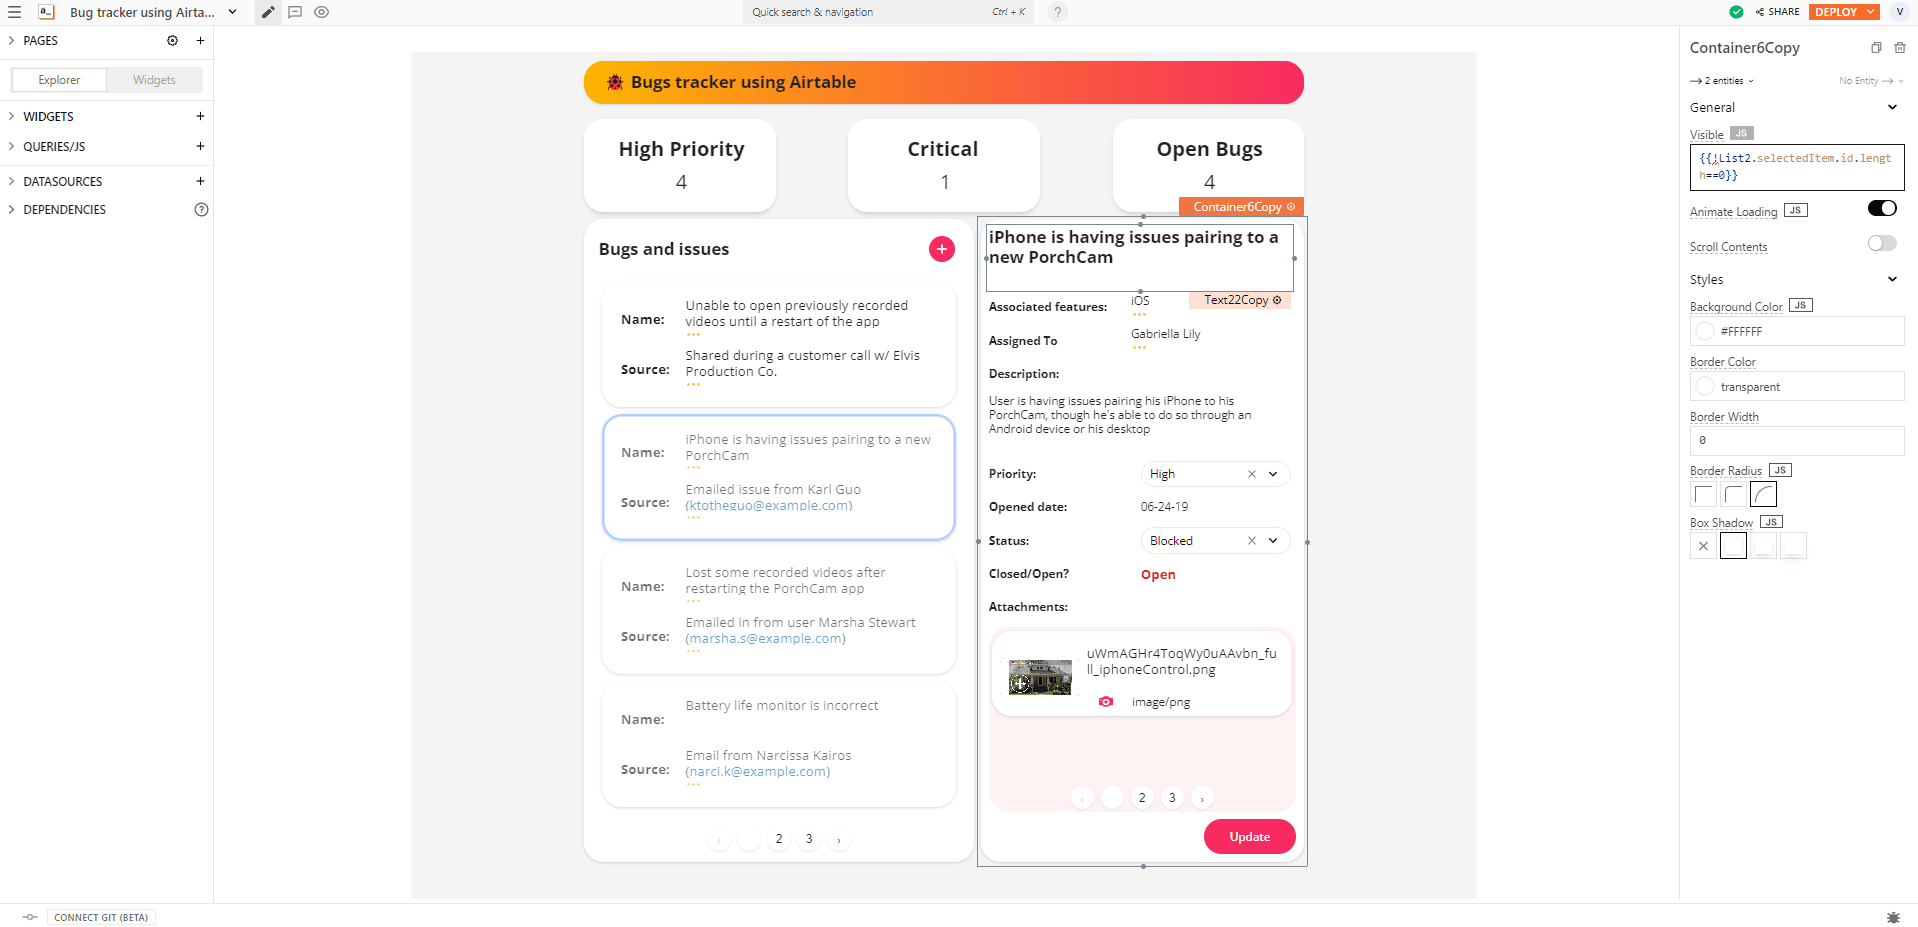
In order to get details about the selected bug on the container placed on the right, we would just use the {{List.selectedItem.attribute}} for all the details you wish to display. For example, The bug title can be displayed using {{List1.selectedItem.Name}}, for Associated features write {{List1.selectedItem.Associated_features}}, For priority write {{List1.selectedItem.Priority}}. So on and so forth.
For a closed/open bug field, use the ternary format to display the status. {{List1.selectedItem.Closed == '1'? "Closed": "Open"}}
To bind the attachments for the selected bug, write {{List1.selectedItem['Attachments']}} to bind data on the list widget in the right container.
Just like binding the bug details, in the image widget enter {{currentItem.url}} in the property pane to display the image attached
Use {{currentItem.filename}} and {{currentItem.type}} to display the file name and type on the text widget.
Displaying Statistics on the Statsboxes
These statsboxes should help display important information at a glance from this database. As the number of issues grows, this will give us a quick understanding of the status.
In order to populate the statsboxes with statistics, we would create a JSObject function that maps to fields and then to Priority within the same JSON response and check if the value is High, meaning the priority is set to high. What we get in the response is our desired statistic.
highPriority: () => {
  const high = getBase.data.records.map((record) => record.fields.Priority);
  return high.filter((currentItem) => currentItem == "High").length;
};
Bind this output in the text widget using {{JSObject1.highPriority()}}
In the very same manner, write a function and bind the output for the number of bugs labeled open and critical
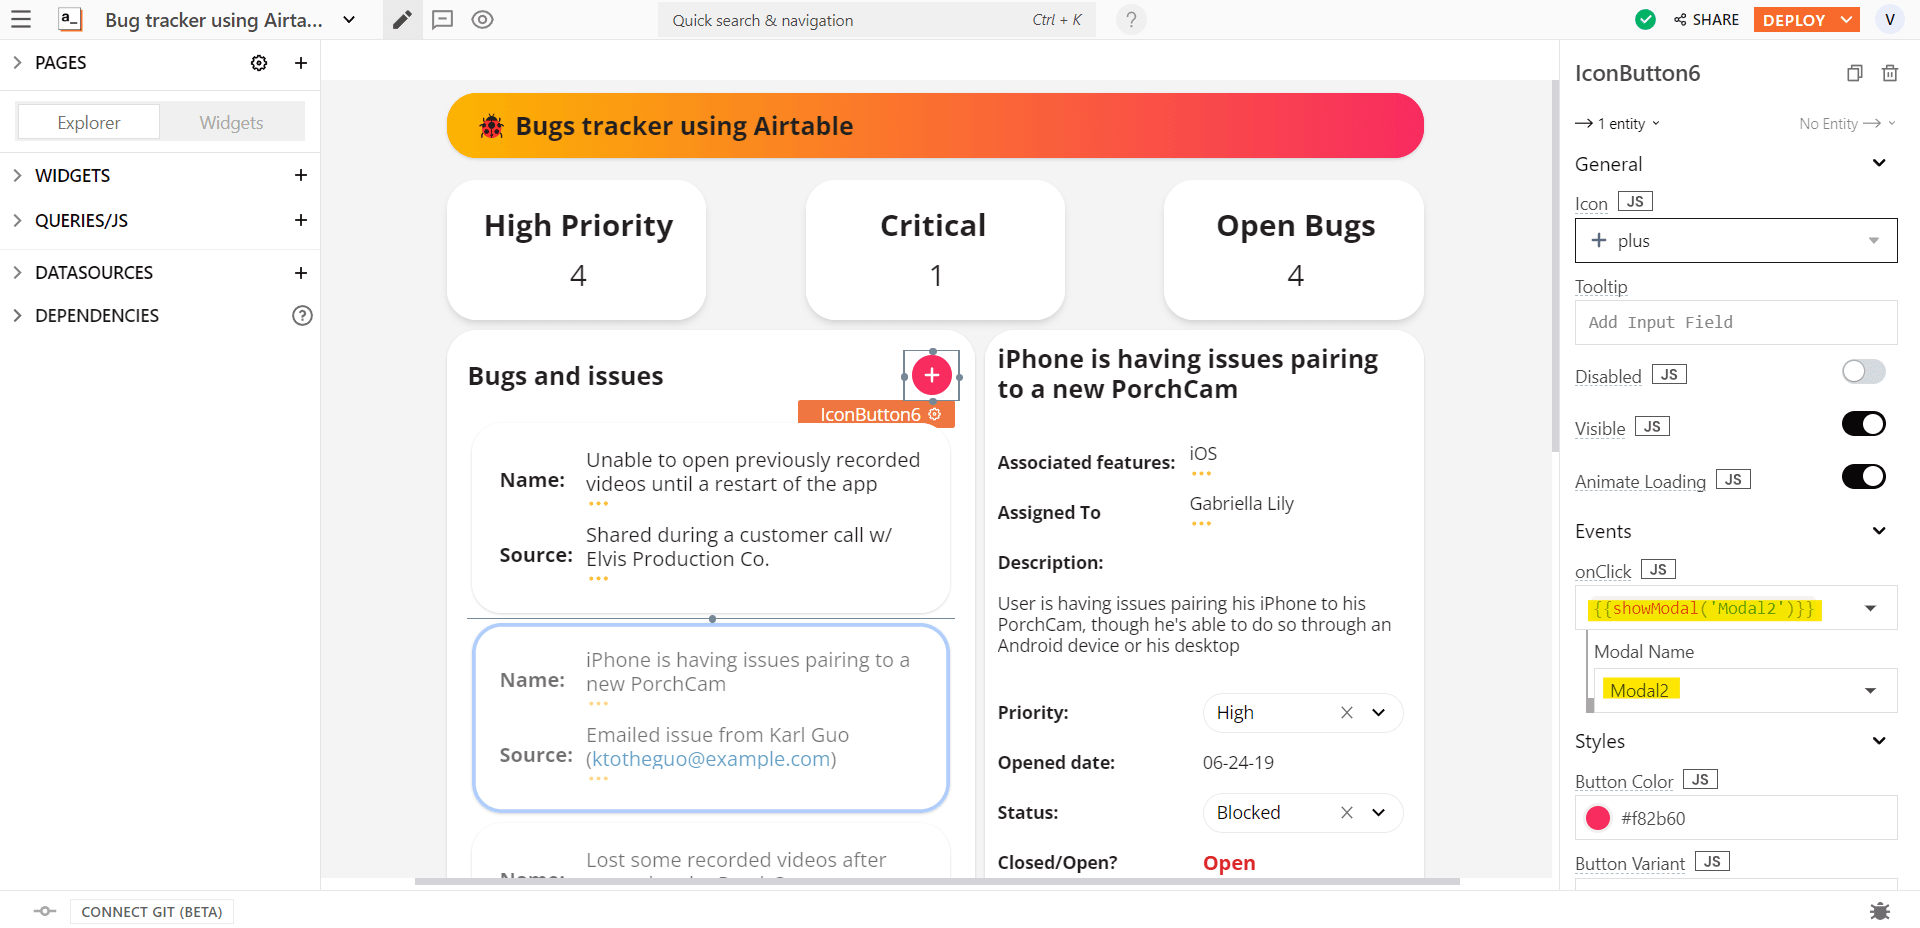
Adding a New Bug/Issue
When clicking the button to add an issue, a modal appears with a form that creates a new entry. It looks like this:

Set the Modal to open on onClick of the icon button on the top right corner of the container on the left.
Populate the JSON Form with source data by pasting the following.
{
"fields": {
    "Bug Title": "",
    "Priority": "",
    "Assigned To":"",
    "Status": "",
    "Screenshots": [
      {
        "URL": ""
      }
    ],
    "Bug Description": "",
    "Bug Source": "",
    "Features Associated": "",
    "Created by": ""
}
}
You can customize the field configuration as per your requirement. Here’s what the JSON Form looks like https://www.loom.com/share/1087b1e8932846feaf3dd03e8b3bb780
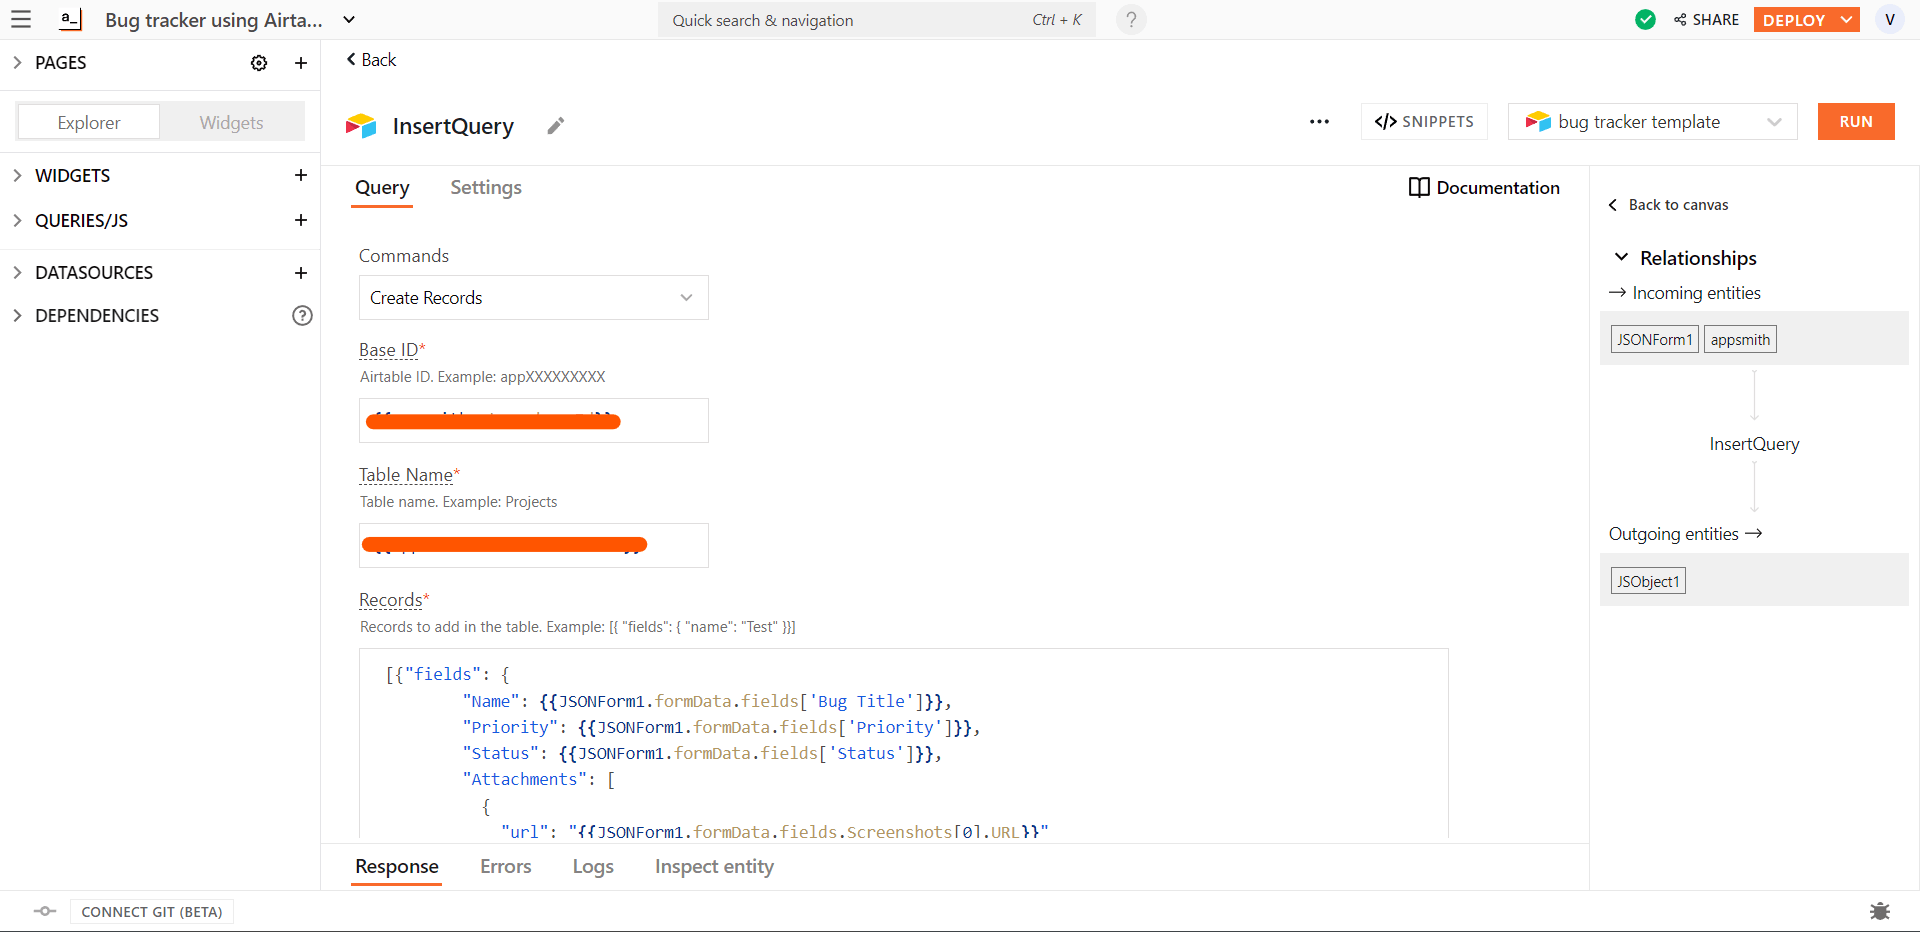
To insert a new record, we’ll write a new query. Create a new query and name it as InsertQuery. Choose the command to be Create Records. Add in your Base ID and Table Name. For the Records, bind the form data from the JSON form for every field.
[
  {
    "fields": {
      "Name": "{{JSONForm1.formData.fields['Bug Title']}}",
      "Priority": "{{JSONForm1.formData.fields['Priority']}}",
      "Status": "{{JSONForm1.formData.fields['Status']}}",
      "Attachments": [
        {
          "url": "{{JSONForm1.formData.fields.Screenshots[0].URL}}"
        }
      ],
      "Assigned_to": "{{JSONForm1.formData.fields['Assigned To']}}",
      "Description": "{{JSONForm1.formData.fields['Bug Description']}}",
      "Bug_source": "{{JSONForm1.formData.fields['Bug Source']}}",
      "Associated_features": "{{JSONForm1.formData.fields['Features Associated']}}",
      "Created_by": "{{JSONForm1.formData.fields['Created by']}}"
    }
  }
]
We’ll make a new JSObject function to run multiple queries when the Add Bug button is clicked in the form
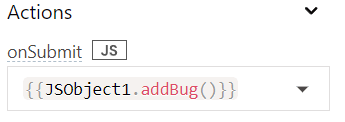
addBug: async () => {
  InsertQuery.run();
  getBase.run();
  closeModal("Modal2");
};
Now bind this function on onClick of the Add Bug button in the JSON Form.
Update Fields of a Bug
This query/button can help update the details of the bug. In this case, we update the priority and statuses.
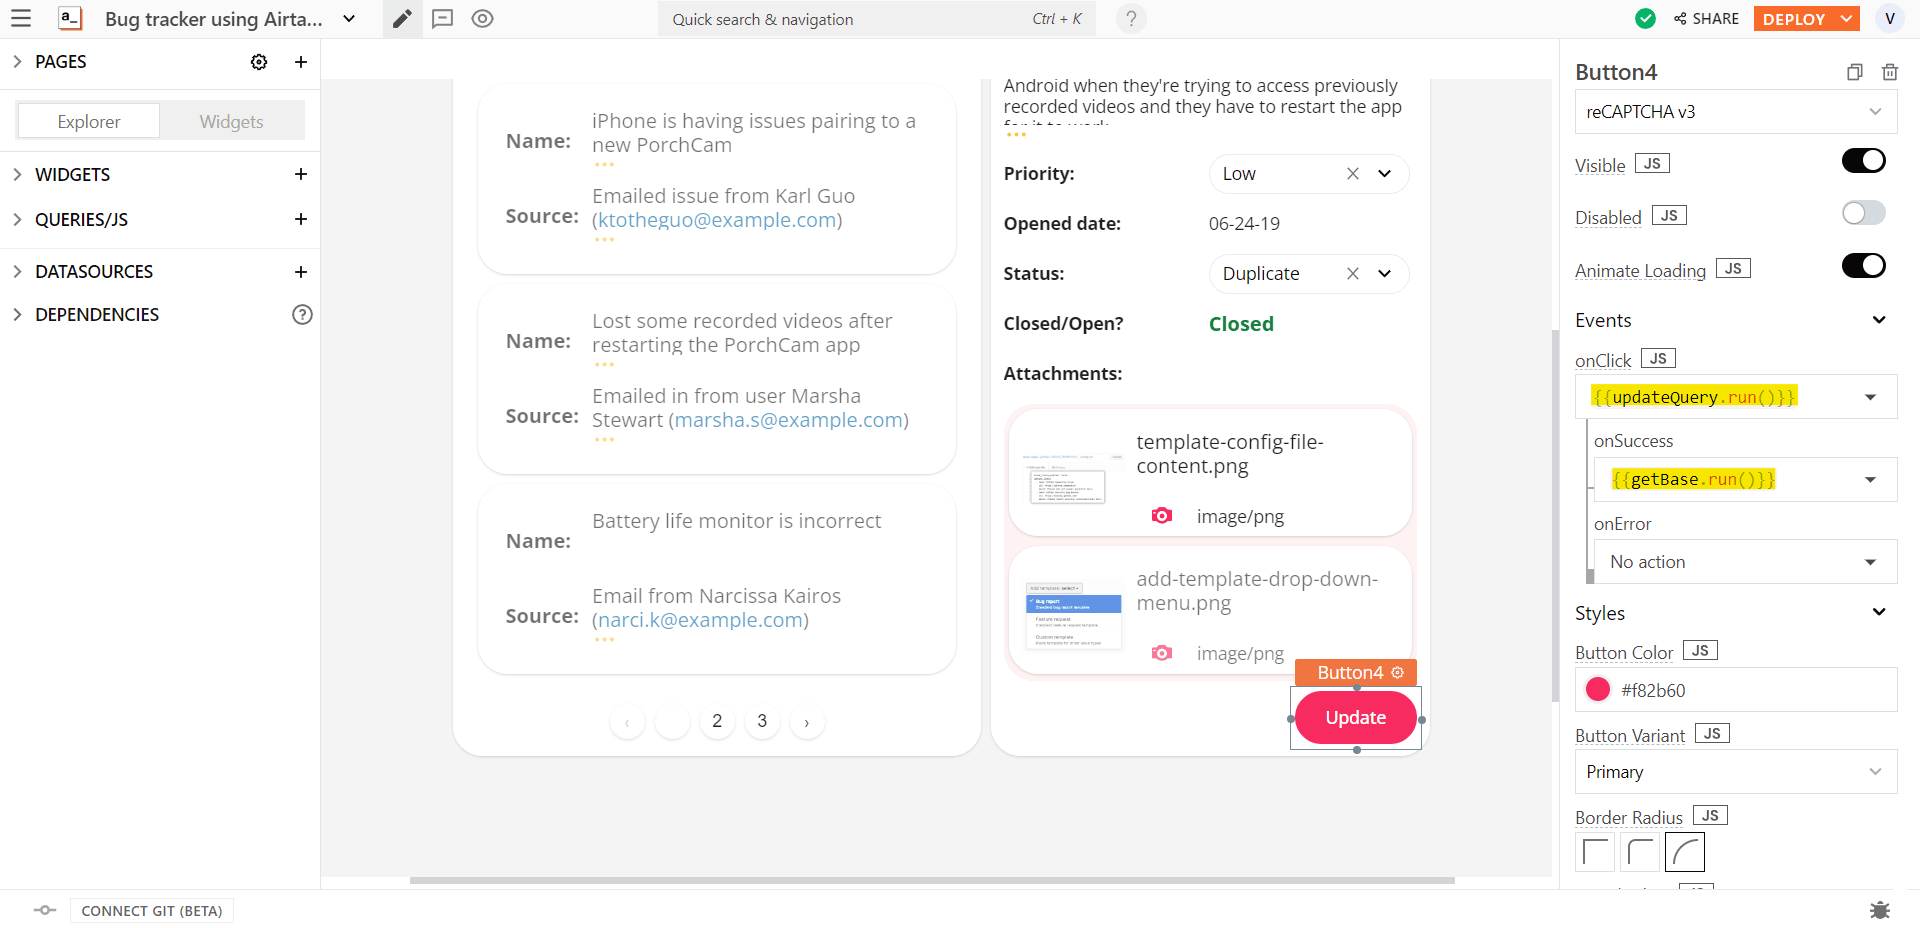
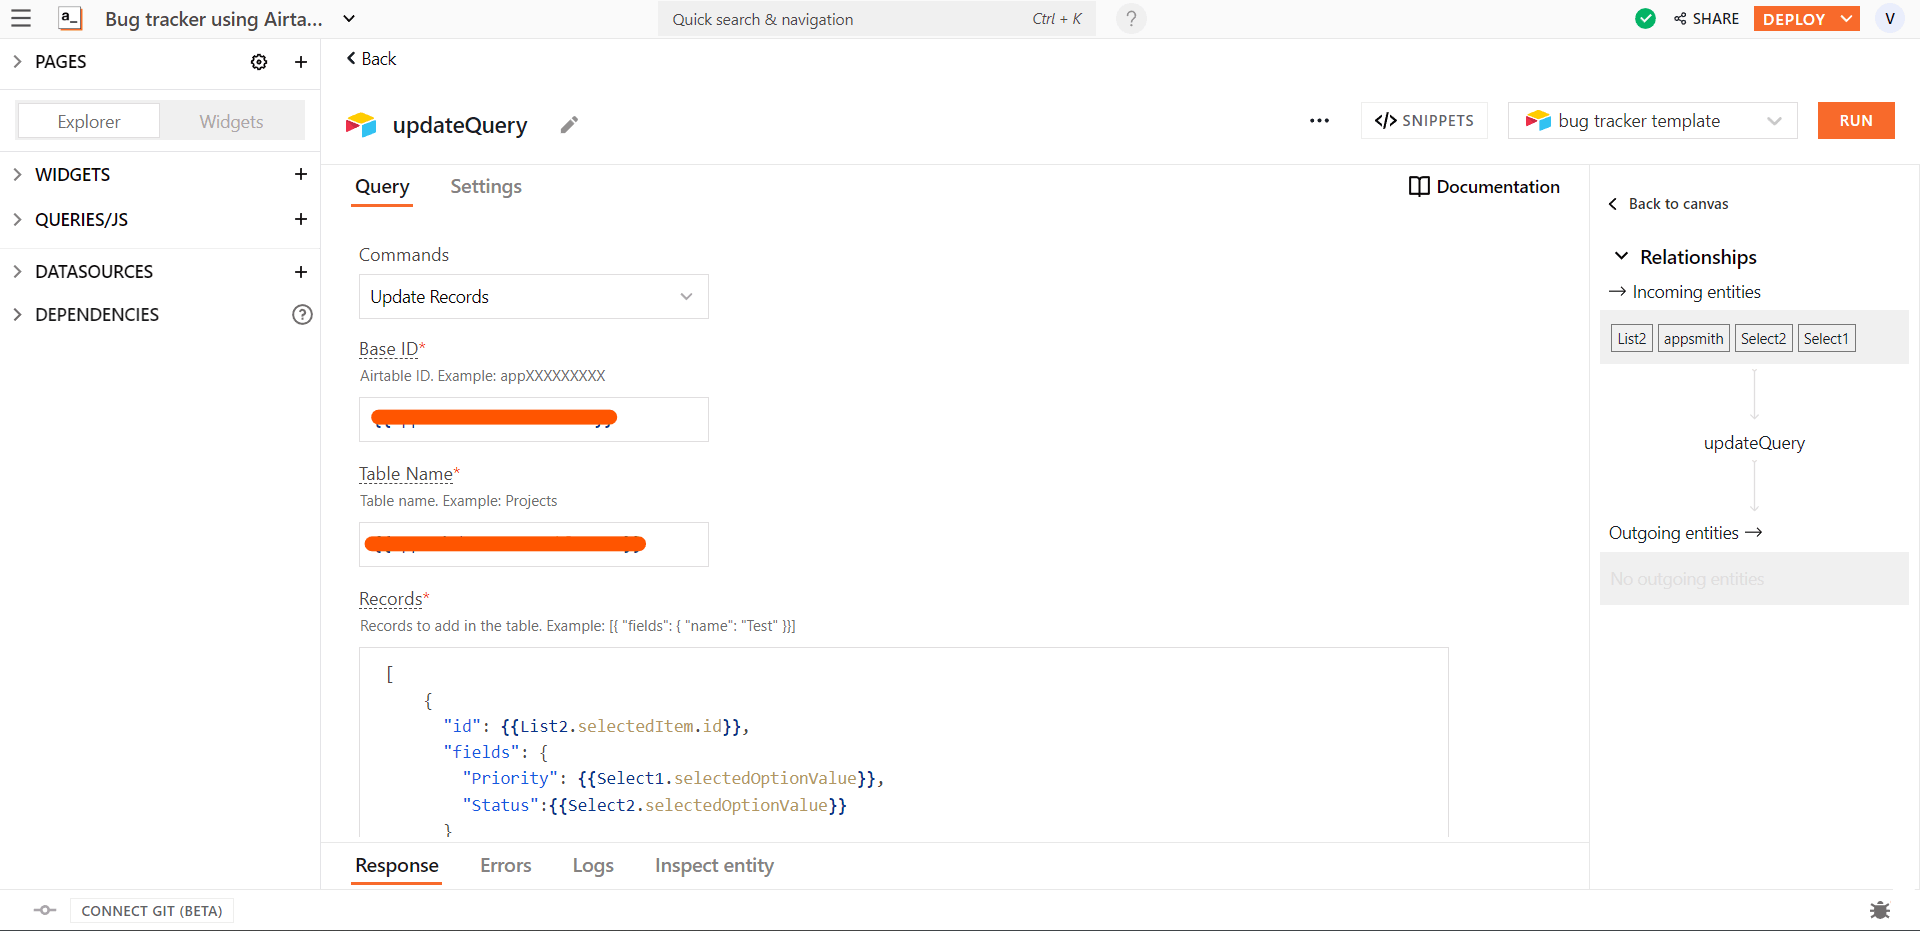
To update the priority and status of a selected bug, an Update Records query would be used.
Create a new query and rename it as updateQuery. Choose the command to be Update Records and enter your BaseID and Table Name . In the records field, paste the following to get the selectedOptionValue of the select widgets
[
    {
      "id": {{List2.selectedItem.id}},
      "fields": {
        "Priority": {{Select1.selectedOptionValue}},
        "Status":{{Select2.selectedOptionValue}}
      }
    }
]
Now, bind this query to run on onClick of the update button.

Final Thoughts
And that’s it! You have your bug tracker application ready using Appsmith’s native Airtable integration 🎉
First, you created a new Appsmith application and connected it to Airtable. Then you created the UI for your app using the drag and drop tools in Appsmith. Finally, you tied the data from Airtable to the UI widgets. Your final app should look similar to this:

Please use this form to contact us if you have any template requests for internal tools that you need, and we will get to work!
If you have any questions, contact us on Discord. You can also keep up with us on Twitter and YouTube.


